Hydas Nature Well-Being Light User manual

Nature Well-Being Light®
Art.No.: 8325
Instructions
Please read carefully before using the Nature
Well-Being Light
M1E102/ENG
2

M1E102/ENG
3
M1E102/ENG
4
Nature Well-Being Light M
Mo
od
de
el
l:
:
8
83
32
25
5
You are now able to have the full benefits of Nature Well-Being Light that helps
you to improve mood, energy, productivity and the quality of sleep and
awakening.
IMPORTANT SAFETY INSTRUCTIONS
When using electrical products, especially when children are present, basic
safety precautions should always be followed, including the following:
READ ALL INSTRUCTIONS BEFORE USING
Important
yAlways unplug the product from the electric outlet immediately after using
and before cleaning.
yDo not reach for a product that has fallen into water. Unplug immediately.
yDo not let water run into appliance or spill water onto the appliance.
yClose supervision is necessary when this appliance is used by, on, or near
children, invalids or disabled person.
yUse this appliance only for its intended use as described in this manual. Do
not use any attachment not been recommended by the manufacturer.
yNever operate the appliance if it has a damaged cord or plug, if it is not
working properly, if it has been dropped or damaged, or dropped into water.
yReturn this appliance to a service center for examination and repair.
yKeep the cord away from heated surfaces.
yThe appliance has been fitted with an automatic protection against
overheating. If the vents are covered, the appliance switches off
automatically. Remove the cause of overheating, unplug the appliance and
let it cool down for approx 30 minutes. Then switch the appliance back on by
plugging it in again.

M1E102/ENG
5
yLet the appliance cool down for approx 15 minutes before you clean or store
it.
yNever use the appliance when the lamp housing is damaged, broken or
missing.
yAlways replace the lamp with a 60W clear incandescing lamp or 70W
energy saving halogen lamp.
Preparing for use
Installation
1. Before first use, open the light cover on top (Fig. a) and back (Fig. b) of the
appliance and screw the lamp into the lamp holder (Fig. c).
2. Place the appliance at 40-50cm from your head, for example on a bedside
table.
3. Put the plug in the wall socket (Fig. d).
4. The light blue color as screen default back light.
5. The clock time on the display starts flashing and below the alarm time has to
be set. (Fig. 1) Please see Setting the clock and alarm.
6. After finishing clock and alarm time, please press button for sun raise
time and aroma setting or by pressing button again to finish first
installation. (For sun raise and aroma setting, please see Setting the
Alarm)
7. After finishing first setting the appliance into stand by mode, you can change
the screen back light by pressing SNOOZE button. (Fig. 2)
Setting the clock and alarm
1. To use ▲ and ▼buttons to set the time.
2. Hold ▲ and ▼ buttons longer to put the time forward or backward more
quickly.
M1E102/ENG
6
3. When you have set the correct time of hour, press SET button to confirm the
hour and set the correct time of min, press SET button again to confirm the
min.
4. After finishing clock time, press SET button and move to alarm time of hour
and set the correct alarm time of hour, press SET button to confirm the time
of min.
Using the appliance
Settingthealarm
When you set alarm, you can choose the light intensity level, the type of sound
or FM radio, sound level and aroma. The alarm is set when the screen showing
alarm symbol and alarm time. The light intensity slowly increases to the chosen
level during the set sun raise time before the set alarm time. The sounds slowly
increase to the chosen level after the set alarm time. The aroma functions will
actives 10 min before the set alarm time.
Setting the clock alarm time
1. Press once to set the clock and alarm. (Fig. 1)
2. Use ▲ and ▼ buttons to select correct clock and alarm time. (Fig. 3)
3. Hold ▲ and ▼ buttons longer to put the time forward or backward more
quickly.
4. Press SET button to shift and confirm the clock time and alarm time.
5. When you have set the correct time of hour, press SET button to confirm the
hour and set the correct time of min, press SET button again to confirm the
min. (Fig. 4)
Setting Alarm with Sun Raise or Aroma Function
1. Press button again to set the sun raise time and aroma.
2. Use ▲ and ▼ buttons to choose sun raise time 00, 15, 30, 45, 60 min. (Fig.
5) Note: If set “00” means no sun raise for wake up and the sun raise symbol

M1E102/ENG
7
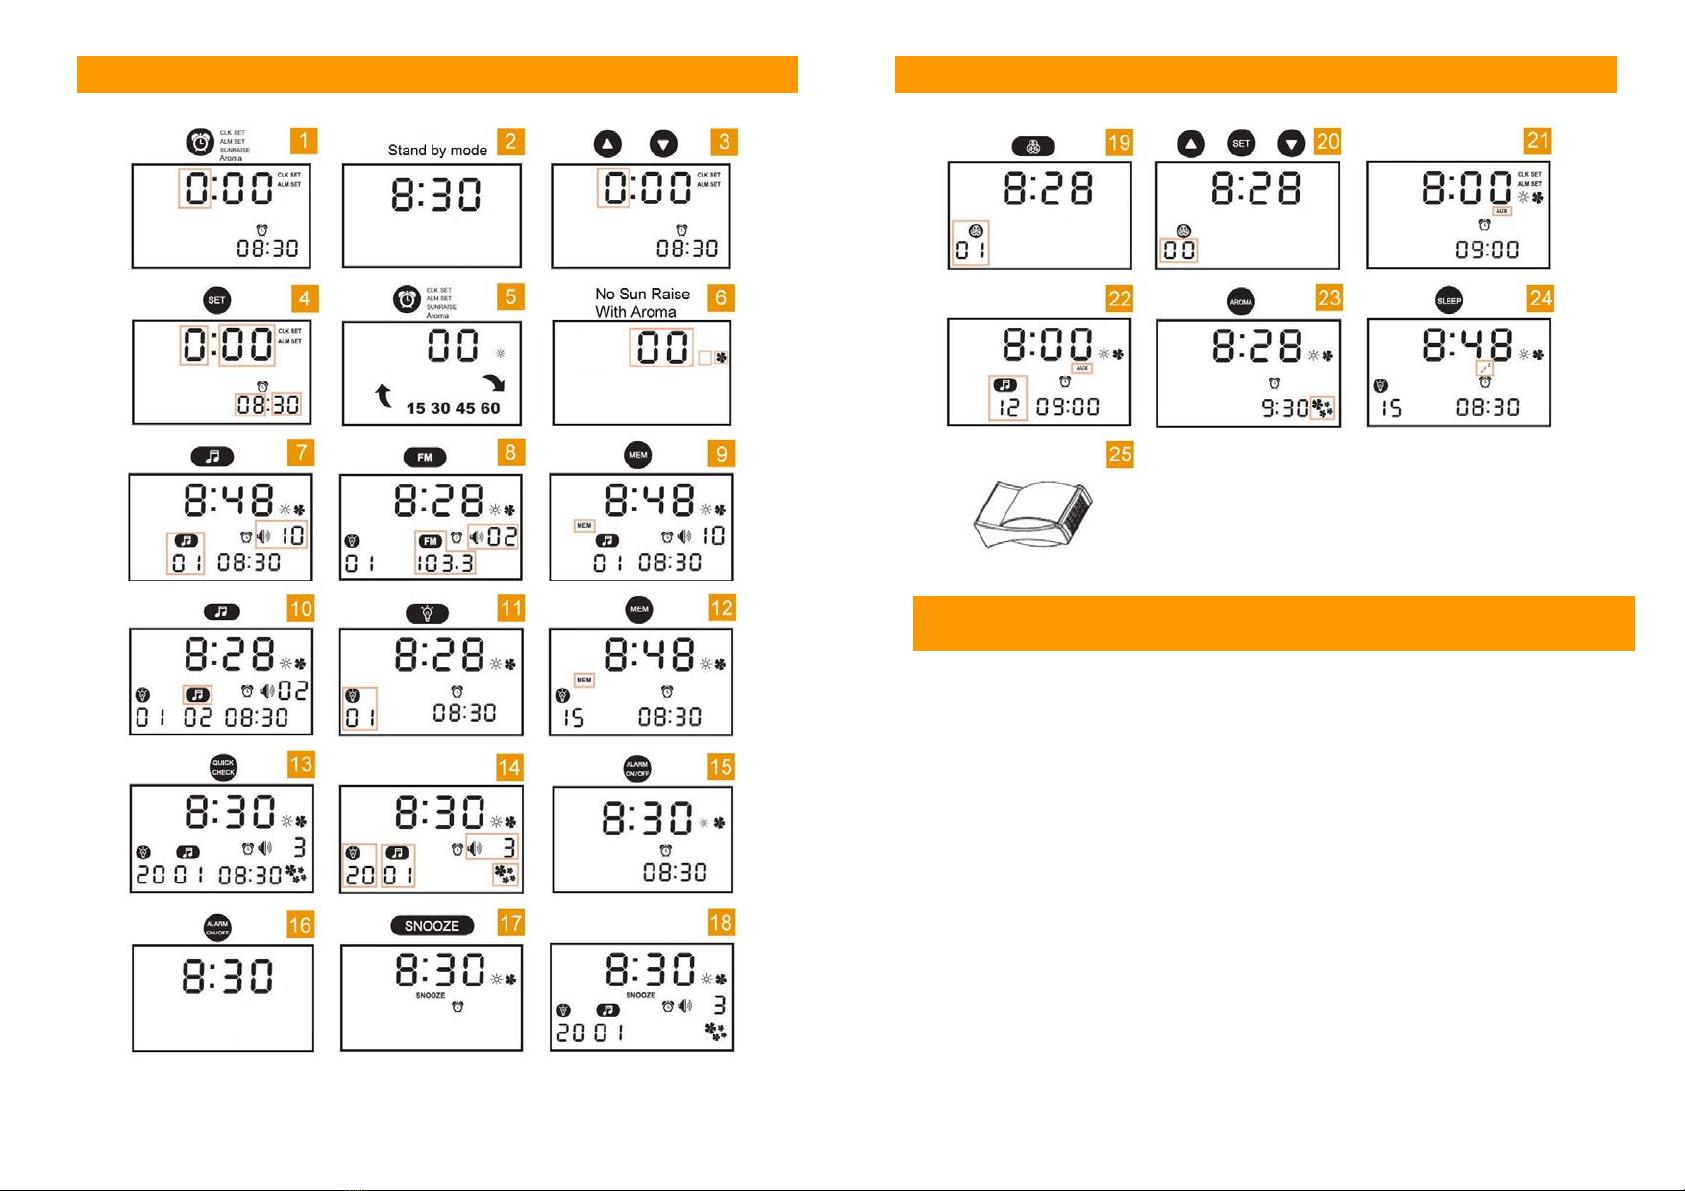
will disappear on the screen (Fig. 6)
3. Press SET button to set Aroma on the aroma symbol shown on screen (Fig.
6), press SET button again to turn it off.
Note: If no aroma symbol on screen means no aroma function for wake up.
4. To press button again the appliance will into stand by mode.
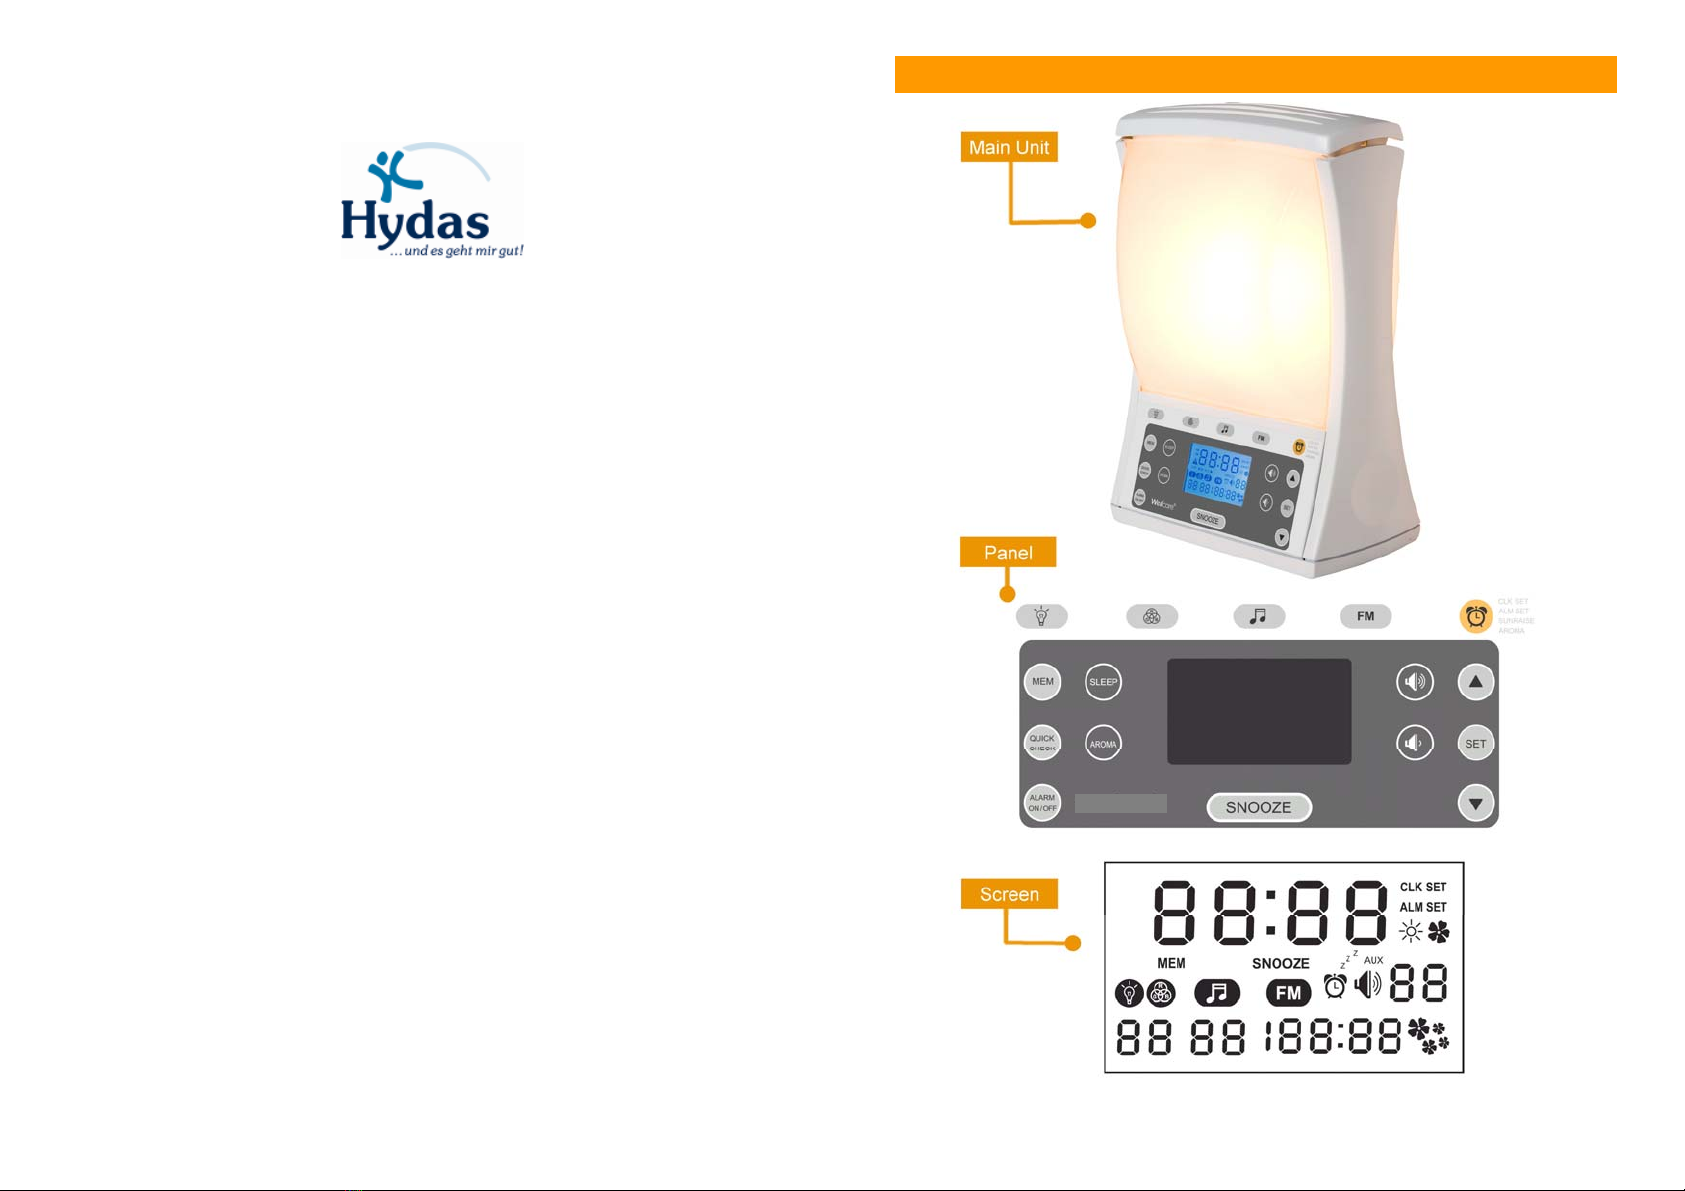
Setting the Sound/FM radio and sound level
1. Press button, the default nature sounds ‘01’ will start playing at sound
level 10 , to press ▲ and ▼ buttons to select favorite nature sounds (01~10
for nature sounds, 11 for beep sound) (Fig. 7)
2. Press FM button into radio mode and press SET button the appliance will
auto seek FM station; press ▲ and ▼ buttons to manually select program.
(Fig.8)
3. The default sound level is 10, to adjust volume to press and buttons
to set the sounds level (00~20).
4. Press MEM button to memorize wake up sound/radio station and sound
level; when press MEM button, the screen will show on and release the
button the MEM will disappear. (Fig. 9)
5. If you like no sound for wake up, please set MEM button and volume level at
‘00’ as mute.
6. If or FM button works with or buttons, the active function
symbol will show on screen, the one with flashing function can use ▲ and ▼
or and buttons, press desired function key again to change setting.
(e.g. When button is working, you can use ▲ and ▼or and
buttons; if you like to change light intensity, press button again to
change the intensity) (Fig. 10)
Light intensity level setting
1. When pressing button,the light will slowly increase to the chosen level.
(default value is 25) (Fig. 11)
M1E102/ENG
8
2. Press button to adjust the brightness and press ▲ and ▼to adjust light
intensity.
3. After selecting your favorite intensity, to press MEM button to memorize light
intensity. (Fig. 12)
4. If you don’t want to wake up with light, select light intensity level ‘00’ and
press MEM.
Quick alarm time check
1. When the alarm setting at stand by mode, press button, to start an
accelerated wake up.
2. During the 60 sec, you can see the light and sound rapid increase of the
light intensity to the selected level. Also the aroma goes on (if select aroma
function). (Fig. 13)
3. Press button again or any key to stop.
ToTurnthealarmonoroff
When the alarm is on, the screen will display wake up sound, sound level, aroma,
light and light intensity.
1. At the set time, the wake up sound is played and aroma will active before 10
min and light will be gradual from ‘01’ to sun raise setting. (Fig. 14)
2. The alarm is active when press button, to turn off all alarm settings, the
music, light and aroma will stop working and all relative symbols will
disappear. (Fig. 15)
3. Press button again to set the alarm off, the alarm time and symbol
will disappear. It’s means there is no alarm on tomorrow. (Fig. 16)
Snoozing/Screen Color Selection
1. Press SNOOZE button to switch off the sound and light and aroma for 6
minutes when the alarm has gone off.
(Fig. 17)

M1E102/ENG
9
2. After 6 minutes the wake up sound is automatically played again. (Fig. 18)
Note: You can only use the snooze function with 6 times. After 35 minutes,
the button no longer functions as snooze and only functions as SCREEN
color selection.
3. Screen Color Selection only available at stand by mode, to press SNOOZE
button to change color; there are 8 colors for choosing. The default color is
light blue when first plug in.
4. At mode, the Screen color will follow the RGB light, after quit the RGB
mode, the screen color will recover the original color setting.
Light – reading lamp
1. Press button to switch the lamp on or off. If RGB function is active once
button is pressed, the RBG function will be deactivate.
2. Turn on the light and adjust ▲ and ▼buttons to increase or decrease the
light intensity level.
3. The light level indication on the display shows the light intensity level (00 to
25).
4. The button can work with button or FM radio
RGB – color changing mood light
1. Press button to switch the mood light on or off. (Fig. 19) If RGB function
is active once button is pressed, the light function will be deactivate.
2. Adjust ▲ and ▼ buttons to change the favorite color (01-09) or press SET
button to auto change mode (00) (Fig. 20)
3. The button can work with button or FM radio.
Note: The RGB color cannot set as wake up light.
Nature Sounds
1. Press button to switch the sound on or off. If the FM function is active
M1E102/ENG
10
once button is pressed, the FM function will be deactivate.
2. Adjust ▲ and ▼buttons to change the favorite nature sound (01-10), beep
sound(11)
3. The button can work with button or button.
MP3
1. To turn on your own MP3 and plug audio cable into your own MP3 and
connect to the appliance at backside of unit (Fig. e), the screen will show
AUX (Fig. 21). The active nature sounds or FM radio will be interrupted by
MP3.
2. When first time plug-in the audio cable the symbol will show on screen
and playing MP3 directly (as 12th sound). (Fig. 22)
3. When the MP3 is working, to adjust ▲ and ▼to change the favorite nature
sounds (01-10), beep sound (11) or MP3 music (12)
Note: The MP3 music cannot set as a wake up sound.
4. Once the audio jack is disconnected, the AUX will disappear from the screen.
5. The MP3 volume control by MP3 itself, the appliance does not provide
volume for MP3.
FMRadio
1. Press FM button to switch the radio on or off. If the music function is active
once FM button is pressed, the music function will be deactive.
2. Press SET button to scan radio frequencies automatically.
3. Or to press ▲ and ▼to select frequency of your favorite station.
4. The FM button can work with button or button.
AromaFunction
1. Aroma installation:
Table of contents
Other Hydas Personal Care Product manuals