Importado por: WOOD CRAFTERS MEXICO HOLDING S. DE R.L. DE C.V.,
Carretera a Matamoros KM. 114, 8-A, Col. La Paz, Rio Bravo, Tamaulipas, 88990,
RFC: WCM080125835 | Tel. (899) 932-0170
Distribuido por: Servicios Home Depot, S de RL de CV
Ricardo Margain 605, Col Santa Engracia, San Pedro Garza García, NL 66267
Tel. 01 (800) 004 6633
Aplica para todos los combos fabricados y/o importados por WoodCrafters
Installation | Instalación
Questions, problems, missing parts?
Before returning to the store, please call Customer Service
Preguntas, problemas, partes faltantes?
Antes de regresar a la tienda, favor de llamar a Servicio al Cliente
(USA) 1-800-235-7747 | (MX) 01-800-570-0319
HOMEDEPOT.COM/GLACIERBAY
QUESTIONS | PREGUNTAS
9Mirror Installation (If Included)
Instalación del espejo (Si está incluido)
• Determine the desired location of the mirror. Use appropriate screws or wall anchors (not included) to hang
mirror.
• Be sure the hanging hardware is rated to handle the weight of the mirror. The mirror weight is approximately 20
lbs.
• Determine donde desea colocar el espejo. Fijelo usando dos clavos o tornillos y taquetes apropiados (no
incluidos) para colgar el espejo.
• Asegúrese que el herraje que use para colgar sea recomendado para el peso del espejo. Aproximadamente 9
kilos.
Care and Cleaning | Cuidado y limpieza
Vanity
• To clean surface of doors or cabinet, use non-abrasive cleaners and or cleaning agents that do not contain
solvents.
Vanity Top
• Your vanity top will remain in its original state if you maintain and clean it properly. Clean the surface with
a glass cleaner or other household cleansers that are non-abrasive. Using abrasive cleansers will damage
the surface.
Mirror
• Use non-abrasive cleansers only.
Gabinete
• Para limpiar la superficie del gabinete o las puertas, use un trapo limpio y seco y limpie toda la superficie.
No usar limpiadores abrasivos.
Lavabo
• Su lavabo permanecerá en su estado original si lo mantiene y limpia correctamente. Limpie la superficie
con limpiador de vidrios o cualquier otro limpiador que no sea abrasivo. Usar limpiadores abrasivos pueden
dañar la superficie del lavabo.
Espejo
• No usar limpiadores abrasivos.
For California Customers Only | Sólo para clientes de California
Important Health Notice For Minnesota Residents Only:
Warranty | Garantía
6Full Extension Drawer Glide Installation (If Applicable)
Instalar los cajones con correderas de extensión total
(Si aplica)
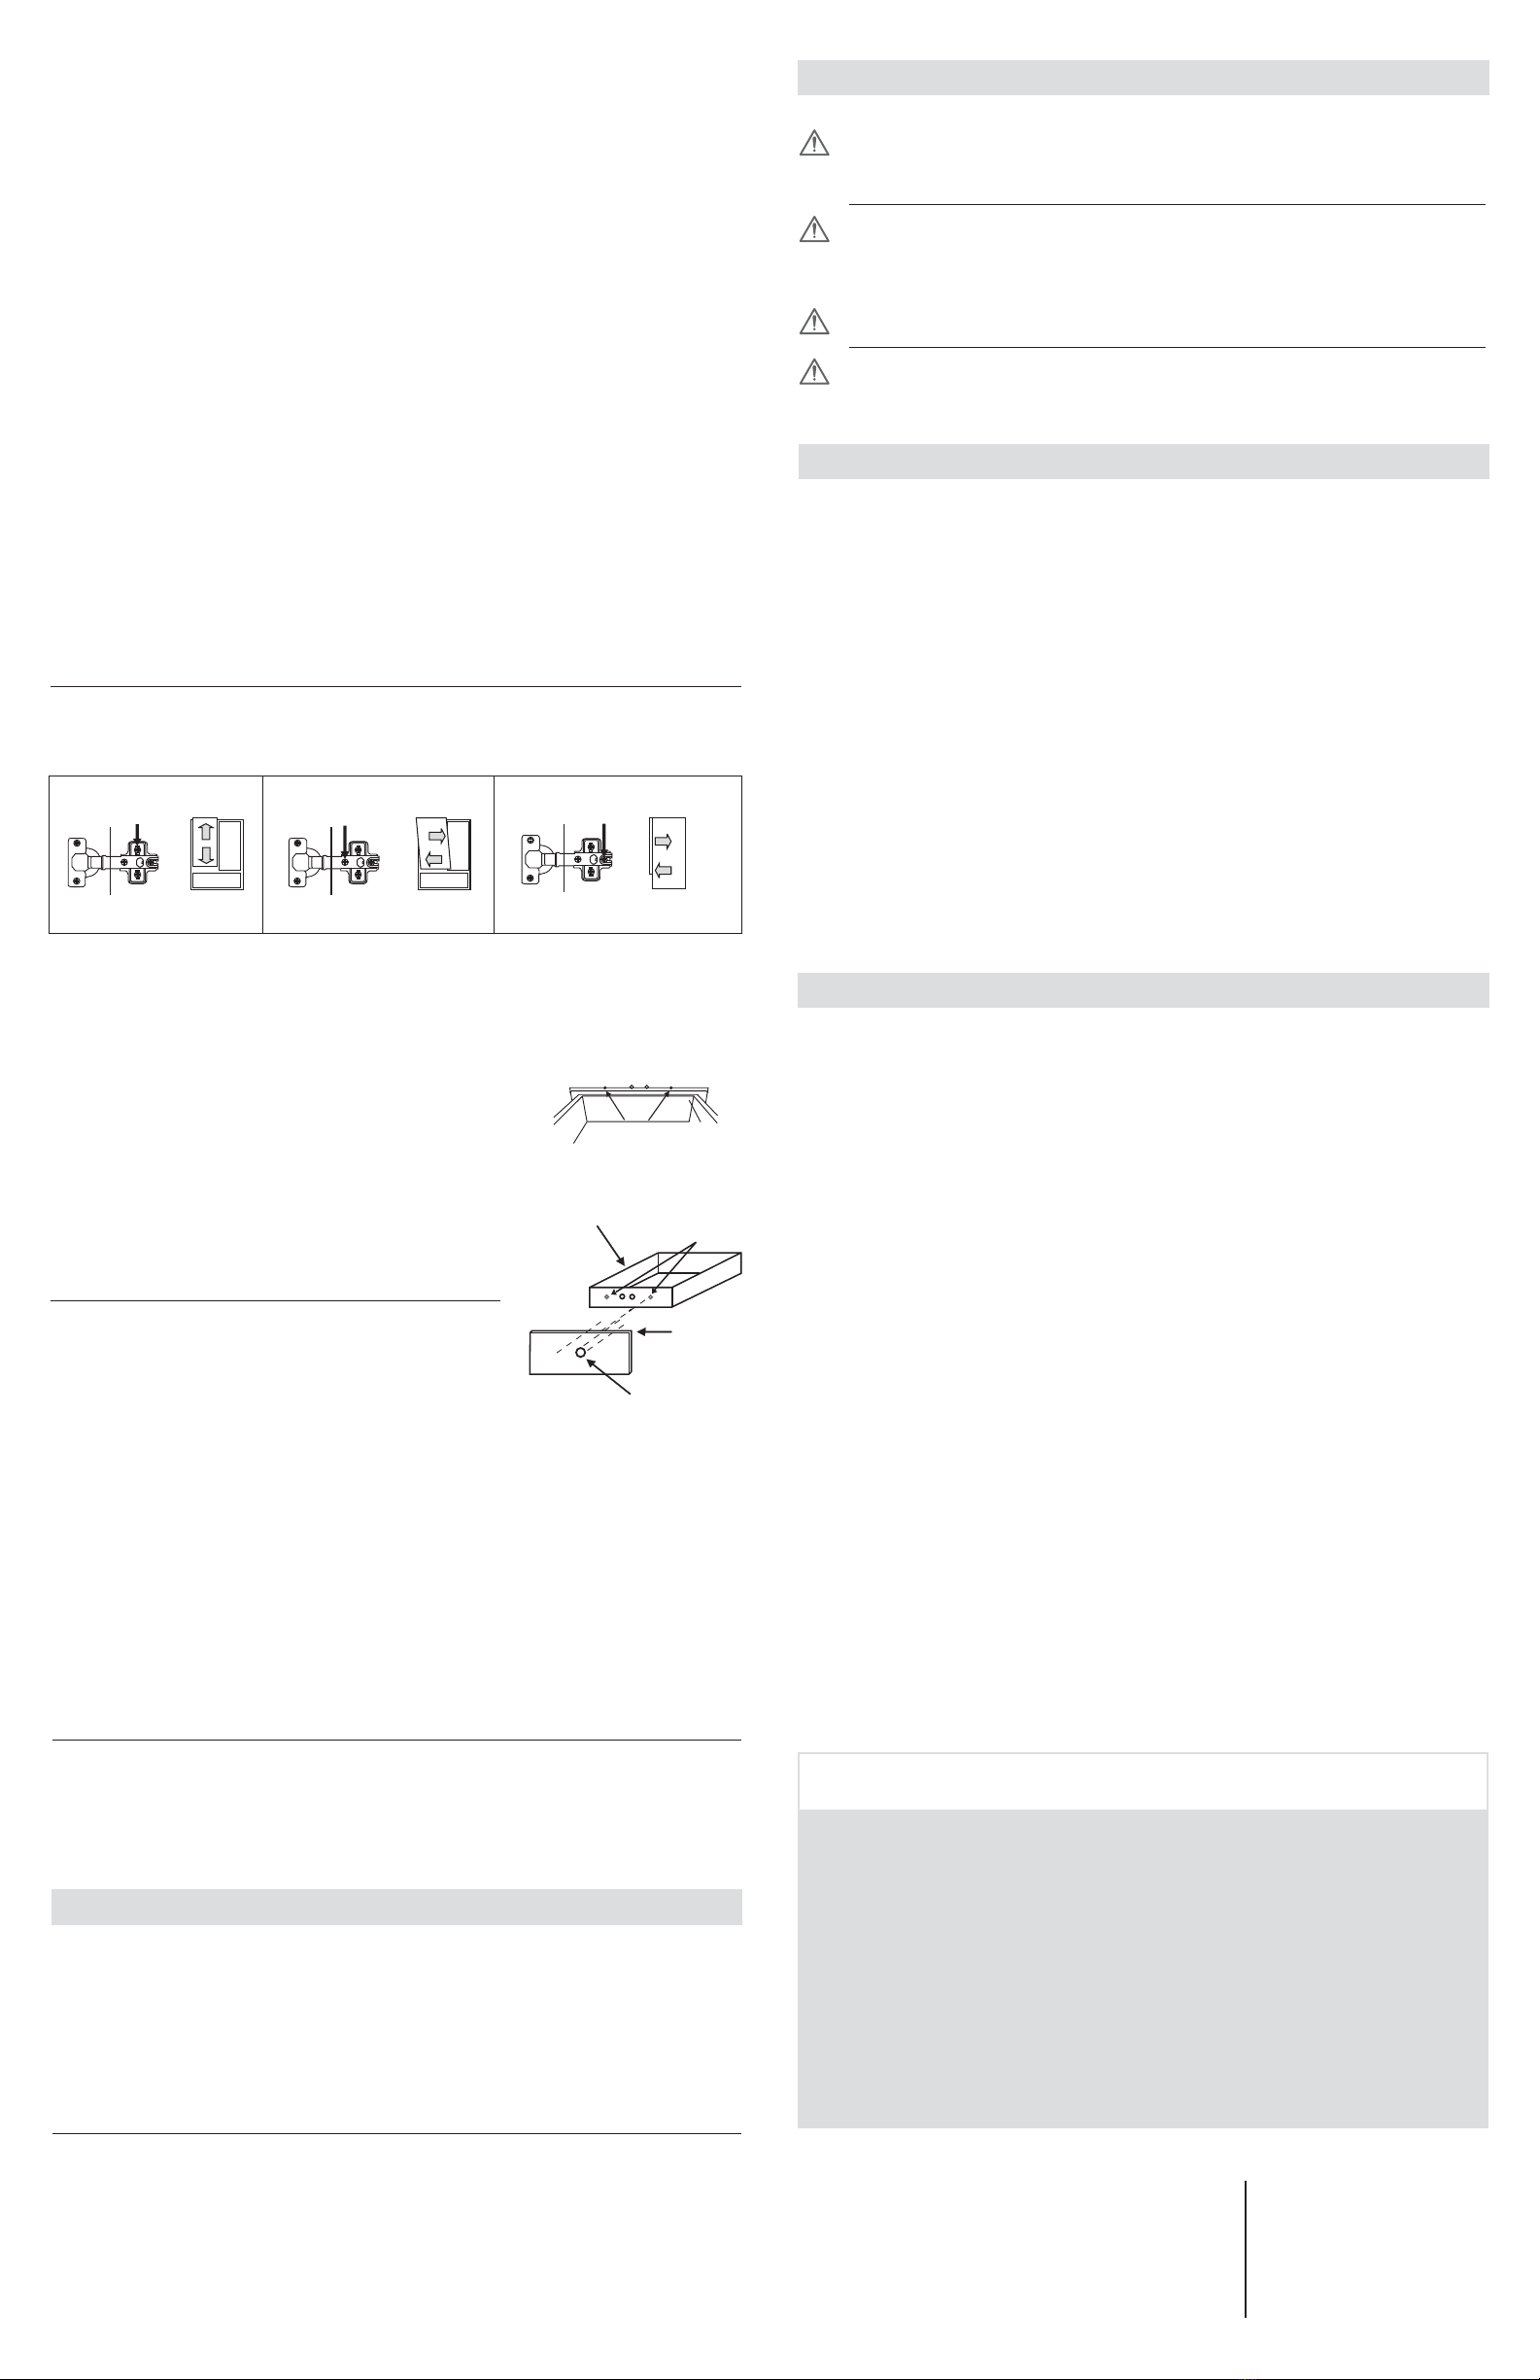
7Hinge/Door Adjustment (If Applicable
Ajuste de puerta/Bisagra (Si aplica))
8Hinge/Door Adjustment (If Applicable
Ajuste de frentes de cajón (Si aplica))
• Manteniendo el riel completamente cerrado, mueva la placa interior con balines hacia el frente ambos
rieles.
• Cuidadosamente alinear los rieles sujetos al cajón con los rieles sujetos al gabinete e introducir el cajón
hasta cerrarlo por completo.
• Abrir el cajón completamente para asegurarse que el cajón ha sido instalado correctamente.
Instalar correderas epóxicas (Si aplica)
• En una posición con ángulo de 30º, introducir el cajón en el gabinete asegurándose que las ruedas de los
rieles del cajón pasen sobre las ruedas de los rieles del gabinete.
• Cierre y abra el cajón completamente para asegurar que ha sido instalado correctamente.
The door alignment was set in the factory, but it could have shifted during transit. If adjustment is needed,
follow the instructions provided in the adjacent chart.
Las puertas estan alineadas de fábrica, pero pudieron haberse desalineado en el envío. Si es necesario
alinearlas, recomendamos ajustar las puertas según se muestra en el siguiente diagrama.
• Remove decorative hardware from the drawer front.
• Hold drawer front in place and slightly loosen both alignment
screws.
• Move the drawer front left, right, up or down to desired position for
alignment.
• While holding the drawer front in place, tighten the alignment screws
securely.
• Install the decorative hardware to the outside of the drawer front.
• Remueva el herraje decorativo del frente del cajón.
• Sostenga el frente del cajón en su lugar y afloje un poco los tornillos.
• Mueva el frente hacia la izquierda, derecha, hacia arriba o abajo
hasta lograr la posición deseada.
• Sosteniendo el frente del cajón en su lugar, apriete los tornillos.
• Instale el herraje decorativo por el frente del cajón.
A B C
A B C
Used to adjust door height
Ajuste de altura de la puerta
Used to adjust gaps between doors
Ajuste de espacios entre las puertas
Used to adjust between door and cabinet
Ajuste entre puerta y gabinete
CABINET FRONT VIEW
VISTA DE FRENTE
CABINET FRONT VIEW
VISTA DE FRENTE
CABINET SIDE VIEW
VISTA LATERAL
decorative hardware
herraje decorativo
drawer front
frente de cajón
drawer box
cajón
alignment screws
tornillos para alineamiento
alignment screws
tornillos para alineamiento
Retain this manual for future use.
Conserve este manual para futuro uso.
Please contact Favor de llamar al
further assistance. para más asistencia.
Some of the building materials used in this home (or these building materials) emit formaldehyde, eye, nose, and throat irritation, headache, nausea
and a variety of asthma-like symptoms, incluiding shortness of breath, have been reported as a result of formaldehyde exposure. Elderly persons and
young children, as well as anyone with a history of asthma, allergies,or lung problems,may be at greater risk. Research is continuing on the possible
long-term effects of exposure to formaldehyde.
Reduced ventilation may allow formaldehyde and other contaminants to accumulate in the indoor air high indoor temperatures and humidity raise
formaldehyde levels. When a home is to be located in areas subject to extreme summer temperatures, an air-conditioning system can be used to
control indoor temperature levels. Other means of controlled mechanical ventilation can be used to reduce levels of formaldehyde and other indoor
air contaminants.
If you have any questions regarding the health effects of formaldehyde, consult your doctor or local health department.
WARNING: THIS PRODUCT CAN EXPOSE YOU TO CHEMICALS INCLUDING WOOD DUST WHICH IS KNOWN TO STATE
OF CALIFORNIA TO CAUSE CANCER. For more information, go to www.P65Warnings.ca.gov
ADVERTENCIA: ESTE PRODUCTO PUEDE EXPONERLO A SUSTANCIAS QUÍMICAS, INCLUYENDO ASERRÍN, QUE EL
ESTADO DE CALIFORNIA RECONOCE COMO CAUSANTE DE CÁNCER.
Para más información, visita www.P65Warnings.ca.gov
WARNING: DRILLING, SAWING, SANDING OR MACHINING WOOD PRODUCTS CAN EXPOSE YOU TO WOOD DUST, A
SUBSTANCE KNOWN TO THE STATE OF CALIFORNIA TO CAUSE CANCER. AVOID INHALING WOOD DUST OR USE A
DUST MASK OR OTHER SAFEGUARDS FOR PERSONAL PROTECTION.
For more information go to www.P65Warnings.ca.gov/wood.
ADVERTENCIA: TALADRAR, SERRUCHAR, LIJAR O PROCESAR A MÁQUINA ARTÍCULOS DE MADERA PUEDE
EXPONERTE AL ASERRÍN, QUE EL ESTADO DE CALIFORNIA RECONOCE COMO CAUSANTE DE CÁNCER. EVITA INHALAR
ASERRÍN O USA UNA MASCARILLA ANTIPOLVO U OTROS MEDIOS DE PROTECCIÓN PERSONAL. Para más información,
visita www.P65Warnings.ca.gov/wood.
Certains des matériaux de construction utilisés dans cette maison (ou ces matériaux de construction) émettent du formaldéhyde. Des symptômes
comme une irritation des yeux, du nez et de la gorge, des maux de tête, de la nausée et une variété de symptômes apparentés à l'asthme,notamment
l'essoufflement, ont été signalés suite à une exposition au formaldéhyde. Les personnes âgées et les jeunes enfants, ainsi que toute personne ayant
des antécédents d'asthme, d'allergies ou de problèmes pulmonaires, peuvent être exposées à des risques accrus. La recherche se continue sur les
effets possibles à long terme de l'exposition au formaldéhyde.
Une ventilation réduite peut permettre au formaldéhyde et à d'autres contaminants de s'accumuler dans l'air intérieur. Les températures intérieures
élevées et l'humidité augmentent les niveaux de formaldéhyde. Lorsqu'une maison doit être située dans des zones soumises à des températures
estivales extrêmes,un système de climatisation peut être utilisé pour contrôler les niveaux de température intérieure. D'autres moyens de ventilation
mécanique contrôlée peuvent être utilisés pour réduire les niveaux de formaldéhyde et d'autres contaminants de l'air intérieur.
Si vous avez des questions concernant les effets du formaldéhyde sur la santé, consultez votre médecin ou votre département de santé local.
Avis de santé important pour les résidents du Minnesota uniquement :
LIMITED LIFETIME WARRANTY APPLICABLE TO USA
This product is warranted under normal use and service, to be free from defects in material and workmanship for the life
of the product from the date purchased. During this warranty period, Seller will, free of charge, repair or replace the
Product at its sole discretion. Proof of purchase, photo and the nature of the problem is required. Our warranty does not
cover damage or failure caused by abuse, misuse, abnormal usage, faulty installation, improper maintenance or any repair
other than those by Seller. There are no obligations or liabilities on the part of Seller for consequential damage arising out
of or in connection with the use or performance of the product or any indirect damages included, but not limited to labor
charges for installation or removal. This warranty gives you specific legal rights, and you may also have other rights that
may vary from state to state. Further information regarding this warranty may be obtained without charge by contacting
Customer Service. If any parts are missing or damaged, please send a copy of your receipt along with your inquiry to
GARANTÍA LIMITADA APLICABLE A E.U.A
Este producto está garantizado bajo condiciones normales de uso y servicio, contra defectos de material y mano de obra
durante la vida útil del producto a partir de la fecha de compra. Durante este período de garantía, el Vendedor, sin cargo
alguno, reparará o reemplazará el producto a su discreción. Se requiere prueba de compra, foto y la naturaleza del
problema. Nuestra garantía no cubre daños o fallas causadas por abuso, uso indebido, uso anormal, instalación defectuo-
sa, mantenimiento inadecuado o cualquier reparación que no sea realizada por el Vendedor. No existen obligaciones ni
responsabilidades por parte del Vendedor por daños consecuentes que surjan de o en relación con el uso o desempeño
del producto o cualquier daño indirecto incluido, pero no limitado a los cargos de mano de obra para la instalación o
remoción. Esta garantía le otorga derechos legales específicos y es posible que también tenga otros derechos que pueden
variar de un estado a otro. Se puede obtener más información sobre esta garantía sin cargo poniéndose en contacto con
el Servicio de atención al cliente. Si falta alguna pieza o está dañada, por favor envíe una copia de su recibo junto con su
GARANTÍA LIMITADA APLICABLE A MÉXICO
El Vendedor garantiza este producto a partir de la fecha de compra y durante el tiempo que el comprador original lo posea.
Esta garantía cubre al producto exclusivamente por defectos en los materiales o en su fabricación. El Vendedor reempla-
zará bajo su propio costo, el Gabinete Completo. En los casos que el modelo esté descontinuado, se ofrecerá reemplazar
el producto poruno de características similares, que se encuentre disponible en el mercado. Para hacer válida la garantía,
deberá acudir a la tienda de Home Depotdonde realizó su compraincluyendo el artículo a reemplazar,recibo original o
factura de compra que indique la fecha parasu reemplazo.Nuestra garantía no cubre daños por el uso inapropiado o
abuso que se le dé al producto, ni por daños realizados durante la instalación, así mismo, excluye los daños causados por
condiciones del ambiente, humedad, limpiadores o substancias abrasivas. Esta garantía no podrá transferirse. Esta
garantía es aplicable sólo a los productos fabricados después del 1 de Diciembre del 2010. Para mayor información, favor
de comunicarse al número gratuito 800-570-0319 desde el interior de la República Mexicana derechos que lleguen a
cambiar de estado a estado. Si faltara alguna parte o estuviera dañada, por favor envíe una copia de su recibo junto con
su
consulta
a
[email protected] en
el
horario
de
8
a.m.
a
5
p.m.
tiempo
del
Centro.
Para
mayor
información relacionada a esta garantía, favor de comunicarse al Centro de Atención al Cliente.


