manuals.online logo
Brands
  1. Home
  2. •
  3. Brands
  4. •
  5. GLAS
  6. •
  7. Indoor Furnishing
  8. •
  9. GLAS STRATA User manual

GLAS STRATA User manual

STRATA
DESIGN YABU PUSHELBERG
Istruzioni di montaggio ed utilizzo
Assembling and use instruction
STRATA
DESIGN YABU PUSHELBERG
Accessori / Tools
x 1
x 1 x 1 x 1
step 1
step 2
step 3
step 4
step 5
step 6
A
C
B
step 7
ATTENZIONE
Nel maneggiare il cristallo, evitare
urti e non appoggiarlo su super-
ci che possano causare scheg-
giature o graf.
ATTENTION
When assembling any glass furni-
ture composition, be sure to rest
the glass on soft surfaces that will
not scratch, chip or abrase it.
ATTENTION
En manipulant le cristal, éviter les
heurts et ne jamais le poser sur
des surfaces pouvant l’ébrécher
ou le griffer.
ACHTUNG
Achten Sie beim Umgang mit
dem Glas darauf, diesen nicht
auf Oberächen abzulegen, die
ihn verkratzen oder beschädi-
gen könnten und vermeiden Sie
Stösse.
ATENCIÓN
Al transportar el cristal, evitar gol-
pes y no apoyarlo sobre super-
cies que puedan causar marcas o
rayas.
step 8
ITALIANO
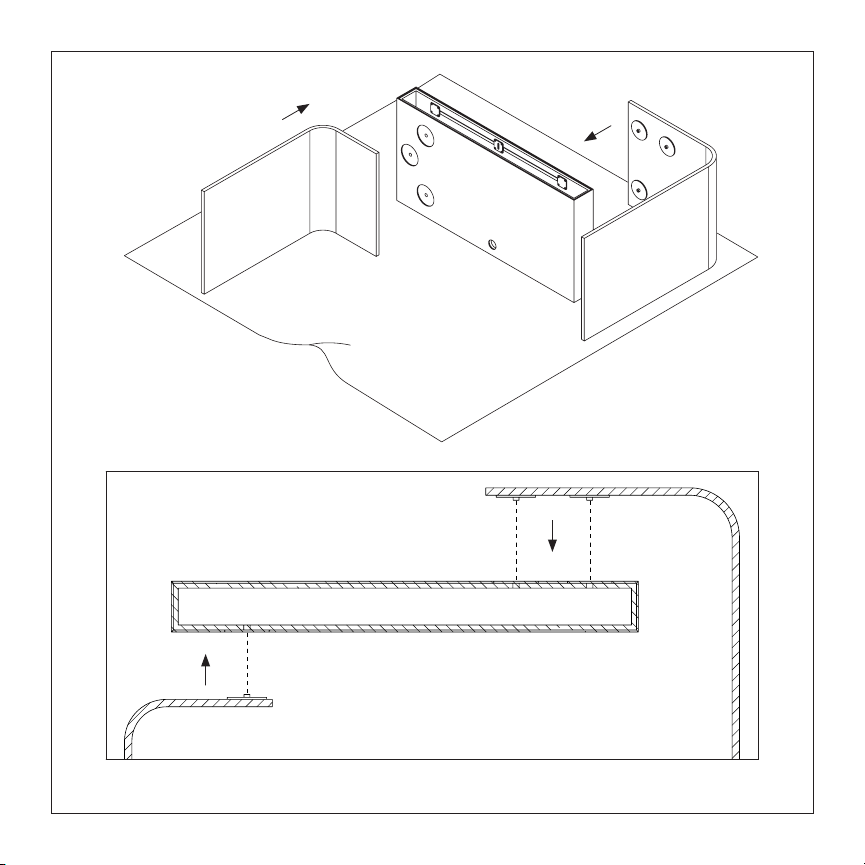
step 1. Estrarre dall’imballo il blocco cassetto e
posizionarlo su una supercie morbida, in modo da
evitare graf e scheggiature, come rappresentato in
gura.
step 2. Estrarre il cassetto.
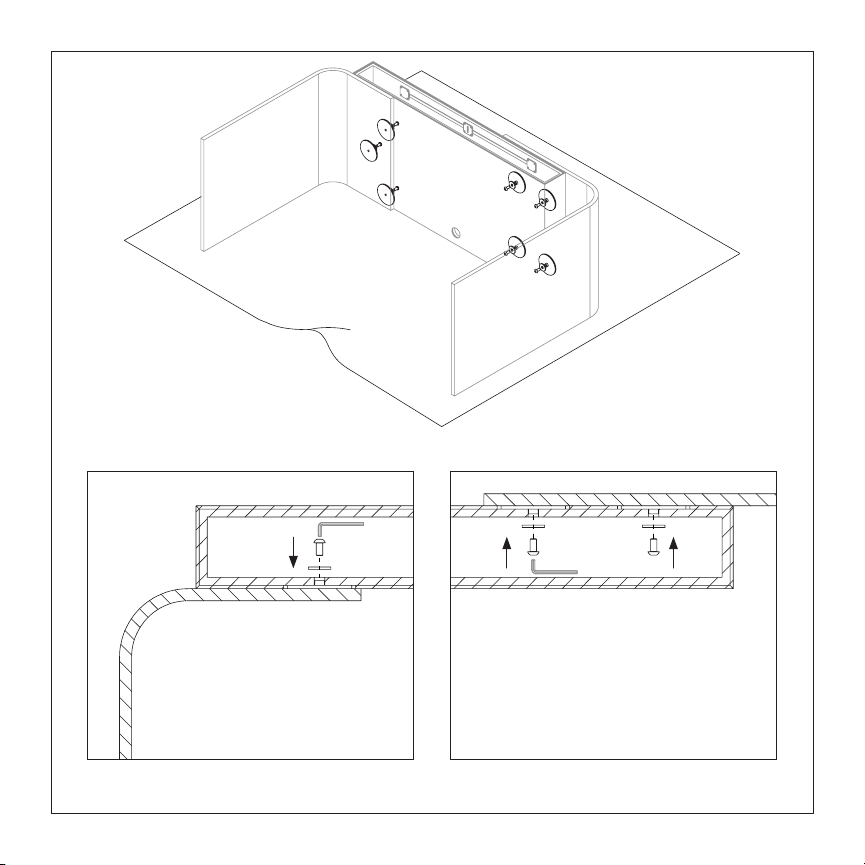
step 3. Accostare la gamba a “L” DX sopra al blocco
cassetto, facendo combaciare le piastre metalliche coi
fori.
step 4. Dall’interno del blocco cassetto avvitare
saldamente le piastre metalliche con le viti e le rondelle
in dotazione.
Ripetere la stessa operazione per la gamba a “L” SX.
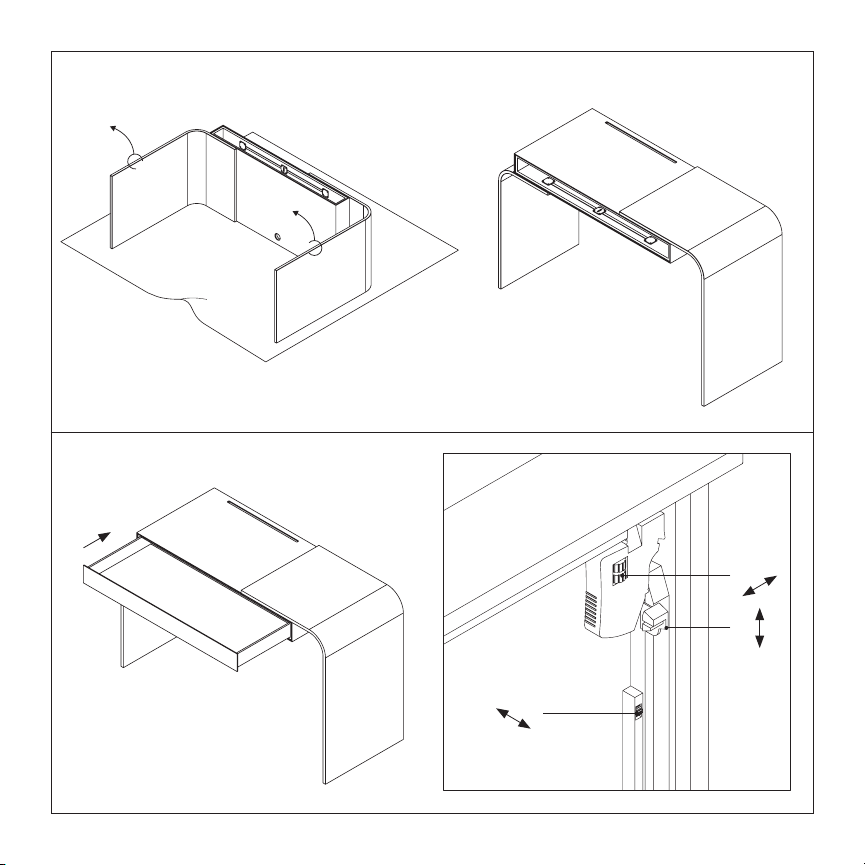
step 5. Sollevare la struttura e posizionarla
delicatamente a terra, facendo attenzione ad evitare
urti.
step 6. Inserire il cassetto e bloccarlo sulla guida. Per
regolare il cassetto, agire sulle rotelline A (destra-
sinistra), B (dentro-fuori) e la levetta C (alto-basso).
step 7. Se il corpo cassetto risulta curvato, togliere
il cassetto ed agire sui tiranti come da disegno,
utilizzando la chiavetta in dotazione.
step 8. A discrezione dell’utente, il taglio nel top può
essere utilizzato come foro passacavi, oppure come
sede per lo specchio in dotazione.
ATTENZIONE: inserendo lo specchio, fare
attenzione a non urtare il bordo del foro,
scheggiandolo irrimediabilmente.
ENGLISH
step 1. Remove the drawer’s structure from the
packaging and place it on a soft surface in order to
avoid scratches and chips, as indicated in the image.
step 2. Remove the drawer.
step 3. Pull together the leg “L” DX (right) on the
drawer’s structure, tting the metal plates with holes.
step 4. From the inside of the drawer’s structure,
screw the metal plates rmly with the supplied screws
and washers.
Repeat the same step for the leg “L” SX (left).
step 5. Lift up the structure and place it gently on the
oor taking care not to hit the glass.
step 6. Insert the drawer and x it to the rail. To adjust
the drawer, use the casters A (right-left), B (inside-
outside) and on the lever C (up-down).
step 7. If the drawer unit seems curved, remove the
drawer and make the regulation on the tie-rods as
shown in the picture, using the supplied Allen key.
step 8. At the discretion of the user, the slot in the top
can be used as a cable outlet or to place the supplied
mirror.
ATTENTION: when inserting the mirror, be careful
to not hit the edge of the hole, chipping it
irremediably.
FRANCAIS
step 1. Extraire le bloc tiroir de l’emballage et le
positionner sur une surface souple, pour éviter griffes
ou éclats, comme indiqué sur le dessin.
step 2. Extraire le tiroir.
step 3. Placer le pied en “L” droite sur le bloc tiroir,
en faisant correspondre les plaques métalliques avec
les trous.
step 4. Par l’intérieur du bloc tiroir visser fermement
les plaques métalliques avec les vis et les rondelles
fournies.
Répéter la même opération pour le pied en “L”
gauche.
step 5. Soulever la structure et positionner la
délicatement au sol, en faisant attention d’éviter les
heurts.
step 6. Insérer le tiroir et le bloquer sur le guide. Pour
faire le réglage du tiroir, agir sur les rondelles A (droite
et gauche), B (intérieur-extérieur) et la pette manette
C (haut-bas).
step 7. Si le bloc tiroir résulte courbé, enlever le tiroir
et agir sur le tirants selon le dessin, en utilisant la clé
fournie.
step 8. A discrétion de l’utilisateur, le trou dans le top
peut être utilisé comme une sortie des câbles, ou pour
placer le miroir fourni.
ATTENTION, en insérant le miroir, ne pas
heurter le bord du trou en l’ébréchant
irrémédiablement.
DEUTSCH
step 1. Entfernen Sie die Verpackung und legen Sie
das Schubladenelement auf eine weiche Oberäche,
um Kratzer und Zersplitterung zu vermeiden (wie in
der Skizze dargestellt).
step 2. Ziehen Sie die Schublade heraus.
step 3. Stellen Sie den “L” DX Fuß (rechts) auf das
Schubladenelement, so dass die Metallplatten mit den
Löchern anpassen.
step 4. Von der Innenseite des Schubladenelements
schrauben Sie die Metallplatten mit den mitgelieferten
Schrauben und Unterlegscheiben fest.
Wiederholen Sie den gleichen Schritt für den “L” SX
Fuß (links).
step 5. Heben Sie die Struktur an und legen Sie sie
vorsichtig auf den Boden und achten Sie darauf, das
Glas nicht zu stoßen.
step 6. Setzen Sie die Schublade ein und befestigen
Sie sie an der Führungsschiene. Um die Schublade zu
regulieren, wirken Sie auf die kleinen Rollen A (rechts-
links), B (innen-außen) und auf den C-Hebel (auf-ab).
step 7. Falls die Schublade gebogen aussieht, nehmen
Sie sie weg und wirken Sie mit dem mitgelieferten
Schlüssel auf die Zugstange, wie in der Skizze gezeigt.
step 8. Nach Belieben kann der Schlitz in der Oberseite
als Kabelausgang oder als Stelle für den mitgelieferten
Spiegel verwendet werden.
ACHTUNG: Beim Einsetzen des Spiegels achten Sie
darauf, gegen die untere Kante des Loches nicht
zu stoßen, um unersetzliche Absplitterungen zu
vermeiden.
ESPAÑOL:
step 1. Quitar del imbalaje la estructura del cajón y
ponerlo en una supercie mullida para evitar arañazos
y desportilladuras, como indica en la imágen.
step 2. Quitar el cajón.
step 3. Acercar la pata a “L” DX (derecha) sobre a la
estructura del cajón, ancajando las planchas metalicas
con los huecos.
step 4. Atornillar fuertemente del interior las planchas
metalicas con los tornillos y rondanas suministrados.
Repetir la misma operación para la pata a “L” SX
(izquierda).
step 5. Levantar la estructura y ponerla con delicadeza
al suelo, con cuidado de no chocar los cristales.
step 6. Insertar la estructura y bloquearla en la guía.
Para regular el cajón, actuar en las rodajas A (derecha-
izquierda), B (dentro – fuera) y la barra C (alto-bajo).
step 7. Si el elemento con el cajón parece curvado,
quitar el cajón y hacer la regulación en los tirantes
como indicado en dibujo, utilizando la llave Allen
suministrada.
step 8. A discreción de quien lo usa, el corte en el
sobre se puede utilizar como hueco pasacables o
como lugar para el espejo suministrado.
ATENCIÓN: Mientras se inserta el espejo, estar
cuidado a no golpear el borde del hueco,
mellandolo irremediablemente.
Sede, direzione commerciale e showroom: via Cavour, 29 - 20846 Macherio (MB)
Tel: +39 0392323202 ra Fax: +39 0392323212 E-mail: [email protected] - www.glasitalia.com

Other GLAS Indoor Furnishing manuals

GLAS TERRALIQUIDA User manual

GLAS

GLAS TERRALIQUIDA User manual

GLAS DON GERRIT User manual

GLAS

GLAS DON GERRIT User manual

GLAS ALADIN WALL User manual

GLAS

GLAS ALADIN WALL User manual

Popular Indoor Furnishing manuals by other brands

Inside Weather ACE LOUNGE CHAIR manual

Inside Weather

Inside Weather ACE LOUNGE CHAIR manual

RiverRidge 02-075 Assembly instructions

RiverRidge

RiverRidge 02-075 Assembly instructions

Welltime LKZ 740372 Assembly instructions

Welltime

Welltime LKZ 740372 Assembly instructions

Bush Business Furniture WC14361 manual

Bush Business Furniture

Bush Business Furniture WC14361 manual

Jofran 1706-71 quick start guide

Jofran

Jofran 1706-71 quick start guide

Otto INDIANA DESK Assembly instruction

Otto

Otto INDIANA DESK Assembly instruction

Presidential Billiards VIENNA Assembly instructions

Presidential Billiards

Presidential Billiards VIENNA Assembly instructions

Sycamore SY9047 installation instructions

Sycamore

Sycamore SY9047 installation instructions

Great Little Trading Paddington Midsleeper Assembly instructions

Great Little Trading

Great Little Trading Paddington Midsleeper Assembly instructions

Living Spaces 2772CL-BENCH Assembly instruction

Living Spaces

Living Spaces 2772CL-BENCH Assembly instruction

Costway GIANTEX HW66874 user manual

Costway

Costway GIANTEX HW66874 user manual

Forte CLFT235 Assembling Instruction

Forte

Forte CLFT235 Assembling Instruction

John Thomas COTTAGE BD-2005 Assembly instructions

John Thomas

John Thomas COTTAGE BD-2005 Assembly instructions

FMD Furniture Marvin 347-001 Assembly instructions

FMD Furniture

FMD Furniture Marvin 347-001 Assembly instructions

Sanela SLZN 52 Mounting instructions

Sanela

Sanela SLZN 52 Mounting instructions

BLACK RED WHITE KOEH SFW1W/103 Assembly

BLACK RED WHITE

BLACK RED WHITE KOEH SFW1W/103 Assembly

BDI OCTAVE 8377 user manual

BDI

BDI OCTAVE 8377 user manual

YitaHome HEFTDR-8003 Assembly instructions

YitaHome

YitaHome HEFTDR-8003 Assembly instructions

manuals.online logo
manuals.online logoBrands
  • About & Mission
  • Contact us
  • Privacy Policy
  • Terms and Conditions

Copyright 2025 Manuals.Online. All Rights Reserved.