Glen SA 3045 User manual

This GLEN Airfryer is fully warranted against any defect arising out of defective
materials or faulty workmanship for a period of two years from the date of
purchase. Should any defect develop in this product, the customer should bring
the product to the nearest authorised service centre, where the company
undertakes to get the product repaired free of charge.
This warranty is not valid if :
l The use and care instructions have not been followed.
l Defects are caused by accident, misuse, abuse or commercial use.
l The repair work is carried out by persons not authorised by the company.
l Any modification or alteration of any nature is made in the product.
l Normal wear & tear of the product is not covered under warranty
l The Bill/Cash memo and copy of warranty card is not presented.
Under no circumstances, whether based on limited warranty or otherwise shall
the company be liable for incidental, special or consequential damages. Use of
product indicates acceptance by you of the aforesaid terms and conditions.
DEALER’S STAMP & SIGNATURE
PRODUCT NAME : AIRFRYER SA 3045
SERIAL NO. :
DATE OF PURCHASE :
Imported & Marketed by
Glen Appliances Pvt. Ltd.
I-34, DLF Ind. Area, Phase-I, Faridabad, India.
Helpline : 9266655555
AIRFRYER
SA 3045
U S E R ' S G U I D E
All manuals and user guides at all-guides.com
all-guides.com

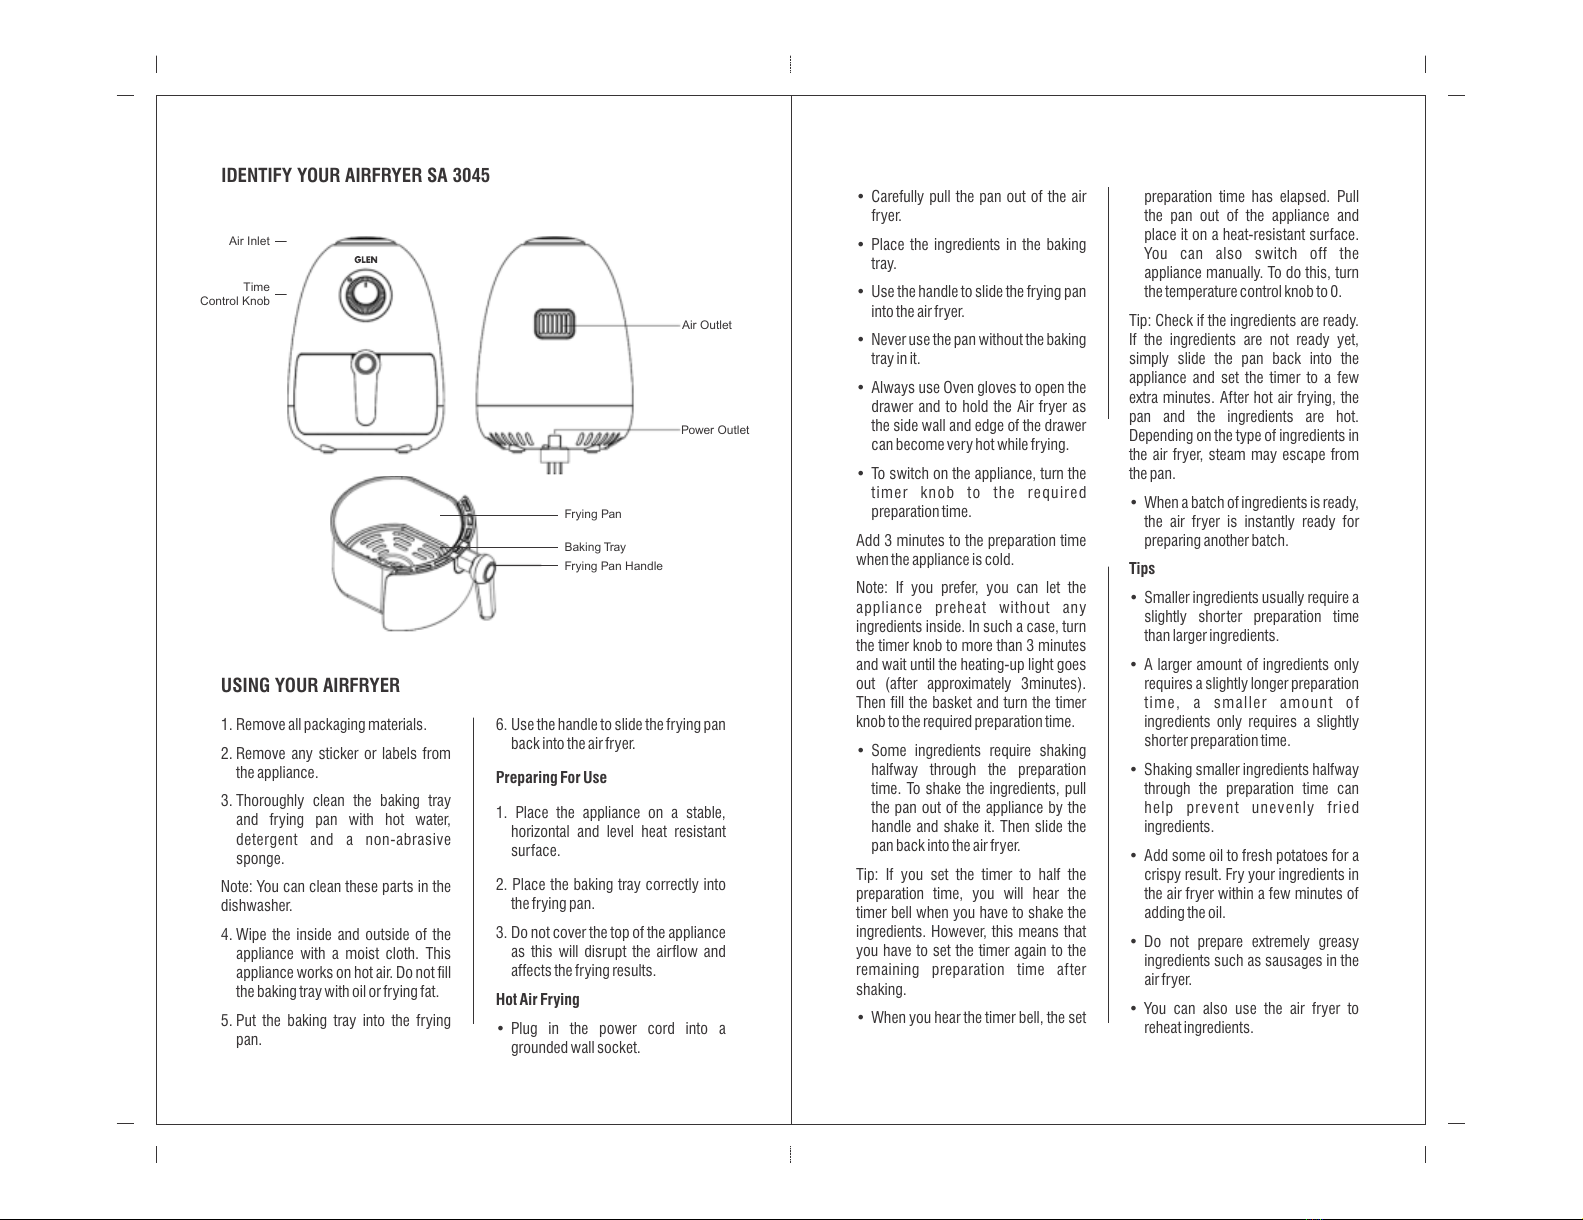
IDENTIFY YOUR AIRFRYER SA 3045
1. Remove all packaging materials.
2. Remove any sticker or labels from
the appliance.
3. Thoroughly clean the baking tray
and frying pan with hot water,
detergent and a non-abrasive
sponge.
Note: You can clean these parts in the
dishwasher.
4. Wipe the inside and outside of the
appliance with a moist cloth. This
appliance works on hot air. Do not fill
the baking tray with oil or frying fat.
5. Put the baking tray into the frying
pan.
USING YOUR AIRFRYER
6. Use the handle to slide the frying pan
back into the air fryer.
Preparing For Use
1. Place the appliance on a stable,
horizontal and level heat resistant
surface.
2. Place the baking tray correctly into
the frying pan.
3. Do not cover the top of the appliance
as this will disrupt the airflow and
affects the frying results.
Hot Air Frying
• Plug in the power cord into a
grounded wall socket.
• Carefully pull the pan out of the air
fryer.
• Place the ingredients in the baking
tray.
• Use the handle to slide the frying pan
into the air fryer.
• Never use the pan without the baking
tray in it.
• Always use Oven gloves to open the
drawer and to hold the Air fryer as
the side wall and edge of the drawer
can become very hot while frying.
• To switch on the appliance, turn the
timer knob to the required
preparation time.
Add 3 minutes to the preparation time
when the appliance is cold.
Note: If you prefer, you can let the
appliance preheat without any
ingredients inside. In such a case, turn
the timer knob to more than 3 minutes
and wait until the heating-up light goes
out (after approximately 3minutes).
Then fill the basket and turn the timer
knob to the required preparation time.
• Some ingredients require shaking
halfway through the preparation
time. To shake the ingredients, pull
the pan out of the appliance by the
handle and shake it. Then slide the
pan back into the air fryer.
Tip: If you set the timer to half the
preparation time, you will hear the
timer bell when you have to shake the
ingredients. However, this means that
you have to set the timer again to the
remaining preparation time after
shaking.
• When you hear the timer bell, the set
preparation time has elapsed. Pull
the pan out of the appliance and
place it on a heat-resistant surface.
You can also switch off the
appliance manually. To do this, turn
the temperature control knob to 0.
Tip: Check if the ingredients are ready.
If the ingredients are not ready yet,
simply slide the pan back into the
appliance and set the timer to a few
extra minutes. After hot air frying, the
pan and the ingredients are hot.
Depending on the type of ingredients in
the air fryer, steam may escape from
the pan.
• When a batch of ingredients is ready,
the air fryer is instantly ready for
preparing another batch.
Tips
• Smaller ingredients usually require a
slightly shorter preparation time
than larger ingredients.
• A larger amount of ingredients only
requires a slightly longer preparation
time, a smaller amount of
ingredients only requires a slightly
shorter preparation time.
• Shaking smaller ingredients halfway
through the preparation time can
help prevent unevenly fried
ingredients.
• Add some oil to fresh potatoes for a
crispy result. Fry your ingredients in
the air fryer within a few minutes of
adding the oil.
• Do not prepare extremely greasy
ingredients such as sausages in the
air fryer.
• You can also use the air fryer to
reheat ingredients.
Air Inlet
Time
Control Knob
Air Outlet
Power Outlet
Frying Pan
Baking Tray
Frying Pan Handle
All manuals and user guides at all-guides.com

Cleaning
Clean the appliance after every use.
The baking tray and pan inside of the
appliance have a non-stick coating. Do
not use metal kitchen utensils or
abrasive cleaning materials to clean
them, as this may damage the non-
stick coating.
1. Remove the power cord from the
wall socket and let the appliance
cool down.
Note: Remove the pan to let the air fryer
cool down more quickly.
2. Wipe the outside of the appliance
with a moist cloth.
Note: Do not use the moist cloth to
clean the light area.
3. Clean the pan and the basket with
hot water, use liquid dish soap and a
non-abrasive sponge.
Tip: If dirt is stuck to the basket or the
bottom of the pan, fill the pan with hot
water and some liquid dish soap. Place
the basket in the pan and allow the pan
and the basket t o soak for
approximately 10 minutes.
4. Clean the heating element with a
cleaning brush to remove any food
residue.
Storage
1. Unplug the appliance and let it cool
down.
2. Make sure all parts are clean and
dry.
Environment
Do not dispose of the appliance with
the normal household waste at the end
of its life, but hand it in at an official
collection point for recycling. By doing
this, you help to preserve the
environment.
SAFETY PRECAUTIONS
• This appliance is not intended for
use by persons (including children)
with reduced physical, sensory or
mental capabilities, or lack of
experience and knowledge, unless
they have been given supervision or
instruction concerning use of the
appliances by a person responsible
for their safety.
• Children should be supervised to
ensure that they do not play with the
appliance.
• Always allow adequate air space
above and on all sides for air
circulation. Do not allow the
appliance to touch curtains, wall
SPECIFICATIONS
Colour : Black & Silver
Wattage : 800W
Supply Voltage : 230 V AC ~ 50Hz
Temperature : 170 – 200 degree
Capacity : 2 Litres
Timer : 30 Min / Bell sound
Thermostat : Pre Set
Min-max
Amount (g)
Time (mint)
Shake
Extra information
Potatos & fries
Thin frozen fries
300-700
11-18
shake
Thick frozen fries
300-700
13-22
shake
Home-made fries (8x8 mm)
300-800
18-22
shake
Add 1/2 tbsp of oil
Home-made potato wadges
300-800
20-24
shake
Add 1/2 tbsp of oil
Home-made potato cubes
300-750
14-20
shake
Add 1/2 tbsp of oil
Rosti
250
17-20
shake
Potato gratin
500
17-20
shake
Meat & Poultry
Steak
100-500
10-14
Pork chops
100-500
12-16
Hamburger
100-500
9-16
Sausage roll
100-500
15-17
Drumsticks
100-500
20-24
Chicken breast
100-500
12-17
Snacks
Spring rolls
100-400
10-12
shake
Use oven-ready
Frozen chicken nuggets
100-500
7-11
shake
Use oven-ready
Frozen sh ngers
100-400
7-11
Use oven-ready
Frozen bread crumbed
cheese snacks
100-400
9-11
Use oven-ready
Staffeo vegetables
100-400
10-12
Baking
Cake
300
23-28
Use baking tin
Cluiche
400
23-25
Use baking tin/oven dish
Mufns
300
18-20
Use baking tin
Sweet Snacks
400
20-22
Use baking tin/oven dish
coverings, clothing, dishtowels or
other flammable materials during
use. Do not use under cupboards or
curtains.
• Always turn the power off, remove
the plug and allow the airfryer to cool
before cleaning.
• Wipe the outside of the airfryer with
a barely damp cloth. Do not use steel
wool pads or other abrasive
cleaners. Do not immerse the unit,
cord set or plug in water or liquid of
any kind.
COOKING TABLE
Note: Add 3 minutes to the preparation time when you start frying while the airfryer is still cold.
All manuals and user guides at all-guides.com
Other Glen Fryer manuals