Globalstar 9600 User manual

Globalstar 9600
User Guide for Mac

Globalstar 9600 User Guide for Mac
This guide is based on the production version of the Globalstar Sat-Fi and Sat-Fi Apps.
Software changes may have occurred after this printing.
Globalstar reserves the right to make changes in technical and product specifications
without prior notice
Globalstar Inc.
300 Holiday Square Blvd.
Covington, LA 70433
Copyright©2015 Globalstar®Incorporated.
All rights reserved.
Globalstar®is a registered trademark of Globalstar Incorporated.
Globalstar 9600TM is a registered trademark of Globalstar Incorporated.
Mac®is a registered trademark of Apple Incorporated.
All other trademarks and registered trademarks are properties of their respective
owners.
Printed in the United States of America

Globalstar 9600 User Guide for Mac
Table of Contents
1. WELCOME.............................................................................................................................................1
2. INSTALLING THE SAT-FI APP.............................................................................................................1
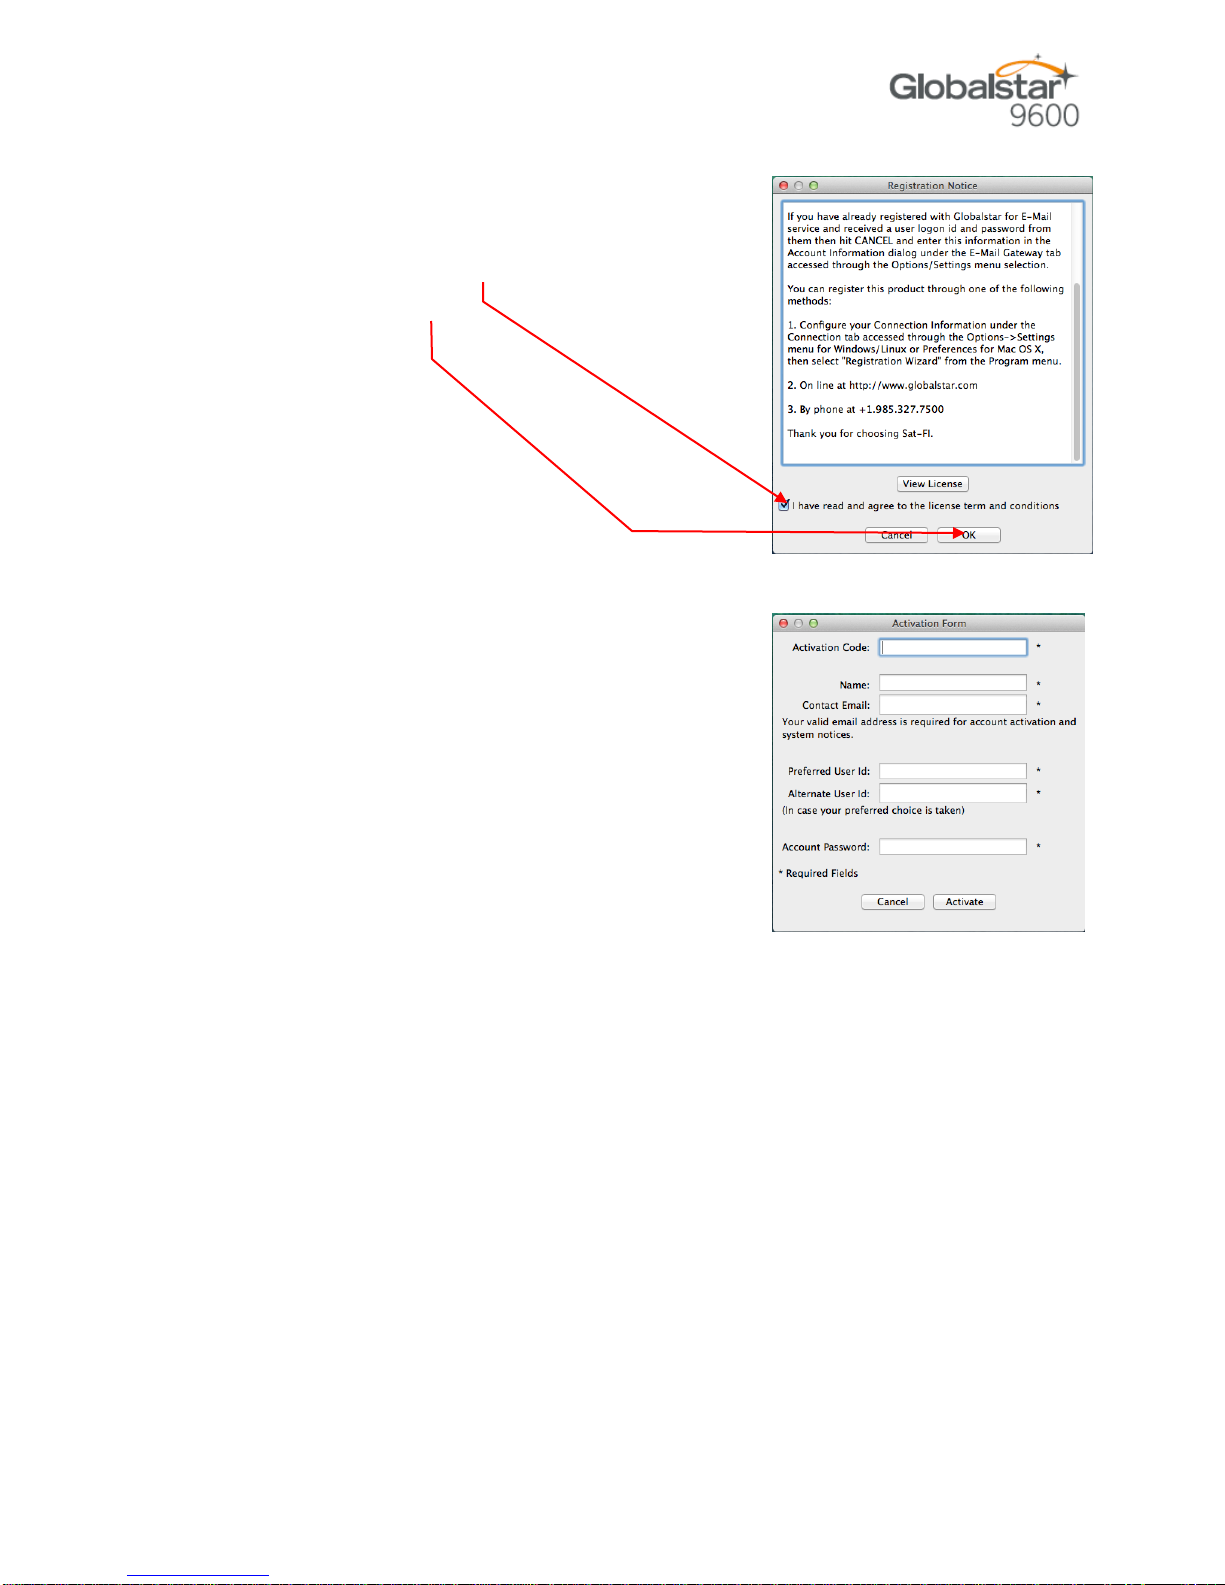
3. ACTIVATING THE SAT-FI APPS...........................................................................................................6
SAT-FI DATA ACCESS VOUCHERS .............................................................................................................6
NEW SAT-FI ACCOUNT..............................................................................................................................6
EXISTING SAT-FI ACCOUNT.......................................................................................................................8
4. CONNECTING TO THE SAT-FI HOTSPOT........................................................................................10
5. CONFIGURING THE SAT-FI NETWORK CONNECTION SETTINGS...............................................11
6. COMPOSING & SENDING EMAIL......................................................................................................13
7. RECEIVING EMAIL..............................................................................................................................17
8. INCREASING/DECREASING EMAIL LIMIT SIZE...............................................................................18
9. SOCIAL MEDIA....................................................................................................................................20
FACEBOOK .............................................................................................................................................20
Setting Up Your Facebook Post-By-Email Address.......................................................................20
Configuring Sat-Fi for Facebook ....................................................................................................24
Sending a Facebook Post..............................................................................................................25
10. WEB BROWSING WITH COMPRESSION..........................................................................................27
CONFIGURING SAT-FI FOR WEB BROWSING............................................................................................27
WEB BROWSING.....................................................................................................................................29

Sat-Fi User Guide for Mac Page 1
1. WELCOME
Today’s wireless devices provide more options for staying in touch with friends and family than ever
before. Unfortunately, they are dependent on wireless networks. Now you can take your computer
beyond wireless the world’s smallest satellite hotspot.
Easily send and receive email via Wi-Fi enabled computer
Conveniently use existing device contacts via the Sat-Fi App
Fastest data speeds in the industry for sending and receiving
email
Designed for both vehicle/vessel-based and fixed locations
Connect up to 8 users to Sat-Fi at one time
Powered by the world’s newest, most modern satellite network
Globalstar 9600 turns your computer into a satellite enabled device.
1. Download and install Sat-Fi for Windows to your computer
2. Connect your computer to the Sat-Fi via a Wi-Fi connection.
3. Sat-Fi links your computer to the Globalstar Satellite Network.
4. Your computer is now a connected for email and data.

Sat-Fi User Guide for Mac Page 2
2. HARDWARE INSTALLATION &SETUP
GSP-1700 Hardware Installation/Connection
Perform the following to connect your Globalstar 9600 system:
Step 1 Connect the supplied GDK-1700 Data Cable to the Globalstar GSP1700 to the Globalstar
9600 USB port using the supplied GDK-1700 Data Cable.
Step 2 Connect the GDK-1700 Data Cable to the Globalstar 9600 USB port.
Setup
Perform the following to setup your Globalstar 9600 system:
Step 1 Use your Globalstar GSP-1700 outdoors with a clear view of the sky and horizon (No
obstructions, i.e. buildings, large trees).
Step 2 Place the Globalstar GSP-1700 on its side and fully extend the antenna, pointing towards
the sky.
Step 3 Turn on your Globalstar GSP-1700 by pressing and holding .
Step 4 Wait about 30 seconds and check your screen for service bars and a
Red House . When you see these two icons on the screen your Globalstar GSP-
1700 is registered with the Globalstar Satellite network.
Step 5 On the Globalstar 9600, turn the Power Switch to On.
Step 6 Your Globalstar 9600 is now ready to send/receive email and data.

Sat-Fi User Guide for Mac Page 3
Globalstar 9600 LED Indicators
The LED on the top of the Globalstar 9600 provides a visual indicator of the Globalstar 9600 status:
Booting
oFlashing Green LED
oSolid Blue LED
ON
oSolid Green LED
oSolid Blue LED
Transmitting
oQuick Flashing Blue LED –Wi-Fi
Charging
oSolid Red LED
oSolid Blue LED
Low Battery
oFlashing Blue LED
Firmware Update
oFlashing Green LED
oSolid Blue LED
OFF
oNo LED

Sat-Fi User Guide for Mac Page 4
Charging the Globalstar 9600
The Globalstar 9600 has an internal rechargeable battery with the following characteristics:
4- hours use
36-hours standby
Use the supplied AC Power Adapter to charge the Globalstar 9600.
Additional Features
Reset
To reset the Globalstar 9600 to factory default perform the following:
Step 1 With the Globalstar 9600 powered on, use a pin to
press and hold the Reset button (about 8 seconds)
unitl the LEDs turn off.
Step 2 Release the button and wait for the Globalstar 9600
to reboot. The Globalstar 9600 will reset to its
factory default settings:
LAN/WAN Port
The LAN/WAN port is used to connect the Globalstar 9600 to a local
PC via Cat-5 (network) cable.

Sat-Fi User Guide for Mac Page 5
3. INSTALLING THE SAT-FI APP
You will be able to send and receive email and data via the Sat-Fi App. The Sat-Fi App can be found on
the Globalstar Sat-Fi Support Page.
Perform the following to download and install the Sat-Fi App for Mac:
Step 1 On a Mac computer connected to the Internet, proceed to the Globalstar Sat-Fi support
Page and download the Sat-Fi App for Mac.
Step 2 Install the Sat-Fi App for Mac on your Mac computer.

Sat-Fi User Guide for Mac Page 6
4. ACTIVATING THE SAT-FI APPS
Sat-Fi Data Access Vouchers
You must have a Data Access Voucher to send and receive email & data via the Sat-Fi App.
Your Sat-Fi Data Access Voucher was issued to you at the time of purchase from the dealer
New Sat-Fi Account
You must have a connection to the Internet to activate your Sat-Fi App for Mac. Perform the following to
activate the Sat-Fi App for Mac:
Step 1 Open the Sat-Fi App for Mac and an Activation
Wizard screen will be displayed. Select New
Account Using Activation Code and click on
Next>.
Step 2 A How do you want to connect to the Internet
screen will be displayed asking you “How do
you want to connect to the Internet?” Perform
the following:
Click on the Connection Method drop-down
arrow and select Network Connection
Click on Next>

Sat-Fi User Guide for Mac Page 7
Step 3 A Registration Notice screen will be displayed.
Perform the following:
Click on the I have read and agree to the
license term and conditions checkbox
Click on OK
Step 4 An Activation Form screen will be displayed.
Perform the following:
In the Activation Code field, enter your Sat-Fi
Data Access Voucher Number
In the Name field, enter your first and last name
In the Contact Email field, enter your contact
email address
In the Preferred User Id field, enter the
username you would like to login with
(username must be between 3 and 16
characters)
In the Alternate User Id field, enter another
username just in case your preferred choice has been taken (username must be
between 3 and 16 characters)
In the Account Password field, enter the password you would like to login with
(password must be between 6 and 16 characters)
Click on Activate
Step 5 A Your activation has succeeded message will be displayed with the following information:
Your email address (example: jsm[email protected])
Your username (example: jsmith)
Your password (example: Gl0bal*)
Additionally, you will receive an email (delivered to your contact email address) with this
product registration information.
Step 6 Click on OK.

Sat-Fi User Guide for Mac Page 8
Step 7 A Registration Complete screen will be displayed.
Click on Finish.
Note: It may take up to 20 minutes to activate in the
system.
Existing Sat-Fi Account
You must have a connection to the Internet to complete the
registration of your Sat-Fi App for Mac If you have an existing Sat-
Fi account on a smartphone or other wireless device, you can
login using your account information. Perform the following:
Step 1 After your computer has rebooted, the Activation
Wizard will be displayed. Select Enter User ID
and Password and click on Next>.
Step 2 A screen will be displayed asking you “How do you
want to connect to the Internet?” Perform the
following:
Click on the Connection Method drop-down
arrow and select Network Connection
Click on Next>

Sat-Fi User Guide for Mac Page 9
Step 3 An Account Information
screen will be displayed.
Perform the following:
In the Real Full Name
field, enter your first and
last name
In Assigned User Name
field, enter the user name
you selected when
activating the Sat-Fi App
In the Password field,
enter the password you
selected when activating
the Sat-Fi App
Click the OK button.
Step 4 A Registration Complete screen will be displayed.
Click on Finish.

Sat-Fi User Guide for Mac Page 10
5. CONNECTING TO THE GLOBALSTAR 9600 HOTSPOT
Perform the following to connect your computer to the Globalstar 9600 hotspot:
Step 1 Turn on the Sat-Fi unit.
Step 2 On your computer, open the Wi-Fi connections view and see the Wi-Fi connections that
are available.
Step 3 Select wXa<XXXXXX> (<XXXXX> is a unique identifier for that specific Globalstar 9600.
Step 4 Open the Wi-Fi connections view and verify that the Sat-Fi hotspot is selected.

Sat-Fi User Guide for Mac Page 11
6. CONFIGURING THE GLOBALSTAR 9600 CONNECTION SETTINGS
Sat-Fi for Mac defaults to a Sat-Fi connection, you will need to change your connection settings to
Globalstar 9600.
Perform the following to change your Globalstar 9600network connection settings:
Step 1 On your computer open Sat-Fi
for Mac, and the Sat-Fi screen
will be displayed.
Step 2 On the Main menu, select
Sat-Fi > Settings…
Step 3 The Settings screen will be
displayed. In the left pane,
click on Connection.
Step 4 In the Connection
Information section, click on
the Type drop-down arrow
and select one of the
following:
Globalstar 9600 –GSP-
1700
Globalstar 9600 –GSP-
1600
Globalstar 9600 –GSP-
2900
Step 5 When finished, click OK.

Sat-Fi User Guide for Mac Page 12
Step 6 On the Settings screen, in the
left-pane, click on Gateway.
Step 7 In the Gateway Parameters
section, click on the Gateway
drop-down arrow and select:
primary.globalstarmail.com.
Step 8 Click on OK.

Sat-Fi User Guide for Mac Page 13
7. COMPOSING &SENDING EMAIL
To maximize the benefits of Globalstar 9600, you will create email and read email offline. You can create
and send one email at a time or create multiple emails and send them all at once. Your Sat-Fi for Mac
must be registered and activated to send/receive email.
Perform the following steps to compose and send email:
Step 1 On your computer, ensure you
are connected to the Globalstar
9600.
Step 2 Open Sat-Fi for Mac and the
Sat-Fi Main Screen will be
displayed. On the toolbar
select .
Step 3 The first time you select Email a Language screen will be
displayed. Select the appropriate language and click OK.

Sat-Fi User Guide for Mac Page 14
Step 4 The iScribe window will be displayed.
Click on New Email to create and
compose email.
Step 5 A Mail Message screen will be
displayed. Perform the following:
In the To field, enter a recipient
Email address
In the Subject field, enter the
subject of the message
In the Message field, enter your
message
Click on Attach File to add
attachments (attached files can
be viewed by clicking on the
Attachments tab)
Step 6 When finished click on Send.Your message will not be sent, but placed in the Spool
folder.
Step 7 Exit out of the iScribe window.

Sat-Fi User Guide for Mac Page 15
Step 8 The Sat-Fi screen will appear.
Click on .
Step 9 The View Mail Box screen with the
email(s) you created in Step 5 will
be displayed.
Step 10 Click on Done.
Step 11 The Sat-Fi screen will appear.
To send your email(s),
click on .

Sat-Fi User Guide for Mac Page 16
Step 12 The LED Status Indicator will start blinking (Slow Blink)
indicating that your data session is being initiated.
Within a few seconds your email will be sent and any
email waiting to be received will be delivered.
Step 13 The Mail Transfer Status bar will
also turn green showing the
transfer progress and the
connection information will be
displayed in the Log section.

Sat-Fi User Guide for Mac Page 17
8. RECEIVING EMAIL
Perform the following steps to connect to the Sat-Fi mail server and receive email:
Step 1 On your computer, ensure you
are connected to the Sat-Fi
hotspot. Default Password:
satfi1234.
Step 2 The Sat-Fi screen will appear.
To check to see if you have any
email to be received, click on
.
Step 3 The LED Status Indicator will start blinking blue indicating
that your data session is being initiated. Within a few
seconds any email waiting to be received will be delivered.
.
Step 4 The Mail Transfer Status bar will
also turn green showing the
transfer progress and the
connection information will be
displayed in the Log section.
Other manuals for 9600
7
Table of contents
Other Globalstar Modem manuals