Globalstar ST100 User manual

QUICK START GUIDE
ST100
8545-0197-01 R1

THANK YOU for purchasing the Globalstar ST100 Board™. The Quick Start Guide stages
the device for activation by setting a lifetime and profile. VARs have full access to all available
features after completing their log-in and registration with Globalstar IoT MyAccount credentials.
ST100 REQUIRES PRODUCT ACTIVATION
To begin using your Globalstar ST100 device, please ensure you have an active
Globalstar IoT MyAccount & subscription. If you do not have an active sub-scription
or encounter issues with your device, visit Globalstar.com/Support for assistance.
Ensure your mobile device or tablet has LTE or Wi-Fi connectivity, is Bluetooth®
enabled and can access iot.globalstar.com
POWER UP
1. Connect a Power Source to the appropriate Battery terminals with either:
2. Connect a Charging Source to the Solar terminals (0.75 to 5 VDC, 100 mA)
• Line power (4.2 VDC), or
• Lithium Polymer Battery (3.8 VDC)
• 5-cell solar panel (not included)
NOTE: Solar charging source is not required if using line power.

REGISTER YOUR GLOBALSTAR IoT MYACCOUNT
1. Open your VAR registration and introduction email received from:
message-noreply@globalstar.com.
2. To register, log-in to your Globalstar IoT MyAccount web page, iot.globalstar.com, using
the provided username and temporary password.
3. Create and secure a new password.
4. Verify your VAR Name (displayed on the Device Management page) after
completing your account log-in.
5. Continue the on-screen instructions to + add device and activate your device.
BATTERY (-) TERMINAL
BATTERY (+) TERMINAL
SOLAR (-) TERMINAL
SOLAR (+) TERMINAL
GPS/SATELLITE U.FL CONNECTOR
14 PIN CONNECTOR

BACK OFFICE PROVISIONING
1. Click + add device to begin the activation flow. From the Device Management Add
screen (see below) complete all fields with orange markers.
a. Locate your device’s 12-digit UID code Afrom the packaging slip or
printed on the ST100 PCB label i.e. 000001000025 (000-001-000-025).
b. In the active drop down list, change the field selection from ESN to UID.
c. Enter the UID A
d. Configuration ID from the Drop down list DEFAULT
e. Your Rate Plan
C
f. Valid to date D(deactivation date)
g. Routing Address E
h. Click the Save button
A
E
CD
A

ST100 CONFIGURATION TOOL
1. Download and install the ST100 Configuration Tool app to your smartphone, tablet, or
other mobile device from either our VAR Support Site or Apple or Google Play store by
searching for ST100 Configuration Tool.
2. Open the ST100 Configuration Tool app from your
device and log-in using your registered Globalstar IoT
MyAccount username and current password.
3. With your wireless device displaying a Scan screen,
connect to the ST100 device requiring activation.
Each “powered on” ST100 device registered to your
Globalstar IoT MyAccount displays an abbreviated
7-digit UID i.e. gst-1039965 A
4. Detailed information on pre-operational states are available in the “ST100 User Manual”,
Section 2.2.
5. If prompted, the device may trigger an option to update to the latest firmware. Globalstar
recommends updating to the latest firmware before proceeding.
6. Once the firmware has successfully updated, open the ST100 Configuration Tool and tap
Configuration Profiles as shown in the next step.
NOTE: The ST100 Configuration Tool connects to a ST100
device via Bluetooth®and uses Wi-Fi or LTE to login to
your Globalstar IoT MyAccount. The full app details are
located in the “ST100 Mobile App User Guide”. All ST100
documents can be downloaded from the Var Support Site,
at var.globalstar.com.

CONFIGURATION PROFILES
ACTIVATION MODE
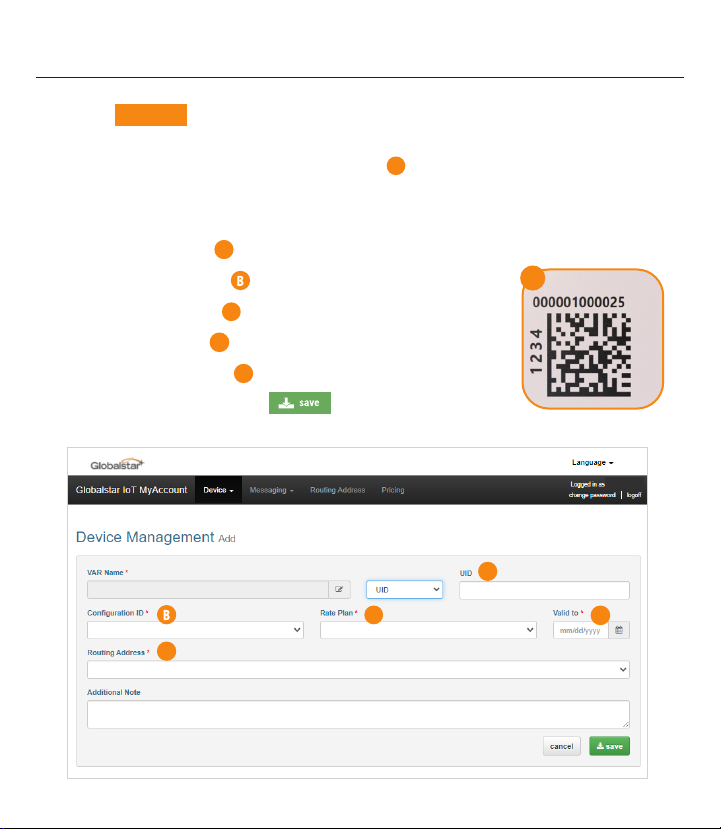
A Configuration Profile must be provided from the VAR
prior to Activation. During this stage, the VAR transitions the
device from original factory settings to Activation Mode by
setting a lifetime and profile for the unit.
FULL INSTRUCTIONS for creating and updating Configuration Profiles are located in the
“ST100 App User Guide”, section “Configuration Guide”.
NOTE: Up to this point, all steps are considered to be pre-operational and the device has not begun a billing
cycle. Completing the Activation Mode will begin the customer billing cycle.
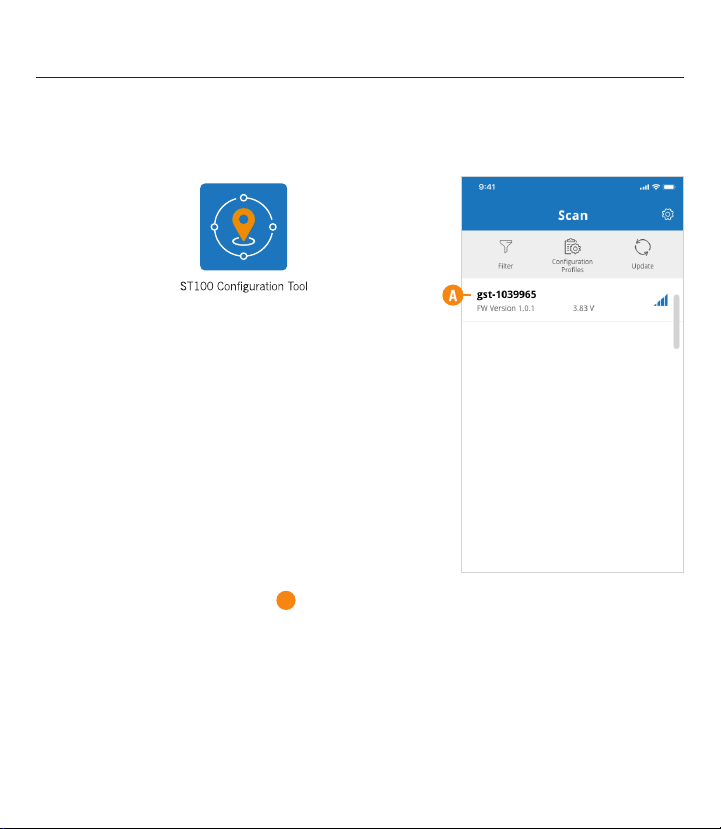
1. The unit enters Activation mode when:
2. To verify activation, open the ST100 Configuration Tool
and navigate to the Scan screen, tap your UID and
connect to the device that you would like to review.
3. Open the settings icon from the Scan screen to
access the ST100 Mobile App User Guide for more
information on customizing the device.
a. It detects exposure to apparent sunlight and
the battery is charging; Defined as a positive
current with continuous flow to the battery for 5
consecutive minutes and acquires a GPS Fix.
a. Verify the Expiration date has been set.
b. If the device has not been set, the Expiration date
will display “Timer Not Started”.
c. Repeat conditions from Step 1 (above) until an
Expiration date is obtained.

TROUBLESHOOTING
IMPORTANT INFORMATION
PROVISIONING ISSUE
1. If the ESN is not found after performing a search, check for a failed request.
DEVICE NOT ACTIVATING
2. To manually activate the ST100, please reference publication 8545-0194-01, “ST100
User Manual,” Section 2 and perform the “Activation mode - line powered, alternative
forced activation”.
The Quick Start Guide is subject to change without notice. Some information in this guide may
be outdated due to firmware updates and product improvements.
Please use our Help FAQs, contact the Support Team, or use the VAR Support Site,
var.globalstar.com, if you are unable to activate the device.
a. Click Device from the Tab Menu at the top of the Globalstar IoT MyAccount page.
b. Select Manage Failed Requests and the search button. If a failed request is
found for the ESN, resend the request.
NOTE: Manual or forced activation will not start transmitting from the device when the battery is low.
The device will maintain its default power & temperature mode behaviors and requirements. Line
powered units must be force activated.

Please visit Globalstar.com/support for the latest version of the Quick Start Guide.
© 2021 Globalstar. All rights reserved.
All trademarks, service marks, trade names, trade dress, product names and logos appearing in
this Quick Start Guide are the property of their respective owners.
Other manuals for ST100
2
Table of contents
Popular Transmitter manuals by other brands

Fuji Electric
Fuji Electric FCX-CII SERIES instruction manual

Star Meter
Star Meter CWDZ22 installation instructions

HONBO AUDIO
HONBO AUDIO EM-100 owner's manual

Aeta Audio Systems
Aeta Audio Systems SCOOP 3 5ASystem user manual

Lectrosonics
Lectrosonics UT200 Operating instructions and troubleshooting guide

Rollei
Rollei Pro Radio Transmitter 2.4 G manual