Globo 7101 User manual

User manual
High definition digital satellite receiver
Model ID: 7101
English 3/2009 jp

User manual
2
Contents
1. Safety precautions ..........................................................................................................................4
2. Environment protection..................................................................................................................6
3. Features ..........................................................................................................................................7
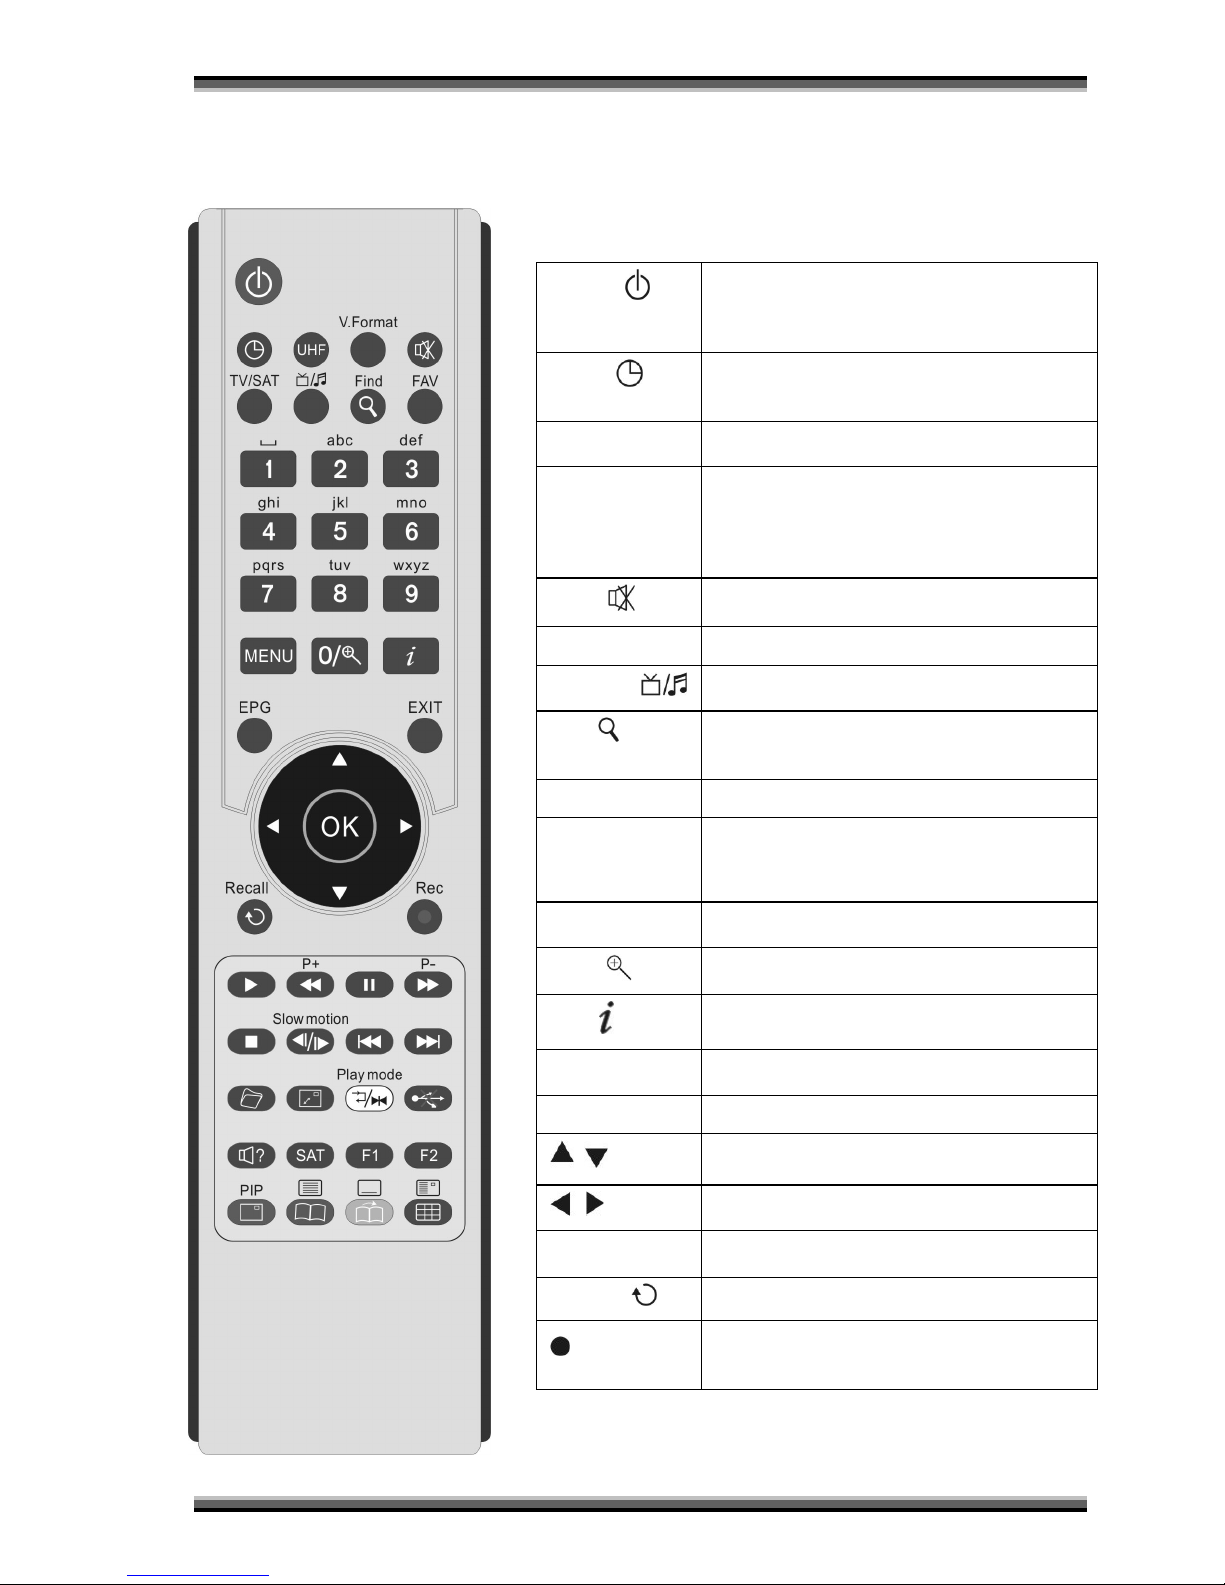
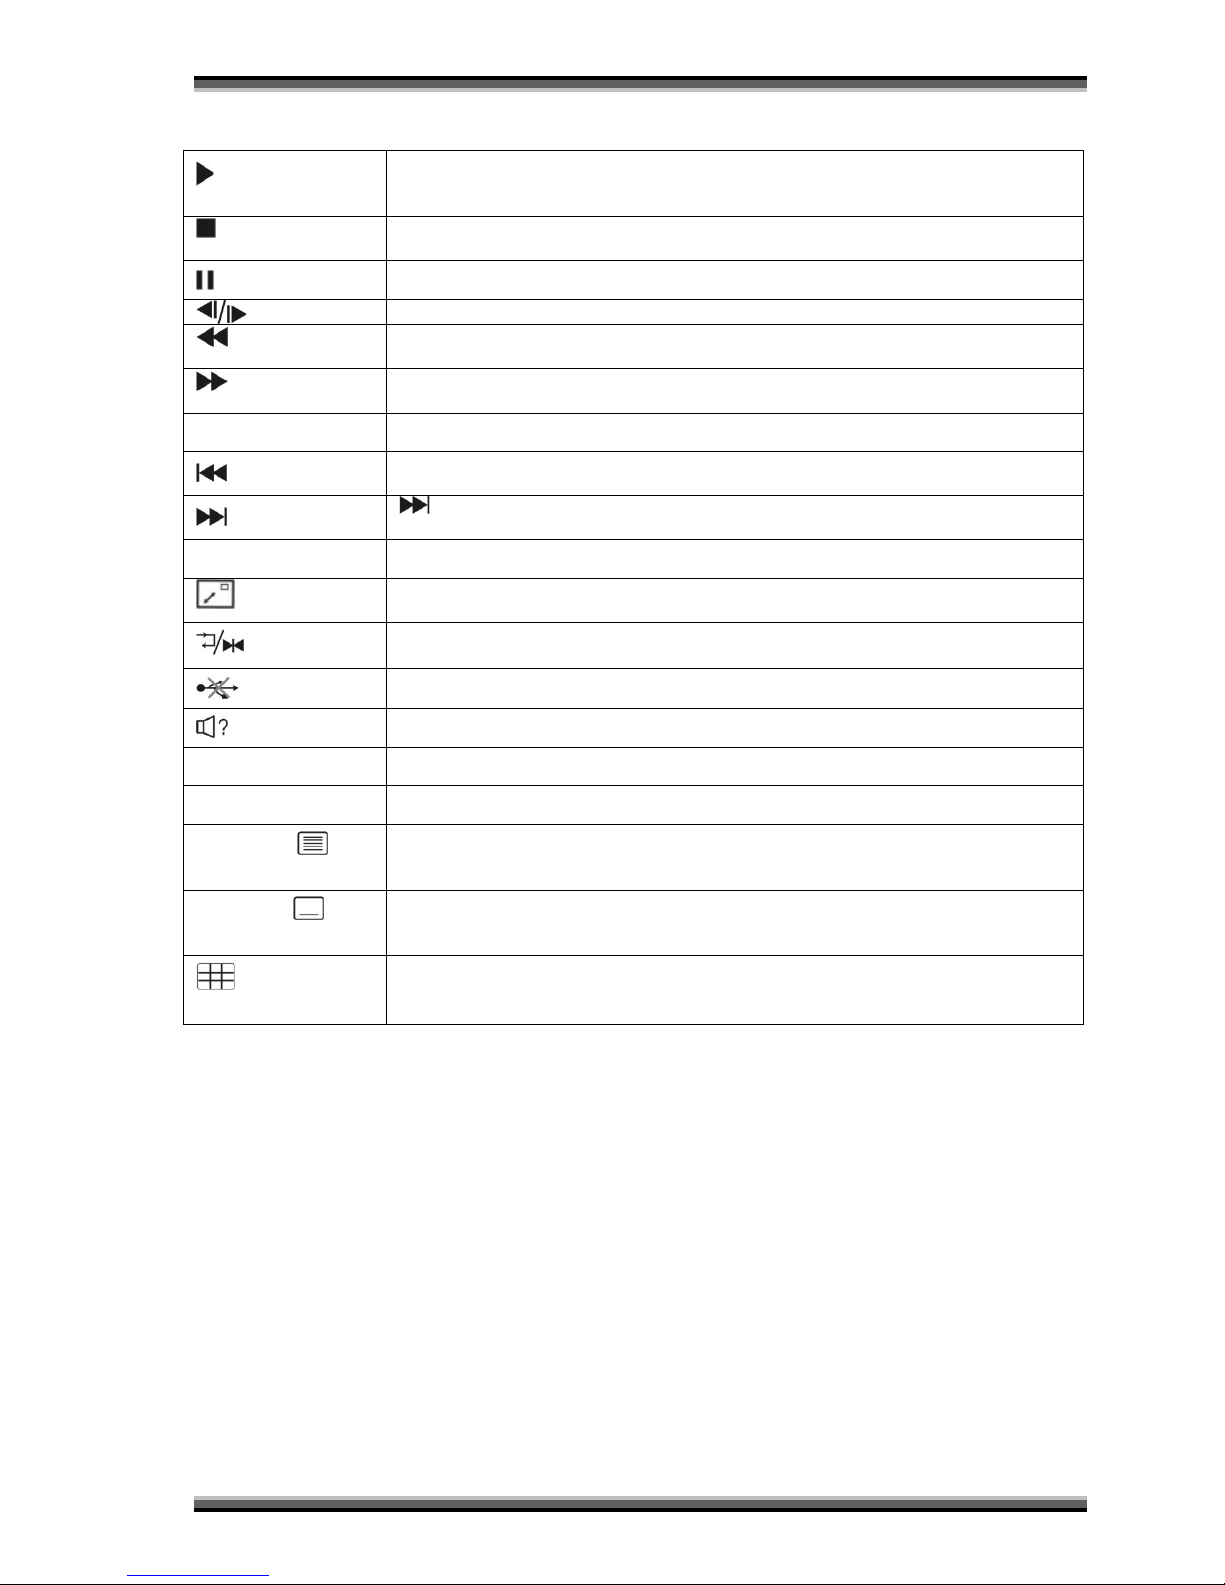
4. Remote Control...............................................................................................................................8
5. Front panel....................................................................................................................................10
6. Rear panel .....................................................................................................................................11
7. Connecting ....................................................................................................................................12
8. Getting started ..............................................................................................................................14
8.1. Easy install................................................................................................................................................ 14
8.2. Box Setting ............................................................................................................................................... 14
8.3. Install Setting............................................................................................................................................ 14
9. Menu operations ..........................................................................................................................14
9.1. Service...................................................................................................................................................... 14
9.1.1. Organizing services. .......................................................................................................................................... 14
9.1.2. Organizing favourites ........................................................................................................................................ 15
9.2. Installation................................................................................................................................................ 15
9.2.1. Manual installation ........................................................................................................................................... 15
9.2.2. Auto Installation ............................................................................................................................................... 17
9.2.3. Guidance of installing a dish.............................................................................................................................. 18
9.2.4. Factory Default ................................................................................................................................................. 18
9.3. PVR (optional, only for PVR ready receivers) ............................................................................................ 18
9.3.1. File List ............................................................................................................................................................. 18
9.3.2. MP3 Player ....................................................................................................................................................... 19
9.3.3. HDD Format...................................................................................................................................................... 19
9.3.4. Record List........................................................................................................................................................ 20
9.3.5. Time Shift setting.............................................................................................................................................. 20
9.4. Preference ................................................................................................................................................ 20
9.4.1. Language .......................................................................................................................................................... 20
9.4.2. Parental Control ............................................................................................................................................... 21
9.4.3. Time setting...................................................................................................................................................... 21
9.4.4. A/V Control ...................................................................................................................................................... 22
9.4.5. UHF Setting ...................................................................................................................................................... 22
9.4.6. Miscellaneous Setting ....................................................................................................................................... 22
9.5. System...................................................................................................................................................... 22
9.5.1. System Information .......................................................................................................................................... 22
9.5.2. Upgrade RS232 ................................................................................................................................................. 23
9.5.3. Upgrade from HDD ........................................................................................................................................... 23
9.5.4. Backup to HDD ................................................................................................................................................. 23
9.5.5. Contact............................................................................................................................................................. 24
9.6. Conditional Access (optional) ................................................................................................................... 24
9.6.1. Smart card ........................................................................................................................................................ 24
9.6.2. Common interface (optional) ............................................................................................................................ 24
9.7. Internet (optional) .................................................................................................................................... 24
9.7.1. Net config......................................................................................................................................................... 25
9.7.2. Lan Settings ...................................................................................................................................................... 25
9.7.3. Net Manual Upgrade......................................................................................................................................... 25
9.8. Game........................................................................................................................................................ 25
9.8.1. Sokoban ........................................................................................................................................................... 25
9.8.2. Tetris ................................................................................................................................................................ 26
9.8.3. Landmine ......................................................................................................................................................... 26
9.8.4. Speed ............................................................................................................................................................... 26
10. Function guide ..............................................................................................................................27
10.1. Ok list ................................................................................................................................................. 27
10.2. EPG..................................................................................................................................................... 27
10.3. Information Box.................................................................................................................................. 28
10.4. Changing Services............................................................................................................................... 29
10.5. Volume Control .................................................................................................................................. 29
10.6. Sound track & Multifeed Audio .......................................................................................................... 29
10.7. Teletext & Subtitle.............................................................................................................................. 29
10.8. Pause & Resume................................................................................................................................. 29

User manual
3
10.9. Zoom .................................................................................................................................................. 29
10.10. Time Shift (optional, only for PVR ready receivers) ............................................................................ 29
10.11. Recording, Edit the reserved delayed Recording (optional, only for PVR Ready receivers)................. 30
10.12. Immediate Recording by RECORD button (optional, only for PVR Ready receivers)...................... 30
10.13. Recording by EPG (optional, only for PVR Ready receivers) ................................................................ 31
10.14. Playback a Recorded Service (optional, only for PVR Ready receivers)............................................... 31
10.15. Slow Motion Playback ........................................................................................................................ 32
10.16. Fast Motion Playback ......................................................................................................................... 32
10.17. MP3 Player ......................................................................................................................................... 32
10.18. JPEG Player......................................................................................................................................... 33
10.19. Picture In Picture (PIP)........................................................................................................................ 33
10.20. Multi-Picture Display .......................................................................................................................... 33
11. Software Upgrade .........................................................................................................................34
12. Trouble Shooting...........................................................................................................................35
13. Specifications ................................................................................................................................36
14. Declaration of conformity.............................................................................................................38

User manual
4
1. Safety precautions
CAUTION:
The lightning flash with
arrowhead symbol,
within an equilateral
triangle, is intended to
alert the user to
"dangerous voltage"
and to prevent from a
risk of electric shock.
Warning:
To reduce the risk of electric
shock, don't open the cabinet.
Refer servicing to qualified
personnel only.
The exclamation point within
an equilateral triangle is
intended to alert the user to
important operating and
maintenance (servicing).
WARNING: Do not use this STB where contact with or immersion in water is a possibility. Do
not use near flower vase, washbowls, kitchen sinks, laundry tubs, swimming pools, etc.
WARNING: Do not put the candle or lamp stand on the cabinet; otherwise, there is the danger
of fire.
WARNING: The unit should be connected to a power supply only of the type described in the
operating instructions or as marked on the unit. If you are not sure of the type of power supply
(for example, 120 or 230 V) to your home, consult your local dealer or local power company.
WARNING:
This product install diodes. Do not open the cabinet or touch any parts in the
inner mechanism. Consult your local dealer for technical service if the opening is required.
Note: To ensure proper use of this product, please read this User manual carefully and
retain for further reference.
Note: This product install diodes. Do not open the cabinet to avoid the unit direct exposure to
radiation.
Unit Cleaning: After the unit power is turned off, you can clea
n the cabinet, panel and remote
control with a soft cloth lightly moistened with a mild detergent solution.

User manual
5
Attachments: Never add any attachments
and/or equipment without the manufacturer
consent; as such additions may result in the risk of fire, electric shock, or other personal injury.
Locating: Slots and openings in the cabinet are provided for ventilation to protect it from
overheating. Do not block these openings or allow them to be blocked by placing the STB on
a bed, sofa, or other similar surface, nor should it be placed over a radiator or heat register.
Power-Cord Protection: Place the power-
supply cord out of the way, where it will not be
walked on. Please take special attentions to cords at plugs, convenience
receptacles, and the
point where they exit from the unit.
Object and Liquid Entry: Never put objects of any kind into this STB through openings, as
they may touch dangerous voltage points or short-out parts that could result in a fire or electric
shock. Never spill any liquid on the STB.
Note: Moisture may be formed on the lens In the following conditions:
•when the unit is suddenly moved from a cold environment or an air-
condition room
to a warm place.
•immediately after a heater has been turned on.
•in a steamy or very humid room.
If the moisture forms inside the unit, it may not operate properly. To correct this problem, turn
on the power and wait about two hours for the moisture to evaporate.
Parts Replacement: When the unit parts need to be replaced, user should make sure the
service technician use the replacement parts specified by the manufacturer or having the
same characteristics as the original part. Unauthorized replacement may put the unit In the
risk of fire, electric shock or other hazards.
Safety Check: After all the maintenances and repairs are done, user is required to request
the service technician to conduct the overall safety check to ensure the machine is In the
proper condition.

User manual
6
2. Environment protection
Attention!
Your product Is marked with this symbol. It means that used electrical and electronic products
should not be mixed with general household waste. There is a separate collection system for
these products.
Information on Disposal for Users (private households) in the European Union
Used electrical and electronic equipment must be treated separately and In accordance with
legislation that requires proper treatment, recovery and recycling of used electrical and
electronic equipment.
Following the implementation by member states, private households within the EU states may
return their used electrical and electronic equipment to designated collection facilities free of
charge*. In some countries* your local retailer may also take back your old product free of
charge if you purchase a similar new one. *) Please contact your local authority for further
details.
If your used electrical or electronic equipment has batteries or accumulators, please dispose
of these separately beforehand according to local requirements.
By disposing of this product correctly you will help ensure that the waste undergoes the
necessary treatment, recovery and recycling and thus prevent potential negative effects on
the environment and human health which could otherwise arise due to inappropriate waste
handling.
Information on Disposal for Business Users
In the European Union
If the product is used for business purposes and you want to discard It:
Please contact your dealer who will inform you about the take-back of the product. You might
be charged for the costs arising from take-back and recycling Small products (and small
amounts) might be taken back by your local collection facilities,
In other Countries outside the EU
If you wish to discard of this product, please contact your local authorities and ask for the
correct method of disposal.

User manual
7
3. Features
MPEG-Fully DVB-S / DVB-S2 (H.264) HD compliant
8000 channels (TV and Radio) programmable
Multilingual menu text support
Channel switching time less than 1 second
Channel list editing
Favorite channel list editing
True-color On-Screen Display (OSD)
Full Picture In Graphic (PIG) function
Electronic Program Guide (EPG) for on screen channel information
Subtitle supported
Teletext supported by VBI insertion and software emulation
Parental lock facility by channel and program event
Program and Channel information transfer from receiver to receiver
Exciting games embedded
S/PDIF for digital audio or Dolby AC-3 bitstream output
DiSEqC 1.0, 1.1, 1.2 and USALS
HDMI HD Video/Audio Output
Dual Decoding (PIP)
Software update via LAN port
USB 2.0 Host
VFD Display for service information
RTC (Real-Time-Clock)
LAN 10/100 Mbps Ethernet (optional)
Time Shift (optional, only for PVR Ready receivers)
Video Recording (optional, only for PVR Ready receivers)
Recording 2 channels the same time, watching 3rd channel (within 1 transponder)
(optional, only for PVR Ready receivers)
Recording one channel and TimeShifting another channel (optional, only for PVR Ready
receivers)
Recording one channel and PIP another channel within the same transponder (optional,
only for PVR Ready receivers)

User manual
8
4. Remote Control
You can power on/off the receiver, operate on screen menu,
and use a variety of hot key function.
POWER
Switch the PVR between Operation and
Standby mode.
Włączanie lub przełączanie w stan
czuwania Standby.
SLEEP
Display the sleep time. At the sleep time,
the power is automatically turn OFF and the
PVR goes to the STANDBY mode.
UHF
Display and alter the UHF setting in menu.
V.Format Switch the TV Standard on the Screen. If
you have problem with setting video format,
switch this button between until setting the
best video resolution
MUTE
Enable / Disable the Audio.
TV/SAT
Switch TV or AV mode on the screen.
TV/ Radio
Select the TV/ Radio mode.
FIND
Find service by name in service list,
organizing services, EPG menu and normal
picture mode.
FAV
Display the favorite service list.
(0~9) Numeric
buttons
Select the TV or Radio services and menu
options.
MENU
Display the Menu on screen or return to
previous menu from submenu.
Zoom Enable the zoom function.
INFO
Display the program information box on the
screen.
EPG
Display the EPG on screen when available.
EXIT
Return to the screen.
,
Service up or down through the available
services.
,
Adjust the volume (Decrease/ Increase).
OK
Display Service List on screen.
Select an item in the menu.
RECALL Select the previously viewed service.
(Optional, only for PVR Ready receivers)
To start the recording.

User manual
9
(Optional, only for PVR Ready receivers) Display the progress bar of time shift or
playback when no progress bar is displayed.Start playback with normal speed.
Return to normal speed from trick mode.
(Optional, only for PVR Ready receivers) Stop time shift, playback or recording.
Stop the MP3 or JPEG player.
Pause the playback and live picture.
(Optional, only for PVR Ready receivers) Start slow motion playback.
(Optional, only for PVR Ready receivers) Fast rewind when the progress bar is
displayed. Start reverse playback. Change the speed of reverse playback.
(Optional, only for PVR Ready receivers) Start fast forward or fast motion
playback. Change the speed of forward playback.
P+/ P- Move up or down pages on the menus or service list.
(Optional, only for PVR Ready receivers) Move the position of Sub-picture at the
PIP by counter clockwise.
Button (Optional, only for PVR Ready receivers) Move the position of Sub-
picture at the PIP by clockwise.
Archiv Display file list.
Exchange main-picture with sub-picture at the PIP. Exchange MP3 Player with
JPEG Player.
(Biały)
Select the play mode in MP3 or JPEG player.
To remove the USB Hard Disk safely.
Select Sound Track and the multilingual if multilingual is available.
SAT
Display the satellite list at normal picture.
PIP (Czerwony)
Is turning on PIP function
TELETEXT
(Zielony)
Enable the teletext.
SUBTITLE
(Żółty)
Activate the subtitle selection Window. Select the subtitle language in the list.
Multi-Picture
(Niebieski)
Display Multi-Picture menu on the screen.

User manual
10
5. Front panel
POWER KEY: To switch the receiver power on/stand by
MENU KEY:To enter into the main menu.
<,> KEY: To adjust volume level, or to move cursor left or right in the menu.
^, v KEY : To change channels, or to move cursor up or down in the menu
OK KEY: To see TV/Radio channel list, or to confirm in the menu.
Remote Sensor: Detects infrared signal from remote control unit
POWER Led: Lights up while the receiver is power on.
Signal Led: When receiving signal is strong, the signal led is lighted.
Card Slot: One or two (optional) slots CA Interface for Conax,
Insert the smart card chip side up!
Common Interface: Two socket for Conditional Access Modules CAM (optional).
Display : (VFD type) Indicates operating status of receiver
VFD Display:

User manual
11
6. Rear panel
Please refer to the diagram above for all possible connections of your receiver. Do not
connect the unit to the mains socket until all other connections have been made and checked.
Your configuration can vary depending on model
POWER ON/OFF SWITCH: To switch ON/OFF the receiver power supply.
LOOP: This enables the connection of another receiver.
LNB IN 13/18V 500mA MAX: This port is to connect the coaxial cable from LNB of your Dish.
TV : This is used to connect your TV through SCART cable.
VCR: Audio and Video input/output socket for the Video cassette recorder or suchlike.
VIDEO : This RCA connector is used to connect any external video.
0/12V 50mA:This is used to Connect 12V to an external 0V/12V switch.
AUDIO R/L : These RCA connectors are used to connect any external audio amp or system.
S/PDIF: Digital Audio interface, connect to AV amplifier S/PDIF input terminal.
HDMI: Audio and Video output socket for TV set with HDMI Input Jack only.
Power for USB: USB port for additional power only, for some of USB hard disk drives.
WARNING! Do not connect standalone USB devices to this port!
USB-Data: USB 2.0 Host, connect to USB hard disk, or flash disk
RS 232C SERIAL PORT: This is used to connect your receiver to a computer through a serial
cable.
Ethernet: (optional) Network port, you can get a new software updates from this port.
YPbPr: Component video output socket for the television set.

User manual
12
7. Connecting
There are four ways to connect the receiver to your existing TV system. We recommend using
one of the following cases for the best result:
1. If you have a high definition television set, you should use a HDMI cable for best result,
Plug one end of the cable into the HDMI socket on the receiver, and the other end into
the matching socket on your television. In this case, you do not have to make audio
connections because the HDMI connector can output stereo audio or Dolby digital audio.
2. Connect one end of SCART cable to the TV (SCART) jack on the back of the receiver
and the other end to a SCART jack on your TV.
3. Connect one end of RCA cable to the RCA jack on the back of the receiver and the other
end to a RCA jack on your TV.
4. You will need to obtain a component video Cable (RCA cable) to use the component
video connector, Plug one end of the Cables into the Y(Green), Pb(Blue) and Pr(Red)
Sockets on the digital receiver, and the other end into the matching sockets on your
television.
Finally connect the coaxial cable from the LNB to the LNB IN jack on the receiver.
Connecting with external audio / Hi-Fi system
To connect any external Audio Hi-Fi system, the receiver has been provided with two RCA
connectors at the back of the receiver marked with Audio L and R. Connect an RCA stereo
cable from the AUDIO L, R jacks on the back of the receiver to the LINE, AUX, SPARE OR
EXTRA input jacks on your Hi-Fi System.

User manual
13
Connecting with Motorized System (DiSEqC 1.2)
Connect one end of your coaxial cable to the LNB IN connector on the receiver and the other
end to the REC or Receiver connector on the DiSEqC 1.2 motor. Connect the coaxial cable
from the LNB to the LNB connector on the DiSEqC 1.2 motor.
All our receivers are designed to be DiSEqC 1.0 and DiSEqC 1.2 compatible. This allows
multiple antennas to be connected to the receiver at the same time.
If you have two or more fixed antennas or LNBs, then we recommend you use a DiSEqC 1.0
switch.
Connect the coaxial cable from the first LNB to the LNB 1 or LNB A input connector of the
DiSEqC switch. Do the same for any other LNBs that you have. Connect one end of a coaxial
cable to the RF output connector of the DiSEqC switch, connect the other end to the LNB IN
socket on the receiver.
To the digital receiver, you can connect either a single satellite antenna directly or LNB of
multi-feed equipment.

User manual
14
8. Getting started
8.1. Easy install
Press the button to operate the receiver from
“Standby” mode. If you did not install it before, the
“Easy Install” Menu will be displayed automatically to
guide you to install your box and dish
*Notice: There are two parts, Box Setting and Install
Setting. Please follow the indication in this menu one
step by one.
8.2. Box Setting
Language
Choose Menu Language. Go to next.
Time Setting
Set Current Date and Time. Go to next.
Parental Control
Set Password, Receiver Lock and Censorship
Classification. Go to next to enter in Install Setting.
8.3. Install Setting
Choose one from the following items: “Install your dish”,
“Automatic install satellite and search channel” and
“Manually install satellite and search channel”.
Install your dish
Install one satellite, Press button (Red) to edit it. It
will automatically calculate the elevation and azimuth
for certain satellite according to the local longitude and
latitude you entered. Set the longitude and latitude by
pressing 0~9 and , buttons, and you get the
elevation and azimuth information from the menu. Then
go to next.
Adjust your dish depend on the intensity and quality.
Press button (Red) to edit satellite as above, press
“ OK ” button to select TP. Then go to next.
Adjust your dish depend on the SNR and BER. Press
button (Red) to edit satellite as above, press “ OK
” button to select TP. Then go to next.
Choose one from the following items: “Install another
satellite” and “Complete installing dish and search
channels”. For “Install another satellite”, you need to
install another satellite as the above step by step. For
“Complete installing dish and search channels”, you
need to set the Scan Mode and Network, then press “
OK ” button to do scan.
Automatic install satellite and search channel
The receiver will detect your antenna and search
available signals and download services for you
automatically.
Manually install satellite and search channel
You need to choose your interested satellites and set
right parameters for LNB Type, 22KHz Tone, 12V,
DiSEqC1.0 or Motorized DiSEqC1.2 or USALS items,
then press button (Red) to do scan to complete
install. For more details, please refer to the chapter
“Manual Installation” of “Menu Operations”.
9. Menu operations
Now this chapter assumes that the HD Receiver system
has been installed correctly, meaning:
The satellite antenna for the HD Receiver has
been installed, connected to the HD Receiver.
The HD Receiver is connected to the TV.
The RCU has batteries and ready to control the
HD Receiver.
If the HD Receiver has not been installed or connected
properly, please refer to the Connecting your equipment
on this manual.
Many of the functions of the HD Receiver are available
from the Main Menu. Press “ MENU ” button to open it.
9.1. Service
9.1.1. Organizing services.
This menu can be used to move, lock, hide, rename
and delete Services.
Move
You can reorder and move the service to the preferred
position. Mark the desired services using “ OK ” button,
use button to choose Move mode and press “ OK ”
button, then use , buttons to move and press “
OK ” button to confirm.
Lock
You can restrain and lock the services. Mark the
desired services using “ OK ” button, use button to
choose Lock mode and press “ OK ” button to confirm.
Delete
You can delete the services. Mark the desired services
using “ OK ” button, use button to choose Delete
mode and press “ OK ” button to confirm.
Rename
Mark the service you want to rename, use button to
select Rename item and press “ OK ” button to display
keyboard, and rename it. After renaming it press
(Red) button to save.
Skip

User manual
15
You can restrain and Skip (hide) the services. Mark the
desired services using “ OK ” button, use button to
choose Skip mode and press “ OK ” button to confirm.
(Red) Group
It is very useful to select services with different Groups.
(Green) Options
It is very convenient function to Mark the desired
services with different options.
Service Found
It is an item to locate certain service by name quickly.
Press button to display the “Find” submenu, use
keyboard to enter service name and press button
again to select the desired services.
Press button to check the detail information if
necessarily.
info display
Press button to display the detail information about
the selected service.
9.1.2. Organizing favourites
This menu is helpful in adding and deleting services to
and from the favorite group.
FAV List
To choose the FAV List by press “FAV” button.
Add
To add services into favorites, Mark the desired
services by press “ OK ” button in Service List, press
to choose Add mode and press “ OK ” button.
Remove
To remove services from favorites, Mark the desired
services by press “ OK ” button in Favorite List, press
to choose Remove mode and press “ OK ” button.
Move
You can reorder and move the service to the preferred
position in Favorite List.
Rename
Select the desired FAV List by press “FAV” button,
using , buttons to choose Rename mode and
press “ OK ” button to display keyboard, and rename it.
After renaming it press (Red) button to save.
Group, Options, Service Found and Detail
Information display
Please refer to the “Organizing Services” part in this
manual.
9.2. Installation
9.2.1. Manual installation
A. (Red) Scan
Select one or more satellites which preprogrammed
correspond to the direction of the antenna in the
satellite list by using the “ OK ” button, to go to the Scan
menu by using the button (Red).
Scan Mode
Choose your favorable services you want to search
among ALL, FTA, ALL_TV, FTA_TV, ALL_Radio and
FTA_Radio.
Network
If the Network item is set to On and the NIT (Network
Information Table) is available, the Transponder’s
information can be found.
“ OK ” Scan
To start the searching process, press“ OK ” button.
To stop the searching process on the way, press either
the “ MENU ” button or the“ EXIT ”button. This menu

User manual
16
will be shown as long as the PVR is searching for
services. All services found will be listed in two columns
on the screen with TV services in one column and
Radio services in the other. Please note that the search
procedure may take a few minutes.
When the search procedure is completed, the screen
will show the Confirm info box. Select YES to save the
services.
B. (Green) Edit
TP
Selects the Transponder to catch the strong signal.
LNB
Select the L.O. Frequency of the LNB among C-
Band(5150), Ku-Band(11300), Universal(9750/10600),
LowBand(9750), HighBand(10600), One Cable L and
One Cable H by using (add left-key and right-key button
icon) buttons.
Also you can insert LNB frequency by using Numeric
key of the RCU when on the User(xxx) item
22kHz
If you are using a 22KHz tone switch box, make 22kHz
tone switch ON or OFF to select LNB or antenna.
NOTE: If the LNB is set to Universal(9750/10600), it is
not possible to set 22kHz because high or low band is
selected by 22kHz.
12V
Switch ON or OFF to enable or disable the 12V DC
power supply.
DiSEqC 1.0
The PVR is designed to be DiSEqC 1.0 compatible.
This allows multiple antenna to be connected to the
PVR at the same time. If you are using two or more
fixed antenna or LNBs, then it is recommended to use a
DiSEqC 1.0 switch.
Select one of DiSEqC A, DiSEqC B, DiSEqC C,
DiSEqC D or OFF according to the option or the
configuration of DiSEqC switch box or antenna.
DiSEqC 1.1
The PVR is designed to be DiSEqC 1.1 compatible.
This allows multiple antenna to be connected to the
PVR at the same time. If you are using two or more
fixed antenna or LNBs, then it is recommended to use a
DiSEqC 1.1 switch.
It is possible to connect up to 16 antennas. Select one
of 1 to 16 or OFF according to the option or the
configuration of DiSEqC switch box or antenna.
Power
Select the LNB voltage among 13, 18, 13/18, 13.5,
18.5, 13.5/18.5 and OFF by using “ OK ” button or ,
buttons.
(Red) Scan
To go to Scan menu directly from this menu, press
button at this menu.
(Green) Rename
Change the satellite name using keyboard popped on
the screen, then press button to Confirm it.
(Yellow) Motor
If you have DiSEqC 1.2 or USALS motorized system,
then you can use their functions by press
button(yellow).
DiSEqC 1.2
−Satellite:Select a satellite that will be used to
identify a motor position.
−TP: Select the transponder to catch the strong
signal.
−Move Continue: To adjust the position of the
antenna using East, West command by press
, buttons.
−Move Step: To adjust the position step by step
using East, West command by press ,
buttons.
−Store Position: To store the current position of
the motor for the selected satellite.
−Set Limit: Set the limits of East, West position.
−Goto Reference: To go to reference position.
−(Red) Scan: To go to Scan menu directly from
this menu.

User manual
17
USALS
−Satellite: Select a satellite that will be used to
identify a motor position.
−TP: Select the transponder to catch the strong
signal.
−My Longitude: it means the longitude of your
location. You can use numeric keys of RCU to
enter the angle. East or West will be selected by
, buttons.
−My Latitude: it means the latitude of your
location. You can use numeric keys of RCU to
enter the angle. South or North will be selected
by , buttons.
−Goto Reference: to go to reference position.
−Move: after setting the Longitude and the
Latitude of the location, press “ OK ” button, the
dish will move to the desired position
automatically.
−Store: to store the current position of the dish.
−(Red) Scan: To go to Scan menu directly from
this menu.
−(Blue) Auto DiSEqC - Refer to the Auto
DiSEqC in the following.
C. (Yellow)TP
(Red) Scan
To go to Scan menu directly from this menu.
(Green) Add
To add a new TP to the TP list of the selected satellite.
(Yellow) Edit
To edit the parameters (Frequency, Polarization,
Symbol rate and FEC) of selected TP.
(Blue) Delete
To delete the TPs selected using (add ok key icon)
button.
Service
Press button to display the detail information about
the selected TP, all services belonged to the TP will
displayed in the list.
D. (Blue) Auto DiSEqC
It is a very useful function to easy installing your system
without knowledge of what kind of signal or LNB your
receiver is connected to. Press button, it will
automatically detect DiSEqC connecting and set the
right configuration of LNB as well. It will show you the
connecting status, you just need to press “ OK ” button
to scan the services of connected satellites.
9.2.2. Auto Installation
“Auto Installation” is a very new and convenient
function. It will automatically detect all dishes
connecting to this machine and scan the available
services belonging to the satellite matched according to
satellites and transponders data in current database.
You don’t have to input any parameter of your antenna
settings. Just press “ OK ” button to enter this “Auto

User manual
18
Installation” menu then it starts scanning and shows
you the result at the end of scanning.
(Red)Stop
Stop the automatically checking.
(Green) Continue
Continue the automatically checking
(Yellow) pause
Pause the automatically checking
9.2.3. Guidance of installing a dish
Refer to the “Install your dish” part of the chapter “Easy
Install” in this manual.
9.2.4. Factory Default
Factory default
It is an item to load the default data to current database
by press “ OK ” button.
Factory reset
Press “ OK ” button it will recover all database to the
same as factory default settings, then it will
automatically go to “Easy Install” menu to re-install your
system.
Set data to factory default data
Press “ OK ” button to set current data as default data.
Delete all channel
To delete all channels by using “ OK ” button.
9.3. PVR (optional, only for
PVR ready receivers)
9.3.1. File List
Press “ OK ” button on this item to enter the File List
menu.
Record Path
Press (Red) button to change the Record Path,
select the path and press (Red) button again to
confirm.
TimeShift Time
Press (Green) button to select TimeShift Time
item, use , buttons to select the length of Time
Shift time among 0:10H, 0:30H, 1:0H, 1:30H, 2:0H,
2:30H, 3:0H and 4:0H.
Select a disk and press “ OK ” button to enter the file list
submenu. The file list has 5 lists. They are Recorded
Services, MP3, Image, Software and Others. The lists
are select by , buttons. The File List is displayed
by pressing button.
A. Recorded Services List
You can see the file number, file name, date of
recording, information of scramble, locking, Service
name, event information, file size, HDD information, etc.
i. (Red) Sort
You can Sort the list by press (Red)
button.
ii. (Green) Options

User manual
19
It is very convenient function to Mark the
desired services with different options.
iii. (Yellow) Edit
a) A new folder can be made by select
“New folder” item, the keyboard will
displayed input the name and press
(Red) button to confirm.
b) Select the files you want to move, then
select “Move to folder” item, the list of
Folders will appear. You can select a
folder you want.
c) You can Rename the file or folder by
select “Rename” item.
d) Select “Delete” item after selecting the
files (or folders) you want to delete. You
have to confirm it at Confirm box.
e) Select “Lock” item after selecting the files
(or folders) you want to restrain or lock.
iv. (Blue) Add Play List
Mark the desired recorded services by press “
OK ” button, add to the current play list using
(Blue) button.
v. (White) Show Play List
To show the Play List by using (White)
button.
vi. Playback
To playback the selected file, press button.
Press “ OK ” button to select the services
among the recorded services list and press
button to playback the multi-services in
sequence automatically.
B. MP3 File List
The file list is displayed by pressing button. The
file list of MP3 can be selected by , buttons from
other list.
i. (Red) Sort
You can Sort the list by press (Red)
button.
ii. (Green) Options
It is very convenient function to Mark the
desired services with different options.
iii. (Yellow) Edit
a) A new folder can be made by select “New
folder” item, the keyboard will displayed
input the name and press (Red)
button to confirm.
b) Select the files you want to move, then
select “Move to folder” item, the list of
Folders will appear. You can select a
folder you want.
c) You can Rename the file or folder by
select “Rename” item.
d) Select “Delete” item after selecting the
files (or folders) you want to delete. You
have to confirm it at Confirm box.
iv. Play
To play the selected file, press button.
Press “ OK ” button to select the files among the MP3
list and press button to play the multi-files in
sequence automatically.
C. Image File List
The file list is displayed by pressing button. The
file list of Image can be selected by , buttons
from other list.
i. (Red) Sort
You can Sort the list by press (Red)
button.
ii. (Green) Options
It is very convenient function to Mark the
desired services with different options.
iii. (Yellow) Edit
a) A new folder can be made by select “New
folder” item, the keyboard will displayed
input the name and press (Red)
button to confirm.
b) Select the files you want to move, then
select “Move to folder” item, the list of
Folders will appear. You can select a
folder you want.
c) You can Rename the file or folder by
select “Rename” item.
d) Select “Delete” item after selecting the
files (or folders) you want to delete. You
have to confirm it at Confirm box.
iv. Play
To play the selected file, press button.
Press “ OK ” button to select the files among
the Image list and press button to play the
multi-files in sequence automatically.
D. Software File List
The file list of Software can be selected by ,
buttons from other list.
E. Others
Can display all folders and all files of the selected folder
or disk.
9.3.2. MP3 Player
You can start the MP3 Player by pressing the “ OK ”
button on this item if the Player is already used before.
If you first time to use, please refer to the MP3 File List/
Play in this manual.
9.3.3. HDD Format
You can Format Disk or Partition Disk in this menu.
Formatting Hard Disk will delete all the data and the

User manual
20
files recorded in HDD permanently. If a new HDD is
installed, it should be formatted because the file
structure of PVR is different from others.
You cannot use the Time shift, Recording and playback
functions with an unformatted HDD.
A. (Red) Format Disk
Select the desired Disk to Format in Disk list and press
(Red) button, select Format Type (FAT32 or
EXT2) in the pop menu, then confirm format by select
‘YES’ item.
B. (Green) Partition Manage
To enter the Partition Manage submenu, Press
(Green) button in this menu and select the HDD (Local
Disk or Mobile Disk) by press “ OK ” button.
I. Press (Green) button to Add a partition.
Move the highlight to “Size” item, using ,
or Numeric buttons to change the size of the
partition.
You can select Type (FAT32 or EXT2) of the
partition on “Type” item.
The maximum number of partitions that can be
created is 8.
II. Press (Yellow) button to Delete the
selected partition.
When completed above settings, it should be
press (Red) button to Start Format.
9.3.4. Record List
You can enter Record List menu directly from
here by press “ OK ” button if the PVR is recording now.
You can also enter this menu by press
(White) button when watching the program.
9.3.5. Time Shift setting
Enable
It is used to turn on or turn off the time shift function by
using , buttons.
ON: To enable the Time Shift function.
OFF: To disable the Time Shift function.
Time shift path
Press “ OK ” button to select partition and press
(Red) button to save and exit, or press (Green)
button to make a new file in the partition that you
choosed.
Time shift time
Press or button to select time(0:10H, 0:30H,
1:0H, 1:30H, 2:0H, 2:3H, 3:0H, 4:0H).
9.4. Preference
9.4.1. Language
There are many languages available for the menu.
Menu Language
It is an item for changing the language of the Main
menu.
Select the language that the menus will be shown in.
The supported language can be changed without any
notice.
Audio language
It is an item for changing the language of the Audio.
If more than one audio language is transmitted, you
may select one language among the language
transmitted by press button.
The supported language can be changed without any
notice.
Audio Priority
You can select the Audio Priority among Dolby and
language by press ” OK ” button.
EPG Language
It is an item for changing the language of the EPG.
Table of contents
Other Globo Receiver manuals
Popular Receiver manuals by other brands

Sony
Sony HCD-GZR88D Service manual

Raymarine
Raymarine SiriusXM SR200 installation instructions

Lectrosonics
Lectrosonics UCR30 operating instructions

Sony
Sony XAV-AX5110 operating instructions

SOMFY
SOMFY SLIM IO RECEIVER PERGOLA+PLUG instructions

HAMTRONICS
HAMTRONICS R302 Series Installation operation & maintenance