GME CM40 Series Owner's manual

CM40 & CM50 PROGRAMMING MANUAL 1
CM40 & CM50 Series
Commercial Analogue Mobile Radios
PROGRAMMING MANUAL

2 PROGRAMMING MANUAL CM40 & CM50
COPYRIGHT NOTICE
GME Pty Ltd reserves all rights to this document and the information contained herein.
Reproduction, use or disclosure to third parties without the express permission is strictly prohibited.
© 2022 GME Pty Ltd, Sydney, Australia

CM40 & CM50 PROGRAMMING MANUAL 3
CONTENTS
Copyright Notice............................................................................................................ 2
Introduction and Setup.................................................................................................. 4
Overview .......................................................................................................................................4
Outline of the Process ..................................................................................................................4
Windows Versions Supported ......................................................................................................4
Hardware ......................................................................................................................................5
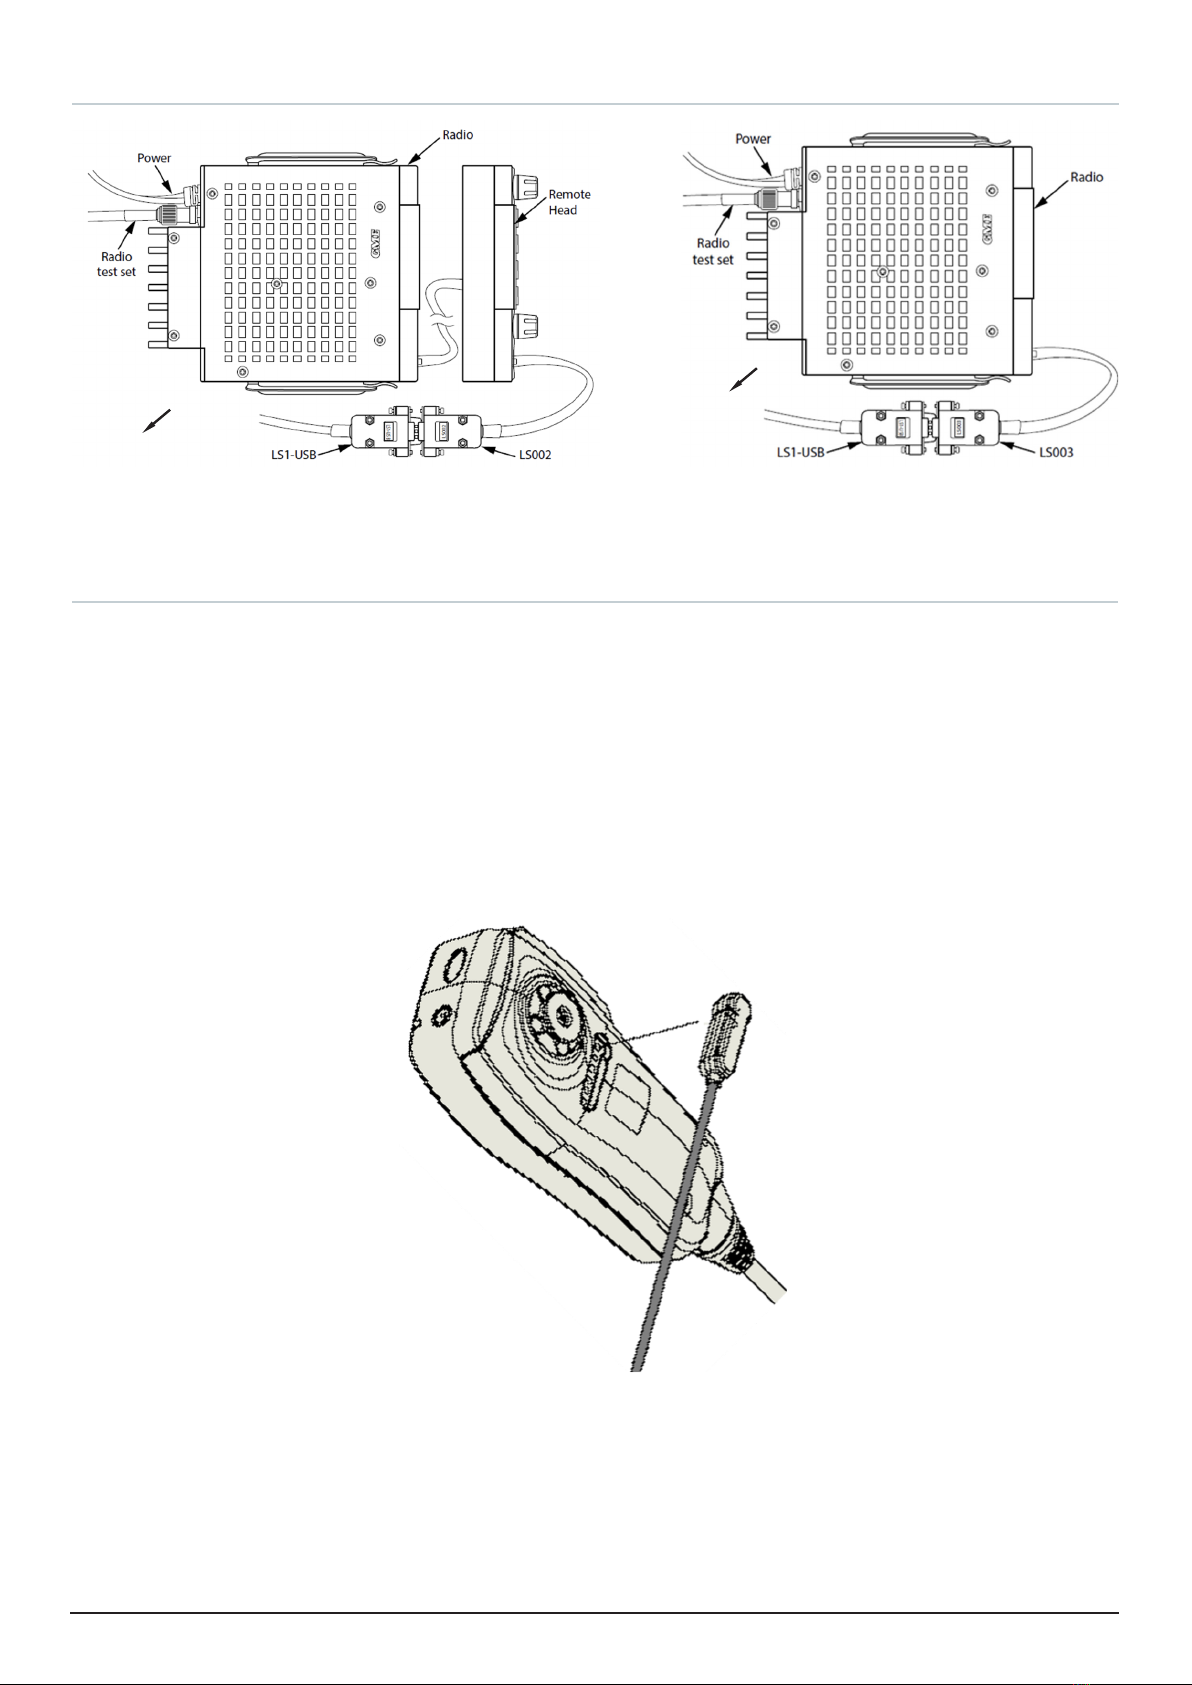
LS1-USB Programming Cable and LS002 or LS003 adapter.........................................................5
LS-UIC Programming Cable...........................................................................................................6
Checking the COM Port.................................................................................................................7
LS1-USB & LS-UIC Drivers.............................................................................................................7
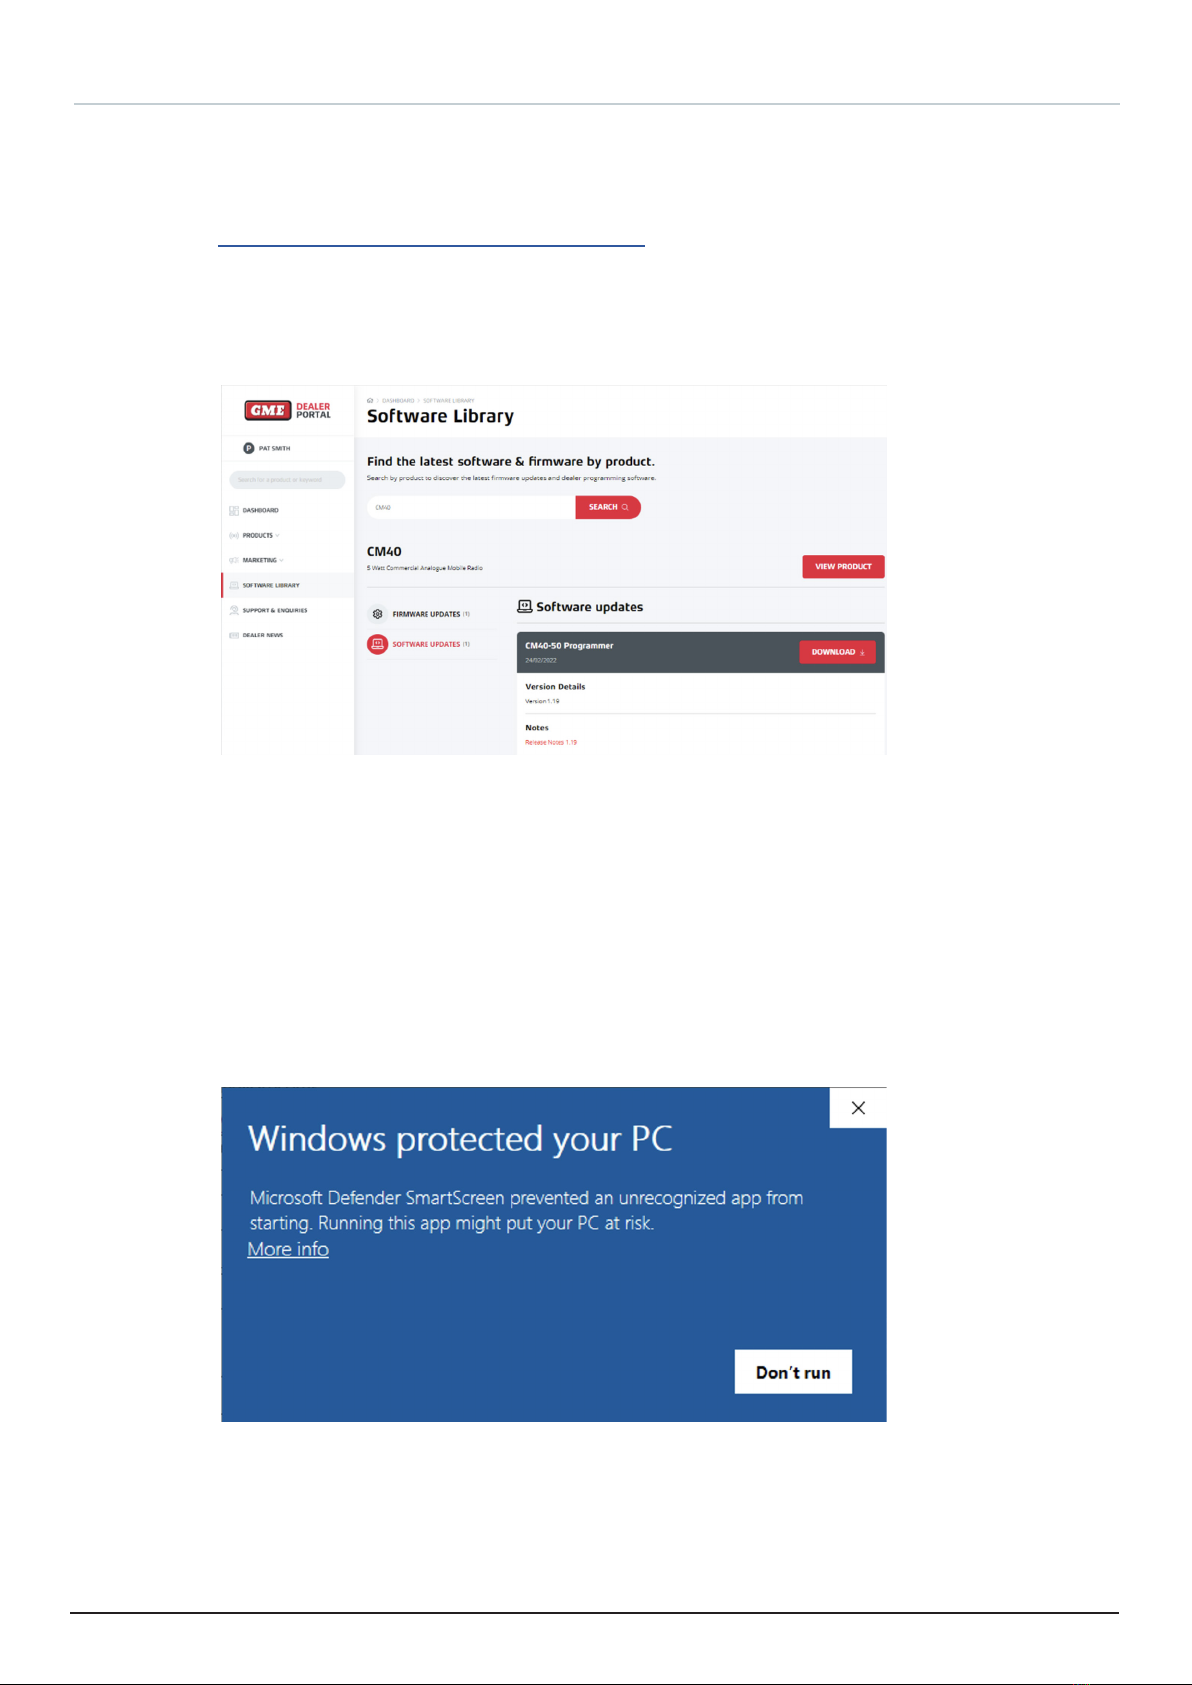
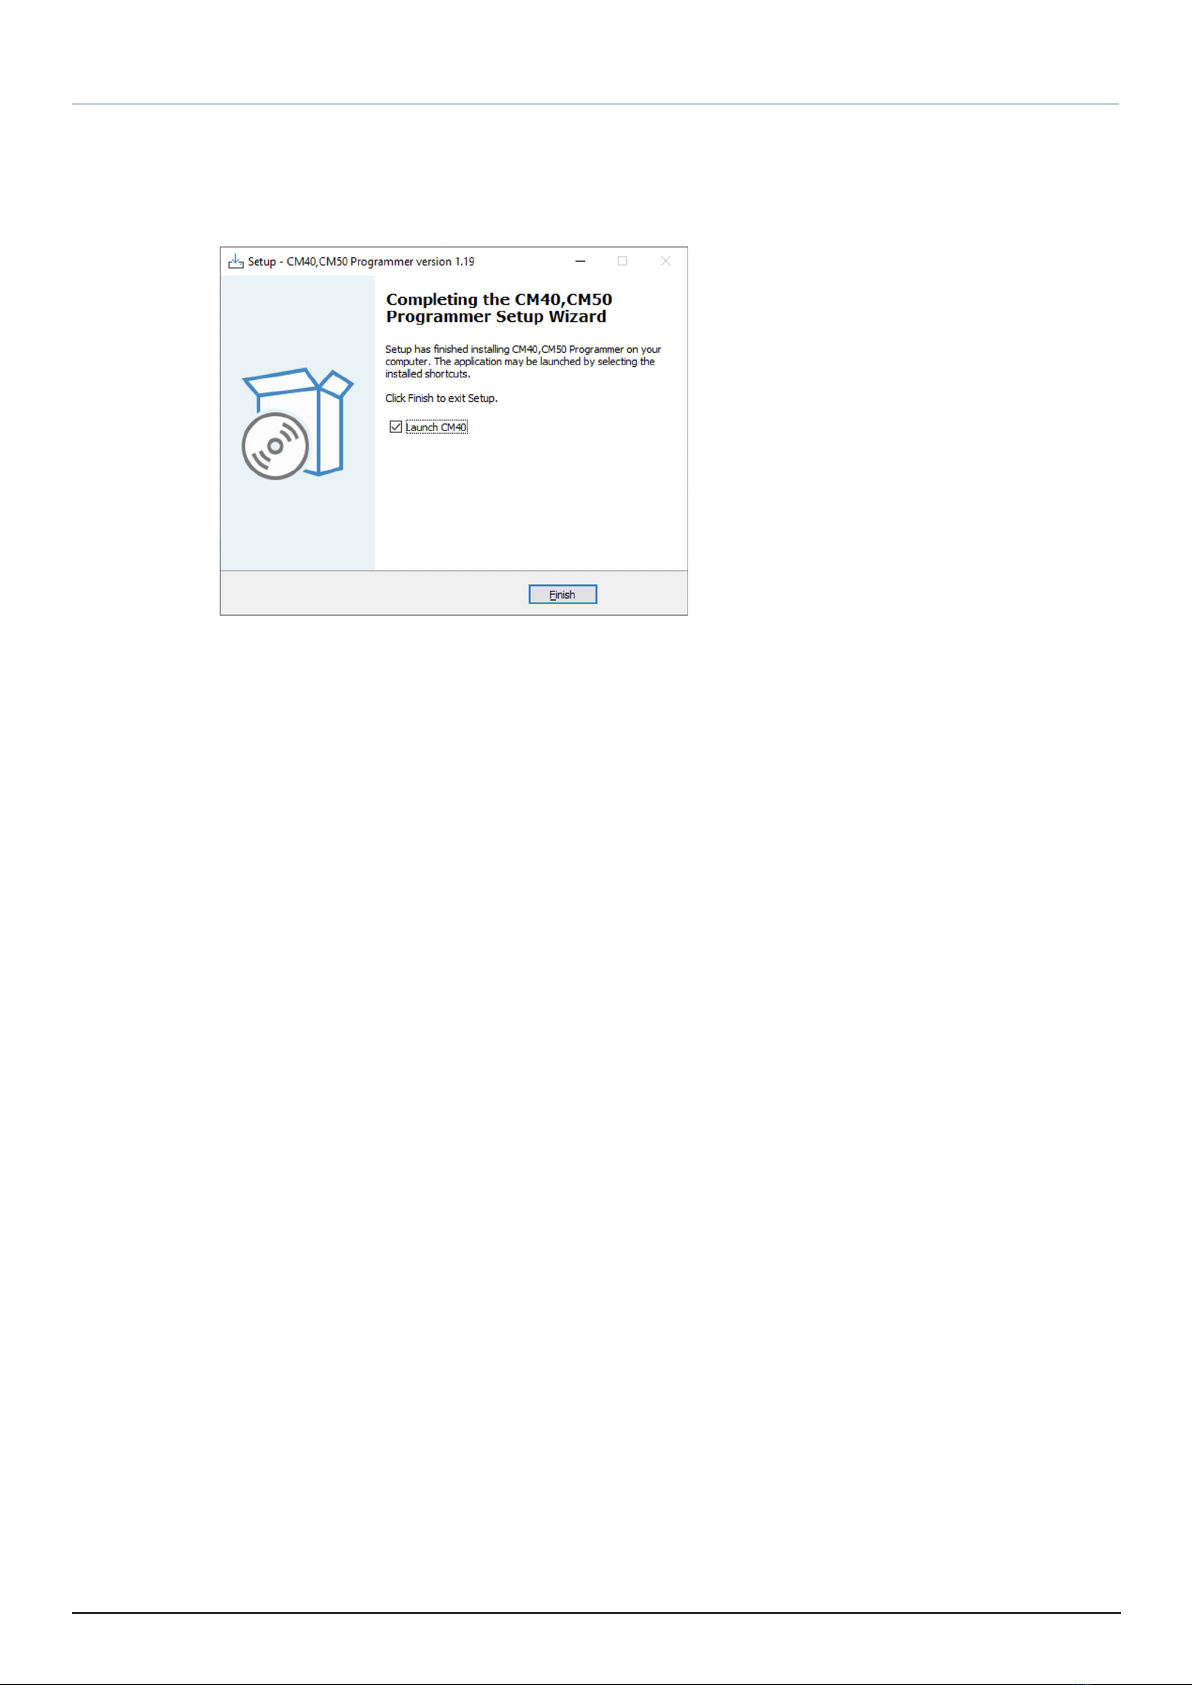
Downloading and Installing the CM40 & CM50 Software ............................................................8
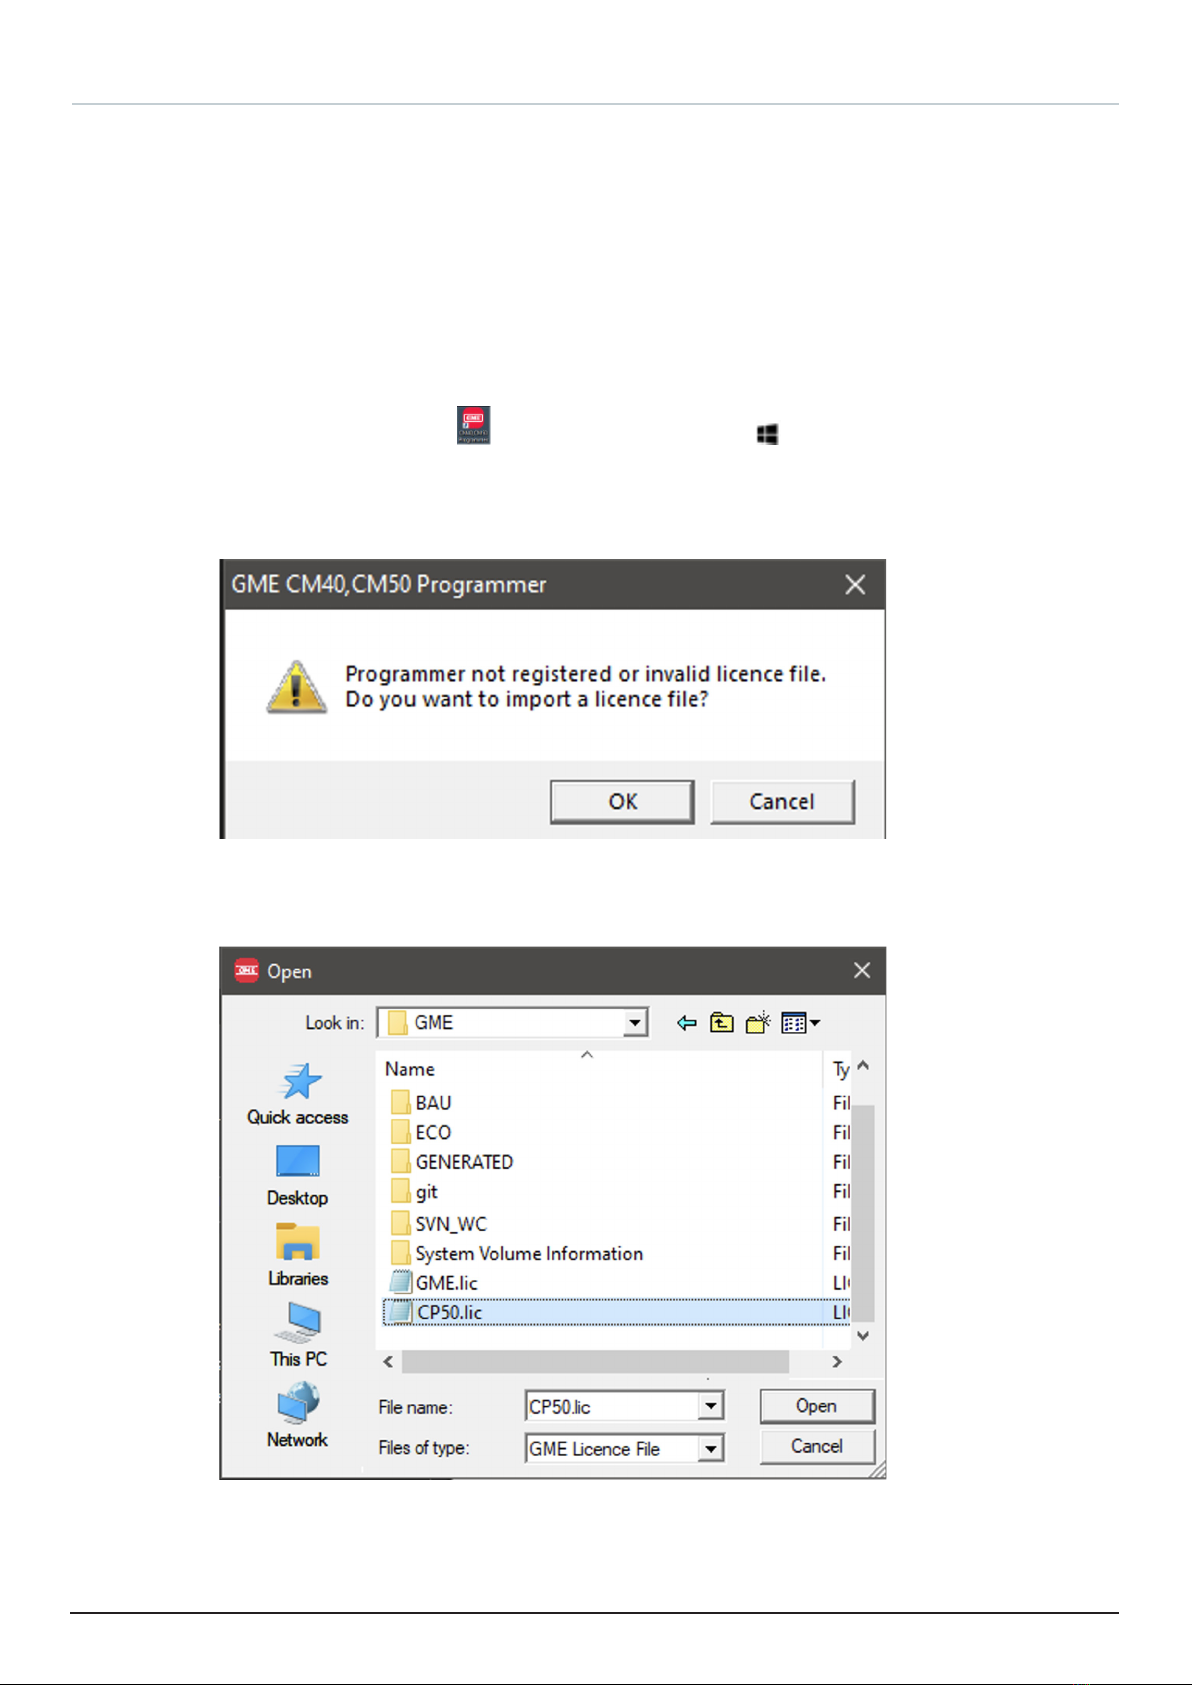
CM40 & CM50 Licensing .............................................................................................................10
Programmer Operation................................................................................................ 12
Connecting the CM40 or CM50 Radio to the Computer .............................................................12
Connecting a CM40 or CM50 Radio to the CM40 & CM50 Programmer ....................................12
Reading & Writing of Congurations........................................................................... 14
Reading a Conguration from a CM40 or CM50 Radio...............................................................14
Writing (Save) a CM40 or CM50 Conguration to a (.GMC) File. ................................................15
Reading a Conguration from a (.GMC) File and Writing it to a CM40 or CM50 Radio..............16
Writing a CM60 Conguration to a CM40 CM50 Radio ..............................................................18
Writing a TX3600 / TX3800 conguration to a CM40 or CM50 radio.........................................19
Setting up a New CM40 or CM50 Radio .....................................................................................20
Disconnecting CM40 or CM50 Radios ........................................................................................20
Settings....................................................................................................................... 21
Zones / Channels.........................................................................................................................21
Adding an Analog Channel .........................................................................................................22
Adding a Group Channel (Voting Groups and Scan Groups) ......................................................23
Exporting and Importing Channels.............................................................................................23
Editing a Channel........................................................................................................................24
User Interface .............................................................................................................................24
CM40 and CM50 Radio Settings .................................................................................................24
Contacts/Lists .............................................................................................................................25
Field Service................................................................................................................................26
Align............................................................................................................................................26
Ancillary and reference information ............................................................................ 27
Firmware Upgrade ......................................................................................................................27
Console Interface........................................................................................................................30
Physical Interface .......................................................................................................................30
Terminal Connection...................................................................................................................30

4 PROGRAMMING MANUAL CM40 & CM50
INTRODUCTION AND SETUP
Overview
This manual provides information about conguring the CM40 & CM50 series radios with the
CM40 & CM50 programmer, CM40_CM50_vx.xx_setup.exe. The chapters that follow describe the
procedures for connecting to the radio and console interfaces, updating the rmware, and setting
up a new radio conguration.
Outline of the Process
The CM40 & CM50 series radio programmer is used to congure and align the CM40 & CM50 series
of radios. A summary of the process to set up and program a CM40 & CM50 series radio is a follows:
1. Download the latest CM40 & CM50 series programming software from the GME
Commercial Dealer Portal onto your Windows computer.
- See Downloading and Installing the Software on page 8.
2. Install the programmer.
- See Downloading and Installing the Software on page 8.
3. Obtain a CM40 & CM50 series licence le from GME Commercial.
- See Licensing on page 9.
4. Start the programmer.
5. Connect the client’s radio to your computer with the correct programming cables.
- See Connecting the Radio to the Computer on page 11.
6. Connect the radio to the programmer.
- See The CM40 & CM50 Programmer on page 11.
7. Program the radio per your clients requirements.
- See Settings on page 16.
8. Optional: Save your clients conguration details for later use.
9. Disconnect the radio.
- See Disconnect the Radio on page 16.
10. Close the programmer.
- See Disconnect the Radio on page 16.
Windows Versions Supported
The programmer runs on the following operating systems:
• Windows 7
• Windows 10
• Windows 11
All necessary programming software, rmware updates and documentation are available from the
GME Commercial Dealer Portal.

CM40 & CM50 PROGRAMMING MANUAL 5
Hardware
The following hardware is required to connect a CM40 or CM50 series radio to a Windows PC or
laptop:
Leads & Adaptors:
• LS1-USB PC programming cable
• LS002 radio programming adapter (Local Radio)
• LS003 radio programming adapter (Base Radio)
or
• LS-UIC Programming lead to suit UIC600 Controller Microphone
Other:
• DC regulated power supply, capable of supplying 13.8 V / 10 A
• DC cable required from radio to power supply:
- DC cable part number LE013 (25 watt radio)
- DC cable part number LE09 ( 5 watt radio)
• Windows computer with USB port
LS1-USB Programming Cable and LS002 or LS003 adapter
The LS1-USB programming lead is a USB to 5 V serial interface lead. Use this lead when
programming and conguring GME Commercial mobile radios using a Windows PC or laptop.
An LS002 or LS003 radio programming adapter is used to interface with CM40 & CM50 radios
NOTE: The LS1-USB lead is not a standard USB to RS232 serial adapter. The attached 9-pin D
connector is used to connect a range of custom GME radio interface adapter leads. These leads
allow the LS1 USB lead to interface to various GME radios with dierent connectors.
The LS002 radio interface connects to the front RJ12 microphone port on the CM40 and CM50 local
models (CM40-U5, CM50-U25 and CM50-V25) and the CM50 remote head models (CM50-U25R and
CM50-V25R)
The LS003 radio interface connects to the RJ45 port on front panel of the CM50 base radio models
(CM50-U25B and CM50-V25B).
The following gures below show examples of connecting a CM40 or CM50 series radio (in the local,
remote head and base setup) to a PC or laptop.
Figure 1 – Connecting a local radio to a computer
Computer
Local

6 PROGRAMMING MANUAL CM40 & CM50
LS1-USB Programming Cable and LS002 or LS003 adapter (cont.)
Figure 2 – Connecting the remote head
to the computer Figure 3 – Connecting a base radio to the
computer
LS-UIC Programming Cable
It is possible to program a GME Commercial Base Radio via a UIC600 controller microphone using
the LS-UIC programming lead. The LS-UIC programming lead has a magnetic connector which
connects to the back of the UIC600 controller microphone whilst the USB end of the LS-UIC
programming lead connects into a PC or laptop. This programming set up can be particularly useful
in the eld if the base radio is dicult to access.
The LS-UIC magnetic connector rmly connects to the UIC600 controller microphone in one
orientation only. Use the shape of the connector as a guide when aligning the connector with the
receptacle on the back of the UIC600 controller microphone.
The gure below shows how to connect the UIC600 controller microphone to a PC or laptop using
the LS-UIC programming lead.
Figure 4 – Connecting the LS-UIC programming lead to a UIC600 controller microphone
NOTE: It is important to make sure that the LS-UIC programming lead remains secure and
undisturbed while programming.
GME recommends placing the UIC600 controller microphone face down, on a at surface, during
programming.
LS-UIC magnetic
connector
UIC600 controller
microphone
Base
Computer
Computer

CM40 & CM50 PROGRAMMING MANUAL 7
Checking the COM Port
Connection to the CM40 or CM50 series radio may be established without the need to check the
COM port. In the event the CM40 & CM50 programmer is unable to communicate with the CM40 or
CM50 series radio, validation of the COM port in use is required. This is achieved by using either the
Windows Device Manager or the CM40 & CM50 programmer’s “Serial Port Auto Detect” function.
To validate the COM port:
1. Open Windows Device Manager.
NOTE: The procedure for opening Windows Device Manager varies depending on the
version of Windows used.
2. Locate Ports in the list of devices.
3. Disconnect the LS1-USB programming lead from the computer.
4. Check the Ports when the list is refreshed. The missing COM port is the COM port
used by the CM40 or CM50 series radio.
5. Reconnect the LS1-USB programming lead. Verify the COM port appears on the list.
The lead is identied as “USB Serial Port ( COMXX)
LS1-USB & LS-UIC Drivers
LS1-USB and LS-UIC drivers are usually installed on supporting windows operating systems. Where
required, drivers for the LS1-USB & LS-UIC can be downloaded from:
http://www.ftdichip.com/Drivers/VCP.htm
Select and save the latest driver download le for your operating system to your computer. GME
Commercial recommends only downloading the ‘Setup Executable’ version.
The procedure below describes how to install the drivers on a Windows operating system. To install
the drivers:
1. Right-click the Zip le and choose Extract All.
2. Select the destination to extract the drivers to.
3. Plug the LS1-USB programming lead into your computer.
4. Open Windows Device Manager.
5. Locate Ports in the list. Expand the list of ports and select the port used by the LS1-
USB programming lead.
6. Right-click the port and select Update driver.
7. Select Browse my computer for drivers.
8. Browse to the extracted le folder. Check Include sub folders. Click Next.
9. Restart the computer when the installation is complete.
For detailed instructions refer to the FTDI installation manual available at:
http://www.ftdichip.com/Support/Documents/InstallGuides.htm.

8 PROGRAMMING MANUAL CM40 & CM50
Downloading and Installing the CM40 & CM50 Software
The CM40 & CM50 programmer software is available for download by authorized GME Commercial
dealers via the GME Commercial dealer portal.
1. Go to your web browser (Microsoft Edge is recommended) and enter:
https://www.gme.net.au/au/dealer/login/
2. Enter your log in credentials.
3. In the menu at the left, click Software Library.
4. In the search box, enter CM40 or CM50. Click Search.
Figure 5 – The Software Library Screen in the Dealer Portal
5. Select Software Updates and download the CM40 & CM50 programmer software. GME
Commercial recommends to review the latest Release Notes.
NOTE: The software le is usually 20–30 megabytes. Depending on your computer
setup, the CM40 & CM50 programmer will download into a folder specied by you or
into the default Downloads folder. If the latter, you may choose to move the le to a
more convenient location using Windows Explorer.
6. Double-click on the installer.
You may see a pop up warning concerning the risks of installing software, for
example:

CM40 & CM50 PROGRAMMING MANUAL 9
Downloading and Installing the CM40 & CM50 Software (cont.)
7. The installation software is signed with GME’s digital certicate. If you wish to
conrm that the software installer is the genuine GME program you can do so by
using Windows’s facilities to view and verify the certicate.
Once you have accepted, you will see a series of dialogs, ending with:
8. Click Finish. If you set the check box Launch CM40, the installer will start.
The Installer installs a new group, GME, in the Start Menu which contains the CM40 &
CM50 Programmer. This group contains the programmer.

10 PROGRAMMING MANUAL CM40 & CM50
CM40 & CM50 Licensing
To run the CM40 & CM50 programmer you will require an active CP/CM series License File.
Authorized GME Commercial Dealers can request a CP/CM series License File via their nominated
NOTE: The CP/CM License File can be shared across multiple PC devices within your organization.
The single CP/CM License File will provide programmer access for CP40/CP50 commercial portables,
CM40/CM50 commercial mobiles as well as the TX6600PRO.
1. Save the CP/CM License File in a convenient and secure folder location on your PC or
laptop.
2. Start the CM40 & CM50 programmer.
You can do this via the desktop icon , or by pressing the Start button and locating the CM40
& CM50 Programmer in the GME group on the Start menu.
When you start the CM40 & CM50 Programmer for the rst time, there will be no CP/CM License File
and the CM40 & CM50 Programmer will display:
3. To import the CP/CM License File, click OK.
4. Browse to your CP/CM License File and click Open:

CM40 & CM50 PROGRAMMING MANUAL 11
CM40 & CM50 Licensing (cont.)
5. Once the License File has been imported and the CM40 & CM50 Programmer is
registered, you will see:
6. Click OK.
NOTE: The details of the CP/CM License File and the CM40 & CM50 Programmer
version are displayed at the bottom right of the start screen of the CM40 & CM50
Programmer window.
Figure 6 – CM40 and CM50 Programmer start screen with licence details

12 PROGRAMMING MANUAL CM40 & CM50
PROGRAMMER OPERATION
This section covers the basic operation of the CM40 and CM50.
NOTE: When a CM40 or CM50 Series radio is placed in read/write conditions, the local head will
display as PROG.
Connecting the CM40 or CM50 Radio to the Computer
1. Connect the CM40 or CM50 series radio to the computer USB port using the LS1-USB
programming lead.
- See Page 5 “LS1-USB programming lead”
NOTE: If programming the radio via the UIC600 controller microphone using the
LS-UIC programming lead, GME Commercial recommends placing the UIC600
controller microphone face down, on a at surface, during programming.
- See Page 6 “LS-UIC programming lead”
2. Ensure the appropriate adaptor is attached to the LS1-USB , for local and remote head
use LS002. For a base unit use the LS003. The radio will turn on automatically.
Connecting a CM40 or CM50 Radio to the CM40 & CM50 Programmer
With the CM40 & CM50 Programmer installed and the CM40 or CM50 radio connected to the PC via
the relevant programming adaptor the CM40 & CM50 programmer can now be run:
1. Via the desktop, select the icon, or press the Start button and nd the CM40 &
CM50 Programmer in the GME group on the Start menu.
NOTE: A prompt to select Model and Type is received each time the CM40 & CM50
Programmer is opened.
Figure 7 – Select model and type

CM40 & CM50 PROGRAMMING MANUAL 13
Connecting a CM40 & CM50 Radio to the CM40 or CM50 Programmer (cont.)
NOTE: The default le parameters are imported when the model and type are
selected. If Model and Type are not selected the CM40 & CM50 Programmer
will default to the CM50-U25.
Figure 8 – GME Programmer
NOTE: Radio and Type can also be selected manually from the File menu by selecting New.
2. Open the Program menu and choose Serial Port Auto Detect.
Alternatively, go to the Program menu choose Serial Port Settings to search for the
correct COM port.
Figure 9 – Congure serial port dialog
3. Click OK.

14 PROGRAMMING MANUAL CM40 & CM50
READING & WRITING OF CONFIGURATIONS
NOTE: The CM40, CM50 and CM60 Series of GME Commercial Mobiles use the “.GMC “ le format.
Reading a Conguration from a CM40 or CM50 Radio
1. Click the Read Radio button in the main window. The program will attempt to contact
the radio before proceeding to read the current radio rmware version, followed by a
complete EEPROM read.
Figure 10 – Reading Conguration from Radio
2. Click Close when reading from the radio is completed.
With conguration details now stored in the CM40 & CM50 Programmer, a CM40 or CM50 Series
radio can be programmed per Settings on page 18. Alternatively the conguration details can be
saved to a le on your computer for later use.
NOTE: GME Commercial recommends you keep a ‘library’ of conguration les for each of your
clients.

CM40 & CM50 PROGRAMMING MANUAL 15
Writing (Save) a CM40 or CM50 Conguration to a (.GMC) File.
To store conguration details in a le:
1. Click Write File in the main window.
Alternatively, you may go to the le menu and choose Save or Save As.
The Save radio cong dialog box displays.
Figure 11 – Write File dialog
2. Navigate to the desired area or folder, and enter a name for the le.
3. Click Save, The Save File dialog displays indicating that the le was successfully
written.
4. Click OK

16 PROGRAMMING MANUAL CM40 & CM50
Reading a Conguration from a (.GMC) File and Writing it to a CM40 or CM50 Radio
NOTE: The conguration details for a CM40 or CM50 radio can be stored as a “.GMC” le on your
computer.
To read a conguration from a “.GMC” le:
1. Click Read File in the main window to read the conguration le.
Alternatively, you may go to the File menu and choose Open.
The Open dialog box displays.
Figure 15 – Read File dialog
2. Navigate to the folder containing the desired conguration. The conguration le has
the le extension *.gmc.
3. Click Open. The Read GMC le dialog displays when the le is read successfully.
Figure 16 – Read File Conrmation dialog
4. Click OK.

CM40 & CM50 PROGRAMMING MANUAL 17
Reading a Conguration from a (.GMC) File and Writing it to a CM40 or CM50 Radio
NOTE: The current conguration can be edited before writing to a radio.
To write a conguration to the radio:
1. Click the Write Radio button in the main window to write the conguration to the
radio. The Completed EEPROM Write message displays.
Figure 17 – Writing Conguration to radio
2. When writing to the the CM40 or CM50 radio is completed, click Close.

18 PROGRAMMING MANUAL CM40 & CM50
Writing a CM60 Conguration to a CM40 or CM50 Radio
To write a CM60 conguration le:
1. Click Read File in the main window to read the CM60 conguration le.
2. Alternatively, you may go to the File menu and choose Open.
3. The Open dialog box displays.
Figure 12 – Write File dialog
4. Navigate to the folder containing the desired conguration and click open.
5. Click the Write Radio button in the main window to write the conguration to the
radio.

CM40 & CM50 PROGRAMMING MANUAL 19
Writing a TX3600 / TX3800 conguration to a CM40 or CM50 radio
Note: TX3600 & TX3800 conguration les are saved as .MEM. The CM40&CM50 programmer can
quickly convert .MEM les into readable CM40 & CM50 .GMC les:
1. Select Import TX36x0/38x0 cong from the File menu of the CM40 & CM50
Programmer.
Figure 13 – GME Programmer
2. When prompted select the radio model and type that the imported conguration
should be created for.
Figure 14 – Select model and type
3. Navigate to location of the TX36x0/38x0 cong (.mem le) on your PC.
4. Double click the desired le.
5. The le conguration will now be imported and can be edited in the CM40 and CM50
Programmer.
6. The conguration le can now be written to a CM40 or CM50 radio and/or written to a
.GMC le for later use.
7. Review the imported settings and conrm that they operate as required as not all
features translate directly from the TX36x0/TX38x0 radios.

20 PROGRAMMING MANUAL CM40 & CM50
Setting up a New CM40 or CM50 Radio
Following the basic programming process: Read > Enter Customer Requirements > Write: the
following options are available to program a CM40 or CM50 series radio:
• Open a previously saved conguration le and write it to the new CM40 or CM50
radio,
• Read a new or existing CM40 or CM50 radio, update customer requirements in the
prole and writing the new prole to a CM40 or CM50 radio.
• Opening a new le, without necessarily having a radio connected (using File menu >
New and selecting a radio model and type). Creating and saving a new conguration
which can be written to a CM40 or CM50 series radio.
• Use channels and zones from a .csv le – start the process as described above and
then import your zones and channels from a .csv le as described under Zones /
Channels on page 18 and Exporting and Importing Channels on page 20.
1. Click the Read Radio button in the main window. The program will read the current
radio rmware version, followed by a complete EEPROM Read. At the end a
Completed EEPROM read message is displayed.
Figure 18 – Reading the Conguration from the Radio
NOTE: As with reading a conguration from the radio, the EEPROM read includes
details of the radio’s model and type.
2. Click Close when reading from the radio is completed.
3. Congure the radio with customer requirements.
4. Write the new conguration to the radio by clicking
The conguration details are now in the programmer; it is recommended to save the conguration
for future use as described under Writing a Radio’s Conguration Details to a File on page 13.
Disconnecting CM40 or CM50 Radios
To disconnect a radio:
1. Ensure the CM40 & CM50 Programmers is no longer in the process of reading or
writing to the CM40 or CM50 radio.
2. Disconnect the programming cable from the radio port.
3. To close the CM40 & CM50 Programmer, from the File menu choose Exit, or press
ALT-F4, or click × at the top right of the programmer screen.
Other manuals for CM40 Series
1
This manual suits for next models
9
Table of contents
Other GME Radio manuals