GME CM60 Series Owner's manual

CM60 SERIES
PROGRAMMING MANUAL

CM60 Series Programming Manual
07 March 2018
© 2018 Standard Communicaons Pty Ltd. All rights reserved.
2
50078-2
Preface
Copyright Noce
Standard Communicaons Pty Ltd reserves all rights to this document and the informaon contained
herein. Reproducon, use or disclosure to third pares without the express permission is strictly
prohibited.
© 2018 Standard Communicaons Pty Ltd, Sydney, Australia
Radio Frequency Exposure Hazard
Aenon
This radio should be used only in an occupaonal (work related) environment where the user is
aware of and able to exercise control over their exposure to RF energy. This radio is not authorised
for use by the consumer or by the general populaon.
To comply with the US FCC radio frequency guidelines and to ensure your safety please read the
following informaon before installing and using the radio.
• Use the radio only within the guidelines of this manual.
• Use only with an approved antenna.
• Ensure your antenna is installed as described under ‘Antenna Installaon’ in this manual.
• Do not remove the RF Exposure label from this radio.
• Do not transit longer than the rated duty cycle of 50% talk-50% listen.
Radio Frequency Exposure Control
This radio emits RF (Radio Frequency) energy or radio waves when transming. RF energy is one of
many forms of electromagnec energy including sunlight and electricity. The FCC Radio Frequency
exposure guidelines include recommendaons on the safe levels of exposure for workers and the
general public with a signicant margin of protecon.
To comply with FCC exposure limits the radio must be installed using an externally mounted antenna
with a gain of either 2.15 dBi or 5.15 dBi. The antenna must be mounted centrally on the roof of the
vehicle in a locaon that ensures a minimum safe distance of 35 inches (0.9 m) from people.
For further informaon on RF energy exposure and how to control it, please visit the following
website. www.fcc.gov/oet/rfsafety/rf-faqs.html
Compliance with RF Energy Standards
This radio is designed and tested to comply with a number of naonal and internaonal standards
and guidelines (listed below) regarding human exposure to RF electromagnec energy. This
radio complies with the IEEE and ICNIRP exposure limits for occupaonal/controlled RF exposure
environment at duty cycles of up to 50% talk-50% listen and should be used for occupaonal use
only. In terms of measuring RF energy for compliance with the FCC exposure guidelines, your radio
radiates measureable RF energy only when it is transming (during talking), not when it is receiving
(listening) or in standby mode.

CM60 Series Programming Manual
07 March 2018
© 2018 Standard Communicaons Pty Ltd. All rights reserved.
3
50078-2
Preface
This radio complies with the following RF energy exposure standards and guidelines:
• United States Federal Communicaons Commission, Code of Federal Regulaons; 47CFR
part 2 sub-part J
• American Naonal Standards Instute (ANSI)/Instute of Electrical and Electronic
Engineers (IEEE) C95. 1-1992
• Instute of Electrical and Electronic Engineers (IEEE) C95. 1-1999 edion
• Internaonal Commission on Non-Ionizing Radiaon Protecon (ICNIRP) 1998
FCC Compliance
This equipment has been tested and found to comply with the limits for a Class B digital device,
pursuant to part 15 of the FCC Rules. These limits are designed to provide reasonable protecon
against harmful interference in a residenal installaon. This equipment generates uses and can
radiate radio frequency energy and, if not installed and used in accordance with the instrucons,
may cause harmful interference to radio communicaons. However, there is no guarantee that
interference will not occur in a parcular installaon. If this equipment does cause harmful
interference to radio or television recepon, which can be determined by turning the equipment
o and on, the user is encouraged to try to correct the interference by one or more of the following
measures:
• Reorient or relocate the receiving antenna.
• Increase the separaon between the equipment and receiver.
• Connect the equipment into an outlet on a circuit dierent from that to which the
receiver is connected.
Consult the dealer or an experienced radio/TV technician for help.
Interference with Vehicle Electronics
Some of the electronics in your vehicle may be suscepble to RF energy when your radio is
transming. Examples of electronic devices in your vehicle that could be aected are an-lock/an-
skid braking systems, cruise control systems and fuel injecon systems. If your vehicle is ed with
any of these systems please consult your vehicle manufacturer to determine whether these systems
are likely to be aected by your radio when it is transming. Careful selecon of mounng locaons
and good installaon techniques should generally minimise any interference to your vehicle
electronics.
Using the Radio in Explosive Atmospheres or Blasng Areas
Switch o your radio before entering any area where there may be inammable gas, liquids or dust.
An explosion could result in serious injury or death.
Switch o your radio when approaching a blasng area. Blasng areas are usually sign posted with
instrucons to users to turn o two way radios. Strong radio transmissions could ignite blasng caps
resulng in an unscheduled explosion resulng in serious injury or death.

CM60 Series Programming Manual
07 March 2018
© 2018 Standard Communicaons Pty Ltd. All rights reserved.
4
50078-2
Preface
Installaon Guidelines
• Do not install the radio near an airbag or in an area where an airbag may deploy. If an
airbag is obstructed by the radio, it may not deploy as expected. It could also propel the
radio with enough force to cause serious injury.
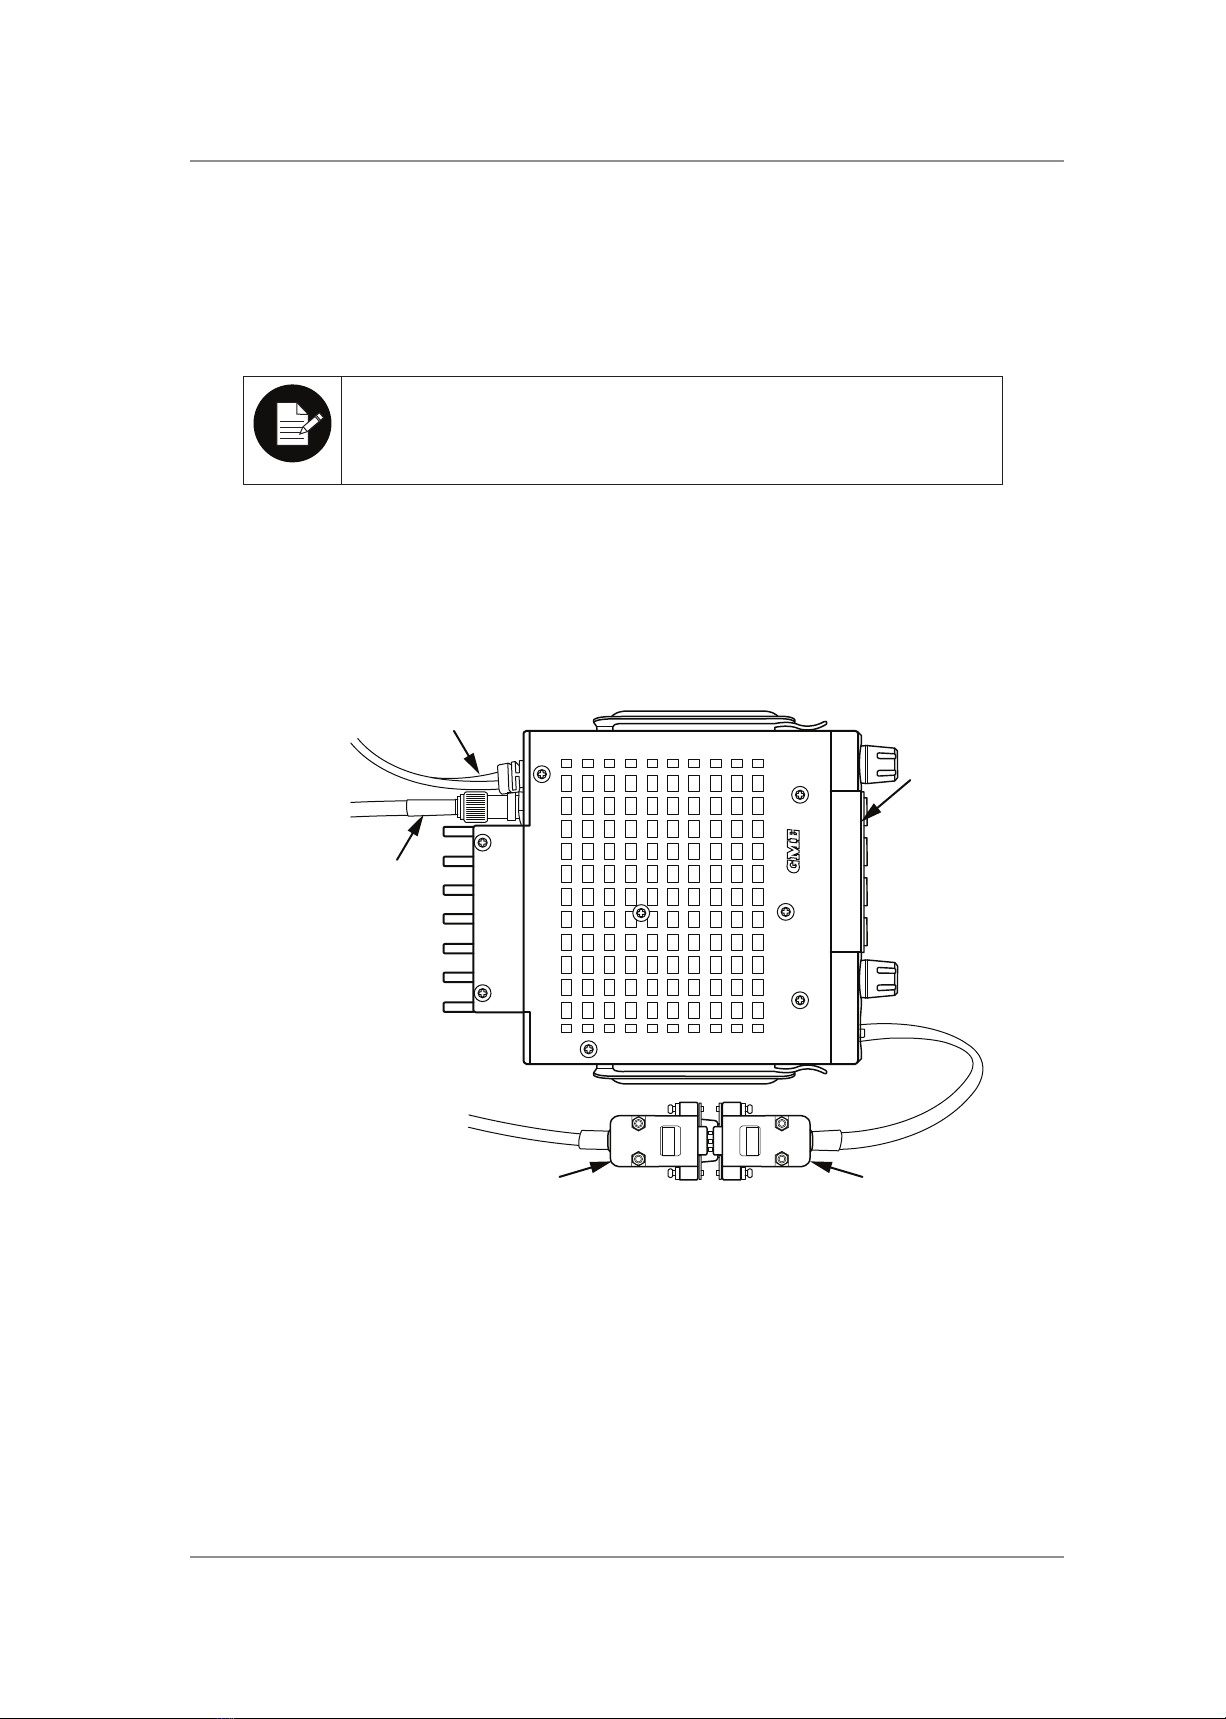
• Avoid touching the heat sink at the rear of the radio while the radio is in use. The heat
sink can become hot during prolonged use.
• Do not install the radio in front of a vehicle heater. The radio requires a cool airow over
the rear heat sink when transming to maintain eciency.
• Do not make unapproved modicaons to the radio. Such modicaons could void the
warranty and cause the radio to operate outside its approved specicaons.
Warranty
This warranty against defects is given by Standard Communicaons Pty Ltd ACN 000 346 814 (We,
us, our or GME). Our contact details are set out in clause 2.7.
1. Consumer guarantees:
a. Our goods come with guarantees that cannot be excluded under the Australian
Consumer Law. You are entled to a replacement or refund for a major failure and
for compensaon for any other reasonably foreseeable loss or damage. You are also
entled to have the goods repaired or replaced if the goods fail to be of acceptable
quality and the failure does not amount to a major failure.
b. To the extent we are able, we exclude all other condions, warranes and
obligaons which would otherwise be implied.
2. Warranty against defects:
a. This warranty is in addion to and does not limit, exclude or restrict your rights
under the Compeon and Consumer Act 2010 (Australia) or any other mandatory
protecon laws that may apply.
b. We warrant our goods to be free from defects in materials and workmanship for
the warranty period from the date of original sale (or another period we agree
to in wring). Subject to our obligaons under clause 1.2, we will at our opon,
either repair or replace goods which we are sased are defecve. We warrant any
replacement parts for the remainder of the period of warranty for the goods into
which they are incorporated.
c. To the extent permied by law, our sole liability for breach of a condion, warranty
or other obligaon implied by law is limited
in the case of goods we supply, to any one of the following as we decide –
(i) the replacement of the goods or the supply of equivalent goods;
(ii) the repair of the goods;
(iii) the cost of repairing the goods or of acquiring equivalent goods;

CM60 Series Programming Manual
07 March 2018
© 2018 Standard Communicaons Pty Ltd. All rights reserved.
5
50078-2
Preface
d. in the case of services we supply, to any one of the following as we decide –
(i) the supplying of the services again;
(ii) the cost of having the services supplied again.
e. For repairs outside the warranty period, we warrant our repairs to be free from
defects in materials and workmanship for three months from the date of the original
repair. We agree to repair or replace (at our opon) any materials or workmanship
which we are sased are defecve.
f. We warrant that we will perform services with reasonable care and skill and agree
to invesgate any complaint regarding our services made in good faith. If we are
sased that the complaint is jused, and as our sole liability to you under this
warranty (to the extent permied at law), we agree to supply those services again at
no extra charge to you.
g. To make a warranty claim you must before the end of the applicable warranty period
(see warranty table), at your own cost, return the goods you allege are defecve,
provide wrien details of the defect, and give us an original or copy of the sales
invoice or some other evidence showing details of the transacon.
h. Send your claim to:
Standard Communicaons Pty Ltd.
PO Box 96 Winston Hills, NSW 2153, Australia.
Tel: (02) 8867 6000 Fax: (02) 8867 6199
Email: [email protected]
i. If we determine that your goods are defecve, we will pay for the cost of returning
the repaired or replaced goods to you, and reimburse you for your reasonable
expenses of sending your warranty claim to us.
3. What this warranty does not cover:
a. This warranty will not apply in relaon to:
(a) goods modied or altered in any way;
(b) defects and damage caused by use with non Standard Communicaons products;
(c) repairs performed other than by our authorised representave;
(d) defects or damage resulng from misuse, accident, impact or neglect;
(e) goods improperly installed or used in a manner contrary to the relevant
instrucon manual; or
(f) goods where the serial number has been removed or made illegal.
4. Warranty period:
a. We provide the following warranty on GME and Kingray products. No repair or
replacement during the warranty period will renew or extend the warranty period
past the period from original date of purchase.
Product type warranty: Commercial accessories
Period: 1 year

CM60 Series Programming Manual
07 March 2018
© 2018 Standard Communicaons Pty Ltd. All rights reserved.
6
50078-2
Preface
Record of Amendments
Rev. Date Descripon By
1March 2018 Original issue. KP/PMV
2March 2018 Minor updates. KP

CM60 Series Programming Manual
06 March 2018
© 2018 Standard Communicaons Pty Ltd. All rights reserved.
7
50078-2
Table of Contents
Table of Contents.......................................................................................................................... 7
Conguraon................................................................................................................................ 9
Overview................................................................................................................................... 9
Connecng to the Radio ........................................................................................................... 9
Hardware............................................................................................................................. 9
LS1-USB Programming Cable............................................................................................. 10
Checking the COM Port ..................................................................................................... 12
Drivers ............................................................................................................................... 13
Security.............................................................................................................................. 14
Update HASP Security USB Key ......................................................................................... 15
Bluetooth Connecvity...................................................................................................... 16
Firmware Upgrade............................................................................................................. 17
CM60 Programmer (DS0042.x.xx)........................................................................................... 20
Connecng the CM60 radio to the computer ................................................................... 20
Running the programming soware ................................................................................. 20
Programming Soware Operaon .......................................................................................... 22
Reading a conguraon from the radio ............................................................................ 22
Wring a conguraon to the radio.................................................................................. 23
Reading a conguraon from a le ................................................................................... 24
Wring a conguraon to a le......................................................................................... 25
Sengs ................................................................................................................................... 26
Channel Setup ................................................................................................................... 26
Adding an analog channel ................................................................................................. 28
Adding a P25 convenonal channel .................................................................................. 29
Adding a P25 Trunking Channel......................................................................................... 30
Adding a group channel (vong groups and scan groups) ................................................ 31
Eding a channel ............................................................................................................... 31
P25 Sengs....................................................................................................................... 32
User Interface.................................................................................................................... 33
Radio Sengs.................................................................................................................... 34
Contacts/Lists .................................................................................................................... 35
Table of Contents

CM60 Series Programming Manual
06 March 2018
© 2018 Standard Communicaons Pty Ltd. All rights reserved.
8
50078-2
Table of Contents
Align .................................................................................................................................. 35
Console Interface .................................................................................................................... 36
Physical Interface............................................................................................................... 36
Terminal Connecon ......................................................................................................... 37
Encrypon .................................................................................................................................. 38
Overview................................................................................................................................. 38
Acronyms........................................................................................................................... 38
GME Key Fill Device........................................................................................................... 39

CM60 Series Programming Manual
06 March 2018
© 2018 Standard Communicaons Pty Ltd. All rights reserved.
9
50078-2
Conguraon
Conguraon
Overview
This manual provides informaon about conguring the CM60 series radio with the CM60
programmer DS0042.X.XX. The chapters that follow describe the procedures for connecng to the
radio, updang the rmware and conguraon, console interfaces and encrypon.
The CM60 series radio programmer is used to congure and align the radio. The programmer
soware runs on the following operang systems:
• Windows XP
• Windows Vista
• Windows 7
• Windows 8
• Windows 10
All necessary programming soware, rmware updates and documentaon are available from the
GME dealer support site at hp://dealersupport.gme.net.au/dealer
Connecng to the Radio
The secons below detail the hardware and drivers required to connect a CM60 series radio to a
Windows PC or laptop.
Hardware
The following hardware is required to connect the radio to the Windows PC or laptop:
• CM60 series radio.
• LS1-USB programming cable.
• LS002 or LS003 radio programming adapter.
• DC regulated power supply, capable of supplying 13.8 V / 10A.
• DC cable required from radio to power supply:
• DC cable part number LE013 for 25 wa radio.
• DC cable part number LE09 for 5 wa radio.
• Windows computer with USB port.
• HASP USB security key.

CM60 Series Programming Manual
06 March 2018
© 2018 Standard Communicaons Pty Ltd. All rights reserved.
10
50078-2
Conguraon
LS1-USB Programming Cable
The LS1-USB programming cable is a USB to 5V serial interface cable. Use this cable when
programming and conguring GME radios using a Windows PC or laptop.
An LS002 or LS003 radio programming adapter is used to interface with the CM60 radio.
The LS1-USB lead is not a standard USB to RS232 serial adapter. The aached 9-pin D
connector is used to connect a range of custom GME radio interface adapter leads.
These leads allow the LS1-USB cable to interface to various GME radios with dierent
connectors.
The LS002 radio interface connects to the front RJ12 microphone port on the local control head, and
the remote head models.
The LS003 radio interface connects to the RJ45 port on front panel of the radio base on the remote
mount model.
The gures below show examples of connecng the radio (in the local, remote and extended setup)
to a PC or laptop.
LS002
LS1-USB
Radio
LS1-USB LS002
Radio
test set
Power
Figure 1 - Connecng the local control head to a computer

CM60 Series Programming Manual
06 March 2018
© 2018 Standard Communicaons Pty Ltd. All rights reserved.
11
50078-2
Conguraon
Radio
Radio
test set
Power
LS002
LS1-USB
Remote
Head
LS1-USB LS002
Figure 2 - Connecng the remote control head to the computer
LS003
LS1-USB
Radio
LS1-USB LS003
Radio
test set
Power
Figure 3 - Connecng the radio (in the extended setup) to the computer

CM60 Series Programming Manual
06 March 2018
© 2018 Standard Communicaons Pty Ltd. All rights reserved.
12
50078-2
Conguraon
Checking the COM Port
Connecon to the radio may be established without the need to check the COM port. If the
programmer is unable to communicate with the radio, check to ensure that the correct COM port
is used. Use Windows Device Manager to check which COM port is used by the radio or use the
programmer’s ‘Serial port auto detect’ funcon.
To check the COM port:
1. Open Windows Device Manager. The procedure for opening Windows Device Manager
varies depending on the version of Windows used.
2. Locate Ports in the list of devices. Refer to the gure below.
3. Disconnect the LS1-USB programming cable from the computer.
4. Check the ports when the list is refreshed. The missing COM port is the COM port used
by the radio.
5. Reconnect the LS1-USB programming cable. Verify that second COM port appears on the
list.
Figure 4 - Device Manager

CM60 Series Programming Manual
06 March 2018
© 2018 Standard Communicaons Pty Ltd. All rights reserved.
13
50078-2
Conguraon
Drivers
The drivers required for the radio and computer interface, for supported operang system versions,
can be downloaded from the following website:
hp://www.dichip.com/Drivers/VCP.htm
Select and save the latest driver download le for your operang system to your computer. A ‘Setup
Executable’ version is also available for download.
The procedure below describes how to install the drivers on a Windows 7 operang system.
To install the drivers:
1. Right-click the zip le and choose Extract All.
2. Select the desnaon to extract the drivers to.
3. Plug the LS1-USB programming cable into your computer.
4. Open Windows Device Manager.
5. Locate Ports in the list. Expand the list of ports and select the port used by the LS1-USB
programming cable.
6. Right-click the port and select Update Driver Soware.
7. Select Browse my computer for driver soware.
8. Browse to the extracted le folder. Check Include sub folders. Click Next.
9. Restart the computer when the installaon is complete.
For detailed instrucons refer the FTDI installaon manual available on the download website at
hp://www.dichip.com/Support/Documents/InstallGuides.htm.

CM60 Series Programming Manual
06 March 2018
© 2018 Standard Communicaons Pty Ltd. All rights reserved.
14
50078-2
Conguraon
Security
The CM60 radio programmer and GME key ll device needs a HASP USB security key to be plugged
into a USB port on the computer when the programmer runs.
There are two types of security keys:
• Version 1
• Version 2
Version 1
1. Download and install the driver for version 1 of the security key.
The HASPUserSetup.exe for version 1 can be downloaded from the following URL
(SafeNet Sennel driver):
hps://sennelcustomer.gemalto.com/senneldownloads/
2. Choose Sennel HASP/LDK – Windows GUI Run-me Installer to download the driver.
Version 2
The version 2 security key automacally installs the drivers.
The gure below displays the version 1 and version 2 security keys.
Figure 5 - HASP USB Security Key Versions 1 (top) and 2 (boom)

CM60 Series Programming Manual
06 March 2018
© 2018 Standard Communicaons Pty Ltd. All rights reserved.
15
50078-2
Conguraon
Update HASP Security USB Key
The HASP security USB key has a predetermined expiry date. The me remaining before the license
expires is displayed at the boom of the CM60 programmer screen.
To update an expired security key:
Click File in the toolbar, and select HASP Key Management. The GME provisioning tool opens,
displaying the current HASP key features, and key ID.
The HASP Security key can be updated either automacally or manually.
Auto Update
To auto update the HASP security key:
Click the Request HASP Reprovision buon. The provisioning tool iniates a provision update
request.
Once connected, the update process will automacally apply the update license le. The progress of
the update process can be monitored in the status window.
An unsuccessful auto update request may be due to internet rewall security. Refer to
the manual update method below.

CM60 Series Programming Manual
06 March 2018
© 2018 Standard Communicaons Pty Ltd. All rights reserved.
16
50078-2
Conguraon
Manual Update
To manually update the HASP security key, the customer needs to generate a C2V le, and email it to
GME at pr[email protected]. GME will return an updated V2C le which needs to be manually
applied by the customer.
To generate a C2V le:
1. Click the Save Provision File (C2V) buon.
2. Save the le and send to GME. GME will reply back with an updated .V2C le, typically on
the same day.
To manually apply the updated V2C le:
1. Click the Manually Apply License (V2C) buon.
2. Open the saved V2C le and observe the status window for successful update.
Bluetooth Connecvity
The Bluetooth programming feature will be available in future programmer releases.

CM60 Series Programming Manual
06 March 2018
© 2018 Standard Communicaons Pty Ltd. All rights reserved.
17
50078-2
Conguraon
Firmware Upgrade
This secon covers the upgrades of the rmware using GME CM60 Flash Updater Programmer
version DSO044.X.XX. The rmware upgrades for the radio and the MSM are installed separately.
Ensure that the versions of the radio and MSM rmware are compable. Radios can be rolled back
to an older version of rmware if necessary.
To set up the equipment:
1. Connect the CM60 radio to the computer using the LS1-USB programming cable, and
appropriate adapter to suit the type of radio (Refer to LSI-USB Programming Cable
secon). Run CM60Flash.exe to open the CM60 Flash Updater applicaon.
Figure 6 - GME CM60 Flash Updater
2. Click Setup on the menu. Select Serial Port. Select the correct COM port.
Figure 7 - Congure Serial Port

CM60 Series Programming Manual
06 March 2018
© 2018 Standard Communicaons Pty Ltd. All rights reserved.
18
50078-2
Conguraon
To upgrade the rmware:
1. Turn the CM60 radio on. Click Start in the CM60 Flash Updater. The Load data from GME
encrypted binary le displays.
2. Select the appropriate *.geb le to ash to radio. Click Open. The Firmware Image
Selecon window displays.
3. Check the update box for the rmware to be updated. Click OK.
Do not interrupt the radio rmware upgrade. If the programming is interrupted, turn
the radio o, and then on. Follow the radio programming procedure to ash the radio.
The MSM rmware typically takes about 15 minutes to install. The radio rmware
typically takes about 2 minutes to install.
Figure 8 - Firmware Image Selecon Window
4. The ashing progress begins. Prog Mode (UIC) or PROG (radio) displays on the radio.
Updated dsPIC ash OK message displays when the radio is ashed successfully. The
radio resets.

CM60 Series Programming Manual
06 March 2018
© 2018 Standard Communicaons Pty Ltd. All rights reserved.
19
50078-2
Conguraon
Figure 9 - Firmware Flash Successful
5. Select Info on the toolbar menu and click Check radio rmware to verify radio rmware
version.
Figure 10 - Firmware Version Display

CM60 Series Programming Manual
06 March 2018
© 2018 Standard Communicaons Pty Ltd. All rights reserved.
20
50078-2
Conguraon
CM60 Programmer (DS0042.x.xx)
The CM60 series radio programmer is used to congure and align the radio. The programmer
version (DS0042.x.xx) is displayed at the top le of the programmer window. x.xx represents the
programmer version that’s downloaded and used by the customer.
Connecng the CM60 radio to the computer
1. Connect the CM60 radio to the computer USB port using the LS1-USB programming cable
and adapter to suit the type of radio.
2. Turn the radio on (local/remote control head). Turning the radio on is not required for a
base radio connecon.
Running the programming soware
To run the programming soware:
1. Run CM60.exe to open the CM60 radio programmer soware.
Figure 11 - GME CM60 Programmer Message
2. Click OK.
Figure 12 - GME CM60 Programmer
Other manuals for CM60 Series
1
Table of contents
Other GME Radio manuals