GNC Power Moon User manual

Power Moon
Aquarium LED lighting system


IT
POWERMOON
MANUALE D’INSTALLAZIONE, USO E MANUTENZIONE
1. COPYRIGHT
Il contenuto del presente manuale può essere modificato dal produttore senza preavviso ne ulteriori obblighi, al fine di includere variazioni e migliora-
menti. È vietata la riproduzione o la traduzione senza il consenso scritto del produttore. Il produttore è alla costante ricerca di nuove soluzioni che
portano all’evoluzione dei prodotti. Ci riserviamo quindi il diritto e dovere di apportare modifiche alle apparecchiature fornite in termini di forma,
dotazione e tecnologia.
2. PRESENTAZIONE E GARANZIA
POWERMOON è un prodotto altamente tecnologico che punta a soddisfare esigenze funzionali, estetiche e di risparmio energetico. L’apparecchio è
progettato e realizzato interamente in Italia con materiali solidi e ricercati. Il costruttore garantisce per 24 mesi i propri prodotti, nel rispetto della
legislazione vigente. Eventuali interventi di garanzia verranno effettuati esclusivamente presso la sede del Costruttore. Il trasporto e la riconsegna
delle apparecchiature sono a carico del Cliente.
Il costruttore non assume alcuna responsabilità sul funzionamento inaffidabile del prodotto, e quindi non estende la garanzia se:
• il montaggio non sia stato eseguito secondo le specifiche istruzioni del produttore
• le modifiche e le riparazioni non siano effettuate da un tecnico del servizio di assistenza GNC o da personale autorizzato da GNC;
• l’apparecchio non sia utilizzato conformemente alla sua destinazione d’uso e alle norme e alle istruzioni per l’uso.
Per rendere operativa la garanzia è sufficiente conservare il documento fiscale di acquisto (fattura o scontrino fiscale parlante).
3. AVVERTENZE PER LA SICUREZZA
Leggere attentamente le avvertenze contenute nel presente Manuale in quanto forniscono importanti indicazioni riguardanti la sicurezza nell’ installa-
zione, nell’uso e nella manutenzione del prodotto.
3.1 CLASSIFICAZIONE E DESTINAZIONE D’USO
Si tratta di apparecchio in bassa tensione, grado di protezione IP 20, idoneo all’uso normale. L’apparecchio è concepito per essere connesso a lam-
pade della serie SILVERMOON per la gestione del livello luminoso e per la simulazione dell’effetto alba e tramonto.
3.2 CONDIZIONI AMBIENTALI
Durante il funzionamento la temperatura ambiente deve essere compresa tra 10 °C e 40 °C, la pressione atmosferica compresa fra 700 e 1060
hPa. L’apparecchio deve essere collocato in posizione riparata dall’acqua.
3.3 CONDIZIONI TECNICHE DI SICUREZZA
L’utilizzo sicuro e il funzionamento a regola dell’arte dell’apparecchio viene garantito se:
• l’apparecchio non viene sollecitato in modo inappropriato;
• l’impianto elettrico dei locali interessati è realizzato secondo regola dell’arte ed è conforme alle norme in vigore nel paese di utilizzo;
• modifiche o manutenzioni all’apparecchio vengono eseguite da personale autorizzato da GNC;
• l’apparecchio è stato montato e messo in funzione seguendo le istruzioni di installazione correttamente.
Non appoggiarsi né posare alcun oggetto sul corpo dell’apparecchio, poiché in questo modo non è più garantito un funzionamento sicuro. Durante il
funzionamento l’apparecchio non deve essere coperto poiché in tal modo verrebbe impedito lo scambio termico con l’ambiente e potrebbe verificarsi
un surriscaldamento di parti dell’apparecchio.
3.4 NOTE AMBIENTALI
Ai sensi dell’art. 13 del D.L. del 25 luglio 2005 , n. 151 “Attuazione delle direttive 2002/95/CE, 2002/96/CE e 2003/108/CE, relative alla ridu-
zione dell'uso di sostanze pericolose nelle apparecchiature elettriche ed elettroniche, nonché allo smaltimento dei rifiuti”, l'apparato è considerato
“Rifiuto di Apparecchiature Elettriche ed Elettroniche” (RAEE). Alla fine della propria vita utile il prodotto va smaltito separatamente dagli altri rifiuti,
tramite centri di raccolta autorizzati.
4. DESCRIZIONE DELL’APPARECCHIO
L’apparecchio è concepito per essere collegato alle lampade della serie SILVERMOON. E' dotato di dispositivo SUPERCAP che consente in assenza di
alimentazione di mantenere tutti i dati impostati per oltre sei ore. L’apparecchio non deve essere coperto poiché in tal modo verrebbe impedito lo
scambio termico con l’ambiente e potrebbe verificarsi un surriscaldamento di parti dell’apparecchio.
5. INSTALLAZIONE
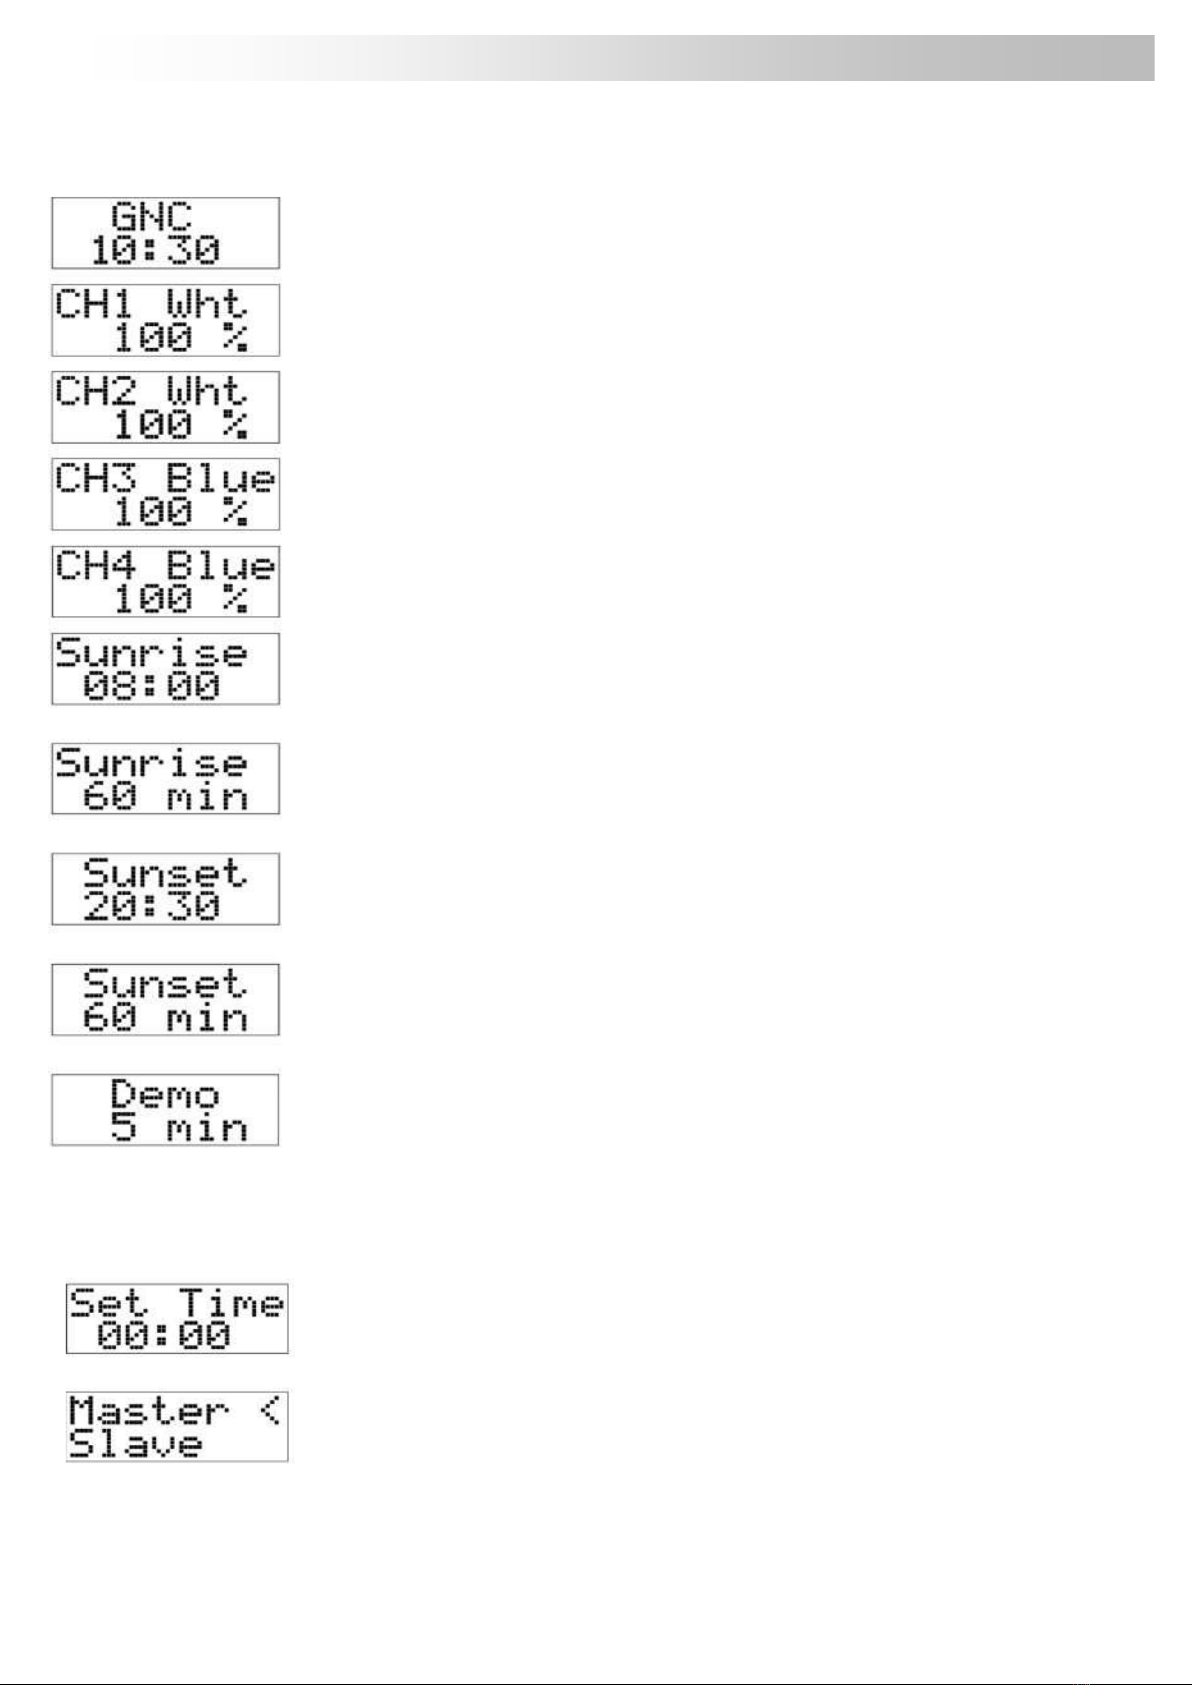
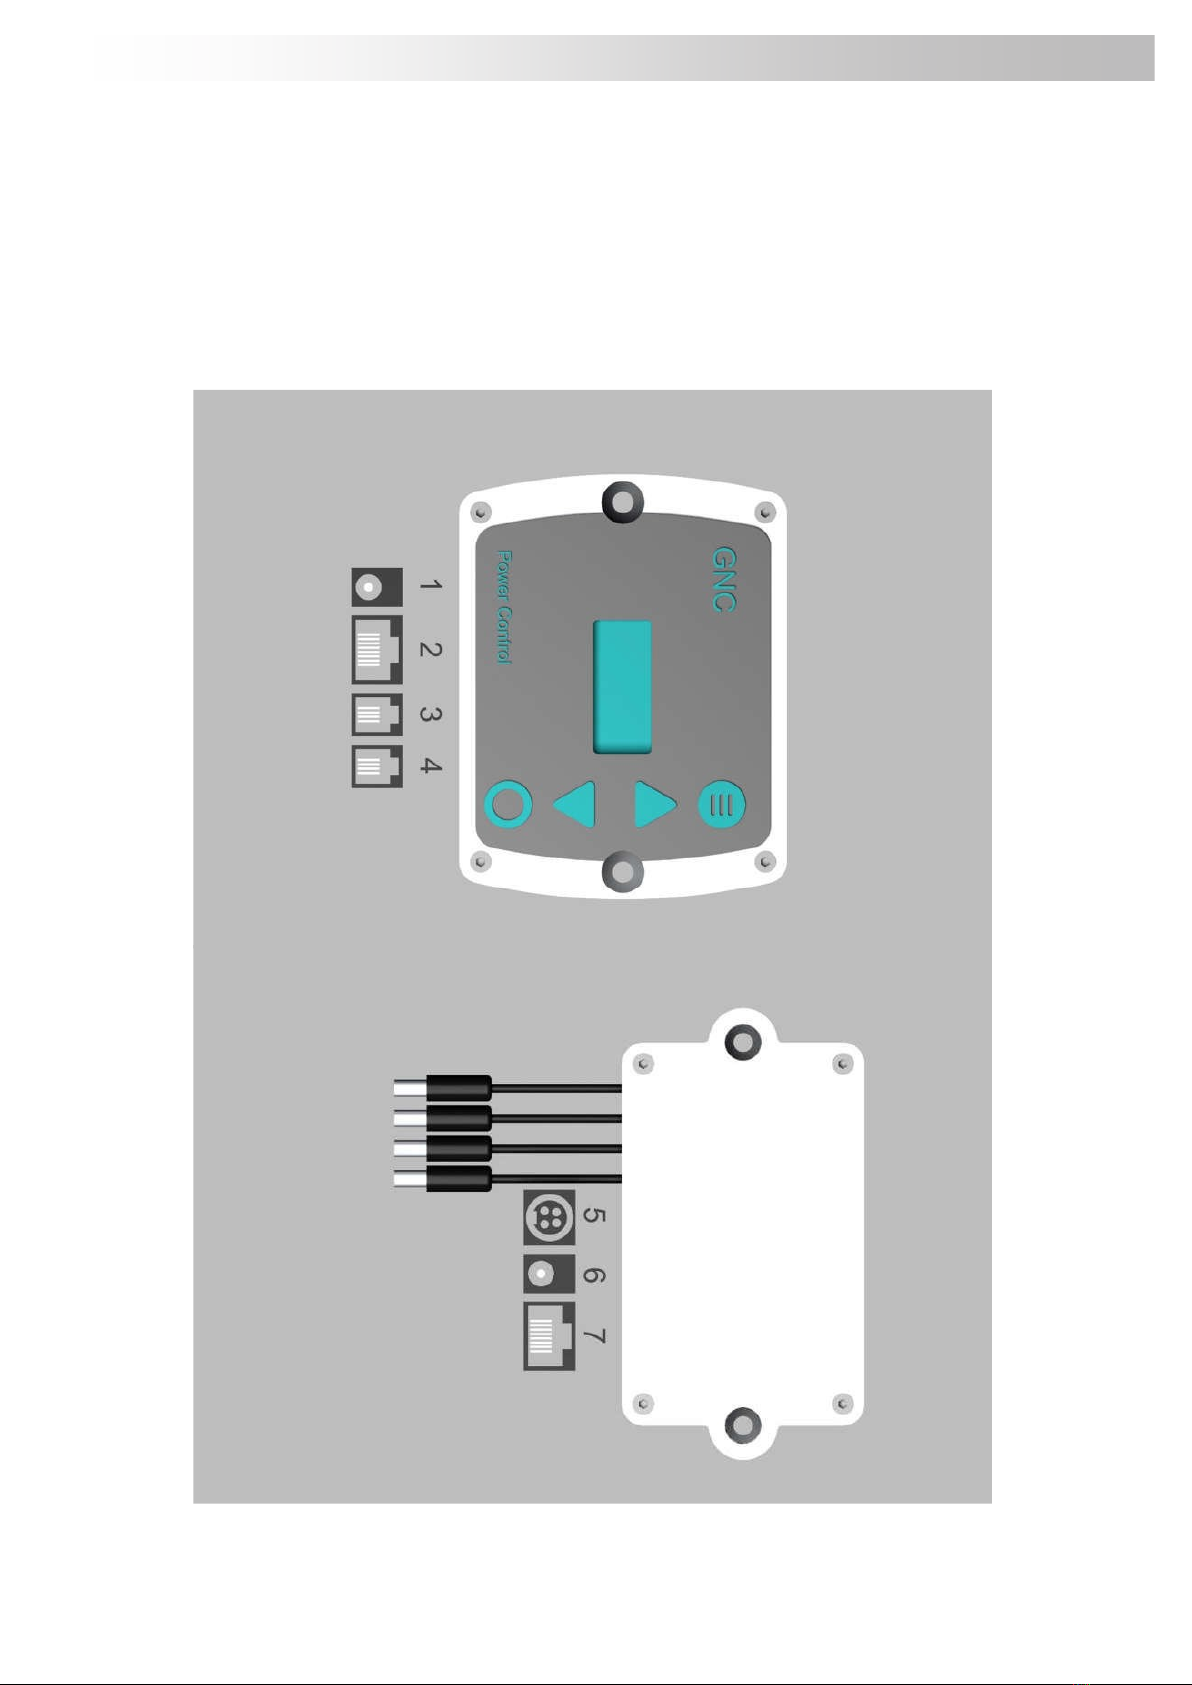
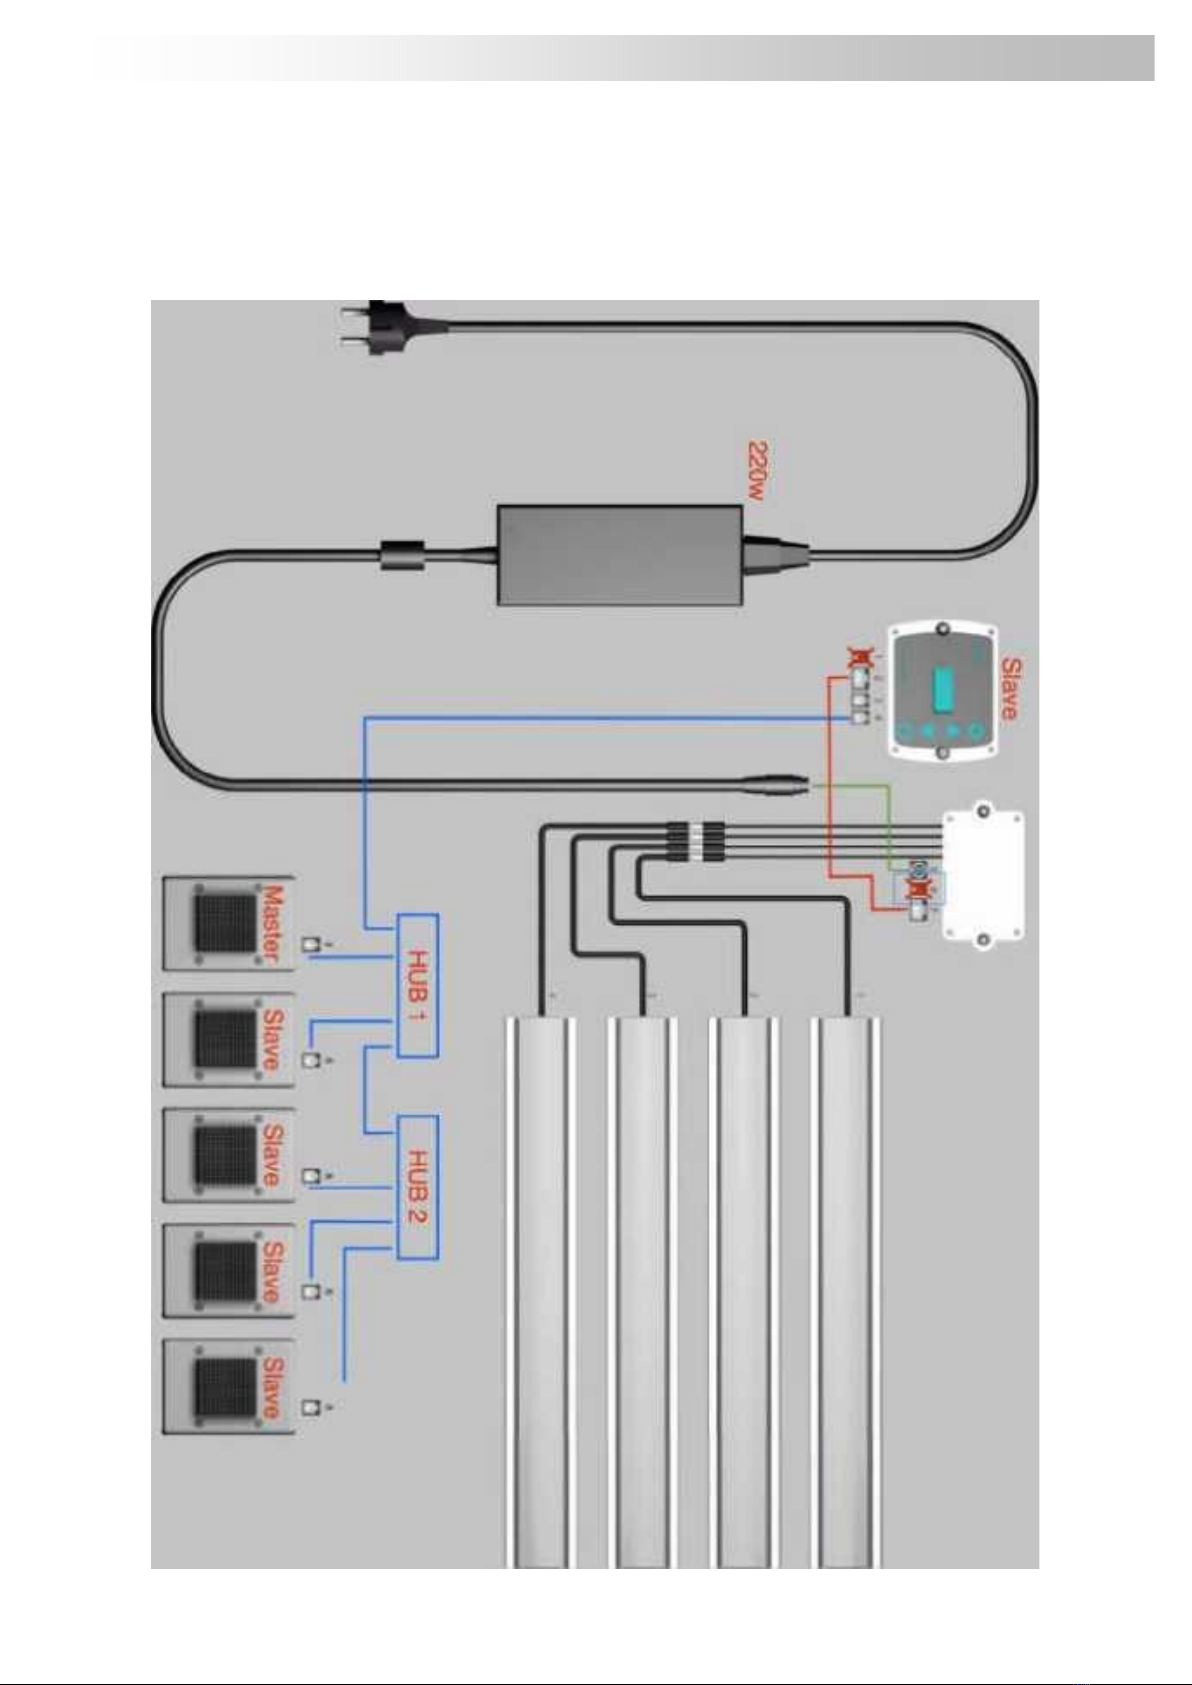
POWERMOON è predisposto per collegare fino a 4 barre mediante 4 cavetti numerati con jack DC. Il programma gestirà poi 4 canali sepa-
rati.Tramite POWER CONTROL è possibile impostare l’ora, programmare i livelli luminosi dei 4 canali e gli scenari di alba e tramonto oltre alla gestio-
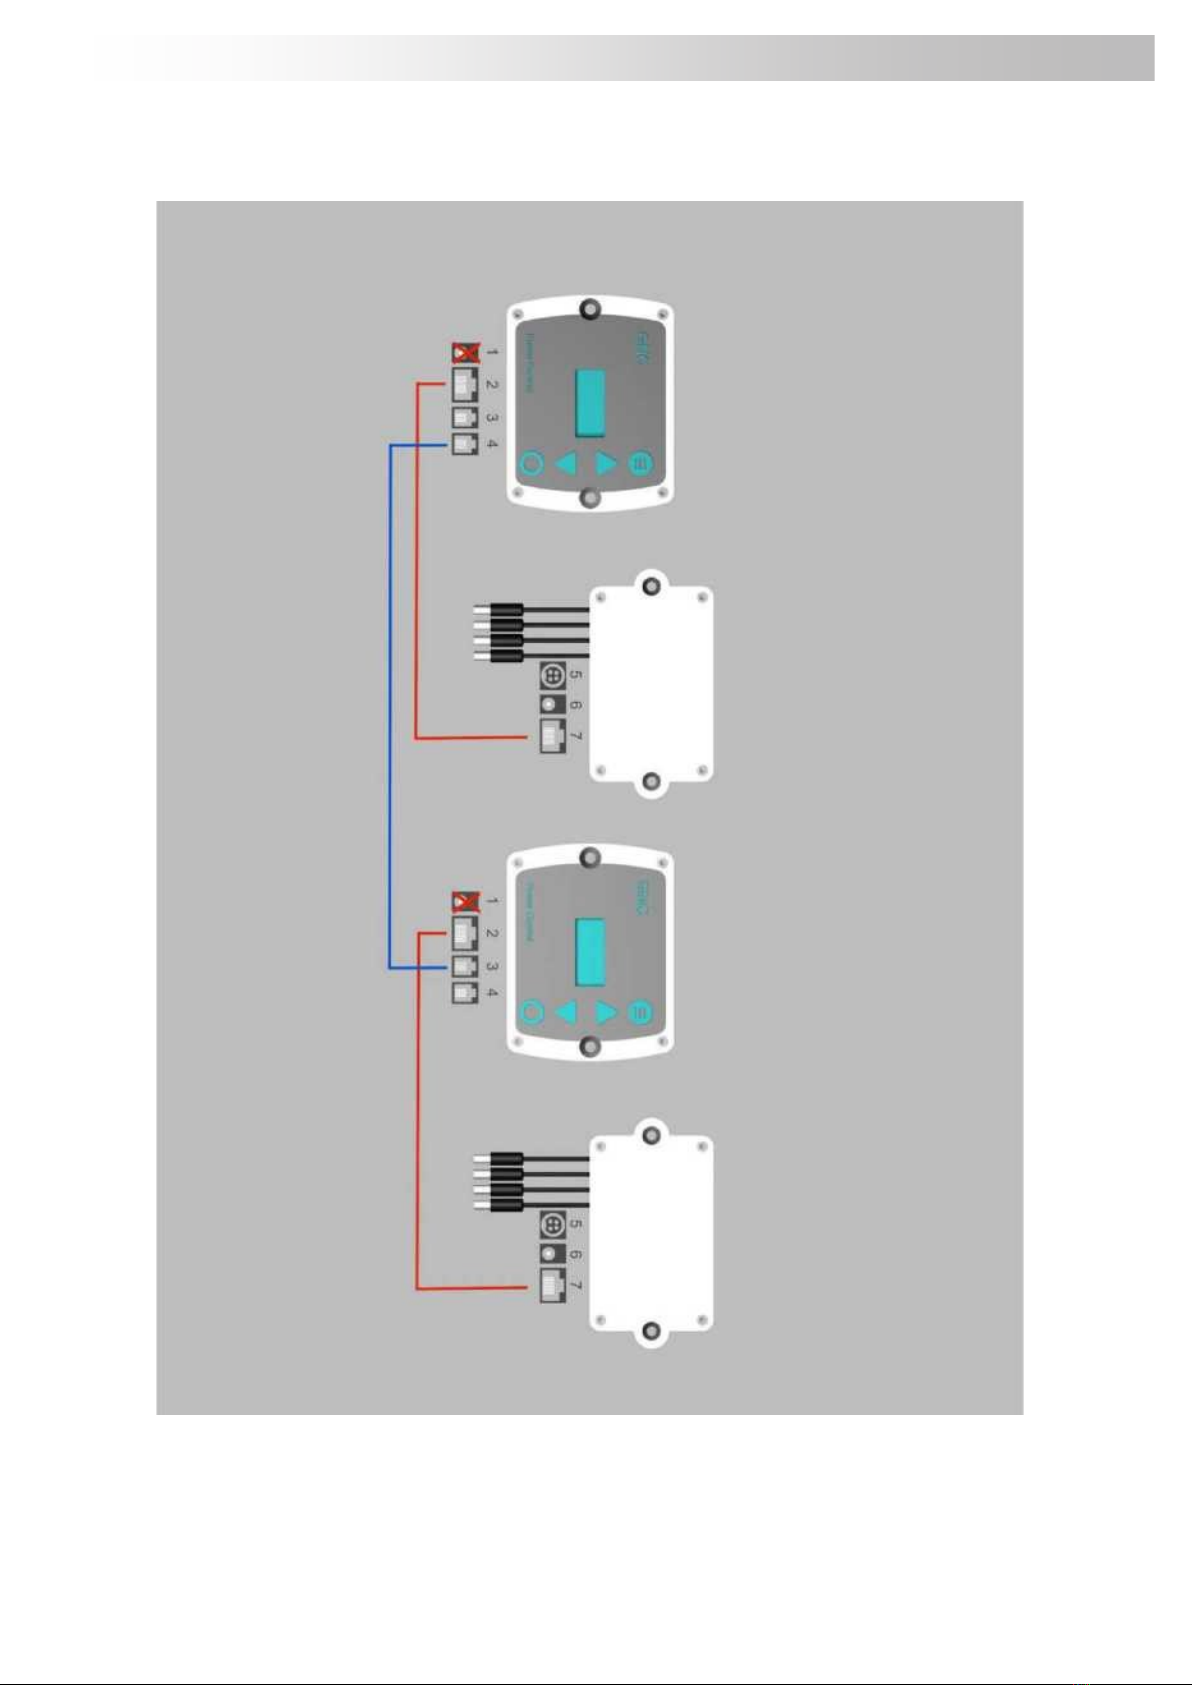
ne della funzione DEMO e all'impostazione di stato Master/Slave in caso di utilizzo in sincronizzazione con AirLink. Per il fissaggio a parete del Power
Control, vengono fornite due boccole nere in plastica da usare per il corretto distanziamento.
6. MANUTENZIONE E PULIZIA
L’apparecchio non ha bisogno di particolari manutenzioni. E’ vietato l’uso di sostanze liquide per la pulizia del prodotto.
7. DATI TECNICI
Potenza singolo canale: 24vdc x 2,5A
Temperatura di esercizio 10 - 40°C
Dimensioni ingombro POWER CONTROL 100x75x20 mm
Dimensioni ingombro POWERMOON 105x56x20 mm

IT
POWER CONTROL - MANAGEMENT DISPLAY
1 - Il display mostra l'orario corrente.
Premendo il pulsante menu passiamo al display successivo.
2 - Il display indica il livello di intensità relativo alla barra montata sul canale 1 agendo sui pulsanti ˄e ˅si imposta il
livello d'intensità desiderato. Completata l'impostazione, con il tasto menu passiamo al display successivo.
3 - Il display indica il livello di intensità relativo alla barra montata sul canale 2 agendo sui pulsanti ˄e ˅si imposta il
livello d'intensità desiderato. Completata l'impostazione, con il tasto menu passiamo al display successivo.
4 - Il display indica il livello di intensità relativo alla barra montata sul canale 3 agendo sui pulsanti ˄e ˅si imposta il
livello d'intensità desiderato. Completata l'impostazione, con il tasto menu passiamo al display successivo.
5 - Il display indica il livello di intensità relativo alla barra montata sul canale 4 agendo sui pulsanti ˄e ˅si imposta il
livello d'intensità desiderato. Completata l'impostazione, con il tasto menu passiamo al display successivo.
6- Il display indica l'orario di inizio dello scenario alba. Agendo sui pulsanti ˄e ˅si imposta l'ora desiderata. Con il
pulsante OK, si conferma e si passa all'impostazione dei minuti. Si conferma nuovamente con il pulsante OK e con il
pulsante menu si passa al display successivo.
7- Il display indica la durata in minuti dello scenario alba. Agendo sui pulsanti ˄e ˅si imposta la durata desiderata
(step di 5 minuti). Si conferma la scelta con il pulsante OK e con il tasto menu passiamo al successivo display.
8- Il display indica l'orario di inizio dello scenario tramonto. Agendo sui pulsanti ˄e ˅si imposta l'ora desiderata. Con
il pulsante OK, si conferma e si passa all'impostazione dei minuti. Si conferma nuovamente con il pulsante OK e con
il pulsante menu si passa al display successivo.
9- Il display indica la durata in minuti dello scenario tramonto. Agendo sui pulsanti ˄e ˅si imposta la durata deside-
rata (step di 5 minuti). Si conferma la scelta con il pulsante OK e con il tasto menu passiamo al successivo display.
10-E' possibile avviare un ciclo completo di alba/giorno/tramonto con questa funzione. Gli scenari alba e tramon-
to hanno una durata preimpostata di 3 min Con i pulsanti ˄e ˅si imposta la durata della fase giorno. Premendo
per tre secondi il pulsante OK avvio la dimostrazione.
Al termine il sistema riprenderà l'attività interrotta dalla DEMO. Analogamente, premendo nuovamente il tasto OK per tre secondi, si interrompe
la funzione DEMO e si torna alla precedente operatività.
11–Impostazione orario corrente.
Agendo sui pulsanti ˄e ˅si imposta l'ora desiderata. Con il pulsante OK, si conferma e si passa
all'impostazione dei minuti. Si conferma nuovamente con il pulsante OK e con il pulsante menu si torna al
display principale.
12- Quando Powermoon e Airlink sono collegati, è possibile stabilire se Powermoon deve comportarsi co-
me Master o Slave. Per accedere a questo display, dal display principale premere contemporaneamente
per 5 secondi i tasti MENU e OK. Con i pulsanti ˄e ˅effettuare la scelta e premere per 5 secondi il tasto
OK per confermare la scelta.

IT
CONTROLLER
FISSAGGIO A PARETE

IT
LEGENDA
1 –Ingresso alimentazione diretta PowerControl (NON UTILIZZARE MAI)
2 - Plug per collegamento al Powermoon mediante cavo in dotazione RJ45.
3 - Plug "in" sincronizzazione
4 - Plug "out" sincronizzazione
5 - Ingresso alimentatore SILVER POWER 220 (optional) per gestione di più di una barra
6 - ingresso alimentatore in dotazione con Silvermoon per gestione singola barra
7 - Plug per collegamento a Power Control

IT
SISTEMA ASSEMBLATO: POWERMOON CON 4 SILVERMOON
SILVER POWER 220 è opzionale e occorre per gestire sistemi con più di una barra.

IT
CONFIGURAZIONE CON DUE POWERMOON SINCRONIZZATI (GESTIONE FINO A 8 SILVERMOON)
Collegamento a mezzo cavetto opzionale Sync Cable (30 cm) o Sync Cable 2 (2 mt) –linea blu nell’immagine.

IT
GESTIONE POWERMOON SINCRONIZZATO CON PLAFONIERA BLURAY
POWERMOON MASTER - BLURAY SLAVE
Il settaggio dei canali effettuato con Power Control produrrà lo stesso effetto anche sui canali della BLURAY.
In particolare:
Canale 1 Power Control agirà sul canale dei bianchi della BLURAY
Canale 2 Power Control agirà sul canale dei rossi della BLURAY
Canale 3 Power Control agirà sul canale dei blu della BLURAY
Collegamento a mezzo cavetto opzionale Sync Cable (30 cm) o Sync Cable 2 (2 mt) –linea blu nell’immagine.

IT
GESTIONE POWERMOON SINCRONIZZATO CON PLAFONIERA BLURAY
POWERMOON SLAVE - BLURAY MASTER
In questo caso il settaggio effettuato sulla BLURAY, produrrà lo stesso effetto anche sui canali gestiti dal Power Control.
In particolare:
Canale dei bianchi della BLURAY agirà sui canali 1 e 2 del Power Control
Canale dei blu della BLURAY agirà sui canali 3 e 4 del Power Control
Collegamento a mezzo cavetto opzionale Sync Cable (30 cm) o Sync Cable 2 (2 mt) –linea blu nell’immagine.

ENG
POWERMOON
INSTALLATION, USE AND MAINTENANCE MANUAL
1. COPYRIGHT
The contents of this manual may be changed by the manufacturer without notice or additional obligations, in order to include changes and improve-
ments. Reproduction or translation without the written consent of the manufacturer is prohibited.
The manufacturer is constantly looking for new solutions that lead to the evolution of products. We therefore reserve the right and duty to make
changes to the equipment supplied in terms of form, equipment and technology.
2. PRESENTATION AND GUARANTEE
POWERMOON is a highly technological product that aims to satisfy functional, aesthetic and energy saving needs. The device is designed and manu-
factured entirely in Italy with solid and refined materials. The manufacturer guarantees its products for 24 months, in compliance with current legis-
lation. Any warranty work will be carried out exclusively at the manufacturer's premises. The transport and return of the equipment are charged to
the customer.
The manufacturer assumes no responsibility for the unreliable operation of the product, and therefore does not extend the warranty if:
• assembly has not been carried out according to the specific manufacturer's instructions
• modifications and repairs are not carried out by a GNC service technician or by personnel authorized by GNC;
• the appliance is not used in accordance with its intended use and with the standards and instructions for use.
To make the guarantee operational, it is sufficient to keep the fiscal document of purchase (invoice or speaking tax receipt).
3. SAFETY WARNINGS
Carefully read the warnings contained in this manual as they provide important information regarding safety in the installation, use and maintenance
of the product.
3.1 CLASSIFICATION AND DESTINATION OF USE
This is a low voltage device, IP 20 protection rating, suitable for normal use. The device is designed to be connected to the SilverMoon series lamps
for the management of the lighting level and effect simulation for the sunrise and sunset.
3.2 ENVIRONMENTAL CONDITIONS
During operation, the ambient temperature must be between 10 ° C and 40 ° C, atmospheric pressure between 700 and 1060 hPa. The appliance
must be placed in a position protected from water.
3.3 SAFETY TECHNICAL CONDITIONS
The safe use and proper functioning of the device is guaranteed if:
• The device is not subjected to inappropriate strain;
• the electrical system of the rooms concerned has been built according to the state of the art and complies with the regulations in force in the
country of use;
• Modifications or maintenance to the appliance are carried out by GNC authorised personnel;
• The unit has been installed and started up according to the correct installation instructions.
Do not lean on or place any objects on the body of the device as this will no longer ensure safe operation. Do not cover the unit during operation as
this will prevent heat exchange with the environment and may lead to overheating of parts of the unit..
3.4 ENVIRONMENTAL NOTES
Pursuant to art. 13 of the Decree Law of 25 July 2005, no. 151 "Implementation of Directives 2002/95/EC, 2002/96/EC and 2003/108/EC
on the reduction of the use of hazardous substances in electrical and electronic equipment and on waste disposal", the equipment is considered
"Waste Electrical and Electronic Equipment" (WEEE). At the end of its useful life, the product must be disposed of separately from other waste
through authorised collection points.
4. DESCRIPTION OF THE APPARATUS
The device is designed for connection to lamps of the SILVERMOON series. It is equipped with a SUPERCAP device that, in the absence of power
supply, allows to keep all the data set for more than six hours. The appliance should not be covered as this would prevent heat exchange with the
environment and could lead to overheating of parts of the appliance.
5. INSTALLATION
POWERMOON is designed to connect up to 4 bars using 4 numbered cables with DC jacks. Through POWER CONTROL it is possible to set the time,
program the light levels of the 4 channels and the sunrise and sunset scenarios in addition to the management of the DEMO function and the Mas-
ter/Slave status setting in case of use in synchronization with AirLink. For wall mounting of the Power Control, two black plastic bushings are supp-
lied for correct spacing.
6. MAINTENANCE AND CLEANING
The device is maintenance-free. The use of liquid substances to clean the product is forbidden.
7. TECHNICAL DATA
Single Channel Power: 24vdc x 2.5A
Operating temperature 10 - 40°C
Dimensions POWER CONTROL 100x75x20 mm
Dimensions POWERMOON 105x56x20 mm

ENG
POWER CONTROL - MANAGEMENT DISPLAY
1 - The display shows the current time.
Press the menu button to switch to the next display.
2 - The display shows the intensity level relative to the bar mounted on channel 1. Use the buttons ˄and ˅to set
the desired intensity level. Once the setting is complete, press the menu button to switch to the next display.
3 - The display shows the intensity level relative to the bar mounted on channel 2. Use the buttons ˄and ˅to set
the desired intensity level. Once the setting is complete, press the menu button to switch to the next display.
4 - The display shows the intensity level relative to the bar mounted on channel 3. Use the buttons ˄and ˅to set
the desired intensity level. Once the setting is complete, press the menu button to switch to the next display.
5 - The display shows the intensity level relative to the bar mounted on channel 4. Use the buttons ˄and ˅to set
the desired intensity level. Once the setting is complete, press the menu button to switch to the next display.
6- The display shows the start time of the sunrise scenario. Use the buttons ˄and ˅to set the desired hour. Press
the OK button to confirm and move on to minute setting. Confirm again with the OK button and use the menu but-
ton to switch to the next display.
7- The display shows the duration of the sunrise scenario in minutes. Use the ˄and ˅buttons to set the desired
duration (5-minute step). Confirm your choice by pressing the OK button and then press the menu button to switch
to the next display.
8- The display shows the start time of the sunset scenario. Use the buttons ˄and ˅to set the desired hour. Press
the OK button to confirm and move on to minute setting. Confirm again with the OK button and use the menu but-
ton to switch to the next display.
9- The display shows the duration of the sunset scenario in minutes. Use the ˄and ˅buttons to set the desired
duration (5-minute step). Confirm your choice by pressing the OK button and then press the menu button to switch
to the next display.
10- You can start a complete sunrise/day/ sunset cycle with this function. Sunrise and sunset scenarios have a
preset duration of 3 min. Use the ˄and ˅buttons to set the duration of the day phase. Press the OK button for
three seconds to start the demonstration.
When finished, the system will resume the activity interrupted by the DEMO. Similarly, by pressing OK again for three seconds, you can stop the
DEMO function and return to the previous operation.
11- Current time setting.
Use the buttons ˄and ˅to set the desired hour. Press the OK button to confirm and move on to minute
setting. You can confirm with the OK button and return to the main display with the menu button.
12- When Powermoon and Airlink are connected, you can determine whether Powermoon should behave
as Master or Slave. To access this display, from the main display press MENU and OK buttons simultane-
ously for 5 seconds. Use the ˄and ˅buttons to make your choice and press the OK button for 5 seconds
to confirm your choice.

ENG
CONTROLLER
WALL MOUNTING

ENG
LEGEND
1 - PowerControl direct power supply input (NEVER USE)
2 - Plug for connection to the Powermoon using the supplied RJ45 cable.
3 - Plug "in" synchronization
4 - Plug "out" synchronization
5 - Power supply input SILVER POWER 220 (optional) for managing more than one bar
6 - power supply input supplied with Silvermoon for single bar management
7 - Plug for connection to Power Control

ENG
ASSEMBLED SYSTEM: POWERMOON WITH 4 SILVERMOON
SILVER POWER 220 is optional and is needed to manage systems with more than one bar.

ENG
CONFIGURATION WITH TWO SYNCHRONIZED POWERMOON (MANAGEMENT OF UP TO 8 SILVERMOON)
Connection by optional cable Sync Cable (30 cm) or Sync Cable 2 (2 mt) - blue line in the image.

ENG
POWERMOON MANAGEMENT SYNCHRONIZED WITH BLURAY CEILING LIGHT
POWERMOON MASTER - BLURAY SLAVE
Setting the channels with Power Control will also have the same effect on the BLURAY channels.
In particular:
Channel 1 Power Control will affect the white channel of the BLURAY.
Channel 2 Power Control will act on the red channel of the BLURAY
Channel 3 Power Control will act on the blue channel of the BLURAY
Connection by optional cable Sync Cable (30 cm) or Sync Cable 2 (2 mt) - blue line in the image.

ENG
POWERMOON MANAGEMENT SYNCHRONIZED WITH BLURAY CEILING LIGHT
POWERMOON SLAVE - BLURAY MASTER
In this case the setting made on the BLURAY will have the same effect also on the channels managed by the Power Control.
In particular:
White channel of the BLURAY will act on channels 1 and 2 of the Power Control.
Blue channel of the BLURAY will act on channels 3 and 4 of the Power Control
Connection by optional cable Sync Cable (30 cm) or Sync Cable 2 (2 mt) - blue line in the image.

DE
POWERMOON
INSTALLATIONS-, GEBRAUCHS- UND WARTUNGSANLEITUNG
1. COPYRIGHT
Der Inhalt dieses Handbuchs kann vom Hersteller ohne vorherige Ankündigung oder zusätzliche Verpflichtungen geändert werden, um Änderungen
und Verbesserungen aufzunehmen. Nachdruck oder Übersetzung ohne schriftliche Genehmigung des Herstellers ist untersagt.
Der Hersteller sucht ständig nach neuen Lösungen, die zur Weiterentwicklung der Produkte führen. Wir behalten uns daher das Recht und die
Pflicht vor, Änderungen an dem gelieferten Gerät in Bezug auf Form, Ausstattung und Technologie vorzunehmen.
2. PRÄSENTATION UND GARANTIE
POWERMOON ist ein hochtechnologisches Produkt, das darauf abzielt, funktionale, ästhetische und energiespartechnische Anforderungen zu erfül-
len. Das Gerät wird vollständig in Italien aus robusten und ausgesuchten Materialien entworfen und hergestellt. Der Hersteller garantiert seine Pro-
dukte für 24 Monate in Übereinstimmung mit den geltenden Rechtsvorschriften. Etwaige Gewährleistungsarbeiten werden ausschließlich im Haupt-
sitz des Herstellers durchgeführt. Der Transport und die Rückgabe der Geräte gehen zu Lasten des Kunden.
Der Hersteller übernimmt keine Haftung für den unzuverlässigen Betrieb des Produkts und verlängert daher die Garantie nicht, wenn:
• die Montage nicht gemäß den Anweisungen des Herstellers durchgeführt wurde
• Änderungen und Reparaturen nicht von einem GNC-Servicetechniker oder von GNC autorisiertem Personal durchgeführt werden;
• das Gerät nicht gemäß seiner bestimmungsgemäßen Verwendung und den Normen und Gebrauchsanweisungen verwendet wird.
Um die Garantie in Betrieb zu nehmen, reicht es aus, den Steuerbeleg des Kaufs (Rechnung oder Spesensteuerbeleg) aufzubewahren.
3. SICHERHEITSHINWEISE
Lesen Sie die Hinweise in diesem Handbuch aufmerksam durch, da sie wichtige Informationen zur Sicherheit bei der Installation, Verwendung und
Wartung des Produkts enthalten.
3.1 KLASSIFIZIERUNG UND VORGESEHENE VERWENDUNG
Dies ist ein Niederspannungsgerät mit Schutzart IP 20 für den normalen Gebrauch. Das Gerät ist dazu konzipiert, an die Lampen der
SILVERMOON-Serie angeschlossen zu werden, um die Lichtstärke und die Simulation des Sonnenauf- und -untergangs zu steuern.
3.2 UMGEBUNGSBEDINGUNGEN
Während des Betriebs muss die Umgebungstemperatur zwischen 10 °C und 40 °C liegen, der Luftdruck zwischen 700 und 1060 hPa. Das Gerät
muss an einem vor Wasser geschützten Ort angebracht werden.
3.3 TECHNISCHE SICHERHEITSBEDINGUNGEN
Die sichere Verwendung und die einwandfreie Bedienung des Gerätes sind gewährleistet, wenn:
• Das Gerät nicht unangemessen beansprucht wird;
• Die Elektroinstallation der betreffenden Räume regelrecht umgesetzt wurde und den im Land der Verwendung geltenden Vorschriften entspricht;
• Änderungen oder Wartungsarbeiten am Gerät von einem von GNC autorisierten Mitarbeiter durchgeführt werden;
• Das Gerät ordnungsgemäß gemäß den Installationsanweisungen installiert und betrieben wurde.
Lehnen Sie sich nicht an und legen Sie keine Gegenstände auf das Gerät, weil auf diese Weise ein sicherer Betrieb nicht mehr gewährleistet ist.
Während des Betriebs darf das Gerät nicht abgedeckt werden, da dies den Wärmeaustausch mit der Umgebung verhindert und eine Überhitzung
von Teilen des Geräts auftreten kann.
3.4 UMWELTHINWEISE
Gemäß Art. 13 der Gesetzesverordnung Nr. 151 vom 25. Juli 2005 „Umsetzung der Richtlinien 2002/95/EG, 2002/96/EG und 2003/108/EG
zur Verringerung der Verwendung gefährlicher Stoffe in Elektro- und Elektronikgeräten sowie der Entsorgung von Abfällen“, gilt das Gerät als „Abfall
von Elektro- und Elektronikgeräten“ (WEEE). Am Ende seiner Nutzungsdauer muss das Produkt getrennt von anderen Abfällen über autorisierte Sam-
melstellen entsorgt werden.
4. BESCHREIBUNG DES GERÄTS
Das Gerät ist für den Anschluss an Lampen der Serie SILVERMOON vorgesehen. Es ist mit einer SUPERCAP-Vorrichtung ausgestattet, die bei fehlen-
der Stromversorgung die Speicherung aller Daten für mehr als sechs Stunden ermöglicht. Während des Betriebs darf das Gerät nicht abgedeckt
werden, da dies den Wärmeaustausch mit der Umgebung verhindert und eine Überhitzung von Teilen des Geräts auftreten kann.
5. INSTALLATION
POWERMOON kann bis zu 4 Balken über 4 nummerierte Kabel mit DC-Buchse verbinden. Das Programm steuert dann 4 getrennte Kanäle. Mit
POWER CONTROL ist es möglich, die Uhrzeit, die Lichtstärken der 4 Kanäle und die Szenarien für Sonnenaufgang und Sonnenuntergang einzustellen
sowie die DEMO-Funktion zu nutzen und die Master/Slave-Statuseinstellungen zu programmieren, wenn das Gerät synchron mit AirLink verwendet
wird. Zur Wandmontage der Power Control sind zwei schwarze Kunststoffbuchsen enthalten, um den korrekten Abstand festzulegen.
6. WARTUNG UND REINIGUNG
Das Gerät benötigt keine besondere Wartung. Die Verwendung von flüssigen Substanzen zur Reinigung des Produktes ist verboten.
7. TECHNISCHE DATEN
Leistung der einzelnen Kanäle: 24 VDC x 2,5 A
Betriebstemperatur 10 - 40°C
Gesamtabmessungen POWER CONTROL 100x75x20 mm
Gesamtabmessungen POWERMOON 105x56x20 mm

DE
POWER CONTROL –DISPLAYVERWALTUNG
1- Das Display zeigt die aktuelle Uhrzeit an.
Durch Drücken der Schaltfläche Menü können Sie zur nächsten Anzeige wechseln.
2- Das Display zeigt die Leuchtstärke in Bezug auf den an Kanal 1 installierten Balken an. Durch Drücken der Schalt-
flächen ˄und ˅können Sie die gewünschte Leuchtstärke einstellen. Wenn die Einstellung abgeschlossen ist, kön-
nen Sie mit der Schaltfläche Menü zur nächsten Anzeige wechseln.
3- Das Display zeigt die Leuchtstärke in Bezug auf den an Kanal 2 installierten Balken an. Durch Drücken der
Schaltflächen ˄und ˅können Sie die gewünschte Leuchtstärke einstellen. Wenn die Einstellung abgeschlossen ist,
können Sie mit der Schaltfläche Menü zur nächsten Anzeige wechseln.
4- Das Display zeigt die Leuchtstärke in Bezug auf den an Kanal 3 installierten Balken an. Durch Drücken der Schalt-
flächen ˄und ˅können Sie die gewünschte Leuchtstärke einstellen. Wenn die Einstellung abgeschlossen ist, kön-
nen Sie mit der Schaltfläche Menü zur nächsten Anzeige wechseln.
5- Das Display zeigt die Leuchtstärke in Bezug auf den an Kanal 4 installierten Balken an. Durch Drücken der Schalt-
flächen ˄und ˅können Sie die gewünschte Leuchtstärke einstellen. Wenn die Einstellung abgeschlossen ist, kön-
nen Sie mit der Schaltfläche Menü zur nächsten Anzeige wechseln.
6- Das Display zeigt die Startzeit des Sonnenaufgangsszenarios an.
Mit den Schaltflächen ˄und ˅können Sie die gewünschte Uhrzeit einstellen. Mit der Schaltfläche OK können Sie die
Einstellung bestätigen und zur Minuteneinstellung wechseln. Mit der Schaltfläche OK können Sie die Einstellung
bestätigen und mit der Schaltfläche Menü zur nächsten Anzeige wechseln.
7- Das Display zeigt die Dauer des Sonnenaufgangsszenarios in Minuten an.
Mit den Tasten ˄und ˅können Sie die gewünschte Dauer (in 5-Minuten-Schritten) einstellen.
Mit der Schaltfläche OK können Sie die Einstellung bestätigen und mit der Schaltfläche Menü zur nächsten Anzeige
wechseln.
8- Das Display zeigt die Startzeit des Sonnenuntergangszenarios an.
Mit den Schaltflächen ˄und ˅können Sie die gewünschte Uhrzeit einstellen. Mit der Schaltfläche OK können Sie die
Einstellung bestätigen und zur Minuteneinstellung wechseln. Mit der Schaltfläche OK können Sie die Einstellung
bestätigen und mit der Schaltfläche Menü zur nächsten Anzeige wechseln.
9- Das Display zeigt die Dauer des Sonnenuntergangszenarios in Minuten an.
Mit den Schaltflächen ˄und ˅können Sie die gewünschte Dauer (in 5-Minuten-Schritten) einstellen.
Mit der Schaltfläche OK können Sie die Einstellung bestätigen und mit der Schaltfläche Menü zur nächsten Anzeige
wechseln.
10- Mit dieser Funktion kann ein kompletter Sonnenaufgangs-/Tag-/ Sonnenuntergangszyklus gestartet werden.
Die Szenarien Sonnenaufgang und Sonnenuntergang haben eine voreingestellte Dauer von 3 Minuten. Mit den
Schaltflächen ˄und ˅können Sie die Länge der Tagesphase einstellen.
Durch Gedrückthalten der Schaltfläche OK über drei Sekunden wird die Demonstration gestartet.
Am Ende wird das System den von der DEMO unterbrochenen Betriebsmodus fortsetzen. Gleichermaßen wird durch erneutes Gedrückthalten der
Schaltfläche OK über drei Sekunden die DEMO-Funktion unterbrochen und der vorherige Betriebsmodus wiederhergestellt.
11- Einstellen der aktuellen Uhrzeit.
Mit den Schaltflächen ˄und ˅können Sie die gewünschte Uhrzeit einstellen. Mit der Schaltfläche OK kön-
nen Sie die Einstellung bestätigen und zur Minuteneinstellung wechseln. Mit der Schaltfläche OK können
Sie die Einstellung bestätigen und mit der Schaltfläche Menü zur Hautpanzeige wechseln.
12- Wenn Powermoon und Airlink miteinander verbunden sind, können Sie festlegen, ob Powermoon als
Master oder als Slave fungieren soll. Um auf dieses Display zuzugreifen, müssen Sie in der Hauptanzeige
gleichzeitig die Schaltflächen MENÜ und OK über 5 Sekunden gedrückt halten. Treffen Sie mit den Schalt-
flächen ˄und ˅Ihre Auswahl und halten Sie dann die Schaltfläche OK über 5 Sekunden gedrückt, um die
Auswahl zu bestätigen.
This manual suits for next models
1
Table of contents
Languages:
Other GNC Lighting Equipment manuals
Popular Lighting Equipment manuals by other brands

EuroLite
EuroLite LED SL-160 user manual

Fiamma
Fiamma Turbo-Vent Premium Installation and usage instructions

Lightolier
Lightolier TU Series specification

Flash
Flash DERBY LASER RG + LED user manual

Original BTC
Original BTC Davey Lighting DP7238 instruction manual

Somogyi
Somogyi home FK 27 instruction manual