GNS NTRIP-X User manual

NTRIP-X
Quick guide
V 1.0, 2023-03-21
1
INTRODUCTION
NTRIP-X is a multi-band, multi-constellation GNSS RTK base-station with built-in NTRIP Client and
Wi-Fi connectivity. The base station supports GPS L1/2/5, GLONASS L1/2, Galileo E1/5a/5b and
BDS B1I/2I/3I simultaneously.
NTRIP-X GNSS RTK Base-Station
This quick guide provides a brief overview of the user interface and helps setting up the device for
the first time.
NTRIP-X Features
•Ultra high precision GNSS RTK engine
•GPS L1 + L2 + L5
•GLONASS L1 + L2
•Galileo E1 + E5a + E5b
•BeiDou (BDS) B1I + B2I + B3I
•All constellations and all bands simultaneously
•NTRIP client using NTRIP protocol v1 & v2 (auto select)
•RTCM protocol v3
•Wi-Fi Station and Access Point 2.4 GHz with WPS

NTRIP-X
Quick guide
V 1.0, 2023-03-21
2
GNS Electronics GmbH
Adenauerstrasse 18
D –52146 Würselen
Germany
www.gns-electronics.com
Index
INTRODUCTION .................................................................................................................... 1
1 LED DESCRIPTION.............................................................................................................. 3
1.1 Wi-Fi LED (green) ........................................................................................................ 3
1.2 GNSS LED (green) ....................................................................................................... 3
1.3 Status LED (RGB) ........................................................................................................ 3
2 Setting up the device ......................................................................................................... 4
2.1 Using alternative antennas............................................................................................ 4
3 Configuration ..................................................................................................................... 5
3.1 Factory Reset .............................................................................................................. 5
3.2 Connecting the NTRIP-X to a Wi-Fi network..................................................................... 5
3.2.1 Using WPS to connect to a Wi-Fi network.................................................................. 5
3.2.2 Using the internal Wi-Fi Access Point to connect to a Wi-Fi network.............................. 6
3.3 Securing the device...................................................................................................... 7
3.3.1 Securing the Access Point ....................................................................................... 7
3.3.2 Securing the web interface...................................................................................... 7
3.4 Configuring the NTRIP Client ......................................................................................... 8
4 DOCUMENT REVISION HISTORY......................................................................................... 8

NTRIP-X
Quick guide
V 1.0, 2023-03-21
3
1LED DESCRIPTION
1.1 Wi-Fi LED (green)
The Wi-Fi LED lights up whenever the NTRIP-X device is connected to an access point. Its
intensity varies with the reception quality and can be used to find the optimum position for the
Wi-Fi antenna, just place it where the LED shines brightest.
Please note that the NTRIP-X can also work as an access point for initial configuration.
Connections where the NTRIP-X acts as access point are not reflected by the Wi-Fi LED.
1.2 GNSS LED (green)
The GNSS LED is active while the GNSS receiver has a position fix.
1.3 Status LED (RGB)
The status LED is full color and displays the status of several internal modules as a succession of
blink-codes in different colors. Each sequence starts with “white” and continues with colors according
to modules currently active. Colors and blink-codes are detailed in the table below, here are some
typical ones:
white –white - …
All modules but the Wi-Fi access point (AP) disabled. This is the state after factory reset, you can
connect to the internal AP and configure the device.
white –blue (double) - white –blue (double) - …
The device is successfully connected to a Wi-Fi network. No other modules active.
white –blue (double) –green (double) - white –blue (double) –green (double) - …
The device is successfully connected to a Wi-Fi network and to an NTRIP-Server.
Wi-Fi
(Green)
GNSS
(Green)
Status
(RGB)

NTRIP-X
Quick guide
V 1.0, 2023-03-21
4
Color
Module
Blink-Code
Meaning
White
System
Single
Begin of sequence
Blue
Wi-Fi
Station
Single
Wi-Fi network configured but not connected
Double
Wi-Fi network configured and connected
Green
NTRIP
Client
Single
NTRIP-Server configured but not connected
Double
NTRIP-Server configured and connected
The status LED is also used for the display of several special device states:
•Button pressed > 1 s.: Fast yellow flashing (-> Start WPS)
•WPS currently activated: Continuous yellow blinking
•Button pressed > 15 s.: Fast pink flashing (-> Factory reset)
•Transient errors: Fast red flashing for 2 s.
•System is booting: Several blink codes white/red
2Setting up the device
The delivery includes the NTRIP-X device, a 2.4 GHz Wi-Fi antenna, and a multi-band GNSS antenna
with 5m antenna cable. An additional USB-C power supply with at least 2 A current rating is needed.
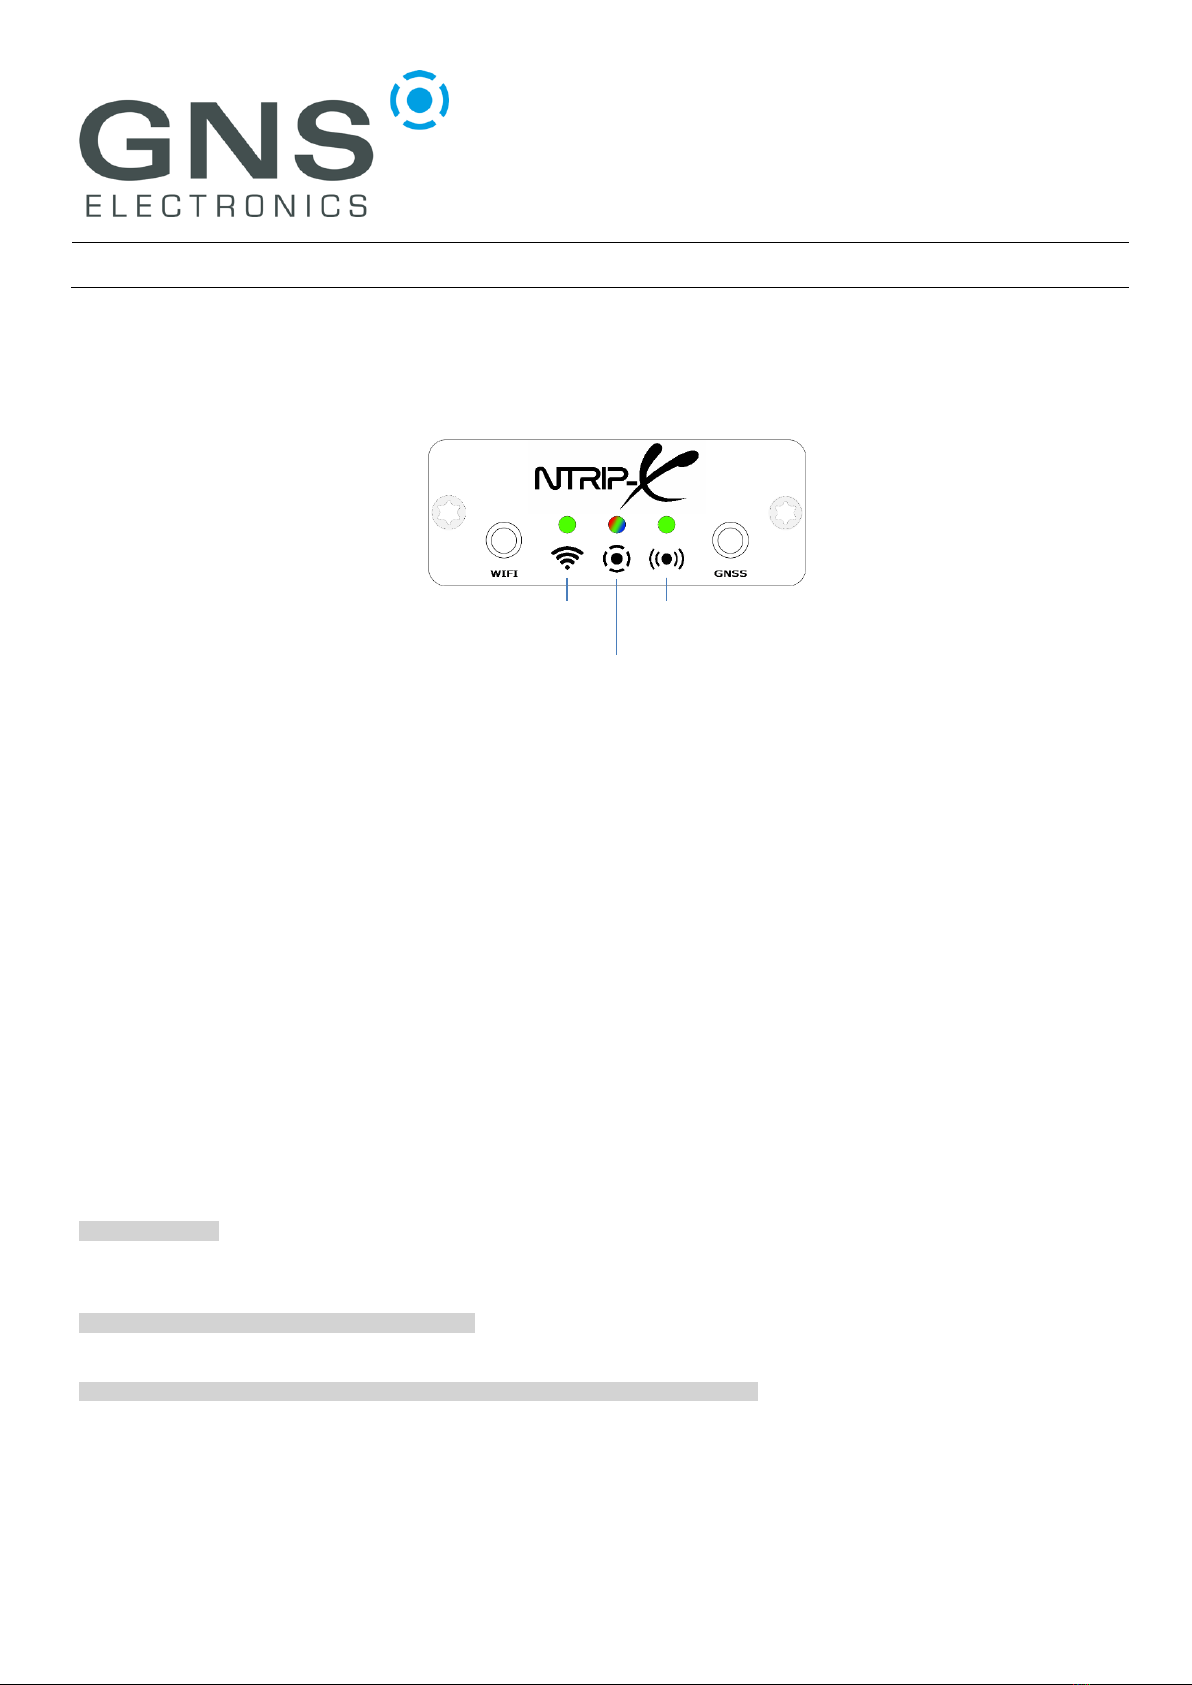
To set-up the device, connect the Wi-Fi antenna to the left (WIFI) antenna port and the GNSS antenna
to the right (GNSS) antenna port using the supplied antenna cable. Make sure that the GNSS antenna
is mounted with a good 360° view to the sky and in such a way that it will not move while active.
Plug-in the USB-C power supply (not included) to start operation.
Under no circumstances should the GNSS antenna be re-positioned while the device is
powered. If you need to change the antenna location, unplug the NTRIP-X power, change the
antenna position and then, with the antenna tightly fixed, power on the device again.
2.1 Using alternative antennas
Any 2.4 GHz antenna with SMA connector may be used as an alternative Wi-Fi antenna.
However, special care should be taken when selecting an alternative GNSS antenna to avoid degrading
the system performance. The supplied GNSS antenna is a high quality active multi-band and multi-
constellation antenna, and it should only be replaced by an active antenna suited for a phantom
supply of 3.3 V and 100 mA maximum current. It should support all of the following constellations and
bands: GPS L1/2/5, GLONASS L1/2, Galileo E1/5a/5b and BDS B1I/2I/3I.

NTRIP-X
Quick guide
V 1.0, 2023-03-21
5
3Configuration
The device can be configured via a web interface. In order to access the web interface, it is necessary
to connect the device to a Wi-Fi access point (AP) or router.
3.1 Factory Reset
When the NTRIP-X has never been configured, the Status LED will blink white every 2 seconds. If any
other colors are displayed in the blink cycle, the device should be factory reset before connecting it to
a new network.
To execute a factory reset, press the WPS button located at the rear of the device for 15 seconds until
the status LED flashes pink, then release the button and wait until the status LED returns to blinking
slowly white. This will clear all setting!
3.2 Connecting the NTRIP-X to a Wi-Fi network
The connection to an existing Wi-Fi network may be established either by using WPS if this is
supported by your AP/router or by accessing the NTRIP-X via its built-in AP.
3.2.1 Using WPS to connect to a Wi-Fi network
Make sure that the NTRIP-X is not yet configured (status LED blinks slowly only white). Otherwise
execute a factory reset as described in §3.1.
During the WPS pairing process the GNSS antenna may be left unconnected.
Place the NTRIP-X nearby the Wi-Fi access point (AP) or router and put the AP/router into WPS mode
(see AP/router documentation on how to do this). Press the WPS button until the status LED starts
flashing yellow, then release the button and the WPS pairing process will start. During this process the
LED will blink yellow. If a pairing error occurs, the status LED will flash red for two seconds and then
return to the normal state. Pairing errors are not uncommon with WPS and it normally just works if
you try again. Upon successful pairing, the device will reboot and the status LED will eventually
indicate the Wi-Fi connection (blue double blink). The built-in AP will be automatically disabled.

NTRIP-X
Quick guide
V 1.0, 2023-03-21
6
3.2.2 Using the internal Wi-Fi Access Point to connect to a Wi-Fi network
Make sure that the NTRIP-X is not yet configured (status LED blinks slowly only white). Otherwise
execute a factory reset as described in §2.1.
Using a smartphone, tablet or notebook, scan for available Wi-Fi networks and connect to the one
named NTRIP-XXXX (where XXXX is a unique number). Open a browser and navigate to
http://192.168.4.1 (not https://) where you should be greeted by the configuration page:
On a smartphone you might be presented with a one-column view of the same configuration page. In
this case you will need to scroll down to locate the settings for specific modules and the ‘Submit’
Button.
Now enable the Wi-Fi module by clicking on the switch marked ‘1’ in the screenshot above. This will
un-blur the Wi-Fi configuration under ‘2’. Fill-in SSID and Password in the now visible fields and press
the ‘Submit’ button marked ‘3’.
The device will reboot, and the status LED will eventually indicate the Wi-Fi connection (blue double
blink). Please note that the internal AP will not be disabled automatically, so continue with
Securing the device.
1
2
3

NTRIP-X
Quick guide
V 1.0, 2023-03-21
7
3.3 Securing the device
3.3.1 Securing the Access Point
It is highly advisable to disable the built-in Access Point (AP) after the device has been successfully
connected to a Wi-Fi network. Configuring via WPS will do this automatically but if Wi-Fi has been
configured manually via the web interface, the AP will remain active to allow re-configuration in case
the supplied SSID/password is wrong.
To disable the AP, log into the NTRIP-X under its new IP address and disable the module by clicking on
the switch located in the upper right corner of the WiFi hotspot configuration:
The ‘Submit’ Button needs to be pressed to activate the changes.
If for some reason the AP should remain active, the security should be adjusted to WPA/2-PSK and a
sufficiently complex password should be supplied. The ‘Submit’ Button needs to be pressed to activate
the changes.
3.3.2 Securing the web interface
Depending on the nature of the network, it may be sensible to secure access to the configuration web
interface. This is accomplished by changing the Admin module’s Auth Method to Username/Password
and entering a username and sufficiently complex password.
The ‘Submit’ Button needs to be pressed to activate the changes.
If the password gets lost, the only way to recover the device is to execute a factory reset!

NTRIP-X
Quick guide
V 1.0, 2023-03-21
8
3.4 Configuring the NTRIP Client
After connecting the Wi-Fi network and securing the device, the NTRIP client needs to be configured to
connect to an NTRIP server of your choice.
Enable the NTRIP client module by clicking on the switch in the upper right corner of the NTRIP client
pane which will unblur the configuration area:
Enter the host name or IP address of the NTRIP server of your choice and change the port number if
necessary, the standard port 2101 is pre-selected. Enter the Mountpoint, Username and Password as
supplied by the NTRIP server administrator and click the ‘Submit’ Button to activate the changes.
The device re-configures and should be showing a blue double-blink (Wi-Fi) and a green double-blink
(NTRIP client) to indicate success.
4DOCUMENT REVISION HISTORY
V0.9
2023-03-20
C. Diehl
Initial creation
V1.0
2023-03-21
C. Diehl
Release
©GNS ELECTRONICS GMBH2023
THE INFORMATION IN THIS DOCUMENTATION DOES NOT FORM ANY QUOTATION OR CONTRACT.TECHNICAL DATA ARE DUE TO BE CHANGED WITHOUT NOTICE.TECHNICAL RECOMMENDATIONS ARE
JUST FOR REFERENCE.
NO LIABILITY WILL BE ACCEPTED BY THE PUBLISHER FOR ANY CONSEQUENCE OF THIS DOCUMENT'S USE.
REPRODUCTION IN WHOLE OR IN PART IS PROHIBITED WITHOUT THE PRIOR WRITTEN CONSENT OF THE COPYRIGHT OWNER
Table of contents
Other GNS Receiver manuals