Go-Go Babyz IC-A User manual

Infant Cruizer
Safety, Assembly &
Operating Instructions
Model #IC-A
Go-Go Babyz Corporation

THANK YOU
ii
Thank you!
Thank you for your recent order. We wish you many happy travels
with your new Infant Cruizer!
Our goal at Go-Go Babyz is to offer innovative, high quality and
safe products to make life easier when you and your baby are “on
the go.”
We welcome suggestions and comments. Go-Go Babyz is
dedicated to making our current products and features easier
to use. Please send ideas for new features, products or general
In addition, we have created a photo gallery on our web site for
families, like us, using Go-Go Babyz products. Please feel free
to email or mail us any photos of you and your children using our
products and we would be happy to share them on our Family
Photo Gallery page.
Thank you again for your purchase. We appreciate your business.
Sincerely,
The Go-Go Babyz Family
Toll Free: 888.686.2552
www.gogobabyz.com

Safety .............................................................................................4
Registration & Maintenance ..........................................................5
Before Assembling the Infant Cruizer .............................................6
Parts ...................................................................................... 8
Assembling the Infant Cruizer ...................................................... 10
How to Properly Use the Infant Cruizer........................................ 12
TABLE OF CONTENTS iii
Table of Contents

Safety
DO NOT USE the Infant Cruizer until you read and understand
these instructions. Your child’s safety depends on you reading and
following these instructions.
!WARNING: NEVER LEAVE CHILD UNATTENDED.
!WARNING: AVOID SERIOUS INJURY FROM
FALLING OR SLIDING OUT. ALWAYS USE THE HARNESS SYSTEM
PROVIDED WITH YOUR INFANT OR TODDLER SEATAS INSTRUCTED
BY THE MANUFACTURER.
!WARNING: TO AVOID INJURY ALWAYS USE
BOTH THE FRONT AND THE REAR BRAKES WHEN INFANT
CRUIZER IS PARKED ON A HILL AND POINT INFANT CRUIZER
FACING DOWNHILL. The Infant Cruizer has greater braking power
in the forward direction. You can use the "quick stop" rear brakes if
you are on a flat surface.
!WARNING: IF YOU PARK ON A HILL, DO NOT
LEAVE YOUR HAND OFF THE INFANT CRUIZER.
!WARNING: THIS IS NOT A JOGGING INFANT
CRUIZER. DO NOT USE THIS PRODUCT WHILE RUNNING,
JOGGING, IN-LINE SKATING OR SIMILAR ACTIVITIES.
!WARNING: NO PARCEL BAGS OR RACKS
ARE PROVIDED WITH THE PRODUCT. Infant Cruizer may become
unstable if any parcel or racks, not approved by the manufatuer are
used.
!WARNING: DO NOT EXCEED WEIGHT LIMIT OF
THE INFANT OR TODDLER SEAT SET BY THE MANUFACTURER.
Maximum weight limit of stroller is 45 pounds.
!WARNING: NEVER USE ON ESCALATORS. For
escalators, you may find it convenient to carry your child and the
Infant Cruizer by the infant seat handle.
SAFETY4

REGISTRATION & MAINTENANCE 5
PLEASE REGISTER
By registering your product, Go-Go Babyz will automatically notify
you if there is any unforeseen product recall and we will keep your
name and date of purchase on file for referencing your warranty
information.
CARE & MAINTENANCE:
Periodically check for warn parts or loose screws. Repair or
replace damaged parts immediately. Periodically check that
wheels are secure by pulling on them. Do not store outside.
Registration & Maintenance

Before Assembling
PLEASE READ THOROUGHLY PRIOR TOASSEMBLING THE
INFANT CRUIZER.
REPORT SHIPPING DAMAGE IMMEDIATELY. IF YOU HAVE
RECEIVED THE INFANT CRUIZER IN THE MAILAND THE BOX
APPEARS DAMAGED, PLEASE INSPECT ITAND REPORT ANY
DAMAGE TO GO-GO BABYZ BEFORE THROWINGAWAY YOUR BOX.
GO-GO BABYZ WILL FILE A CLAIM DIRECTLY WITH UPS OR OTHER
FREIGHT CARRIER AND WILL REPLACE THE INFANT CRUIZER
AT NO EXTRA COST. PLEASE CALLA GO-GO BABYZ CUSTOMER
REPRESENTATIVE TOLL FREE AT 888.686.2552 OR LOCAL
408.360.0653.
CUSTOMER SERVICE AT GO-GO BABYZ CAN USUALLY RESOLVE
ANY PROBLEM ORANSWER ANY QUESTION YOU HAVE WITH
ONE PHONE CALL. PLEASE CALL US TOLL FREEAT 888.686.2552
OR LOCAL 408.360.0653 IF YOU HAVE ANY PROBLEMS WITH THE
INFANT CRUIZER.
ONCE YOU HAVE REMOVED YOUR INFANT CRUIZER FROM THE
BOX PLEASE INSPECT IT FOR DAMAGES AND CALL GO-GO BABYZ
CUSTOMER SERVICE IF YOU HAVE ANY QUESTIONS. PLEASE CALL
A CUSTOMER REPRESENTATIVE TOLL FREE AT 888.686.2552 OR
LOCAL 408.360.0653.
BEFORE ASSEMBLING6

GENERAL INSTRUCTIONS FOR ASSEMBLING THE INFANT CRUIZER
BEFORE ASSEMBLING YOUR INFANT CRUIZER, PLEASE TAKE A FEW MINUTES TO READ
THE SAFETY WARNINGS AND OPERATING INSTRUCTIONS.
ASSEMBLY INSTRUCTIONS 7
Assembly Instructions
Infant Cruizer Shown With Handle Folded Infant Cruizer Shown With Handle Open

INCLUDED PARTS:
• (1) INFANT CRUIZER BASE
• (2) FRONT CASTERS/WHEELS (ALREADYATTACHED TO THE BASE)
• (1) SPRING LATCH
(ALREADYATTACHED TO THE BASE)
• (1) HANDLE - LOCKING DISCS LOCATED AT THE TOP OF THE HANDLE
• (1) METALAXLE
• (2) SPRING CLIPS (LOCATED IN SEPARATE PLASTIC BAG LABELED SPRING
CLIPS)
• (2) REAR WHEELS
• (1) SAFETY STRAP (NOT SHOWN - YOU MAYATTACH THE STRAP TO THE
HANDLE OF THE INFANT CRUIZERAND USE FOR ADDED SAFETY)
INCLUDED ADAPTORS:
IN YOUR BOX YOU WILL HAVE EITHER:
1 GRACO ADAPTOR - ALREADY ATTACHED
TO THE BASE OF THE INFANT CRUIZER
(NO ADAPTOR ASSEMBLY REQUIRED)
OR
2 PEG PEREGO ADAPTORS &
2 BRITAX ADAPTORS
OR
2 PEG PEREGO ADAPTORS &
2 BRITAX ADAPTORS &
2 COMBI ADAPTORS
PARTSPART
PARTS8
Infant Cruizer Shown With Graco Adaptor

PARTS 9
PARTS
Front Casters with
“Toe Brakes”
Rear Wheel
Handle
Axle
Spring
Clip
Rear Wheel
Spring Latch (Top)
Handle “Locking
Discs” (not shown
in picture)
Infant Cruizer Base
Adaptors will attach
to at surface on base.
Push Button

Assembly Instructions
ASSEMBLY INSTRUCTION10
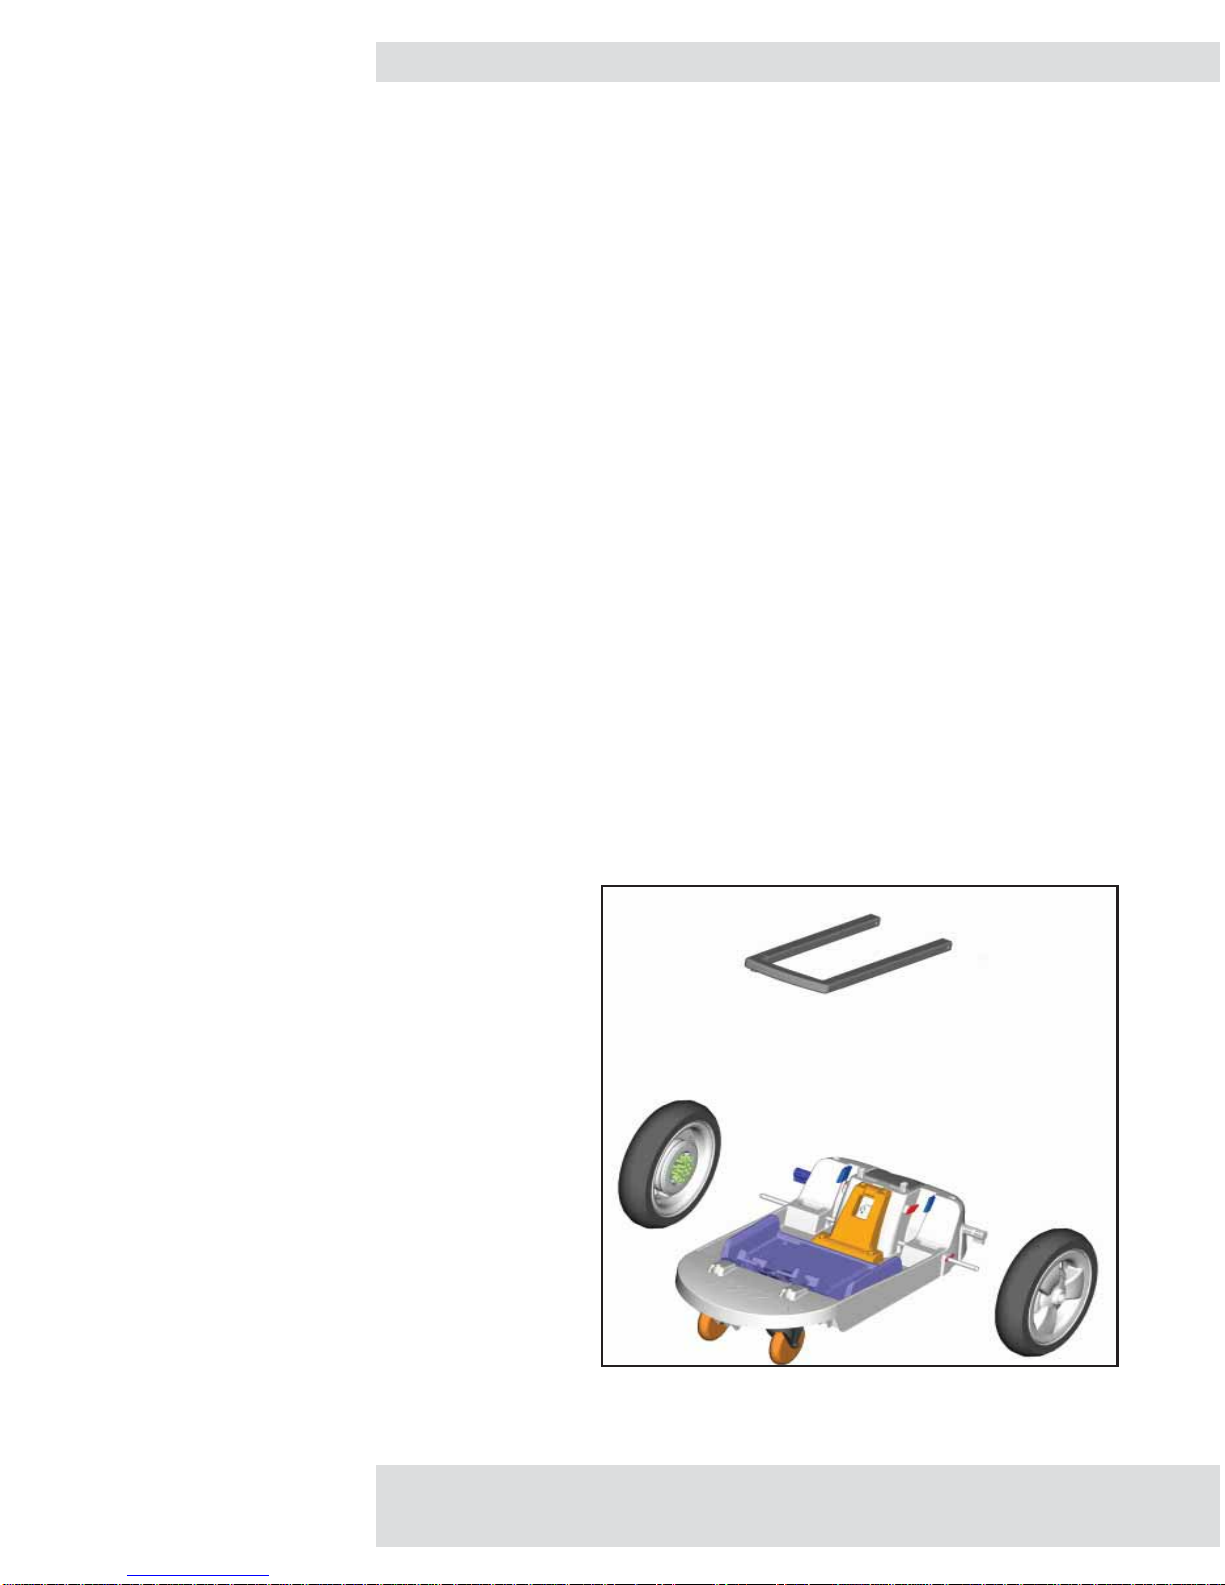
Step 1. Handle should be in folded posi-
tion for first step in assembly. When you
place (lay) the handle on the base of the
Infant Cruizer, the “locking discs”, which are
attached to the handle, will sit in the docking
slots of the Infant
Cruizer.
Step 2. Line up holes in the bottom of handle
with the axle holes in the base of the Infant
Cruizer.
Step 3. Slide axle through opening on
the side of the Infant Cruizer body. Make
sure axle goes through the body of the In-
fant Cruizer, through the hole in the handle,
through the brake, through the other side of
the handle and out the other side of the Infant
Cruizer body.
Step 4. Insert spring clips in axle as shown
in Picture 1.
Step 5. Slide on rear wheels until "click"
is heard and the push button in the center of
the wheel is flush with the surface as shown in
Picture 2.
Picture 1
Picture 2
AXLE, HANDLE, SPRING LATCH &
REAR WHEELS
Infant Cruizer in the folded position
Infant Cruizer with handle extended
Handle
“Locking
Discs”
Handle
“Docking Slots”
Rear Brake
Axle Holes
In Handle
& Base

Assembly Instructions Cont.
11
ASSEMBLY INSTRUCTIONS
Step 1. Graco Adaptors come already as-
sembled and attached to the Infant Cruizer.
No additional assembly is required.
For all other adaptors, you will need a Phillips
screwdriver to attach the two adaptors to the
Infant Cruizer. Screws should drive through
the adaptor and into the base of the Infant
Cruizer fairly easily.
Select the adaptors from the Infant Cruizer
parts that match your infant seat car seat.
Example: Bottom of Peg Perego Adaptor
shown in Picture 3.
NOTE: All car seat adaptors will have a two
adaptors (left side and right side) except the
Graco.
Step 2. Align the locator "posts" on the bot-
tom of the adaptors, as shown in Picture 6,
with Locator/Adaptor holes on the base of the
Infant Cruizer. As shown in Picture 4. Screw
openings in the adaptors should align with
screw holes in base of the Infant Cruizer. Use
screws provided to secure the adaptors.
NOTE: TheAdaptors attach to the top side
on the base of the Infant Cruizer. The locator
posts on the bottom of the adaptors will slip
into place on the base of the Infant Cruizer.
This is how you know they are in the correct
place on the Infant Cruizer base before attach-
ing.
Make sure after attaching the adaptors with
the screws to the Infant Cruiser that they are
secure.
WHEELS
Before first use, and periodically thereafter,
test wheels by pulling on them. Failure to se-
cure wheels may result in injury to your child.
To remove wheels: Push in the "push button"
in the center of wheel and pull off.
TIRES
The tires provided are the new long lasting,
composite "airless" tires. They provide a
smooth ride like pneumatic wheels, but they
will never go flat.
Picture 3
Picture 4
INFANT CAR SEAT ADAPTORS

1. TO OPEN INFANT CRUIZER
Step 1. From folded position of the Infant Cruizer, push
“Red” button (picture A) on top of handle and extend
handle slightly to remove locking disks from the docking
area.
Step 2. Pull handle up and back until it goes behind the
"spring latch" shown in Picture B.When handle snaps into
position behind the “Spring Latch”, your Infant Cruizer is in
the “operating” position.
2. TO OPERATE BRAKE SYSTEM
!WARNING: ALWAYS USE THE
REAR BRAKE WHEN INFANT CRUIZER IS PARKED,
EVEN ON FLAT SURFACES.
!WARNING: IF PARKED ON A HILL,
ALWAYS ENGAGE FRONT AND REAR BRAKES AND
POINT INFANT CRUIZER FACING "DOWNHILL."
THE INFANT CRUIZER HAS MORE BRAKING POWER
IN THE FORWARD DIRECTION THAN THE REAR
DIRECTION.
TO LOCK FRONT TOE BRAKES:
Pull Infant Cruizer backwards a little bit to expose caster
brake pedals in the front of the Infant Cruizer and step on
brake pedals until they remain in the locked position as
shown in Picture C.
TO LOCK REAR BRAKE:
Push brake pedal down at any location with your foot until
it locks in place, as shown in Picture D. IMPORTANT
NOTE: The back brake has three positions. Always use
the brake in the third position. You will hear three clicks
when the brake is fully depressed. The third click may take
some force to go into position.
TO UNLOCK FRONT TOE BRAKES:
Release the front brakes by pulling up the brake pedals
with your hand.
TO UNLOCK THE REAR BRAKE:
Release the rear brake by pushing up on the brake pedal
with your toe.
12 HOW TO PROPERLY USE THE INFANT CRUIZER
How to Properly Use the Infant Cruizer
Picture A
Picture B
Picture C
Picture D

How to Properly Use the Infant Cruizer
3. TO SECURE INFANT SEAT INTO
INFANT CRUIZER
Step 1. Lock rear brake as shown in Picture D, to keep
Infant Cruizer from rolling.
Step 2. Place infant seat into the base of the Infant
Cruizer in a similar manner to placing it in its' car
seat base. MAKE SURE YOU HEAR THE FAMILIAR
"CLICKS" THAT SECURE THE INFANT SEAT TO THE
BASE.
Step 3. Lift infant seat by its handle to make sure it
is connected properly, as shown in Picture E. Infant
Cruizer should lift with the infant seat.
!WARNING: Avoid serious
injury from falling or sliding out. ALWAYS USE
THE HARNESS SYSTEM PROVIDED WITH YOUR
INFANT OR TODDLER SEAT AS INSTRUCTED BY
THE MANUFACTURER.
4. TO REMOVE INFANT SEAT
FROM INFANT CRUIZER
Engage rear brake. Pull up on the release mechanism
of the infant seat and lift infant seat handle with your
other hand; just like when removing your infant car
seat from the car seat base.
5. TO FOLD THE INFANT CRUIZER
Step 1. Push Button on top of handle and close most
of the way, leaving approximately 3 or 4 inches of
opening.
Step 2. Squeeze top of spring latch with thumbs as
shown in Picture F.
Step 3. Swing handle all the way to the base and
close handle all the way.
Step 4. Lock handle into the body of the Infant Cruizer.
Make sure handle disks are locked into the docking
position of the body as shown in Picture G.
HOW TO PROPERLY USE THE INFANT CRUIZER 13
Picture E
Picture F
Picture G

EXPRESS LIMITED WARRANTY
Go-Go Babyz Corporation (“Go-Go Babyz”) warrants this product to be free from
defects in materials and workmanship for a period of one year from the date of
purchase. Go-Go Babyz will repair or replace, at its sole option, the defective
product within that one-year time period.
If you have a problem with your Go-Go Babyz product or are not satisfied with it,
please contact Go-Go Babyz Customer Service at 1.888.686.2552.
This express limited warranty does not cover:
(1) Pick-up, delivery, or freight charges.
(2) Corrosion caused by improper storage or failure to reasonably protect the
product from salt water and adverse conditions.
(3) Deterioration due to lack of maintenance and cleaning as specified in the
product instructions.
Go-Go Babyz SHALL NOT BE LIABLE FOR ANY INCIDENTAL OR
CONSEQUENTIAL DAMAGES ARISING FROM BREACH OF ANY EXPRESS
OR IMPLIED WARRANTY ON THIS PRODUCT. ANY IMPLIED WARRANTY,
INCLUDING IMPLIED WARRANTIES OF MERCHANTABILITY AND FITNESS
FOR A PARTICULAR PURPOSE, IS LIMITED TO THE DURATION OF
THE EXPRESS, LIMITED WARRANTY (ONE-YEAR FROM THE DATE OF
PURCHASE).
Under no circumstance shall any liability of Go-Go Babyz under this Express
Limited Warranty, or otherwise, exceed the price of the defective product or parts.
Note: Some states do not allow the exclusion or limitation on incidental or
consequential damages, so the above limitation may not apply to you. Some
states do not allow limitations on how long an implied warranty lasts, so the above
limitation may not apply to you.
This Express Limited Warranty gives you specific legal rights, and you may have
other rights, which vary from state to state.
CONTACT GO-GO BABYZ' CUSTOMER SERVICE FOR INFORMATION AND
ALL RETURNS:
Go-Go Babyz Returns
7013 Realm Drive, Suite C
San Jose, CA 95119
408.360.0653
14
This manual suits for next models
1
Table of contents