Go groove BassPULSE 5.1CH User manual

REGISTER NOW ENREGISTRER
USER GUIDE • GUIDE DE L’UTILISATEUR
GOgroove.com/warranty
BassPULSE®5.1CH
This product comes with a 1 year limited warranty.
Register this product within 30 days of sale to activate a complimentary
2 year warranty extension and receive free advanced technical support.
Learn more and register now.
Ce produit a une garantie limitée de 1 an.
Enregistrer ce produit dans les 30 jours suivant son achat pour activer
l’extension de garantie de 2 ans et bénécer de notre service après-vente
gratuit. Pour en savoir plus, enregistrez ce produit dès à présent.

2
See more exciting products at:
Voir plus de produits passionnants sur:
Para los productos mas fasinantes visitenos:
Weitere interessante Produkte an:
Scopri altri fantastici prodotti su:
查看更多精彩的产品
:
AccessoryPower.com/promoAccessoryPower.com/promo
GOgroove
®
SonaVERSE
®
GS3
GOgroove
®
BlueVIBE
®
FXT
GOgroove® AudiOHM® RNF

3
See more exciting products at:
Voir plus de produits passionnants sur:
Para los productos mas fasinantes visitenos:
Weitere interessante Produkte an:
Scopri altri fantastici prodotti su:
查看更多精彩的产品
:
AccessoryPower.com/promoAccessoryPower.com/promo
GOgroove
®
SonaVERSE
®
GS3
GOgroove
®
BlueVIBE
®
FXT
GOgroove® AudiOHM® RNF

4
Need help with this product?
Besoin d’assistance sur ce produit?
¿Necesita ayuda con este producto?
Benötigen Sie Hilfe bei diesem Produkt?
Hai bisogno di aiuto per questo prodotto?
购买的产品,是否需要提供协助?
GOgroove.com/support

5
BassPULSE®5.1CH

6
Package contents
L’emballage contient
Contenidos del paquete
Packungsinhalt
Contenuto della confezione
包装内容
q
w
e
e
w
r
ty
u

7
EN
1Subwoofer
2Front satellites (6 foot cable)
3Rear satellites (12 foot cable)
4Center speaker
5EVA pads
6Adhesive strip
73.5mm input cables (green, black, orange)
FR
1Caisson de basse
2Enceintes avant (cable de 6ft)
3Enceintes arrière (cable de 12ft)
4Enceintes centrales
5Protections anti-vibrasion
6Bande adhésive
7Câbles en entrée de 3.5mm (vert, noir, orange)
ES
1Subwoofer
2Satélitesfrontales(cablede1,8 metros)
3Satélitestraseros(cablede3,6 metros)
4Altavozcentral
5AlmohadillasEVA
6Tiraadhesiva
7Cablesdeentradade3,5mm (verde,negro,naranja)
DE
1
Basslautsprecher
2
Kleinere Lautsprecher auf derVorderseite (1,8-m-Kabel)
3
Kleinere Lautsprecher auf der Rückseite (3-m-Kabel)
4
Zentrallautsprecher
5
EVA-Pads (Vibrationskissen)
6
Klebestreifen
7
3,5-mm-Eingangskabel (grün, schwarz, orange)
ZH
1低音炮
2前置卫星式(6 英尺电缆)
3后置卫星式(12 英尺电缆)
4中置扬声器
5EVA 垫
6胶带
73.5 毫米输入电缆(绿色,黑色,橙色)
IT
1Subwoofer
2Satellitifrontali(cavoda1,8m)
3Satellitiposteriori(cavoda3,6m)
4Altoparlantecentrale
5Feltriniantivibrazione
6Strisciaadesiva
7Cavidiingressoda3,5mm(verde,nero,arancione)

8
t
Product diagram
Schéma du produit
Diagrama de product
Producktabbildung
Schema del prodotto
产品图
i
o
a
q
w
y
u
e
r

9
EN
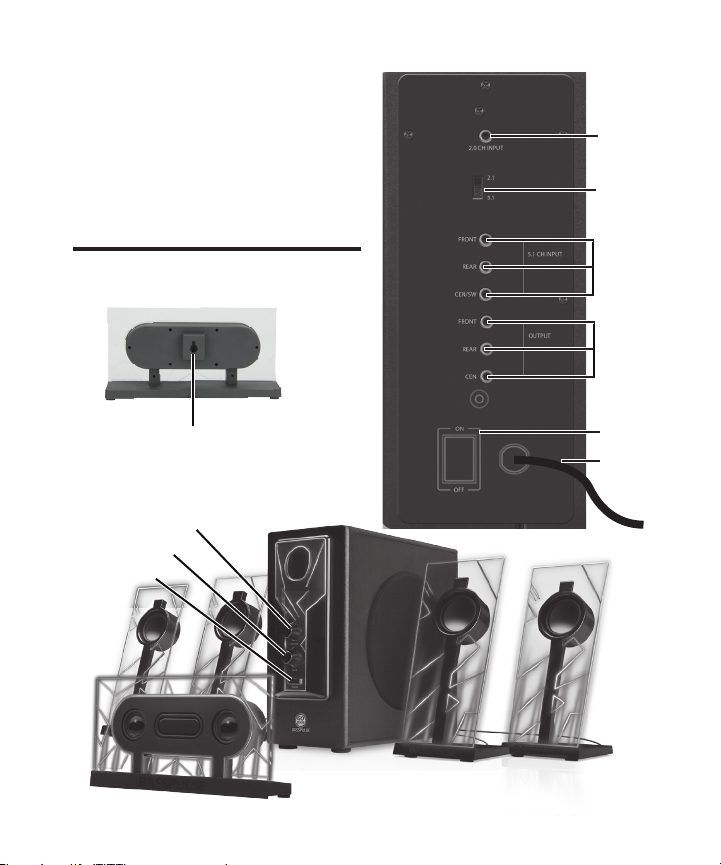
12.0CH INPUT port (1x 3.5mm)
22.1CH / 5.1CH INPUT switch
35.1CH INPUT ports (green, black, orange)
4Speaker OUTPUT ports (purple, white, yellow)
5Center speaker hang hole
6Power switch
7AC cable
8VOLUME knob
9BASS knob
10 PULSE button
ES
1Puertode entradaCH2.0y (1x3.5mm)
2Interruptordemodo2.1CH /5.1CH
3Puertosde entrada5.1CH (verde,negro,naranja)
4Puertosde salidadealtavoz(púrpura,blanco,amarillo)
5Agujeroparacolgardelaltavozcentral
6Interruptordepotencia
7CableAC
8BotóndeVOLUMEN
9BotóndeBAJOS
10 Botóndevibración
IT
1Portadiingresso2.0(1x3.5mm)
2Selettorepermodalitàa2.1/5.1
3Portediingressoperil5.1(verde,nero,arancione)
4PortediUSCITAperaltoparlanti(viola,bianco,giallo)
5Foroperappenderel'altoparlantecentrale
6Interruttorediaccensione
7CavoAC
8ManopolaVOLUME
9ManopolaBASSI
10 ManopolaIMPULSI
FR
1Port en entrée du haut-parleur
2Mode HP 2.1/ HP 5.1 interchangeable
3Ports d'entrée HP 5.1 (vert, noir, orange)
4Ports de sortie des enceintes (violet, blanc, jaune)
5Point de xation mural pour l'enceinte centrale
6Bouton marche/arrêt
7Câble d'alimentation
8Bouton de réglage du volume
9Bouton de réglage des basses
10 Bouton de réglage des pulsations
DE
12.0-KANAL-Eingangsport (1x 3.5 mm)
22.1-KANAL-/5.1-KANAL-Modusschalter
35.1-KANAL-Eingangs-Ports (grün, schwarz, orange)
4AUSGANGS-Ports für Lautsprecher (lila, weiß, gelb)
5Zentrallautsprecher zum Aufhängen geeignet
6Netzschalter
7Wechselspannungskabel
8LAUTSTÄRKE-Regler
9BASS-Regler
10 IMPULS-Regler
ZH
12.0声道输入端口(1x3.5mm)
22.1声道/5.1声道模式开关
35.1声道输入端口(绿色,黑色,橙色)
4扬声器输出端口(紫色,白色,黄色)
5中置扬声器挂孔
6电源开关
7交流电缆
8音量旋钮
9低音旋钮
10 脉冲按钮

10
FR
FL
RR
C
RL
FR
FL
RR
C
RL
2.0 CH INPUT
2.1
5.1
FRONT
REAR 5.1 CH INPUT
OUTPUT
CEN/SW
FRONT
REAR
CEN
ON
OFF
PURPLE
WHITE
YELLOW
Speaker setup
Operating instructions
Front speakers: Connect the purple 3.5mm speaker plug to the purple FRONT OUTPUT port.
Rear speakers: Connect the white 3.5mm speaker plug to the white REAR OUTPUT port.
Center speaker: Connect the yellow 3.5mm speaker plug to the yellow CEN OUTPUT port.
EN
PEEL
PEEL
PEEL
Center speaker mounting.
1. Surface: Peel and stick the EVA pads underneath the speaker.
2. Monitor: Peel and stick the adhesive underneath the center speaker. Carefully place the speaker in the
desired postion on the monitor and hold for 30 seconds.
3.Wall: Hang the speaker using a nail or screw (not included).
q w e

11
VOLUME
BASS
PULSE
Audio input
Playing audio
5.1 channel input: compatible with computers equipped with surround sound cards.
Move the input switch to 5.1 mode.
Front speakers: Connect the green 3.5mm cable to the green FRONT 5.1CH INPUT port.
Rear speakers: Connect the black 3.5mm cable to the green REAR 5.1CH INPUT port.
Center speaker: Connect the orange 3.5mm cable to the orange CEN 5.1CH INPUT port
2.0 channel input: compatible with any audio device with 3.5mm headphone output.
Move the input switch to 2.1 mode.
Use one of the included 3.5mm cables to connect between your audio device and the 2.0 CH INPUT.
Use the volume and bass knobs to control the BassPULSE audio.
NOTE: For 5.1 audio surround sound, make sure of the following:
1.The settings in the computer as well as the media player/game settings
are set to 5.1ch output.
2.The media or game format supports 5.1ch output.
3.The volume is up in the media player/game, computer and BassPULSE.
Use the PULSE button to turn the LED lights ON/OFF.
For PULSE eect, turn and bass up past 80%.
2.0 CH INPUT
2.1
5.1
FRONT
5.1 CH INPUT
FRONT
REAR 5.1 CH INPUT
OUTPUT
CEN/SW
FRONT
REAR
CEN
ON
GREEN
BLACK
ORANGE
PC
5.1 CH 2.0 CH

12
Mode d’emploi
FR
Conguration des enceintes
FR
FL
RR
C
RL
FR
FL
RR
C
RL
2.0 CH INPUT
2.1
5.1
FRONT
REAR 5.1 CH INPUT
OUTPUT
CEN/SW
FRONT
REAR
CEN
ON
OFF
PURPLE
WHITE
YELLOW
Enceintes avant : Connectez la prise violette de 3.5 mm au port de sortie avant violet.
Enceintes arrière : Connectez la prise blanche de 3.5 mm au port de sortie arrière blanc.
Enceintes centrales : Connectez la prise jaune de 3.5 mm au port de sortie centrale jaune.
PEEL
PEEL
PEEL
Support de xation pour l’enceinte centrale
1. Surface : Retirez et collez les protection anti-vibration sour les enceintes.
2. Moniteur : Retirez et collez la bande adhésive sous l’enceinte centrale. Positionnez soigneusement
l’enceinte à l’endroit désiré sur le moniteur et tenir pendant 30 secondes.
3. Mur : Accrochez l’enceinte en utilisant un clou ou une vis (non fourni).
q w e

13
VOLUME
BASS
PULSE
Entrée audio
Audiojouer
FRONT
REAR 5.1 CH INPUT
OUTPUT
CEN/SW
FRONT
REAR
CEN
ON
GREEN
BLACK
ORANGE
PC
5.1 CH
2.0 CH INPUT
2.1
5.1
FRONT
5.1 CH INPUT
2.0 CH
L’entrée 5.1 est compatible avec les ordinateurs équipés de cartes son.
Passez l’interrupteur d’entrée en mode 5.1
Enceintes avant : Connectez la prise verte de 3.5mm au port de sortie avant 5.1 vert.
Enceintes centrales : Connectez la prise orange de 3.5mm au port de sortie centrale 5.1 orange.
Enceintes arrière : Connectez la prise noire de 3.5mm au port de sortie arrière 5.1 noir.
L’entrée 2.0 est compatible avec n’importe quel équipement équipé d’une sortie casque de 3,5mm.
Passez l’interrupteur d’entrée en mode 2.1.
Utilisez l’un des cables 3,5 mm pour eectuer la connexion entre votre dispositif audio et l’entrée des
haut-parleurs 2.0
Utilisezle contrôleduvolumeet des basse pourgérerle son des pulsationsdebasse.
Note: Pour le son en immersion 5.1, assurez-vous de respecter les points suivants :
1. La conguration de l’ordinateur ou du support de jeu sont réglés sur la
sortie 5.1
2. Le support ou le format du jeu supportent la sortie 5.1.
3.Lesonestactivépourlesupportde jeu,l’ordinateur etlesupportde pulsationdesbasses.
Utilisez le bouton de réglage des pulsations pour allumer ou éteindre
les lumières LED. Pour avoir un eet de pulsation, vous devez activer les
basses au-delà de 80%.

14
ES
Instrucciones de Operación
Conguración de los altavoces
FR
FL
RR
C
RL
FR
FL
RR
C
RL
2.0 CH INPUT
2.1
5.1
FRONT
REAR 5.1 CH INPUT
OUTPUT
CEN/SW
FRONT
REAR
CEN
ON
OFF
PURPLE
WHITE
YELLOW
Altavoces frontales: Conectar la clavija púrpura de 3,5 mm del altavoz al puerto de salida frontal de color púrpura.
Altavoces traseros: Conectar la clavija blanca de 3,5 mm del altavoz al puerto de salida trasero de color blanco.
Altavoz central: Conectar la clavija amarilla de 3,5 mm del altavoz al puerto de salida central de color amarillo.
PEEL
PEEL
PEEL
Montaje del altavoz central.
1. Supercie: Pelar y pegar las almohadillas EVA debajo del altavoz.
2. Monitor: Pelar y pegar el adhesivo debajo del altavoz central. Con cuidado, coloque el altavoz en la
posición deseada en el monitor y mantener durante 30 segundos.
3. Pared: Cuelgue el altavoz usando un clavo o un tornillo (no incluido).
q w e

15
VOLUME
BASS
PULSE
Entrada de audio
Reproducción de audio
FRONT
REAR 5.1 CH INPUT
OUTPUT
CEN/SW
FRONT
REAR
CEN
ON
GREEN
BLACK
ORANGE
PC
5.1 CH
2.0 CH INPUT
2.1
5.1
FRONT
5.1 CH INPUT
2.0 CH
El canal de entrada 5.1 es compatible con ordenadores equipados con tarjetas de sonido envolvente.
Mover el interruptor de entrada al modo 5.1.
Altavoces frontales: Conectar el cable verde de 3,5 mm al puerto de entrada frontal verde 5.1CH.
Altavoz central: Conectar el cable naranja de 3,5 mm al puerto de entrada central naranja 5.1CH.
Altavoces traseros: Conectar el cable negro de 3,5 mm al puerto de entrada trasero verde 5.1CH.
La entrada estéreo 2.0 es compatible con cualquier dispositivo de audio con salida de auriculares de 3,5 mm
Use uno de los cables incluidos de 3.5 mm para conectar su dispositivo de audio y la entrada 2.0 canales
Use los botones de volumen y bajos para controlar el audio de los bajos vibradores
OBSERVACIÓN: Para el sonido envolvente 5.1, asegúrese de lo siguiente:
1.Los ajustes del ordenador, así como la conguración del reproductor /
conguración del juego estén jados en la salida 5.1 canales.
2. El formato multimedia o juego es compatible con salida de 5.1 canales.
3. El volumen está alto en el reproductor multimedia / juego, ordenador y en el
bajo vibrador.
Use el botónVIBRADOR para cambiar las luces LED a ENCENDIDO o
APAGADO. Para el efectoVIBRADOR, suba el bajo hasta más del 80%

16
DE
Bedienungsanleitung
Lautsprecher-Setup
FR
FL
RR
C
RL
FR
FL
RR
C
RL
2.0 CH INPUT
2.1
5.1
FRONT
REAR 5.1 CH INPUT
OUTPUT
CEN/SW
FRONT
REAR
CEN
ON
OFF
PURPLE
WHITE
YELLOW
Vorderseitige Lautsprecher: Stecken Sie den lilafarbenen 3,5-mm-Lautsprecherstecker in den gleichfarbigen AUSGANGS-Port auf der VORDERSEITE
Rückseitige Lautsprecher: Stecken Sie den weißen 3,5-mm-Lautsprecherstecker in den gleichfarbigen AUSGANGS-Port auf der RÜCKSEITE
Zentrallautsprecher: Stecken Sie den gelben 3,5-mm-Lautsprecherstecker in den gleichfarbigen AUSGANGS-Port in der MITTE
PEEL
PEEL
PEEL
Anbringung des Zentrallautsprechers
1. Oberäche: Entfernen Sie die Schutzfolie und kleben Sie die EVA-Pads auf die Unterseite des Lautsprechers.
2. Monitor: Entfernen Sie die Schutzfolie und befestigen Sie das Klebeteil auf der Unterseite des Zentrallautsprechers.
Platzieren Sie diesen vorsichtig dort, wo Sie ihn auf dem Monitor anbringen möchten, und halten Sie ihn in dieser
Position 30 Sekunden lang fest.
3.Wand: Aufhängung des Lautsprechers erfolgt mithilfe eines Nagels oder einer Schraube (nicht inbegrien).
q w e

17
VOLUME
BASS
PULSE
Audioeingang
Der 5.1-Kanaleingang ist kompatibel mit Computern, die über Surroundsound-Karten verfügen
Stellen Sie den Eingangsschalter auf 5.1-Modus
Vorderseitige Lautsprecher: Verbinden Sie das grüne 3,5-mm-Kabel mit dem gleichfarbigen 5.1-KANAL-EINGANGS-
Port derVORDERSEITE
Zentrallautsprecher: Verbinden Sie das orangenfarbene 3,5-mm-Kabel mit dem gleichfarbigen ZENTRALEN
5.1-KANAL-EINGANGS-Port der rückseitigen Lautsprecher. Anschließend verbinden Sie dann das schwarze 3,5-mm-
Kabel mit dem grünen 5.1CH-EINGANGS-Port der RÜCKSEITE
Der 2.0-Stereo-Eingang ist kompatibel mit jedem Audiogerät, das über einen 3,5-mm-Kopfhörerausgang verfügt
Stellen Sie den Eingangsschalter auf 2.1-Modus
Verwenden Sie eines der mitgelieferten 3,5-mm-Kabel, um eineVerbindung zwischen Ihrem Audiogerät und dem
2.0-KANAL-EINGANG herzustellen
Die Lautstärke- und Bassregler dienen zur Kontrolle der Bass-IMPULS-Töne.
HINWEIS: Für 5.1-Audio-Surroundsound ist Folgendes zu beachten:
1. Bei den PC- und Mediaplayer-/Spieleinstellungen muss der 5.1-KANAL-
Ausgang angezeigt werden.
2. Beim Mediaplayer/Spiel, Computer und BassIMPULS darf der Lautstärkeregler
nicht auf stumm geschaltet sein.3.The volume is up in the media player/game,
computer and BassPULSE.
3. Zum EIN-/AUSSCHALTEN der LED-Lichter verwenden Sie bitte den IMPULS-
Knopf. Für IMPULS-Eekte drehen Sie diesen auf über 80 % Bassstärke auf.
FRONT
REAR 5.1 CH INPUT
OUTPUT
CEN/SW
FRONT
REAR
CEN
ON
GREEN
BLACK
ORANGE
PC
5.1 CH
2.0 CH INPUT
2.1
5.1
FRONT
5.1 CH INPUT
2.0 CH
Wiedergabe von Audio

18
IT
Istruzioni operative
Impostazione dei diusori
FR
FL
RR
C
RL
FR
FL
RR
C
RL
2.0 CH INPUT
2.1
5.1
FRONT
REAR 5.1 CH INPUT
OUTPUT
CEN/SW
FRONT
REAR
CEN
ON
OFF
PURPLE
WHITE
YELLOW
Altoparlanti frontali: Collega la spina del cavo viola dell’altoparlante da 3,5 mm alla porta viola USCITA FRONTALE.
Altoparlanti posteriori Collega la spina del cavo bianco dell’altoparlante da 3,5 mm alla porta bianca USCITA POSTERIORE.
Altoparlante centrale: Collega la spina del cavo giallo dell’altoparlante da 3,5 mm alla porta gialla USCITA CEN.
PEEL
PEEL
PEEL
Montaggio dell’altoparlante centrale.
1. Su una superce: Rimuovi la pellicola e incolla i feltrini antivibrazione sotto all’altoparlante.
2. Sul monitor: Rimuovi la pellicola e incolla l’adesivo sotto all’altoparlante centrale. Posiziona con
attenzione l’altoparlante nella posizione desiderata sul monitor e fai pressione per 30 secondi.
3. Sul muro: appendi l’altoparlante usando un chiodo o una vite (non inclusi).
q w e

19
VOLUME
BASS
PULSE
Ingresso audio
Audio giocare
Altoparlanti frontali: Collega la spina del cavo viola dell’altoparlante da 3,5 mm alla porta viola USCITA FRONTALE.
Altoparlanti posteriori Collega la spina del cavo bianco dell’altoparlante da 3,5 mm alla porta bianca USCITA POSTERIORE.
Altoparlante centrale: Collega la spina del cavo giallo dell’altoparlante da 3,5 mm alla porta gialla USCITA CEN.
L’uscita a 5.1 canali è compatibile con computer dotati di schede audio surround.
Altoparlanti frontali: Collega il cavo verde da 3,5mm alla porta verde INGRESSO FRONTALE 5.1.
Altoparlante centrale: Collega il cavo arancione da 3,5mm alla porta arancione INGRESSO CEN 5.1.
Altoparlanti posteriori: Collega il cavo nero da 3,5mm alla porta nera INGRESSO POSTERIORE 5.1.
Connect the black 3.5mm cable to the green REAR 5.1CH INPUT port.
L’ingresso stereo 2.0 è compatibile con qualsiasi dispositivo dotato di un’uscita per cue da 3,5mm.
Sposta l’interruttore sulla modalità 2.1
Usa uno dei cavi da 3,5m inclusi per collegare il tuo dispositivo audio all’INGRESSO 2.0
Usa le manopole del volume e dei bassi per controllare l’audio BassPULSE.
NOTA: Per il suono surround a 5.1 canali, verica le seguenti cose:
1.Le impostazioni del computer e del riproduttore/gioco sono congurate
per uscita a 5.1 canali.
2. Il formato dei le o il gioco supporta l’uscita a 5.1 canali.
3. Il volume è alzato nel riproduttore/gioco, nel computer e in BassPULSE.
Usa il bottone IMPULSI per accendere o spegnere le luci LED. Per
l’eetto a IMPULSI, accendilo e aumenta i bassi oltre l’80%.
FRONT
REAR 5.1 CH INPUT
OUTPUT
CEN/SW
FRONT
REAR
CEN
ON
GREEN
BLACK
ORANGE
PC
5.1 CH
2.0 CH INPUT
2.1
5.1
FRONT
5.1 CH INPUT
2.0 CH

20
ZH
操作指令
ZH
扬声器设置
FR
FL
RR
C
RL
FR
FL
RR
C
RL
2.0 CH INPUT
2.1
5.1
FRONT
REAR 5.1 CH INPUT
OUTPUT
CEN/SW
FRONT
REAR
CEN
ON
OFF
PURPLE
WHITE
YELLOW
前置扬声器:将紫色 3.5 毫米扬声器插头连接到紫色前置输出端口。
后置扬声器:将白色 3.5 毫米扬声器插头连接到白色后置输出端口。
中置扬声器:将黄色 3.5 毫米扬声器插头连接到黄色中置输出端口。
PEEL
PEEL
PEEL
中置扬声器安装
1. 表面:剥离并将 EVA 垫粘贴到扬声器下面
2. 显示器:剥离并将粘合剂粘贴到中置扬声器下面。小心地将扬声器放置
在显示器上所需的位置,并保持 30 秒钟。
3. 墙壁:使用钉子或螺钉(未包含)悬挂扬声器 。
q w e
Table of contents
Languages:
Other Go groove Speakers System manuals