Goalsetter Signature Series User manual

INSTALLATION AND
OWNER’S INSTRUCTIONS
Junior Wall-Mounted Systems
36” Junior
Wall Mount

Junior Wall Mount Instructions
2 www.goalsetter.com 800.362.GOAL (4625)
This manual explains the proper
installation, operation and maintenance of
your Goalsetter Goal. Study and
understand these instructions thoroughly
before installing or operating the goal.
Failure to do so could result in serious
injury or death and/or equipment damage.
Consult your Goalsetter dealer or
Goalsetter Systems, Inc. if you do not
understand the instructions in this manual
or need additional information.
Goalsetter Systems, Inc. recommends that
you retain this manual for future reference
of operation, maintenance and parts
information.
The instructions, illustrations and
specifications in this manual are based on
the latest information available at the time
of publication. Your goal may have product
improvements and options not yet
contained in this manual.
Goalsetter Systems, Inc. reserves the right
to make changes at any time without
notice or obligation.
Additional copies of these instructions are
available from Goalsetter Systems, Inc.
GOALSETTER®and GOALSETTER BASKETBALL logo are registered
trademarks of Goalsetter Systems, Inc. in the United States.
GOALSETTER SYSTEMS™ and BEST I BASKETBALL™ are
trademarks of Goalsetter Systems, Inc.
This product is covered by various U.S. and Canadian patents, including
U.S. Patent #5,211,393. Patent infringement will be prosecuted.
o part of this manual may be reproduced in any form or by any means
electronic or mechanical, including photocopying, recording, or by any
information storage and retrieval systems without the express written
consent of Goalsetter Systems, Inc.
Copyright 2006.
All rights reserved.
Revised 1/2015
GS IM330ZC
Questions? Comments? Contact Us:
Phone: 800.362.4625 • Fax: 641.594.3343
Email: info@goalsetter.com
www.goalsetter.com

Junior Wall Mount Instructions
TABLE OF CONTENTS
Contact Information . . . . . . . . . . . . . . . . . . . . . . . . . . . . . . . . . . . . . . . .2
Safety Instructions . . . . . . . . . . . . . . . . . . . . . . . . . . . . . . . . . . . . . . . . .4
Goal Assembly . . . . . . . . . . . . . . . . . . . . . . . . . . . . . . . . . . . . . . . . . . . .5
Goal Specifications . . . . . . . . . . . . . . . . . . . . . . . . . . . . . . . . . . . . . . . .5
Required Tools and Materials . . . . . . . . . . . . . . . . . . . . . . . . . . . . . . . .5
Parts List . . . . . . . . . . . . . . . . . . . . . . . . . . . . . . . . . . . . . . . . . . . . . . . .6
Hardware Identification . . . . . . . . . . . . . . . . . . . . . . . . . . . . . . . . . . . . .7
Frame Attachment . . . . . . . . . . . . . . . . . . . . . . . . . . . . . . . . . . . . . . . .8
Rim Attachment . . . . . . . . . . . . . . . . . . . . . . . . . . . . . . . . . . . . . . . . . .9
Frame Assembly . . . . . . . . . . . . . . . . . . . . . . . . . . . . . . . . . . . . . . . . .10
Cleaning and Maintenance . . . . . . . . . . . . . . . . . . . . . . . . . . . . . . . . .11
Cleaning . . . . . . . . . . . . . . . . . . . . . . . . . . . . . . . . . . . . . . . . . . . . . . .11
Maintenance . . . . . . . . . . . . . . . . . . . . . . . . . . . . . . . . . . . . . . . . . . . .11
Warranties . . . . . . . . . . . . . . . . . . . . . . . . . . . . . . . . . . . . . . . . . . . . . . .12
800.362.GOAL (4625) www.goalsetter.com 3
Thank you and congratulations for purchasing a Goalsetter Goal – the finest
basketball goal system on the market today! You ill discover that Goalsetter is
unsurpassed in product innovation, quality and integrity in the basketball equipment
industry. We are continually focused on designing, engineering and producing
products that meet and exceed the expectations of today’ s toughest playing
environments and demanding players.
Our commitment is to all those ho ant to play the game of basketball – to be
able to train at hatever level they are at and then shoot for the stars. We are also
committed to you, our customer, long after the sale has been made. Please contact us
if you have any concerns, questions or suggestions regarding our products. Again,
e are honored that you have purchased our goal system and e look for ard to
helping you ith your game in the years ahead.
THAN YOU!

Junior Wall Mount Instructions
4 www.goalsetter.com 800.362.GOAL (4625)
Failure to follow these safety instructions may result in serious injury or death
and/or property damage.
•Do not install or use this product unless the
instructions within this manual have been
carefully read and understood.
•Consult your Goalsetter dealer or Goalsetter
Systems, Inc. if you do not understand the
instructions in this manual or need additional
information.
•If using a ladder during assembly, use extreme
caution. Two or three people are recommended
for safe installation and assembly.
•Installation and assembly of this product will
require lifting and bending that may result in
injury to anyone not accustom to this type of
activity.
•Ensure there are no overhead power lines
within a 20 ft. (7 m.) radius of the goal location.
•Climate, corrosion or misuse could result in
system failure.
•If the unit is installed with the rim at a 6'-0"
playing height, the minimum operational height
will be 5'-4" (1.9 m) to the bottom of the
backboard.
•DO OT HA G on the rim or any part of the
goal system. This includes the backboard,
support braces or net.
•During play, especially when performing
dunking activities, keep the player’s face away
from the backboard, rim and net. Serious injury
could result if teeth/face come in contact with
the backboard, rim or net. Do not wear jewelry
or other loose objects that could become
entangled in the net.
•Twice yearly, check the goal system for loose
hardware, excessive wear and signs of
corrosion. Repair the system before use.
•ever play on damaged equipment.
SAFETY INSTRUCTIONS

Junior Wall Mount Instructions
Failure to follow these safety instructions may result in serious injury or death
and/or property damage.
•Do not install or use this product unless the
instructions within this manual have been
carefully read and understood.
•Consult your Goalsetter dealer or Goalsetter
Systems, Inc. if you do not understand the
instructions in this manual or need additional
information.
•If using a ladder during assembly, use extreme
caution. Two or three people are recommended
for safe installation and assembly.
•Installation and assembly of this product will
require lifting and bending that may result in
injury to anyone not accustom to this type of
activity.
•Ensure there are no overhead power lines
within a 20 ft. (7 m.) radius of the goal location.
•Climate, corrosion or misuse could result in
system failure.
•If the unit is installed with the rim at a 6'-0"
playing height, the minimum operational height
will be 5'-4" (1.9 m) to the bottom of the
backboard.
•DO OT HA G on the rim or any part of the
goal system. This includes the backboard,
support braces or net.
•During play, especially when performing
dunking activities, keep the player’s face away
from the backboard, rim and net. Serious injury
could result if teeth/face come in contact with
the backboard, rim or net. Do not wear jewelry
or other loose objects that could become
entangled in the net.
•Twice yearly, check the goal system for loose
hardware, excessive wear and signs of
corrosion. Repair the system before use.
•ever play on damaged equipment.
800.362.GOAL (4625) www.goalsetter.com 5
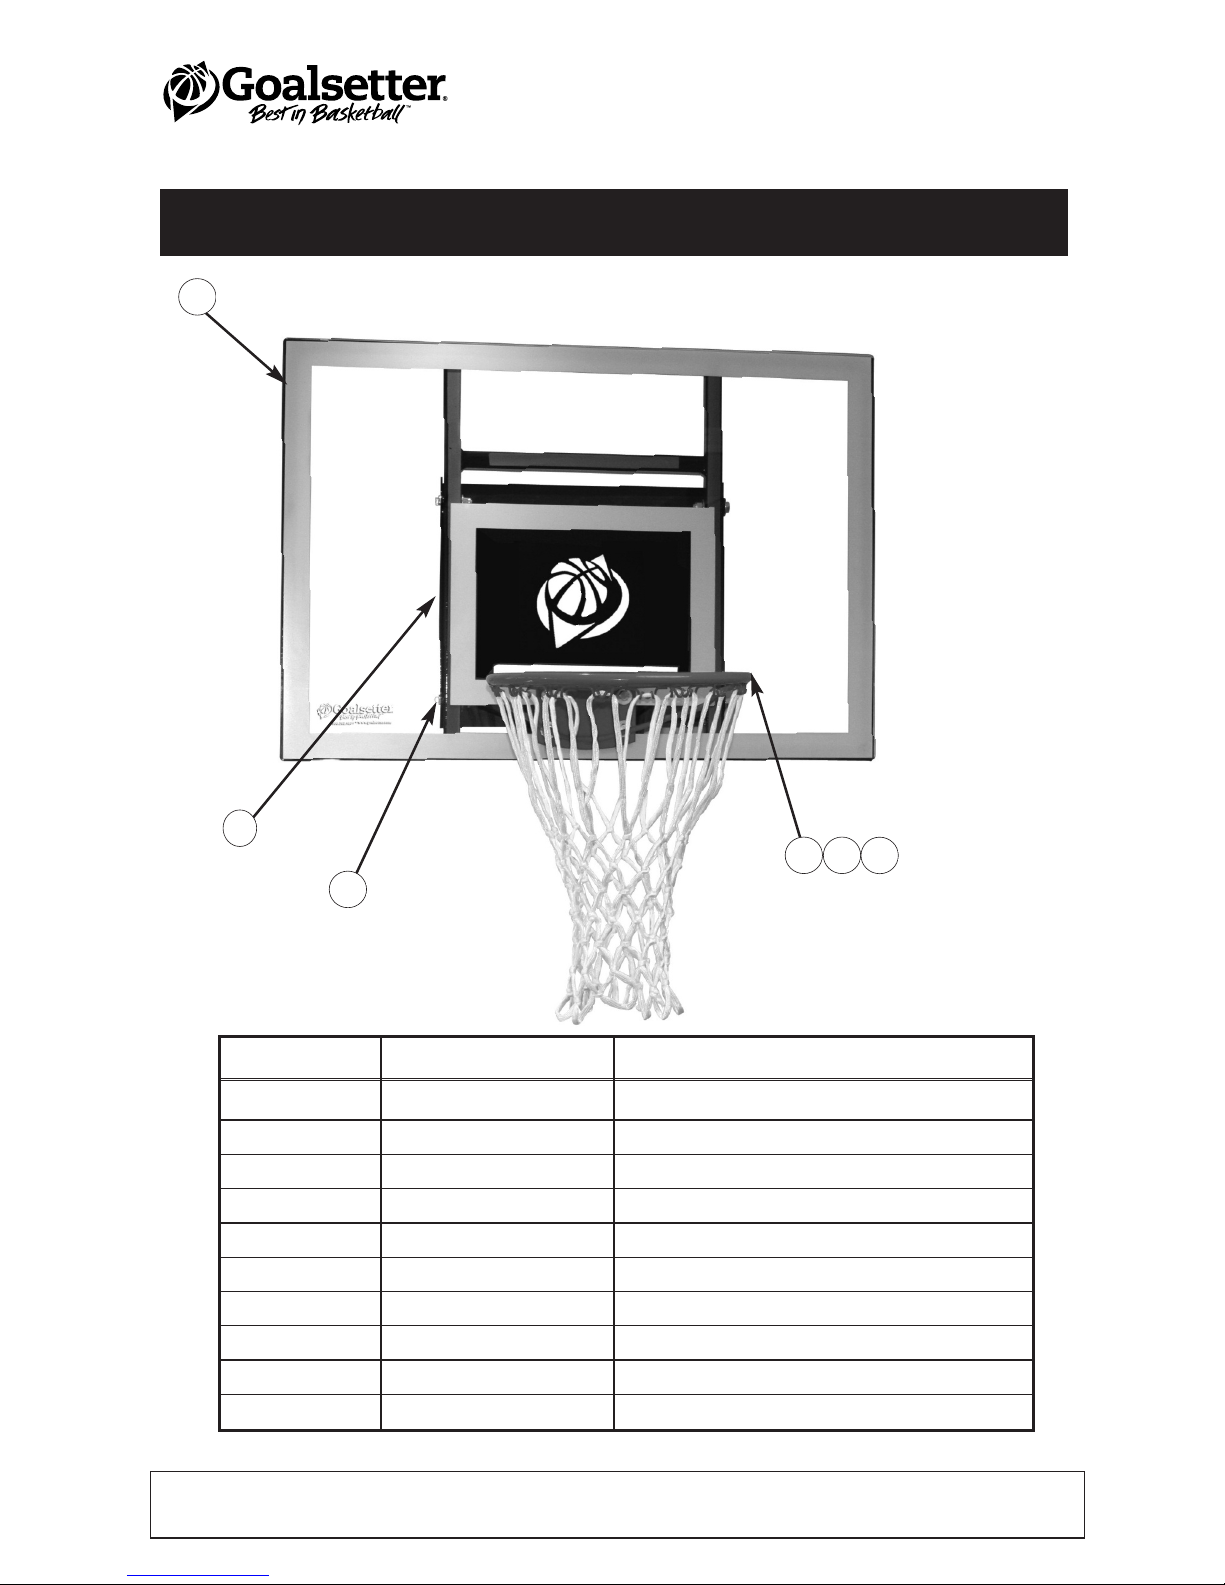
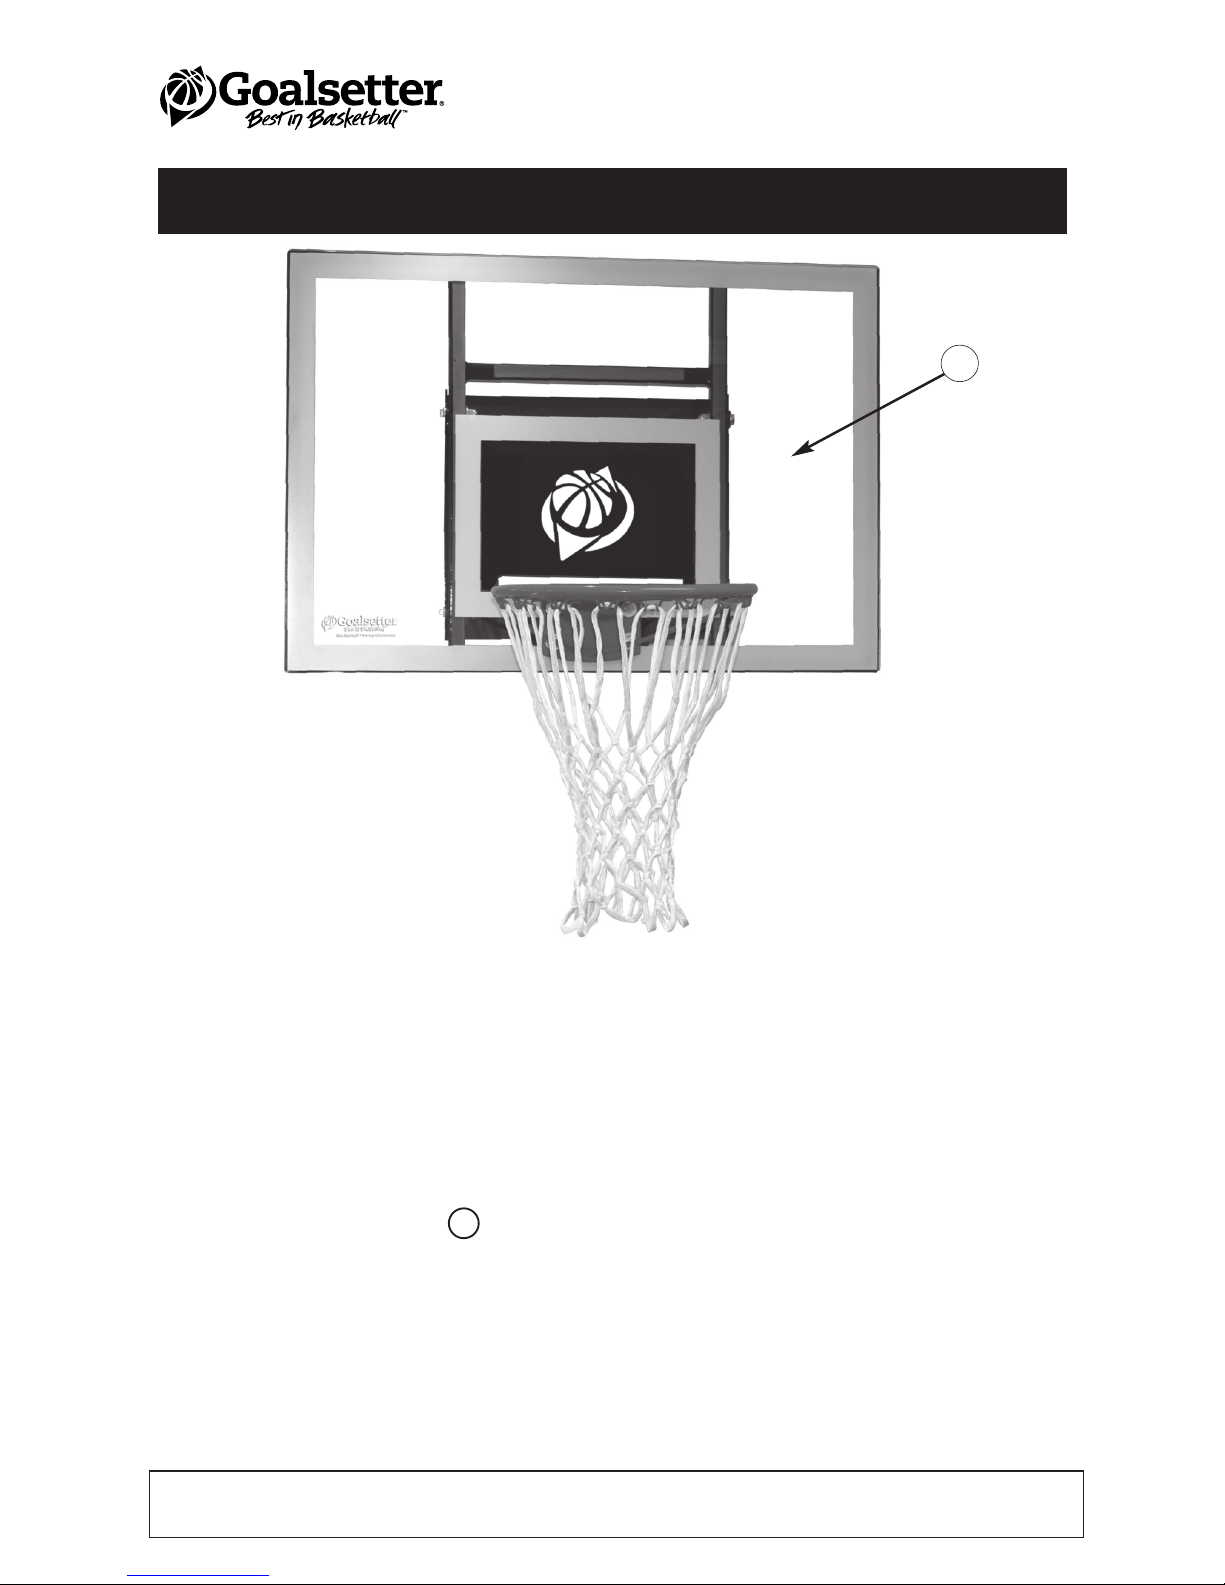
GOAL SPECIFICATIONS
B
A
C
G
F
H
Playing Surface
Backboard Size 25" x 36"
Weight With Glass 36 lbs.
Height Range (A) 6'
Extension Distance (B) 5-3/4"
Rim To Top-Of-Goal Distance (C) 20"
Bottom Of Frame Height (F) 69-1/8"
Frame Size (G) 15"
Top Of Frame Height (H) 84-1/8"
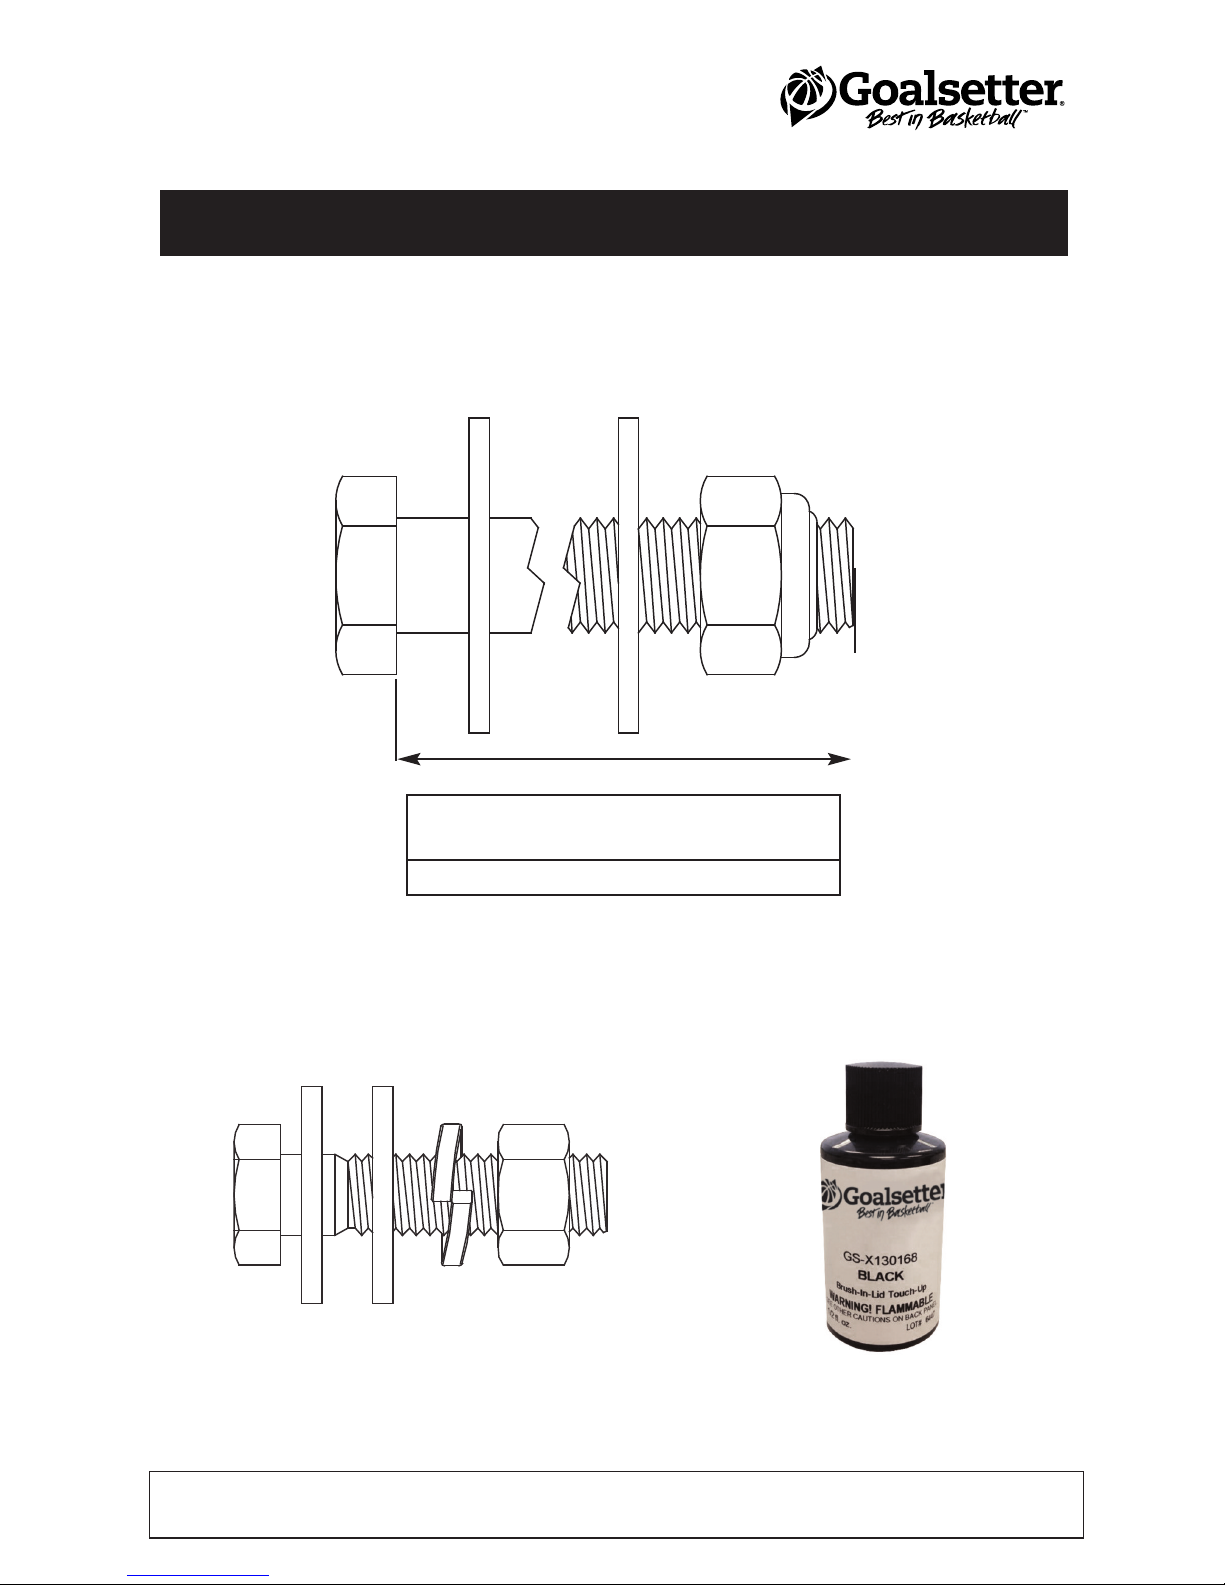
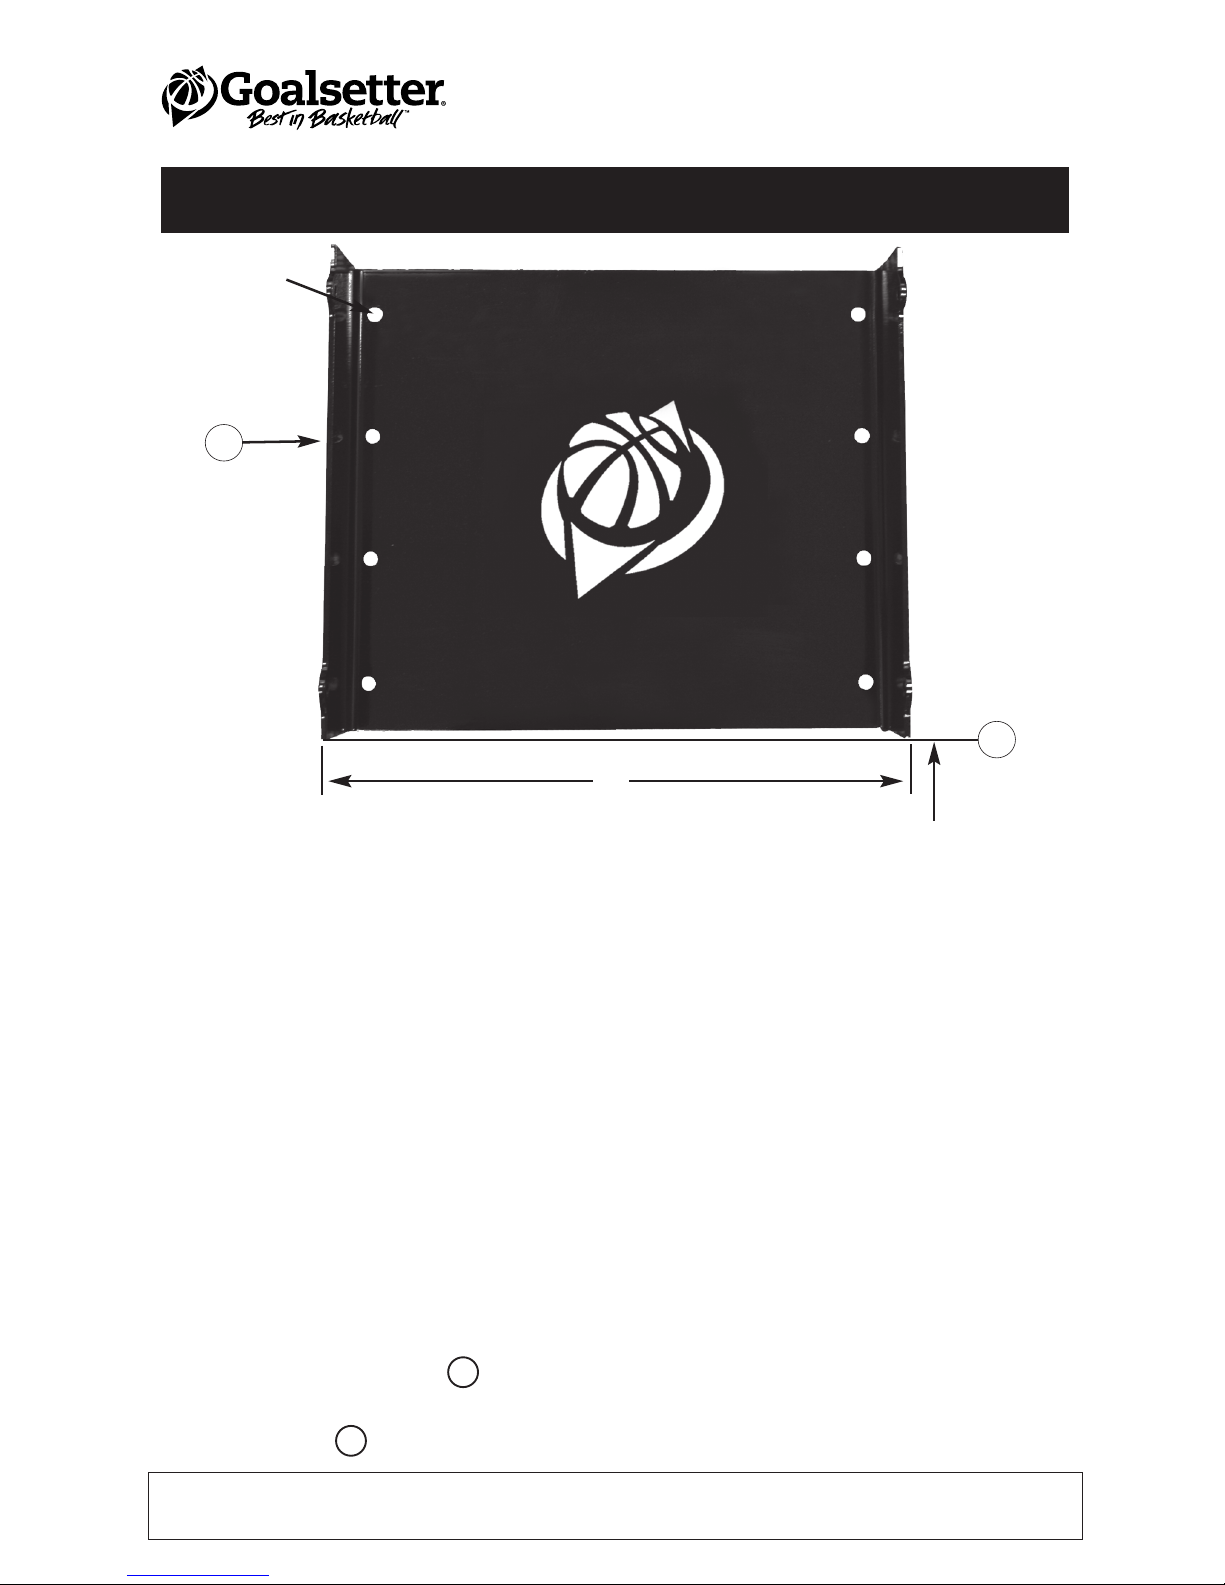
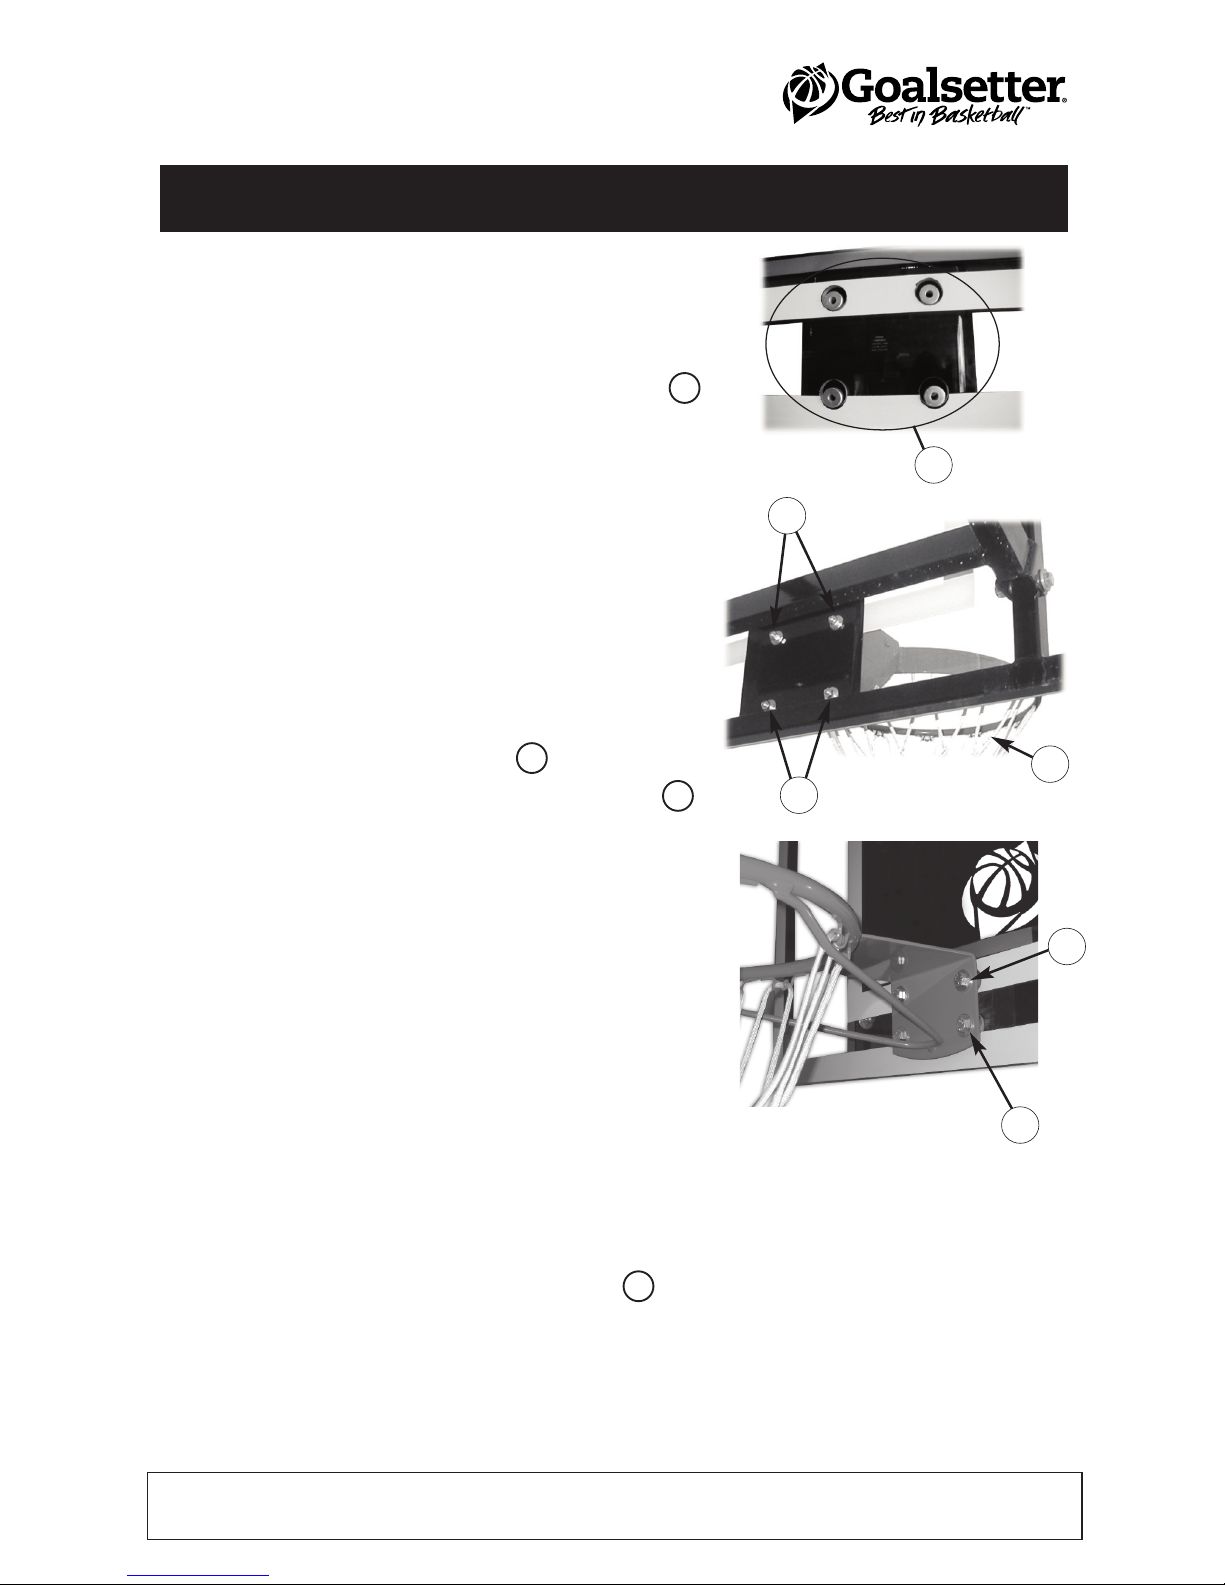
GOAL ASSEMBLY
Goalsetter Systems cannot assume liability for the installation of
any wall-mounted structure. Goalsetter Systems recommends
consulting a professional architect or contractor to determine a
safe wall anchoring system to match the wall construction being
used in your application.
IMPORTANT: Safe assembly of the goal requires two to three people
in good physical condition and capable of lifting 80-100 lbs (36-45 kg)
each.
IMPORTANT: Locate and familiarize yourself with all parts of the goal
before beginning assembly.
NOTE: The type of wall fasteners and drill bits required are determined
and provided by the customer and/or installer.
Level
Rubber Mallet
12' Tape Measure
Ratchet
Socket Extension
9/16" Socket
9/16" Wrench
Wall Fasteners (not included)
Drill and Drill Bits (masonry
if necessary)
Required Tools and Materials

Junior Wall Mount Instructions
6 www.goalsetter.com 800.362.GOAL (4625)
3
PARTS LIST & DESCRIPTION – JUNIOR WALL MOUNT
56
NOTE: Refer to page 7 for hardware descriptions.
Backboard
Assembly
Rim & Net
Assembly, Rim
Bolt Backplate,
& Hardware
1Frame 4
2Hardware
4 places
REF MINI WALL MOUNT DESCRIPTION
11 Frame
2a 4 Bolt, 3/8"-16 U C x 1-1/4"
2b 8 Flat Washer, 3/8"
2c 4 Locknut, 3/8" U C
31 Backboard Assembly, 25" x 36"
41 Rim and et Assembly
5a 4 Bolt, 3/8"-16 U C x 2"
5b 8 Flat Washer, 3/8"
5c 4 Lock Washer, 3/8"
5d 4 ut, 3/8"-16 U C

Junior Wall Mount Instructions
800.362.GOAL (4625) www.goalsetter.com 7
HARDWARE IDENTIFICATION
NOTE: Refer to page 6 for descriptions and quantities.
Rim Bolt Assembly
(#5 in Parts List)
Description Parts List Length
Callout
Mounting Bolt (at backboard) #2 1-1/4"
Black Touch-Up Paint

Junior Wall Mount Instructions
8 www.goalsetter.com 800.362.GOAL (4625)
FRAME ATTACHMENT
IMPORTANT: Safe assembly of the
goal requires two or three people in
good physical condition and
capable of lifting 80-100 lbs (36-45
kg) each.
Step 1: Unpack frame.
Step 2: Determine where to place
frame on mounting surface.
Step 3: Goal can be mounted at
any height preferred. To mount at a
rim height of 6', draw a horizontal
line on the mounting surface 69-
1/8" up from playing surface.
Step 4: Position frame 1 on wall
with with bottom of frame centered
on drawn line 2 .
Step 5: Level frame horizontally
and vertically using a level. Mark
wall mounting holes needed for
attachment of frame. (To be
determined by customer and/or
installer.)
Step 6: Set frame down.
Step 7: Drill holes as needed in
mounting surface.
Step 8: Loosely attach frame to
wall using correct fasteners. (To be
determined by customer and/or
installer.) Level frame horizontally
and vertically using a level.
Step 9: Fully tighten fasteners.
1
16"
Mounting Hole
2
69-1/8" Up From
Playing Surface
For 6' Rim Height

Junior Wall Mount Instructions
800.362.GOAL (4625) www.goalsetter.com 9
69-1/8" Up From
Playing Surface
For 6' Rim Height
RIM ATTACHMENT
2
3
4
Step 1: Remove any cardboard edge
protectors and protective sheeting from
backboard.
NOTE: Four steel shouldered bushings 1
are factory installed. If loose, make sure
to have them seated properly when
tightening rim bolts. If missing, contact
Goalsetter or dealer to get replacements.
DO NOT install rim without bushings.
IMPORTANT: Correct sequence of
hardware installation MUST be followed
during assembly.
Step 2: Loosely attach rim 4 to
backboard through top mounting holes 2
with two 3/8" x 2" bolts, four flat washers,
two lock washers and two nuts. Snug
tighten hardware – a 9/16" open-end
wrench may be necessary. NOTE: Attach
rim to backboard before mounting
backboard to mounting bracket on
wall.
Hardware Sequence: Bolt passes through flat
washer - rim backplate - backboard bushing -
backboard mounting plate - flat washer - lock
washer - nut.
Step 3: Repeat procedure outlined in
Step 2 for lower rim mounting holes 3 .
Step 4: Level rim side to side and then
fully tighten hardware.
Step 5: Attach net to rim.
1
2
3

Junior Wall Mount Instructions
10 www.goalsetter.com 800.362.GOAL (4625)
IMPORTANT: Use two or more
people to raise backboard into
position. They should be in good
physical condition and capable of
lifting 80-100 lb (36-45 kg).
IMPORTANT: Rim should already
by attached to backboard.
Step 1: Lift backboard 1 into
position and attach to mounting
plates.
• Make sure backboard frame is
between the mounting plates.
• Attach with four 3/8" x 1-1/4"
bolts (#2 in parts list), eight flat
washers and four locknuts – do
not fully tighten.
Hardware Sequence: Bolt passes through
flat washer - mounting plate - frame flange
- flat washer - locknut.
Step 2: Fully tighten all fasteners.
FRAME ASSEMBLY
1

Junior Wall Mount Instructions
800.362.GOAL (4625) www.goalsetter.com 11
Goalsetter uses a two-part acrylic-enamel paint on our
goals. With periodic inspection and service when
needed, the high-gloss finish is designed to last for
many years. A small bottle of black paint with brush is
provided with every goal for touch up of imperfections
as they develop and can be found in the hardware kit.
If more touch up is required, please contact Goalsetter
Systems, Inc. or your local Goalsetter Dealer.
MAINTENANCE
The exterior finish of your Goalsetter goal is designed for outdoor
environments and should only require periodic cleaning and inspection for
imperfections that could develop over time (see Maintenance section).
When cleaning is necessary, Goalsetter recommends using water and a mild
dish detergent applied with a soft, non-abrasive cloth.
IMPORTANT: DO OT use abrasive cleaners to clean the goal. Damage to
the finish may result.
CLEANING

INSTALLATION AND
OWNER’S INSTRUCTIONS
12 www.goalsetter.com 800.362.GOAL (4625)
WARRANTIES
LIMITED WARRANTY
LIMITED LIFETIME WARRANTY: Subject to proper installation and
normal, intended use, and subject to the limitations set forth below,
Goalsetter Systems, Inc. warrants to the original retail purchaser that
all structural components of Goalsetter Systems™ Signature Series*,
Extreme Series** and GS Wall ount Series*** basketball systems are
free of defects in material and workmanship for the duration of
ownership by such original retail purchaser or five (5) years after
discontinuation of the product by Goalsetter Systems, Inc..
*Signature Series – VP, Captain, All-American, All-Star, Contender,
Champion;
**Extreme Series – X672, X660, X560, X554, X454, X448;
***GS Wall ount Series – GS72 Wall ount, GS60 Wall ount, GS54
Wall ount, GS48 Wall ount
LIMITED WARRANTY: Subject to proper installation and normal,
intended use, and subject to the limitations set forth below, Goalsetter
Systems, Inc. warrants to the original retail purchaser that all structural
components of (a) Goalsetter Systems™ Tournament Series Elite Plus
and GS Baseline Wall ount Series* basketball systems are free of
defects in material and workmanship for a time period of five (5) years
from date of purchase (b) Goalsetter Systems™ Junior VP and GS
Junior Wall ount basketball systems are covered for a time period of
two (2) years from date of purchase.
*GS Baseline Wall ount Series – GS72 Baseline, GS60 Baseline,
GS54 Baseline
Any warranty on a basketball system excludes t e rim. Rim
warranties are as follows: Rims shall be free from defects in materials
and workmanship from the date of purchase as follows: R10126 Single
Ring Static Rim: one (1) year limited warranty; R10226 Double Ring
Static Rim: unconditional lifetime warranty; R10326 HD Breakaway
Rim: two (2) year limited warranty; R10554 GS Collegiate Breakaway
Rim: one (1) year limited warranty.
Padding Warranty: Padding shall be free from defects in materials
and workmanship from the date of purchase as follows: ulti-Purpose
Backboard Edge Padding: one-year limited warranty; Custom Fitted
Pole Padding: one-year limited warranty; Wrap Around Pole Padding:
one-year limited warranty.
The Limited Lifetime Warranty and the Limited Warranty shall cover
damage or failure that occurs during the course of NORMAL or
INTENDED USE of the product. Normal or intended use shall be
described as activity that is necessary for the participation in the sport
for which the equipment is designed. NOT COVERED is damage
caused by deliberate hanging, multiple player hanging, vandalism, non-
basketball activities or any other activity that could be regarded as
abusive. Goalsetter Systems™ Junior VP and GS Junior Wall ount
warranty voided if damage caused by the act of dunking.
A limited lifetime warranty is effective for the duration of ownership by
the original retail purchaser or 5 years after discontinuation of the
product by Goalsetter Systems, Inc.
Goalsetter Systems, Inc. shall have the right to require the purchaser to
deliver at its expense the allegedly defective product to Goalsetter for
testing, repair or replacement. Goalsetter shall not be responsible for
any expenses associated with the replacement or removal of the
product from its application for such delivery.
THE WARRANTY IS VOID IF THE PRODUCT HAS BEEN DA AGED
BY ACCIDENT, USE FOR PURPOSES FOR WHICH IT IS NOT
INTENDED, AS THE RESULT OF I PROPER INSTALLATION,
FAILURE TO FOLLOW INSTALLATION, CARE OR AINTENANCE
INSTRUCTIONS PROVIDED WITH THE PRODUCT, USE OF PARTS
NOT PROVIDED BY GOALSETTER SYSTE S OR ANY
ODIFICATION OF ANY PRODUCT BY THE CUSTO ER UNLESS
APPROVED BY GOALSETTER SYSTE S, INC., OR OTHER
CAUSES NOT ARISING OUT OF DEFECTS IN ATERIALS OR
WORK ANSHIP.
The sole obligation of Goalsetter Systems, Inc., and the exclusive
remedy under the applicable warranty, is repair or replacement of any
component part determined by Goalsetter Systems, Inc. to be defective
and covered by the warranty. Goalsetter Systems, Inc. will not be liable
for any other damages or expenses. The applicable warranty is
expressly in lieu of all other warranties, express or implied. Goalsetter
Systems, Inc. does not assume, and no other person or representative
is authorized to assume for Goalsetter Systems, Inc. any other liability
in connection with the sale of Goalsetter System™ products.
NOT COVERED BY WARRANTY
• Use in non-residential applications of Glass backboards on Signature
Series systems.
• Use in non-residential applications of Extreme Series and Tournament
Series complete systems.
• Any products subjected to abuse, negligence, improper installation,
vandalism, acts of God, alteration of product and any other events
beyond the control of Goalsetter Systems, Inc.
• Junior Series breakage caused by the act of dunking.
• Paint or rusted parts. Touch-up paint is included in all hardware kits.
• Deterioration of product due to time or wear and tear.
Normal deterioration of products due to atmospheric conditions,
weather, wear and tear (including scratching or scuffing paint from
normal use), or other causes that do not affect functional use are not
covered by Goalsetter Systems, Inc. warranties. All warranties are valid
only when product is used in the intended application & when installed
according to Goalsetter Systems instructions. Warranty may be void if
maintenance instructions in the Owner’s anual are not followed. If you
did not receive an Owners anual, please call 1-800-362-4625 and
one will be mailed to you.
DISCLAIMERS: THE APPLICABLE WARRANTY IS EXPRESSLY IN
LIEU OF ALL OTHER WARRANTIES, EXPRESS OR I PLIED. AND
ALL OTHER WARRANITES ARE HEREBY DISCLAI ED, INCLUDING
BUT NOT LI ITED TO THE I PLIED WARRANTIES OF
ERCHANTABILITY AND FITNESS FOR A PARTICULAR PURPOSE.
UNDER NO CIRCU STANCES SHALL GOALSETTER SYSTE S,
INC. BE LIABLE FOR ANY INDIRECT, CONSEQUENTIAL, SPECIAL,
INCIDENTAL, PUNITIVE, OR EXE PLARY DA AGES OF ANY KIND.
THE PRODUCT IS INTENDED TO BE USED TO PLAY THE SPORT
OF BASKETBALL. ALL SPORTS INVOLVE RISK OF INJURY. THE
USER ASSU ES ALL RISK OF INJURY RESULTING FRO THE
USE OF THIS PRODUCT. ALL PRODUCTS ARE SOLD ON THIS
CONDITION AND NO REPRESENTATIVE OF THE CO PANY AY
WAIVE OR CHANGE THIS POLICY.
Some states do not allow the exclusion or limitation of implied
warranties or consequential or incidental damages, so the above
limitations or exclusions may not apply to you.
LEGAL REMEDIES: This warranty gives you specific legal rights, and
you may also have other rights which may vary from state to state.
WARRANTY CLAIMS: All returns must be arranged through the
Goalsetter Systems, Inc. dealer where the product was originally
purchased. Warranties do not cover dealer service charges, labor
charges, freight charges, and travel expenses associated with
replacement, repair or removal of warranty items. Photos of the
damaged product prior to any repair or clean-up actions must clearly
show and permit analysis of the damaged product by Goalsetter
Systems, Inc. A Goalsetter® Warranty Claim form must be completed,
and photos submitted, together with proof of purchase, for any item you
wish to claim under warranty. If the purchase was not made through a
dealer, this form is available by email, fax or mail. In response to your
claim, you will receive an order confirmation as well as a notice stating
whether Goalsetter Systems, Inc. needs your warranty item returned.
Goalsetter Systems, Inc. will notify you by fax or phone if we determine
that the item cannot be claimed under warranty. Goalsetter Systems,
Inc. is not responsible for any c arges for labor to install or repair
defective product wit out prior aut orization. Goalsetter Systems,
Inc. will determine t e most economical met od to eit er repair or
replace product before any work is to commence.
Enclosed underneath the protective sheeting on your backboard is a
warranty registration card. YOU MUST FILL OUT AND MAIL IN THIS
CARD IN ORDER TO HAVE A VALID WARRANTY. You may also fill
out a warranty registration online at www.goalsetter.com.
IMPORTANT
This manual suits for next models
18
Table of contents
Popular Accessories manuals by other brands

Frigidaire
Frigidaire PLMB186CC1 installation instructions

American Standard
American Standard Robe Hook 6721 installation instructions

Spector&Co
Spector&Co T123 user manual

Weber
Weber MONSTER AMALFI STUDIO EASEL Assembly & set-up instructions

Omega
Omega OS-MINIUSB series user guide

Z-Wave
Z-Wave EH-DS-01 installation guide