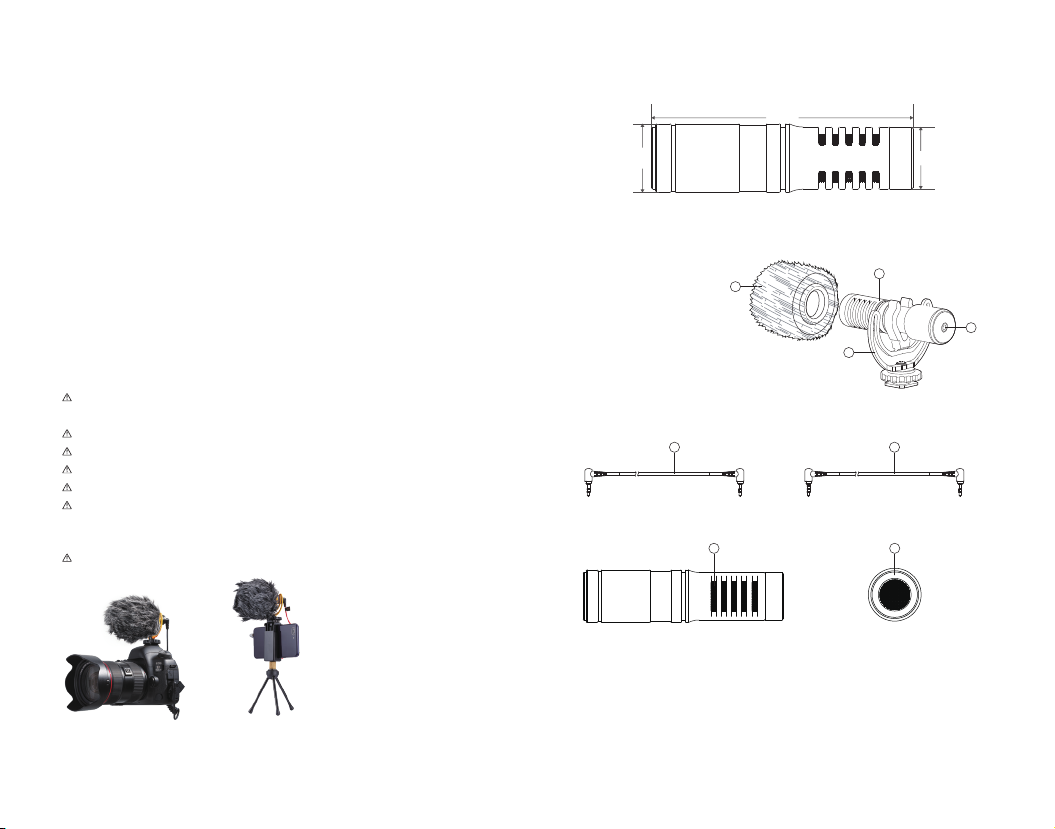
Godox VD-Mic User manual

神牛微信公众号
Follow Wechat Public Account
Made In China
地址: 深圳市宝安区福海街道塘尾社区耀川工业区厂房2栋
电话: +86-755-29609320(8062) 传真: +86-755-25723423 邮箱: [email protected]
深圳市神牛摄影器材有限公司
GODOX Photo Equipment Co., Ltd.
Add: Building 2, Yaochuan Industrial Zone,Tangwei Community, Fuhai Street, Bao’an
District, Shenzhen 518103, China
Tel: +86-755-29609320(8062) Fax: +86-755-25723423
godox.com Instruction Manual
Compact Directional Shotgun
Microphone

前言
欢迎使用轻型指向性枪式麦克风VD-Mic,本产品为主播、视频博主、记者等拍
摄人群提供即插即用无需电池的便携式音频解决方案。常用于Vlog、户外采访、
直播以及音乐和环境声录制。请仔细阅读本说明书,以便能正确的操作,发挥
本产品的优越性能。
产品特点
仅长80mm,仅重40g;
即插即用,无需额外供电;
机身全铝合金打造,拥有更强的抗射频干扰能力;
配置专业减震支架及防风兔毛;
严格的灵敏度管控;
超宽的频率响应范围100-20KHz,更好地收录清晰自然的声音;
高品质声学性能;
高信噪比同时具备极低的失真度。
•
•
•
•
•
•
•
•
警告
请勿私自拆卸产品,如产品出现故障须由本公司或授权的维修人员进行检查
维修。
请保持干燥:请勿用湿手接触产品,亦不可将产品浸入水中或暴露于雨中。
请勿让儿童接触本产品。
请勿在易燃易爆环境中使用。在这些场合下,请注意相关警告标识。
请勿放置在超过50摄氏度的高温环境中。
使用供电的注意事项:
请勿给VD-Mic幻象供电。 VD-Mic需要插入式供电,一般默认相机的3.5mm麦
克风输入插口提供即可,大约为2-3V。连接相机或手机设备即可使用。
-
产品尺寸
产品结构
19mm21mm
80mm
请仔细阅读并遵守由厂商提供的警告或指示。
- 01 - - 02 -
防风兔毛
麦克风机身
3.5mm 音频接口
减震支架
3.5mm TRS-TRS 音频连接线(相机适配线)
3.5mm TRS-TRRS 音频连接线(手机适配线)
侧面防护钢网
咪头防护钢网
1.
2.
3.
4.
5.
6.
7.
8.
5
7 8
6
智能手机单反相机
1
2
4
3

装置组件
麦克风:Ф14mm(0.5英寸)高性能电容麦克风
主动电子元器件:高性能JFET换能器
线材:抗干扰屏蔽线
机身:全铝合金机身
表面工艺:磨砂阳极氧化
3.5mm音频接口:无氧铜
使用说明
注:音频线插头需完全插入机身接口当中,避免出现不正常工作
标配物品
频率响应及指向性
1k 10k 20k
-30
-20
-40
-10
0
+10
+20
10 100
Frequency Response
[dB/1V/Pa]
Polar Pattern
减震支架×1
3.5mm TRS-TRS音频
连接线(相机适配线) ×1
3.5mm TRS-TRRS音频
连接线(手机适配线)×1 防风棉×1 防风兔毛×1
一.安装防护罩、支架与音频线:
将麦克风机身卡入 Rycote Lyre 减震支架上,同时确保麦克风处于中心位置,保
持平衡与稳定。
将所需防风棉或防风兔毛套入麦克风机身的前端,兔毛与海绵内部均具备容纳
麦克风机身的形状,将麦克风机身插进到合适的位置即可。
若需连接相机,请选择 3.5mm TRS-TRS 音频连接线并将其连接到麦克风机身
上的 3.5mm 接口。
若需连接到手机使用,则 3.5mm TRS-TRRS 音频连接线,并将 3 极端子的一头
连接线连接到麦克风接口,音频线的另一头即 4 极端子连接到手机上即可开始
使用,安卓 type-c 与苹果 lightning 需自备接头转接线。
1.
2.
3.
4.
- 03 - - 04 -

三.安装到支杆或话筒支架:
将减震支架热靴底座部的 3/8”(内配 1/4”)螺纹连接到您的支杆或者话筒支架
所用的 3/8”或 1/4”螺纹;
顺时针拧紧螺母,注意不要过度拧紧。
四.操作技巧:
为了本产品发挥更好的性能,使用时请注意不要使用其他非官方配件,如防风棉,
防风兔毛。若使用其他厂商的音频线可能导致麦克风不能正常工作严重时可能损
坏。
避免手或其他物品遮挡住任何进音孔,否则可能影响麦克风的性能。
VD-Mic 不需要额外的电池供电就能工作,但是需要通过相机麦克风的输入内置供
电,为了达到最佳的录音效果,请参考如下设置您的相机音频输入:
音频输入:麦克风输入
音频电平 / 增益控制:手动(根据您对相机的熟练度与习惯)
插入式电源:开启
另敬请参照您相机随附关于麦克风输入的说明,了解调节音频设置更有助于您使
用本产品。
二.安装到相机:
安装到相机之前,将麦克风与热靴座上的固定环逆时针转动,使其松开到可以
完全插入相机的热靴当中。
支架及麦克风安装到位后,顺时针拧紧固定环。
将 3.5mm TRS-TRS 音频连接线的一端连接到麦克风机身的接口上,另一端连
接到相机的麦克风输入插口。
1.
2.
3.
1.
2.
规格参数
型号 VD-Mic
拾音模式 心型指向
信噪比 75dB
灵敏度 -33dB±2(0dB=1V/Pa at 1KHz)
音频频率范围 100-20KHz
等效噪声级(A计权) 20dB
音频连接线插头 3.5mm接口
最大声压级 120dB(THD≤3% at 1KHz)
重量 40g
产品尺寸 长80mm Φ21mm
工作温度 -10~+50℃
维护保养
避免跌落:如果受到强烈碰撞或振动,设备可能会发生故障。
保持干燥:本产品是非防水产品,如果将其浸入水中或放置于高湿度的环境中
将可能发生故障。内部构造生锈可能会导致无法修理的损害。
避免温度骤变:温度的突变,诸如在寒冷天进出温暖的大楼将可能会使产品内
部结露。为避免结露,请将本产品事先装入手提袋或塑料包内,以防温度突
变。
远离强磁场:无线电广播发射机等设备产生的强静电或强磁场可能会干扰本产
品正常工作。
- 05 - - 06 -

Thank you for purchasing Compact Directional Shotgun Microphone VD-Mic.
This product offers a portable audio recording solution for anchors, vloggers,
journalists and more, featuring plug-and-play power input and rid of batteries. It
can be commonly used for vlogging, outdoor interviews, live streaming, music
and ambient sound recording etc. Please read this manual carefully before
using to make sure the correct operation and exert the optimum function.
Forward
With 80mm's length and weighs 40g
Inserted into equipment to use directly without extra power supply
Aluminum alloy materials with stronger RFI resistance
With professional shock-absorbing bracket and furry windscreen
Strict sensitivity control
100-20KHz Broad frequency response range to offer better voice recording
and reproduce
High-quality voice performance
High signal noise ratio and low distortion degree
Product Features
•
•
•
•
•
•
•
•
Do not disassemble. Should repairs become necessary, this product must be
sent to an authorized maintenance center.
Always keep this product dry. Do not use in rain or in damp conditions.
Keep out of reach of children.
Please don't use it in flammable and combustible environments. In certain
circumstance, please pay attention to the relevant warnings.
Do not leave or store the product if the ambient temperature reads over 50℃.
Observe precautions in power supply:
Do not supply VD-Mic with phantom power. As VD-Mic needs plug-in power supply, it is
recommended to supply power by 3.5mm microphone input port of camera, which is about 2
to 3V. Connect the microphone to the camera or smartphone to use.
Warning
Please carefully read and observe the warning or direction offered by
the manufacture.
-
Dimension of Product
Structure of Product
DSLR Camera Smartphone
1. Furry Windscreen
2. Microphone Body
3. 3.5mm Audio Port
4. Shock-absorbing Bracket
5. 3.5mm TRS-TRS Audio Connect Cable (For Camera)
6. 3.5mm TRS-TRRS Audio Connect Cable (For Smartphone)
7. Protective Steel Mesh
8. MIC Steel Mesh
- 07 - - 08 -
19mm21mm
80mm
1
2
4
3
7 8
65

Equipment Description
Microphone: Ф14mm(0.5 inch) high performance condenser microphone
Main electronic component: high performance JFET transducer
Cable: anti-interference shielded wire
Main body: aluminum alloy materials
Surface techniques: scrub anodic oxidation
3.5mm Audio port: oxygen-free copper
Frequency Response and Directivity
What’s in the Box
Install Protective Cover, Bracket and Audio Cable
Note: the audio plug shall be fully inserted into the port to avoid abnormal
working.
Insert the microphone into the Rycote Lyre shock-absorbing bracket and
make sure that the microphone is placed in the center and keep balance.
Install the windscreen foam or furry onto the former end of the microphone to
the suitable place.
To connect to the camera, please choose the 3.5mm TRS-TRS Audio
Connect Cable and insert it to the 3.5mm port of the microphone.
To connect to the smartphone, please choose the 3.5mm TRS-TRRS Audio
Connect Cable and insert one end of the triple terminals into the microphone
port. The other end of the audio cable, namely, the quadrupole terminal, shall
be connected to the smartphone. Cables for Android Type-C and Apple
lightning should be provided by oneself.
Usage Instruction
Shock-absorbing
bracket ×1
3.5mm TRS-TRS Audio
Connect Cable (For Camera) ×1
3.5mm TRS-TRRS Audio
Connect Cable (For Smartphone) ×1
Windscreen foam ×1 Furry Windscreen ×1
- 09 - - 10 -
1k 10k 20k
-30
-20
-40
-10
0
+10
+20
10 100
Frequency Response
[dB/1V/Pa]
Polar Pattern
1.
2.
3.
4.

Attach to Camera
Before attaching to the camera, please turn the microphone’s fixing ring
counterclockwise to loosen it until the microphone can be fully inserted into
the camera’s hotshoe.
Lock the fixing ring by turning it clockwise after the bracket and microphone
are installed.
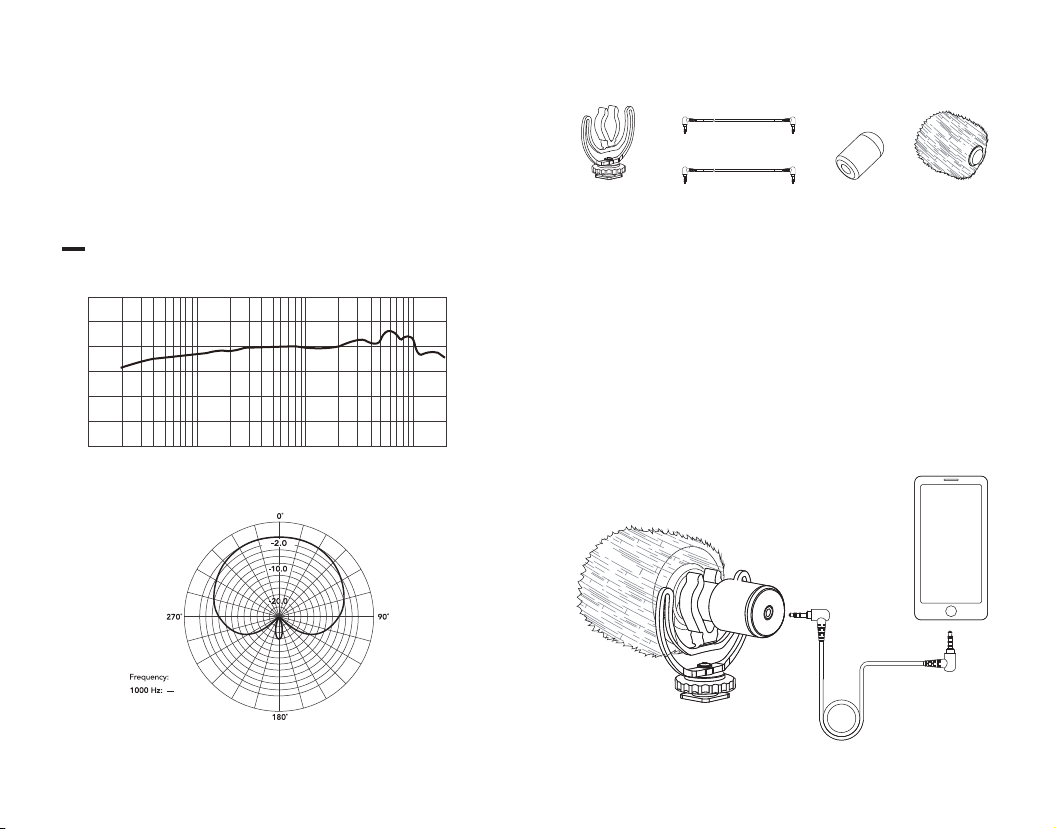
Connect one end of 3.5mm TRS-TRS Audio Connect Cable to the
microphone port and the other end to the camera’s microphone input port.
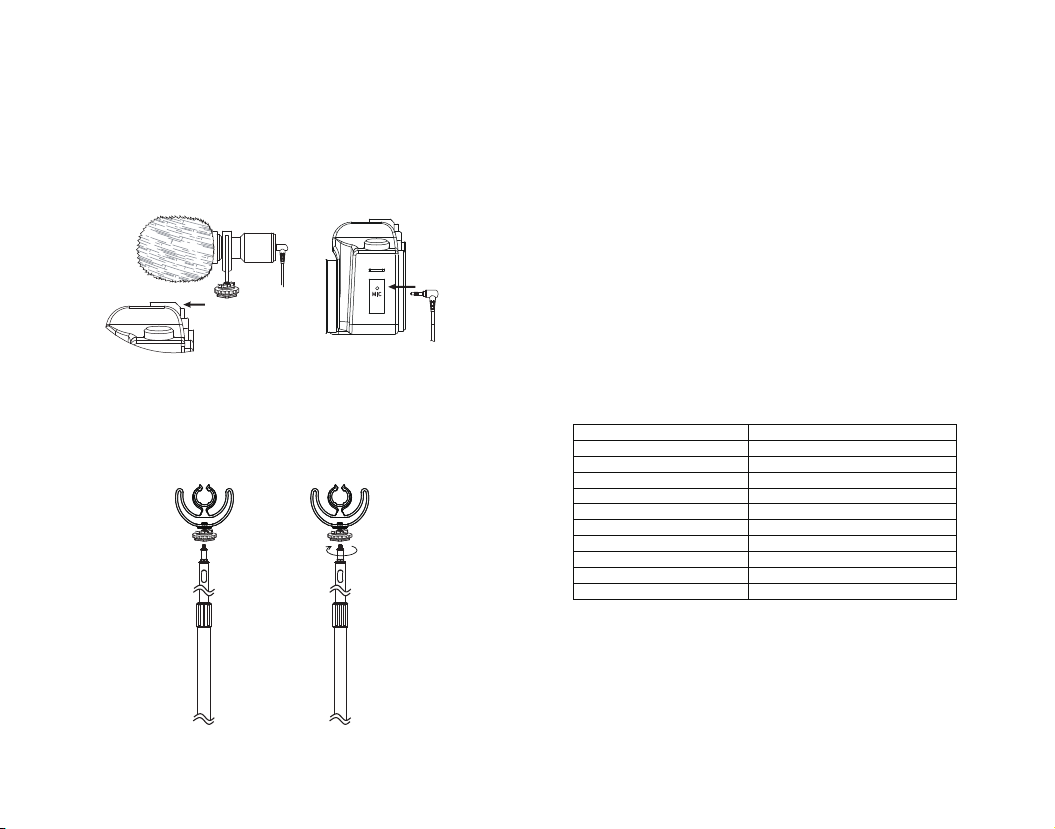
Attach to Microphone Stand
Connect the 3/8”(included 1/4" inside) mounting hole of shock-absorbing
bracket to the 3/8”or 1/4" mounting hole of microphone stand.
Screw up the nut clockwise. Note: do not over tighten.
Operation Method
Technique Data
To exert the optimum function of this product, please do not use non-official
included accessories e.g. windscreen foam or furry windscreen, etc. The
microphone may do not work properly or be seriously damaged if using other
manufacture’s audio cables.
Do not block or shield any sound hole, otherwise, the microphone’s
performance may be influenced.
Although VD-Mic do not need extra battery to finish power supply, built-in power
supply through camera’s microphone is required. To achieve the best recording
effects, please refer to the following operations to set your camera’s audio input:
Audio input: through microphone
Audio level/gain control: manual (according to your proficiency and customs of
camera)
Power insert: turn on
Please refer to the microphone input instructions of your camera to know more
about the audio settings and adjustments, which will contributes a lot to use this
product.
Maintenance
Avoid sudden drops. The device may fail to work after strong shocks, impacts,
or excess stress.
Keep dry.
The product isn’t water-proof. Malfunction, rust, and corrosion may occur and go
beyond repair if soaked in water or exposed to high humidity.
Avoid sudden temperature changes. Condensation happens if sudden tempera-
ture changes such as the circumstance when taking the product out of a building
Model VD-Mic
Pick-up sound mode Cardioid directivity
Signal-noise ratio 75dB
Max. sound pressure level 120dB(THD≤3% at 1KHz)
Equivalent noise level (A-weighting) 20dB
Sensitivity -33dB±2(0dB=1V/Pa at 1KHz)
Audio frequency range 100-20KHz
Audio cable plug 3.5mm port
Weight 40g
Dimension 80mm Φ21mm
Working temperature -10℃ to +50℃
- 11 - - 12 -
1.
2.
1.
2.
3.

with higher temperature to outside in winter. Please put the product in a
handbag or plastic bag beforehand.
Keep away from strong magnetic field. The strong static or magnetic field
produced by devices such as radio transmitters leads to malfunction.
Changes made to the specifications or designs may not be reflected in this
manual.
- 13 - - 14 -
Table of contents
Other Godox Microphone manuals