Godox WMicS1 User manual

Chinese English Bilingual | 中英文双语
Instruction Manual | 说明手册
关注神牛微信公众号
Follow Wechat Public Account
地址: 深圳市宝安区福海街道塘尾社区耀川工业区厂房2栋
电话: +86-755-29609320(8062) 传真: +86-755-25723423 邮箱: [email protected]
深圳市神牛摄影器材有限公司
GODOX Photo Equipment Co., Ltd.
Made In China
UHF无线麦克风系统
UHF Wireless Microphone System
WMicS1
Add: Building 2, Yaochuan Industrial Zone,Tangwei Community, Fuhai Street, Bao’an
District, Shenzhen 518103, China
Tel: +86-755-29609320(8062) Fax: +86-755-25723423 E-mail: [email protected]
godox.com

前言
欢迎使用UHF无线麦克风系统⸺WMicS1,本产品非常适用于摄影录
制,现场采访及语音录制等场合。请仔细阅读本说明书,以便能正确的
操作,发挥本产品的优越性能。
•
•
•
•
•
•
•
•
•
UHF频率范围:514MHz-596MHz,96个无线通道可随意切换,互不
干扰
广播级音质,清晰稳定
无线距离最大可达100m
OLED显示屏提供各项参数设置
3.5mm耳机实时监听
输出音量控制,提供静音功能
发射功率可调节
支持2个发射器拖1个接收器工作
2种供电方式
产品特点:
前言
警告
目录
部件名称
标配物品
可搭配产品
供电方式
使用说明
规格参数
故障排除
维护保养
目录
01
01
02
03
05
06
06
06
08
09
09
警告
- 01 - - 02 -
请勿私自拆卸产品,如产品出现故障须由本公司或授权的维修人员进
行检查维修。
请保持干燥:请勿用湿手接触产品,亦不可将产品浸入水中或暴露于
雨中。
请勿让儿童接触本产品。
请勿在易燃易爆环境中使用。在这些场合下,请注意相关警告标识。
请勿放置在超过40度的高温环境中。
若发生任何故障,请立即关闭电源。
使用电池的注意事项:
警告
只能使用本手册中列出的电池。 请勿混用新旧电池或不同类型的电池。
请仔细阅读并遵守由厂商提供的警告或指示。
切勿使电池短路或拆卸电池。
切勿将电池投入火中或加热升温。
切勿试图以反方向安装电池。
当电量用尽时,电池容易漏液。 所以为了避免产品受损,请在长期不使用本产品
或电量用尽时取出电池。
如果受损电池中的液体接触到皮肤或衣服,请立即用大量清水冲洗。
-
-
-
-
-
-
-

CH-B-05
578.030MHZ
部件名称
腰包发射器(TX1) 便携接收器(RX1)
6
543
2
1
1. 通讯频段
2. 无线组别及通道
3. 发射功率指标
4. 静音图标
5. 输入音量显示
6. 电池电量显示
1. 天线
2. 3.5mm 音频线输入接口
3. Power 指示灯
- 绿灯:电量充足
- 红灯:电量低,需更换电池
4. 电源 / 静音键
5. 菜单键
6. 麦克风输入接口
7. Audio 指示灯
- 绿灯:拾音模式
- 红灯:静音模式
8. OLED 显示屏
9. 菜单 +
10. 菜单 -
11. Type-C USB
12. 金属背夹接口
13. 电池盒 - 两节 5 号电池
14. 产品标签贴
15. 1/8 冷靴接口
A
RCVR-A
CH-13 RCVR-B
CH-05
B
A B
4
6
5
3
21 1. A 组射频信号
2. B 组射频信号
3. 电池电量显示
4. A 组接收频道
5. B 组接收频道
6. 同步发射器电量及输入音量
OLED显示屏: OLED显示屏:
13
12
8
7
11
14
15
6
4
3
5
9
10
1. 天线
2. 3.5mm 音频线输出接口
3. Power 指示灯
- 绿灯:电量充足
- 红灯:电量低,需换电池
4. 电源 / 返回键
5. 菜单键
6. 3.5mm 耳机监听接口
7. RF 指示灯
- 绿灯:RF 信号强
- 红灯:RF 信号弱或已断开
8. OLED 显示屏
9. 音量 +/ 菜单 +
10. 音量 -/ 菜单 -
11. Type-C USB
12. 金属背夹接口
13. 电池盒 - 两节 5 号电池
14. 产品标签贴
15. 1/8 冷靴接口
13
12
7
11
6
415
3
5
9
8
10
14
- 03 - - 04 -
2
1
2
1

标配物品 可搭配产品
供电方式
使用说明
一、发射器设置
• 开关机:长按2秒电源开关按键即可开/关机;短按电源
键开关静音。
• GRP/CH/RF设置:长按菜单键进入设置界面,再短按
菜单键切换下一个设置。
- GRP组别设置:选中GRP,按+/-可选A/B组别。
- CH通道设置:选中CH,按+/-可设置CH,有01-48个通道可选择。
- RF功率设置:选中RF power切换H/L功率。
- 05 - - 06 -
无线手持麦克风发射器
WH-M1
卡侬口插接发射器
TX3-XLR
名称 型号 标配物品
腰包发射器 TX1 发射器 x1
发射器 x1
腰夹 x1
腰夹 x2
全向型领夹式麦克风×1
便携接收器 RX1
接收器 x1
接收器 x1
腰夹 x1
3.5mm插头音频线×1
3.5mm卡侬头音频线×1
3.5mm插头音频线×1
3.5mm卡侬头音频线×1
1/8”冷靴 x1
1/8”冷靴 x1
UHF无线麦克
风系统组合一 WMicS1
Kit 1
WMicS1
Kit 2
全向型领夹式麦克风×1
发射器 x2 腰夹 x3接收器 x1
3.5mm插头音频线×1
3.5mm卡侬头音频线×1
1/8”冷靴 x1
全向型领夹式麦克风×2
UHF无线麦克
风系统组合二
UWM
LINE IN MIC
TYPE-C接口(5V)
两节AA(5号)干电池
两种供电方式
发射器 腰夹
接收器 3.5mm插头音频线
3.5mm卡侬头音频线
1/8”冷靴
全向型领夹式麦克风

规格参数
三、发射器接口:
LINE IN:连接外界音频信号输入。
MIC:连接领夹麦克风。
名称 腰包发射器
TX1
便携接收器
RX1
频道数 96(A组48 B组48)
RF频率范围 514MHz - 596MHz
频道组 A/B
振荡器类型 晶体控制锁相环合成器
音频频率范围 40Hz - 18KHz
声音延迟 12ms
天线 1/4λ
音频输入接口 3.5mm接口
USB接口 Type -C USB
供电
电池 两节AA(5号)电池
工作温度范围 0℃-40℃
信噪比
储存温度
≈70dB
-10℃-40℃
接收灵敏度 \ -95dBm
失真 \0.5%以下
尺寸 63*190*22mm 63*190*25mm
净重 70g 80g
- 07 - - 08 -
UWM
LINE IN MIC
OUTPUT: 连接外界音频信号输出。
PHONES:连接耳机线。
四、接收器接口:
显示屏亮度设置:短按 +/- 至显示屏显示 OLED light,再长按菜单键选
中 OLED light 对应的亮度级别。短按 +/- 键选择亮度级别,级别:1-8 八
级。
软件版本:短按 +/- 显示 Version 时,表示软件的版本。
背光时间:短按 +/- 至显示屏显示 BackLight,再长按菜单键背光时间跳
动,短按 +/- 键选择背光时间:ON 常亮,OFF 常闭,Delay10S/30S/60S。
恢复出厂设置:短按 +/- 至显示屏显示 Restore Default ,再长按菜单键
即可进行恢复出厂设置。
•
•
•
•
二、接收器设置
开关机 /GRP/CH 设置方法同发射器一样,设置为相同组别通
道即可录音和实时监听。
显示屏亮度设置:短按 +/- 至显示屏显示 OLED light,再长按
菜单键 OLED light 对应的亮度值跳动, 短按 +/- 键选择亮度
级别,级别:1-8 八级。
输出模式:分为 Stereo(立体声)和 Mono(单声道)两种模式。
短按 +/- 键切换至 Output mode,再长按菜单键即可进行两
种声道切换。当输出模式是 Mono(单声道)时,左声道和右声
道音频将被混合输出;当输出模式是 Stereo(立体声),左(A
•
•
•
•
•
•
组)和右(B 组)音频声道输出将独立;系统默认为 Mono(单声道)。
软件版本:短按 +/- 显示 Version 时,表示软件的版本。
背光时间:短按 +/- 至显示屏显示 BackLight,再长按菜单键背光时间跳
动,短按 +/- 键选择背光时间:ON 常亮,OFF 常闭,Delay10S/30S/60S。
恢复出厂设置:短按 +/- 至显示屏显示 Restore Default ,再长按菜单键
即可进行恢复出厂设置。

故障排除
如不能接收到音频信号,请检查电池是否正确安装以及是否打开发射器
电源;发射器和接收器是否设置在同一组别和频道;麦克风及耳机是
否已正确牢固连接到位;功能模式是否设置正确。
检查发射器是否设置的静音。
如您的发射器受到他人干扰,改变发射器和接收器的频道设置即可。
如您发现发射音频距离有限或者有漏发现象, 请检查是否电池耗尽,
请尝试更换电池。
维护保养
避免跌落:如果受到强烈碰撞或振动, 发射器和接收器可能会发生故障。
保持干燥:本产品是非防水产品,如果将其浸入水中或放置于高湿度的
环境中将可能发生故障。 内部构造生锈可能会导致无法修理的损害。
避免温度骤变:温度的突变,诸如在寒冷天进出温暖的大楼将可能会使
发射器和接收器内部结露。 为避免结露, 请将发射器和接收器事先装入
手提袋或塑料包内, 以防温度突变。
远离强磁场:无线电广播发射机等设备产生的强静电或强磁场可能会干
扰本产品正常工作。
1 年保修, 消耗品如领夹麦克风等, 不在 1 年保修范围。
经发现擅自检修此设备, 将取消一年保修期, 维修需要收取相关费用。
如果本品出现故障或者被水淋湿, 在专业人员维修后方可继续使用。
如有技术更改, 恕不另行通知。
Thank you for purchasing UHF Wireless Microphone System ——
WMicS1. These products are suitable for video recording, journalistic
shooting, audio recording, etc. Please read this manual carefully
before using to make sure the correct operation and exert the optimum
function.
Forward
UHF Frequency Range: 514MHz-596MHz. There are 96 wireless
channels which can be freely switched without interference
High and stable sound quality like broadcast
The maximum wireless distance up to 100m
With OLED display to show the parameters setting
Achieve real-time monitoring with 3.5mm earphone
With output volume control and silence function
The power of transmitter is adjustable
Support two transmitters and one receiver to work simultaneously
Two power supply mode
Features:
- 09 - - 10 -
•
•
•
•
•
•
•
•
•
•
•
•
•

Content
Forward
Warning
Content
Names of Parts
Included Item
Recommended Combination
Power Supply
Operation Instruction
Technical Data
Troubleshooting
Maintenance
10
11
12
13
15
16
16
16
19
20
20
Do not disassemble. Should repairs become necessary, this product
must be sent to an authorized maintenance center.
Always keep this product dry. Do not use in rain or in damp condi-
tions.
Keep out of reach of children.
Do not use the flash unit in the presence of flammable gas. In
certain circumstance, please pay attention to the relevant warnings.
Do not leave or store the product if the ambient temperature reads
over 40℃.
Turn off the flash trigger immediately in the event of malfunction.
Observe precautions when handling batteries.
Warning
Use only batteries listed in this manual. Do not use old and new batter-
ies or batteries of different types at the same time.
Read and follow all warnings and instructions provided by the manu-
facturer.
Batteries cannot be short-circuited or disassembled.
Do not put batteries into a fire or apply direct heat to them.
Do not attempt to insert batteries upside down or backwards.
Batteries are prone to leakage when fully discharged. To avoid
damage to the product, be sure to remove batteries when the product
is not used for a long time or when batteries run out of charge.
Should liquid from the batteries come into contact with skin or clothing,
rinse immediately with fresh water.
- 11 - - 12 -
-
-
-
-
-
-
-

Names of Parts
Body-pack Transmitter(TX1)Portable Receiver(RX1)
1. Communication Frequency
2. Wireless Group and Channel
3. Transmitting Power Icon
4. Silence Icon
5. Input Volume Indicator
6. Battery Level Indicator
1. Antenna
2. 3.5mm Audio
Line In Port
3. Power Indicator
-Green light: full battery level
-Red light: Low battery level,
replace the batteries
4. Power Source/Mute
Button
5. Menu Button
6. MicrophoneInput Port
7. Audio Indicator
-Green light: Sound
directivity mode
-Red light: Silent mode
8. OLED Display
9. Menu +
10. Menu -
11. Type-C USB Port
12. Metal Clip Port
13. Battery Holder
(-2x AA Battery)
14. Product Label
15. 1/8"Shoe Mount Port
1. A Group Frequency Signal
2. B Group Frequency Signal
3. Battery Level Indicator
4. A Group Receive Channel
5. B Group Receive Channel
6. Transmitter’s Battery Level
and Volume
OLED Display:OLED Display:
13
12
8
7
11
14
15
6
4
3
5
9
10
1. Antenna
2. 3.5mm Audio
Output Port
3. Power Indicator
-Green light: full battery level
-Red light: Low battery level,
replace the batteries
4. Power Source/Mute
Button
5. Menu Button
6. 3.5mm Earphone
Monitoring Port
7. RF Indicator
-Green light: Strong
RF signal
-Red light: Week or
disconnected RF signal
8. OLED Display
9. Volume +/Menu +
10. Volume -/Menu -
11. Type-C USB Port
12. Metal Clip Port
13. Battery Holder
(-2x AA Battery)
14. Product Label
15. 1/8"Shoe Mount Port
- 13 - - 14 -
13
12
7
11
6
415
3
5
9
8
10
14
CH-B-05
578.030MHZ
6
543
2
1
A
RCVR-A
CH-13
RCVR-B
CH-05
B
A B
4
6
5
3
21
2
2
1
1

Included Item
Recommended Combination
Name Model Included Items
Body-pack Transmitter TX1
Belt Clip x1
Belt Clip x1
Transmitter x1
Omnidirectional Lavalier
Microphone×1
Receiver x1
3.5mm Audio Cable×1
XLR To 3.5mm Audio Cable×1
1/8"Shoe Mount Adapter x1
Belt Clip x2
Transmitter x1
Receiver x1
Omnidirectional Lavalier
Microphone×1
3.5mm Audio Cable×1
XLR To 3.5mm Audio Cable×1
1/8"Shoe Mount Adapter x1
Portable Receiver RX1
UHF Wireless Microphone
System Kit 1
WMicS1
Kit 1
UHF Wireless Microphone
System Kit 2
WMicS1
Kit 2
Belt Clip x3
Transmitter x2
Receiver x1
Omnidirectional Lavalier
Microphone×2
3.5mm Audio Cable×1
XLR To 3.5mm Audio Cable×1
1/8"Shoe Mount Adapter×1
Power Supply
2 AA Batteries
There are two modes of power supply
Operation Instruction
• Power on/off: Long press the power switch for 2
seconds to power it on or off. Short press the power
switch to make it silent.
Transmitter Setting
- 15 - - 16 -
Wireless Handheld Microphone
Transmitter WH-M1
Plug-On XLR Transmitter TX3-XLR
UWM
LINE IN MIC
Transmitter Belt Clip
Receiver 3.5mm Audio Cable
XLR To 3.5mm Audio Cable
1/8"Shoe Mount Adapter
Omnidirectional Lavalier Microphone
TYPE-C Port(5V)

GRP/CH/RF Setting: Long press the menu button to enter the setting
interface. Then, short press the menu button to switch the next
setting.
GRP Group setting: Choose GRP and press +/- to choose A or B group.
CH Channel setting: Choose CH and press +/- to set channel from 01 to 48.
RF Power setting: Choose RF power to switch H/L power.
Display brightness setting: short press +/- button until OLED light is
displayed on the panel. Then, long press the menu button to choose
the corresponding brightness level of OLED light. Short press +/-
button to choose brightness from 1 to 8 levels.
Software version: short press +/- button until Version is displayed,
which means the version of software.
Backlighting time: Short press +/- until Back Light is displayed on the
LCD panel. Then,long press the menu button and the backlighting
time will be blinking. Short press the +/-button to choose backlighting
time: ON means lighting and OFF means off. Delay10S/30S/60S.
Restore factory settings: short press the +/- button until Restore
Default is displayed. Then, long press the menu button to restore
factory settings.
- 17 - - 18 -
-
-
-
•
•
•
•
•
The setting methods of power on&off/GRP/CH is the same
as transmitter. Set the receiver’ s group and channel to the
same as the transmitter’s to record sound.
Display brightness setting: short press +/- button until
OLED light is displayed on the panel. Then, long press the
menu button and the corresponding brightness value of
OLED light will be blinking. Short press +/- button to
choose brightness from 1 to 8 levels.
Output mode: there are Stereo mode and Mono mode.
Receiver Setting
Short press +/- button to enteroutput mode. Then, long pressthe
menubutton to switch the two channels. When in Monochannel
output, the sound of left channel and right channel will be output
simultaneously. When in Stereo channel output, the sound of left
channel(A group) and right channel(B group) will be output inde-
pendently. The default channel of this system is Mono channel.
Software version: short press +/- button until Version is displayed,
which means the version of software.
Backlighting time: Short press +/- until Back Light is displayed on
the LCD panel. Then, long press the menu button and the backlight-
ing time will be blinking. Short press the +/- button to choose back-
lighting time: ON means lighting and OFF means off.
Delay10S/30S/60S.
Restore factory settings: short press the +/- button until Restore
Default is displayed. Then, long press the menu button to restore
factory settings.
•
•
•
•
•
•
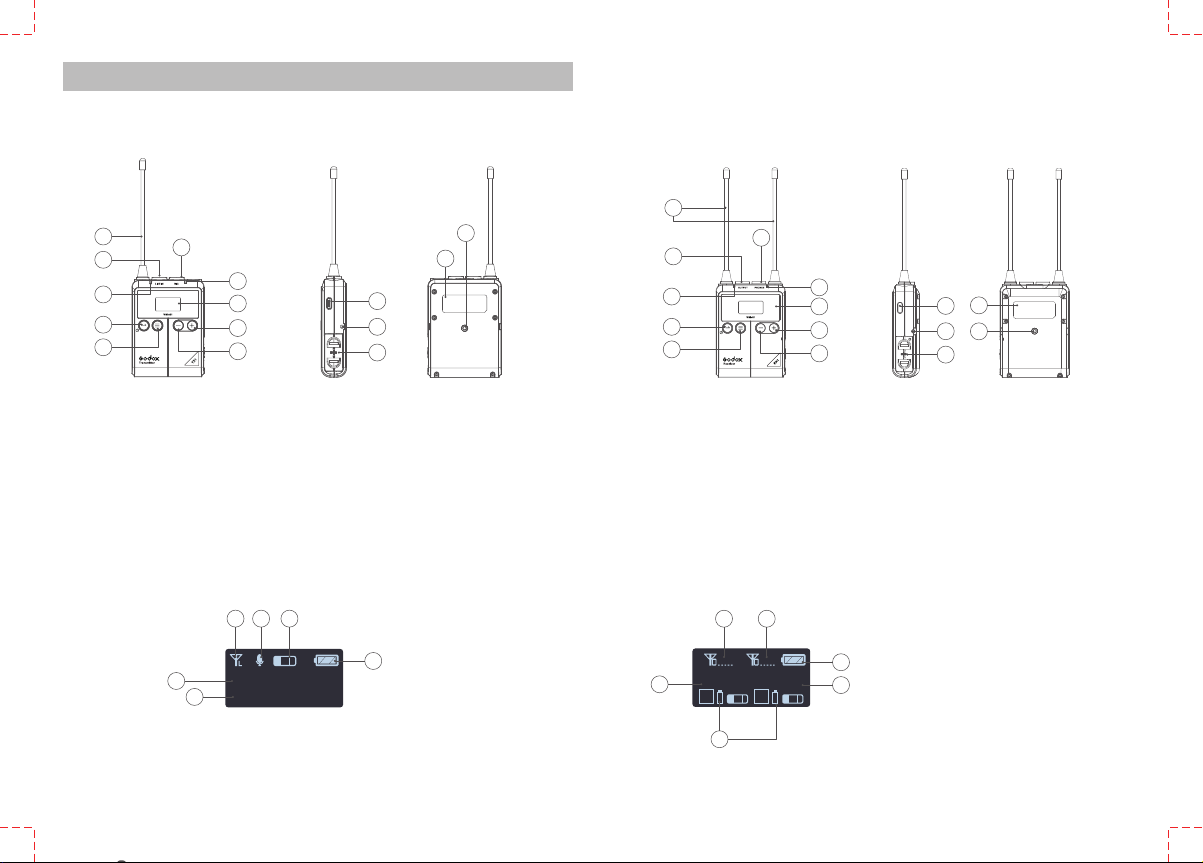
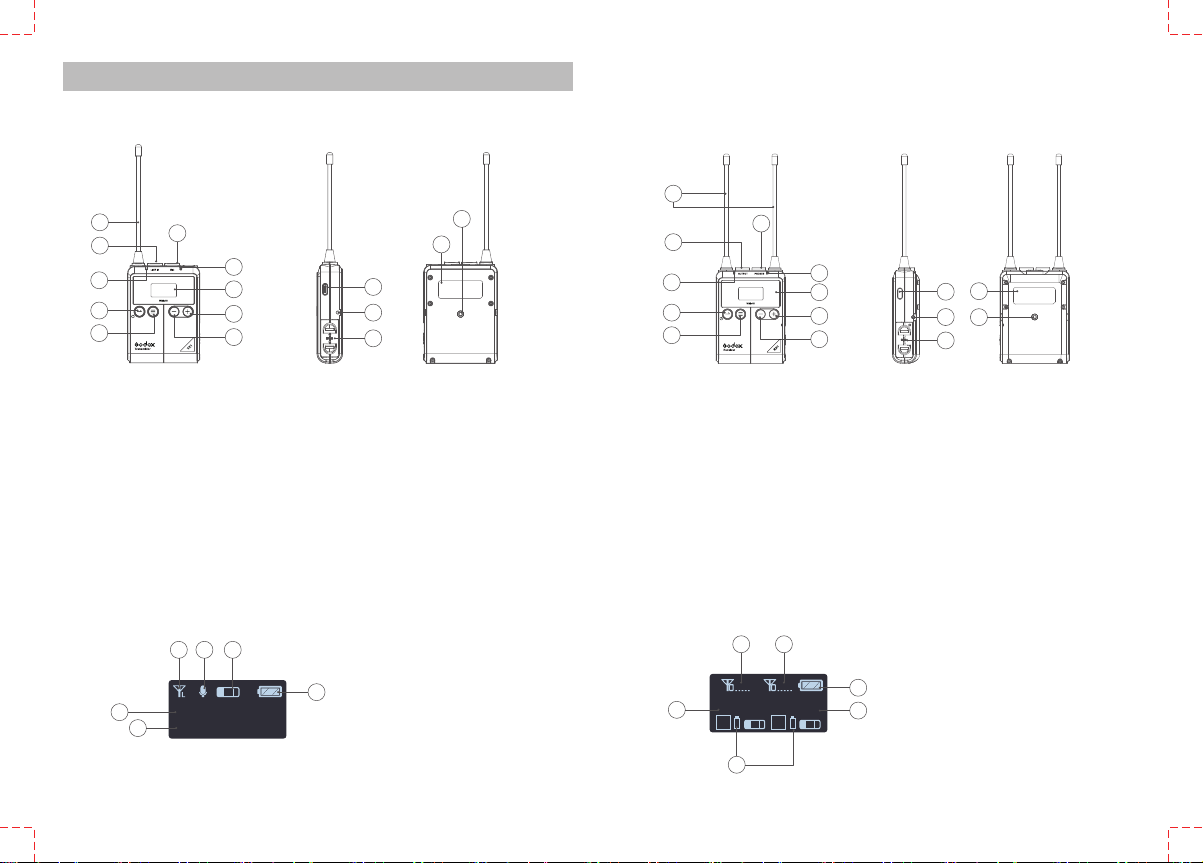
OUTPUT: To connect with external audio signal output.
PHONES: To connect with earphone cable.
Receiver Port
LINE IN: To connect with external audio signal input.
MIC: To connect with lavalier microphone.
Transmitter Port
UWM
LINE IN MIC

Antenna 1/4λ
Audio Input Port 3.5mm Port
USB Port Type-C USB
Power
Supply Battery Two AA batteries
Working Temperature Range
Storage Temperature
Signal Noise Ratio
0℃-40℃
-10℃-40℃
≈70dB
Receive Sensitivity \ -95dBm
Distortion \ Below 0.5%
Size 63*190*22mm 63*190*25mm
Net Weight 70g 80g
Avoid sudden drops. The device may fail to work after strong shocks,
impacts, or excess stress.
Keep dry. The product isn’t water-proof. Malfunction, rust, and corrosion
may occur and go beyond repair if soaked in water or exposed to high
humidity.
Avoid sudden temperature changes. Condensation happens if sudden
temperature changes such as the circumstance when taking the
transmitter and receiver out of a building with higher temperature to
outside in winter. Please put the transmitter and receiver in a handbag
or plastic bag beforehand.
Keep away from strong magnetic field. The strong static or magnetic
field produced by devices such as radio transmitters leads to malfunc-
tion.
This product, except consumables e.g. lapel microphone, is supported
with a one-year warranty.
Unauthorized service will void the warranty.
If the product had failures or was wetted, do not use it until it is repaired
by professionals.
Changes made to the specifications or designs may not be reflected in
this manual.
Maintenance
- 19 - - 20 -
Unable to receive audio signal. Make sure batteries are installed
correctly and Power Switch is turned on. Check if the transmitter and
the receiver are set to the same channel, if the microphone or
earphone is well connected, or if the devices are set to the correct
mode.
Check if the transmitter is set to silent mode or not.
Signal disturbance or shooting interference. Change a different
channel of the transmitter and receiver.
Operating audio distance limited or signal missing. Check if batteries
are exhausted. If so, replace them.
Troubleshooting
•
•
•
•
Technical Data
Name Body-pack
Transmitter TX1
Portable
Receiver RX1
Selectable Channel 96(Group A: 48; Group B: 48)
RF Frequency Range 514MHz - 596MHz
Channel Group A/B
Oscillator Type Crystal Controlled Phase-Locked
Loop Synthesizer
Audio Frequency Range 40Hz-18KHz
Sound Delay 12ms
Other manuals for WMicS1
3
Table of contents
Other Godox Microphone manuals
Popular Microphone manuals by other brands

Amperes
Amperes PM 1000 instruction manual

Motorola
Motorola PMMN4125 installation guide

Wharfedale Pro
Wharfedale Pro KM-1 Operating manual and user guide

PCB Piezotronics
PCB Piezotronics 377A60 Installation and operating manual

Shure
Shure RK6MB quick start guide

RODE Microphones
RODE Microphones NT1-A Instruction guide