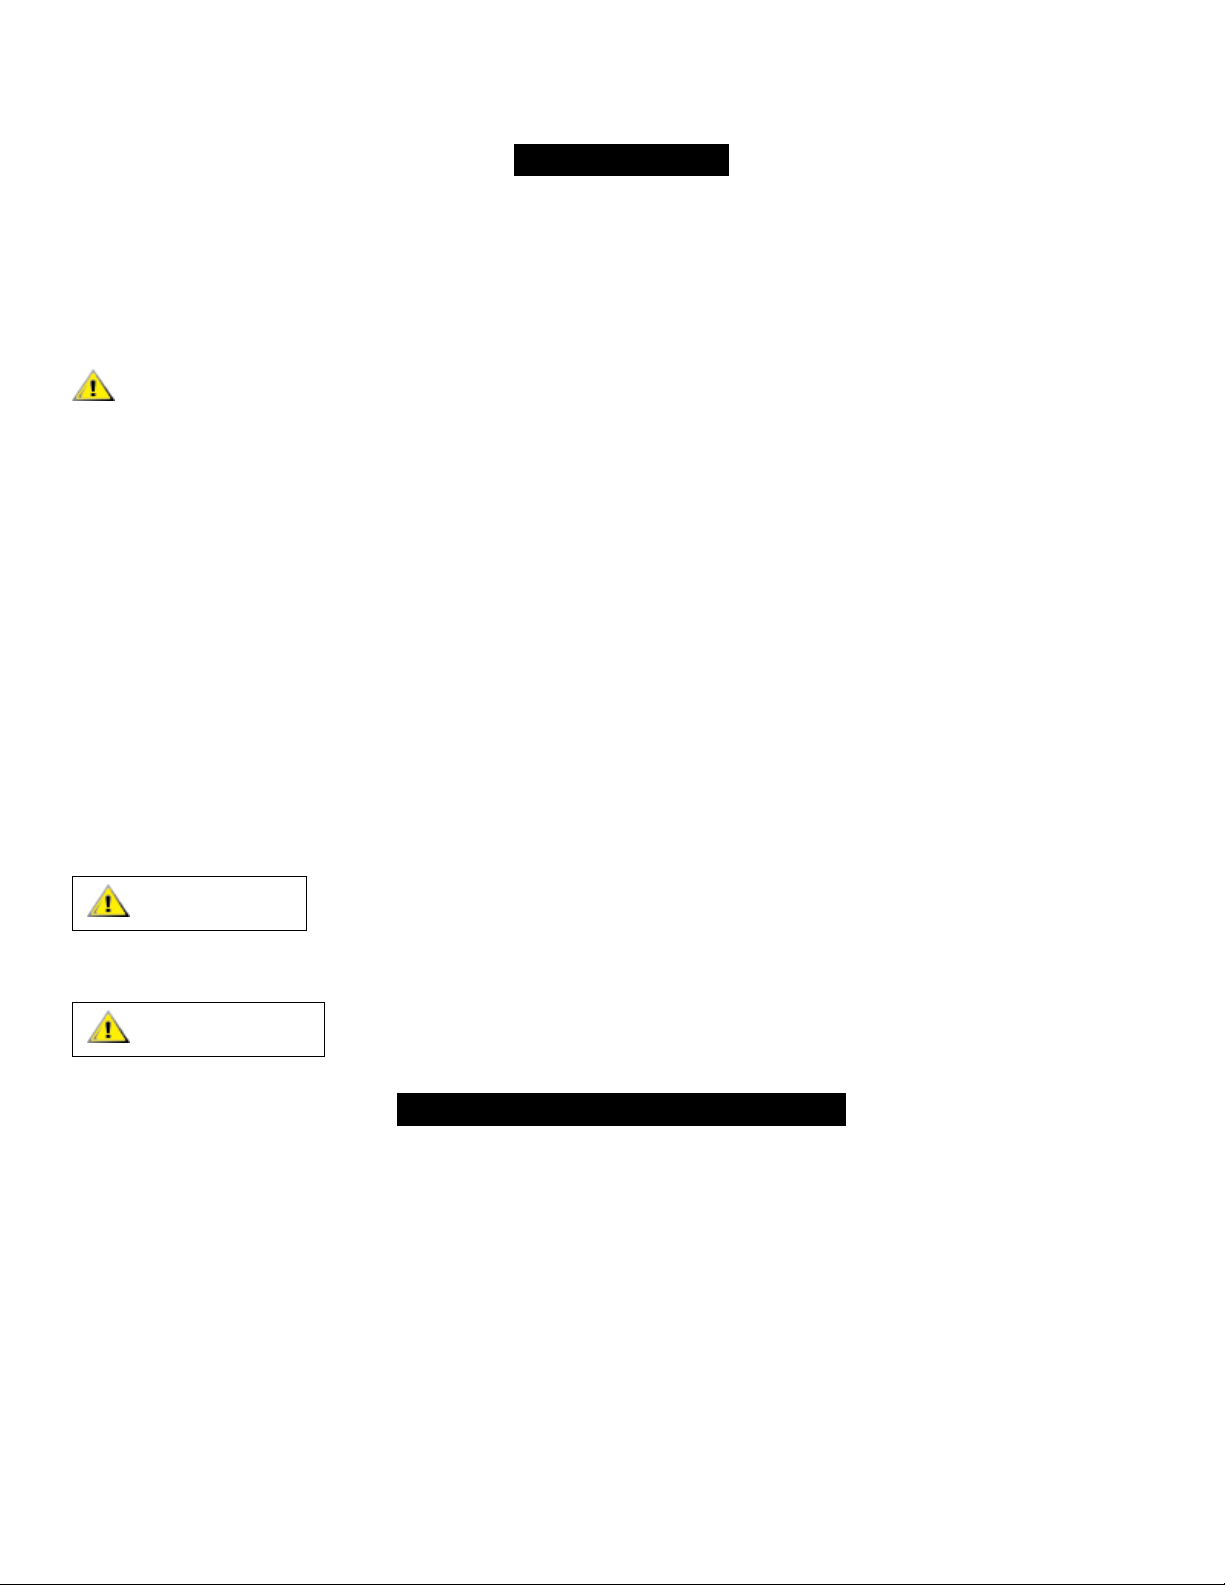
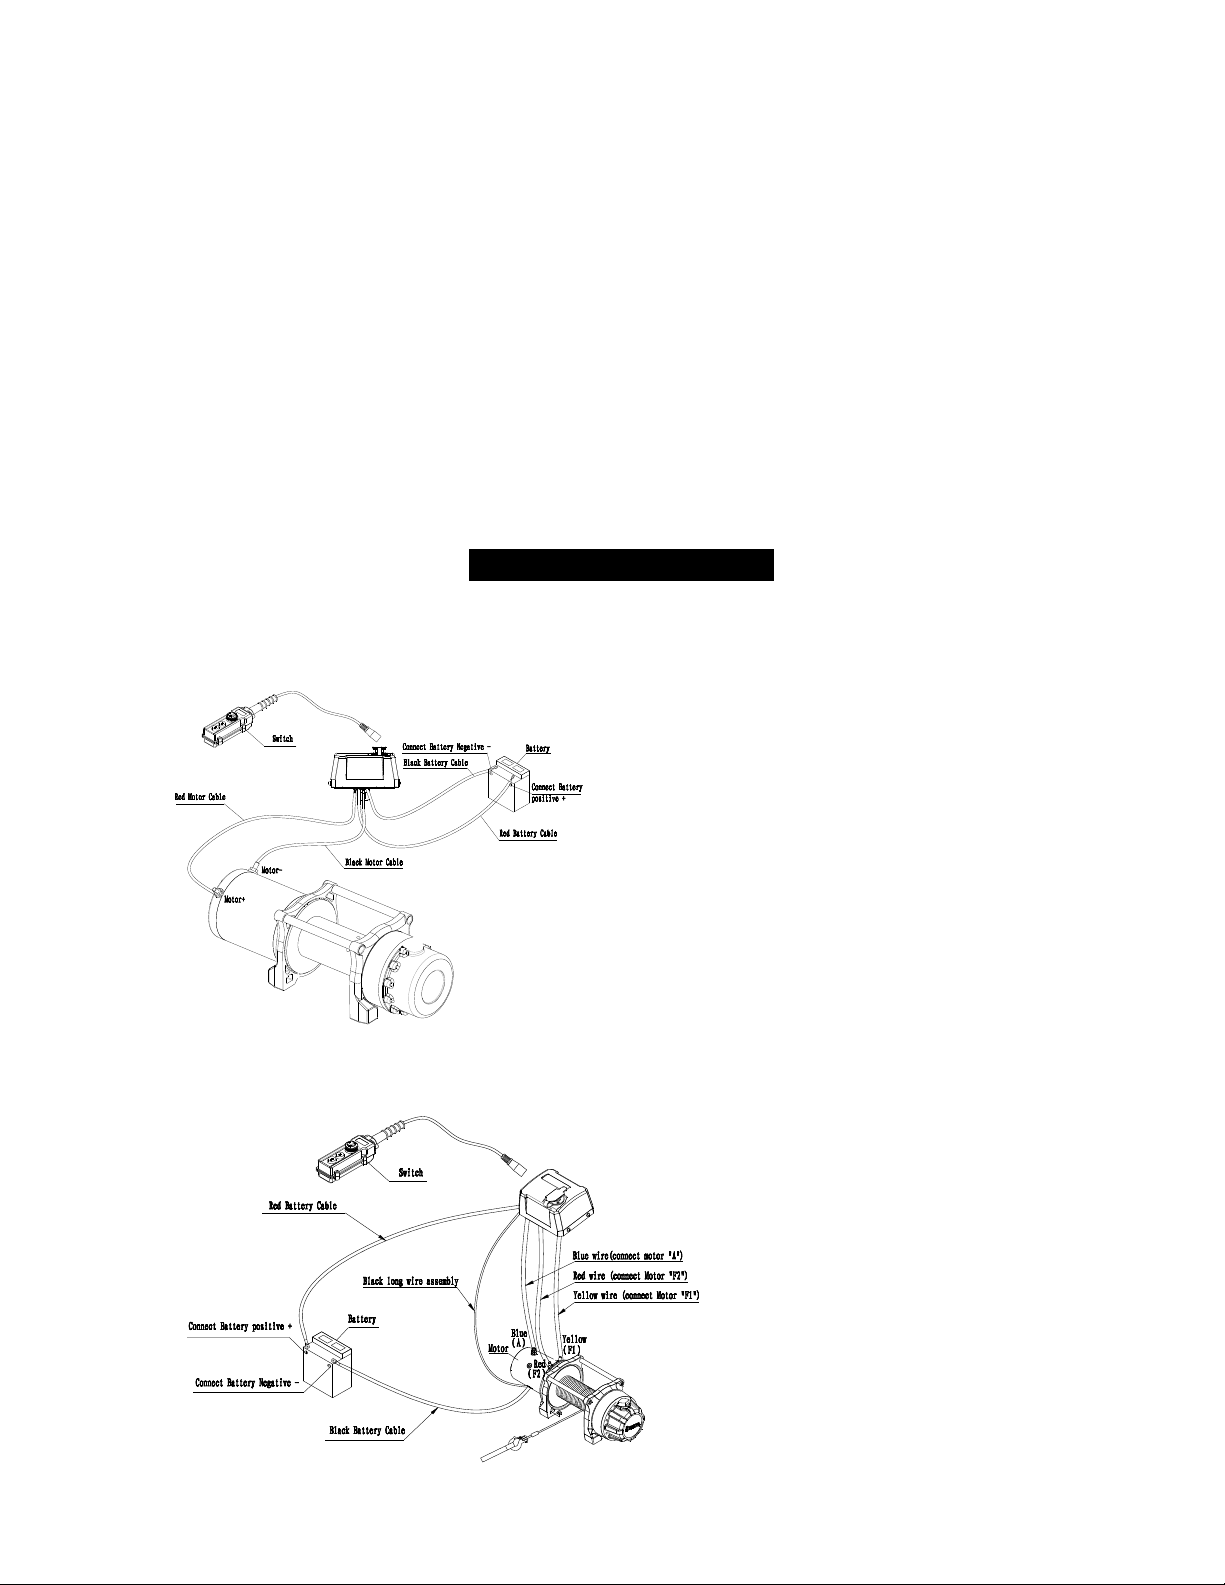
goldwinch GTD 300 User manual

ELECTRICAL HOIST
GTD 300
GTD 600
GTD1200
Assembly & Operating Instruction

CONTENTS
INTRODUCTION .................................................................................... 1
GETTING TO KNOW YOUR HOIST....................................................... 1
SAFETY PRECAUTIONS....................................................................... 3
GENERAL TIPS FOR SAFE OPERATION............................................. 4
HOISTING TECHNIQUES A-Z ............................................................... 6
HOIST ASSEMBLY AND MOUNTING ................................................... 7
MOUNTING DRAWING.......................................................................... 8
HOIST WORKING DEMONSTRATION.................................................. 9
RIGGING TECHNIQUES........................................................................ 9
REPLACING THE WIRE ROPE............................................................1 0
MAINTENANCE.................................................................................... 1 0
TROUBLE SHOOTING......................................................................... 1 1
HOIST ASSEMBLY DRAWING(GTD300)........................................1 2
HOIST PARTS LIST(GTD300).........................................................1 3
HOIST ASSEMBLY DRAWING(GTD600)........................................14
HOIST PARTS LIST(GTD600).........................................................15
HOIST ASSEMBLY DRAWING(GTD1200)......................................16
HOIST PARTS LIST(GTD1200).......................................................17
SPECIFICATION(GTD300)..............................................................1 8
SPECIFICATION(GTD600)..............................................................1 9
SPECIFICATION(GTD1200)............................................................20

1
INTRODUCTION
Congratulations on your purchase of a high quality hoist. We design and
manufacture hoists to strict specifications and with proper use and maintenance
should bring you years of satisfying service.
WARNING - Read, study and follow all instructions before operating this
device. Failure to heed these instructions may result in personal injury
and/or property damage.
Your hoist can develop tremendous pulling forces and if used unsafely or
improperly could result in property damage, serious injury or death. Throughout
this manual you will find the following symbols for caution, warning and danger.
Pay particular attention to the notes preceded by these symbols as they are
written for your safety. Ultimately, safe operation of this device rests with you, the
operator.
This indicates a potentially hazardous situation, which if not avoided, may
result in minor or moderate injury. This notation is also used to alert you
against unsafe practices.
This indicates a potentially hazardous situation, which if not avoided, could
result in death or serious injury.
GETTING TO KNOW YOUR HOIST
Your hoist is a powerful piece of machinery. It is important that you
understand the basics of its operation and specifications so that when you
need to use it, you can use it with confidence and safety. Below is a list of
the components of your hoist and their use. You should practice using
your hoist before you are in a situation where you need to use it.
1. This hoist is engineered for maximum line pull with only one layer of cable
spooled onto the hoist drum (the first layer).
CAUTION
WARNING

2
2. Motor: Your motor is powered by a 12/24 volt battery and provides power to the
gear mechanism which turns the drum and winds the wire rope;
3. Hoist Drum: The hoist drum is the cylinder on which the wire rope is stored. It
can feed or wind the rope depending on the remote hoist switch.
4. Wire Rope: Your hoist has a galvanized aircraft cable designed specifically for
load capacity of rated line pull. The wire rope feeds onto the drum in the “under
wind” position through the roller fairlead and is looped at the end to accept the
clevis hook pin.
5. Roller Fairlead: When using the hoist at an angle the roller fairlead acts to
guide the wire rope onto the drum and minimizes damage to the wire rope from
abrasion on the hoist mount or bumper.
6. Mechanic Gear System: The reduction gears convert the hoist motor power into
extreme pulling forces.
7. Braking System: Braking action is automatically applied to the hoist drum when
the hoist motor is stopped and there is a load on the wire rope. A separate
mechanical brake applies the braking action.
8. Free Spooling Clutch: The clutch allows the operator to manually disengage
(“CLUTCH OUT”) the spooling drum from the gear train, free spool. Engaging
the clutch (“CLUTCH IN”) locks the hoist into the gear system.
9. Solenoid: Power from the vehicle battery flows through the weather-sealed
switch before being directed to the hoist motor.
10.Remote Switch: The Power switch leads have a dual switch for powering in or
powering out your hoist drum. The remote switch allows you to stand clear of
the wire rope when the hoist is under load.
11.Wireless Remote Control: allow you control hoist far from 50 Ft away.
12.Universal Flat Bed Mounting Channel: Your hoist could have been optionally
supplied with a flat bed mounting channel that can be mounted to most flat
surfaces such as trailers, step bumpers, truck beds, etc. The mounting channel
also has holes to accept your roller fairlead.
13.Snatch Block: If your hoist is supplied with a snatch block that can double the
pulling power of the hoist, or change the pulling direction without damaging the

3
wire rope. We recommend you to use double line and snatch block for pulling
over 70% of the rated line pull.
SAFETY PRECAUTIONS
WARNING
WARNING –Do not exceed rated capacity shown in this table.
WARNING –Intermittent use only. Allow hoist to cool between uses.
WARNING –Do not use hoist to pull or move people in any way.
WARNING –NEVER cut, weld, or modify any part of the hoist or cable.
WARNING –A minimum of five wraps of cable around the drum barrel is
necessary for pulling and holding the rated load.
WARNING –Keep yourself and others a safe distance to the side of the cable
when it is under tension.
WARNING –Never step over a cable, or go near a cable under load.
WARNING –Don’t move the vehicle to pull a load (towing) on the hoist cable.
This could result in cable breakage.
WARNING –Disconnect the remote control and battery leads when not in use.
WARNING –Avoid “shock loads” by using the control switch intermittently to
take up the slack in the wire rope. “Shock loads” can far exceed the rate
capacity for the wire rope and drum.
WARNING –Do not exceeds maximum line pull ratings shown on the tables.
WARNING –When spooling the cable ensure that the cable spools in the
under-wind position with the cable entering the drum from the bottom, not the
top. To spool correctly you should keep a slight load on the cable while pushing
the remote button to draw in the cable. Walk toward the hoist not allowing the
cable to slide through your hands. Do not let your hands get within 12 in. of
the hoist while spooling. Turn off the hoist and repeat the procedure until a few
feet of cable is left. Disconnect the remote control and finish spooling by

4
rotating the drum by hand with the clutch disengaged. Keep your hands clear
of the fairlead and drum while the hoist is under power.
Failure to heed these warnings may result in personal injury and/or property
damage.
WARNING –Use gloves to protect hands when handling the cable. Never let
the cable slide through your hands.
WARNING –Never connect the cable back to itself. Apply blocks to the wheels
of the vehicle when on an incline. Duration of hoisting pulls should be kept as short
as possible. If the motor becomes uncomfortably hot to the touch, stop hoisting
immediately and let it cool down for a few minutes. Do not pull for more than one
minute at or near the rated load.
CAUTION –If the motor stalls do not maintain power to the hoist. Electric
hoistes are designed and made for intermittent use and should not be used in
constant duty applications.
CAUTION –Never disengage the clutch when there is a load on the hoist.
CAUTION –Use the hand saver hook when handling the hook for spooling or
un-spooling the wire rope.
Don’t place any part of your body or clothing near rotating or moving
components.
Don’t stand too close to hoist when operating.
Don’t lift loads greater than the rated load of the hoist.
Don’t touch or hand wire rope or riggings when operating.
Don’t put wire rope around an object and hook it back to rope.
Don’t use unsuitable rope in construction, strength or having any defects.
GENERAL TIPS FOR SAFE OPERATION
•The hoist and its all-derivative types are rated at rated capacity when spooling
the first rope layer on the drum. Overloading can damage the hoist/motor/ or
wire rope. For loads over 70% of rated line pull, we recommend the use of the
pulley block/snatch block to double the wire rope line. This will aid in two ways:
a) reduce the number or rope layers on the drum, as well as, b) reduce the load

5
on the wire rope by as much as 50%. When doubling the line back to the
vehicle, attach to the frame or other load bearing part.
•Get to know your hoist before you actually need to use it. We recommend that
you set up a few test runs to familiarize yourself with rigging techniques, the
sounds your hoist makes under various loads, the way the cable spools on the
drum, etc.
•Inspect the wire rope and equipment before each use. A frayed or damaged
rope must be replaced immediately. Use only the manufacturer’s replacement
rope with the exact specifications.
•Inspect the hoist installation and bolts to ensure that all bolts are tight before
each operation.
•Never connect the cable back to itself. This will cause cable damage. Always
use a snatch block, sling or chain of suitable strength as shown in the
illustrations.
•Store the remote control inside your vehicle in a place that it will not be
damaged.
•Any hoist that appears to be damaged in any way, is found to be worn, or
operates abnormally shall be removed from service.
•Pull only on parts of the vehicle as specified by the vehicle manufacturer.
•Only attachments and/or adapters supplied by the manufacturer shall be used.
•Whenever before your hoist start to working, please slightly test-run your hoist
in two direction, even if the hoist drum only round a few degree of angle,
ensure the hoist is well-balanced, especially after you operated the clutch, test-
running hoist can make hoist in gear.
•Check all safety and environmental conditions prior and during use.
•Before use, ensure that you are familiar with all lifting operations (hoist speeds
& direction).
•A wire rope should be replaced if it shows signs of excessive wear, broken
wires, corrosion or any other defects.
•The operator must remain with the hoist when it is being operated.
•If the hoist fails to pull a load under normal conditions, stop the operation within
30 seconds otherwise motor damage may occur.

6
•Ensure that the hoist is connected to the correct voltage. 12VDC or 24VDC
only.
•Make sure the wire rope is wound evenly on the first layer on the drum, rewind
it if not evenly wound.
•Remove the trigger switch from the hoist when not in use.
•Do not wrap the wire rope around the load and back onto it self.
•Keep hands and clothes away from the hoist, wire rope, and fairlead.
•Never unplug the trigger switch when hoisting a load.
•To avoid insufficient power when hoisting a load, the vehicle should be running
and in neutral.
•Keep the trigger switch cord clear of the battery leads at all times.
•If noise or vibration occurs when running, stop the hoist immediately and return
it for repair.
HOISTING TECHNIQUES A-Z
a. Take time to asses your situation and plan your pull.
b. Put on gloves to protect your hands.
c. Disengage the clutch to allow free-spooling and to save energy.
d. Attach the hand saver hook to the clevis hook.
e. Pull out the wire rope to your desired anchor point using the hand saver hook.
f. Secure the clevis hook to the anchor point: Sling, chain or snatch block. Do not
attach the hook back onto the wire rope.
g. Engage the clutch.
h. Connect the remote control to the hoist.
i. Start your engine to ensure power is being replenished to the battery.
j. Power in the wire rope guiding the wire under tension to draw up the slack in the
wire. Once the wire is under tension stand well clear. Never step over the wire rope.
k. Double-check your anchors and make sure all connections are secure.
l. Inspect the wire rope. Make sure there are at least 5 wraps of wire rope around the
hoist drum.
m. Clear the area. Make sure all spectators are back and that no one is directly in
front or behind the vehicle or anchor point.

7
n. Begin hoisting. Be sure that the wire rope is winding evenly and tightly around the
drum. Avoid shock loads; keep the wire rope under tension.
o. The hoist is meant for intermittent use. Under full load with a single line rig do not
power in for more than a minute without letting the motor cool down for a few minutes
and then resume the hoisting operation.
p. The hoisting operation is complete once the vehicle is on stable ground and is able
to drive under its own power.
q. Secure the vehicle. Be sure to set the brakes and place the vehicle in park.
r. Release the tension on the wire rope. The hoist is not meant to hold the vehicle for
long periods of time.
s. Disconnect the wire rope from the anchor.
t. Rewind the wire rope. Make sure that any wire already on the drum has spooled
tightly and neatly. If not, draw out the wire and re-spool from the point where the rope
is tight.
u. Keep your hands clear of the hoist drum and fairlead as the wire rope is being
drawn in.
v. Secure the hook and hook strap.
w. Disconnect the remote control and store in a clean, dry place.
x. Clean and inspect connections and mounting hardware for next hoisting operation.
HOIST ASSEMBLY AND MOUNTING
1. Your hoist is designed with a bolt pattern that is standard in this class of hoist.
Many hoist mounting kits are available that utilize this bolt pattern for the
mounting channels. If you will utilize the mounting channel you must ensure
that it is mounted on a flat surface so that the three major sections (motor, drum
and gear housing) are properly aligned. Proper alignment of the hoist will allow
even distribution of the full rated load.
2. Pull out a few inches of cable from the drum. Now, using the remaining cap
screws, flat washer, lock washer and nut secure the hoist to the mounting
channel.
3. Connect the battery and motor leads as the drawing above. Keep in mind that
every type of hoist is different each other.

8
4. Assemble the clevis hook to the cable. Take off the pin from the clevis hook,
connect the clevis hook to the cable and mount the pin back to the clevis Hook.
5. Always use the hand saver when free-spooling and re-spooling the wire rope.
Using the hand saver keeps your hands and fingers away from the rotating
drum.
6. Check for proper drum rotation. Pull out some cable from the drum. Press the
cable out button on the power switch. If the drum is turning and releasing more
cable then your connections are accurate. If the drum is turning and collecting
more cable then reverse the leads on the motor. Repeat and check rotation.
MOUNTING DRAWING
The mounting drawing
GTD300
GTD600

9
GTD1200
CAUTION –Batteries contain gases which are flammable and explosive. Wear
eye protection during installation and remove all jewelry. Do not lean over
battery while making connections.
RIGGING TECHNIQUES
For pulls over 70% rated line pull, we recommend the use of the
snatch block/pulley block to double line the wire rope. Fig 3.1
This reduces the load on the hoist and the strain on the rope by up
to 50% depending on the included angle.
WARNING - Never use your hoist for overload hoisting or for lifting
people .
HOIST WORKING DEMONSTRATION
1. Grab the cable assembly and pull the cable to the desired length, then attach to
item being pulled.
Fig 3.1
Fig 3.2

10
Caution: Always leave at least five turns of cable on the drum; Review hoist safety
warnings and precautions on page 2、3 before continuing.
2. Insert the switch assembly connector onto the control box.
3. Test-run hoist in two directions, each direction for one or two seconds.
4. While standing aside of the tow path, hold and operate the switch assembly
supplied by your choice. To reverse directions. Wait until the motor stops before
reversing directions.
5. When the pulling is complete, remove the switch assembly. From the female
connector of the directional valve and replace the female connectors cover.
REPLACING THE WIRE ROPE
If the wire rope has become worn or is beginning to show signs of strands breaking, it
must be replaced before being used again.
1. Extend cable assembly to its full length. Note how the existing cable is connected
to the drum.
2. Remove old cable assembly and attach new one as the old cable connected to the
drum. Insert the end of the new rope and secure the screw .
3. Ensure that the new cable wraps in the same rotation direction as the old one.
The cable should leave the drum from the bottom, under the drum.
4. Retract Cable Assembly onto drum, first five wraps being careful not to allow
kinking, then hoist cable must be wound onto the drum under a load of at least
10% rated line pull.
WARNING - Only replace the wire rope with the identical replacement part
recommended by the manufacturer.
MAINTENANCE
1. Periodically check the tightness of mounting bolts and electrical connections.
Remove all dirt or corrosion and always keep clean.
2. Do not attempt to disassemble the gear box. Repairs should be done by the
manufacturer or an authorized repair center.
3. The gearbox has been lubricated using a high temperature lithium grease and
is sealed at the factory. No internal lubrication is required.

11
TROUBLE SHOOTING
When the hoist fails to operate after several attempts, or if there is any fault while
operating check the following:
Symptom
Possible Cause
Remedy
Hoist will not
operate
Cut circuit
Check battery lead
Weak battery
Recharge or replace battery(at least
650CCA)
Damaged circuit breaker
Replace circuit breaker
Bad connection of wirings
Reconnect tightly
Damaged solenoid
Replace solenoid
Cut circuit on switch
Replace switch
Damaged motor or worn carbon brush
Replace motor or carbon brush
Dropt or lost motor wiring
Tighten wirings
Motor runs in
one direction
Broken wiring or bad connection
Reconnect or replace wiring
Damaged or stuck solenoid
Replace solenoid
Switch inoperative
Replace switch
Dropt or lost wiring
Replace wiring and tighten wirings
Hoist won’t lift
rated load
Considerable voltage drop exceeds by 10% of
the rated voltage of 12V DC or 24V DC
Correct leads size
Replace battery as bad condition
Clean and tighten the wirings
No brake
Damaged brake cam and disc
Replace brake cam and disc
Damaged gear box
Replace gear box
Dropt snatch ring
Replace snatch ring
Oil leakage at brake
Clean oil leakage
Damaged or inoperative spiral spring
Replace and position spiral spring
Brake distance
is too long
Worn or damaged brake
Replace or adjust brake
Oil leakage at brake
Clean oil leakage
Damaged gear
train
Hit by certain exterior force
Replace the damaged components
Damaged gear train
Replace the damaged components
Over load operation
Replace a new hoist
Motor runs
extremely hot
Long period of operation
Allow to cool
Damaged motor
Replace or repair motor
Damaged or inoperative brake
Replace or repair brake
Hoist vibrates
badly or is
noisy
Damaged brake
Replace or repair brake
Mounting surface is not flat
Make sure mounting surface is flat
Tie bar is bent
Replace tie bar
Crack on the motor and gearbox support racks
Replace racks

12
HOIST ASSEMBLY DRAWING(GTD300)
30
29
3
4
5
6
7
8
9
10
11
12
10
13
14
15
16
17
18
19
20
25
24
23
22
21
2
1
16
31
32
28

13
HOIST PARTS LIST(GTD300)
No.
Part #
Qty
Description
Remark
1
H300001
2
Terminal Protect
2
H300100
1
Motor Assembly
3
H300002
4
Think Flat Washer Φ8
4
H300003
4
Lock Washer Φ8
5
H300004
4
Screw M8 x 25
6
H300005
4
Hex Nut M8
7
H300006
4
Screw M6 x 20
8
H300007
2
Tie Bar
9
H300200
1
Break / Shaft Assembly
10
H300008
2
Bushing-Drum
11
H300009
4
Lock Washer Φ6
12
H300300
1
Drum Assembly
13
H300010
8
Screw M5 x 50
14
H300011
8
Lock Washer Φ5
15
H300012
1
End Bearing
16
H300013
2
Gasket
17
H300014
1
Gear—Ring
18
H300015
1
Inner Gear—Ring
19
H300400
1
Gear Carrier Assembly(Output)
20
H300500
1
Gear Carrier Assembly(Intermediate)
21
H300600
1
Gear Carrier Assembly(Input)
22
H300016
1
Gear—Input Sun
23
H300017
1
Trust Washer
24
H300018
1
Trust Washer I
25
H300019
1
Gear—Housing
26
H300020
2
Screw M6×8
27
H300021
1
Six Angle Bar
28
H300022
2
Ring Seals
29
H300700
1
Cable Assembly
30
H300023
1
Strap
31
H300800
1
Remote Control Switch
32
H300900
1
Control Section

14
HOIST ASSEMBLY DRAWING(GTD600)
1
7
2
3
6
5
4
8
910
11 12
13
14
1516
17 18 19
20
11
12
21
22
23
22
42425
26
27
28
29
30 31 32 33
34
35 36
37
38
39
40
41

15
HOIST PARTS LIST(GTD600)
No.
Part #
Qty
Description
Remark
1
H6000001
4
Lock Washer Φ6
2
H6000002
4
Screw M6x 20
3
H6000100
1
Motor Assembly
4
H6000003
2
Ring Seals
5
H6000004
1
Ring Seals
6
H6000005
1
Motor Bracket
7
H6000006
4
Think Flat Washer Φ10
8
H6000007
4
Lock Washer Φ10
9
H6000008
4
Cap Screw M10 x 35
10
H6000009
4
Hex Nut M10
11
H6000010
2
Ring Seals
12
H6000011
2
Bushing-Drum
13
H6000200
1
Break / Shaft Assembly
14
H6000012
1
Six Angle Bar
15
H6000013
4
Screw M8 x 20
16
H6000014
4
Lock Washer Φ8
17
H6000015
2
Tie Bar
18
H6000300
1
Drum Assembly
19
H6000016
1
Screw M8×10
20
H6000017
1
Coupling
21
H6000018
1
End Bearing
22
H6000019
2
Gasket
23
H6000020
1
Gear—Ring
24
H6000021
1
Circlip For Hole
25
H6000400
1
Bearing
26
H6000500
1
Gear Carrier Assembly(Output)
27
H6000022
1
Circlip For Hole
28
H6000600
1
Gear Carrier Assembly(Intermediate)
29
H6000700
1
Brake/ Shaft Assembly
30
H6000023
1
Gear—Input Sun
31
H6000024
3
Planetary Gear
32
H6000025
1
Trust Washer
33
H6000800
1
Bearing
34
H6000900
1
Gear ring bolt
35
H6000026
1
Gear—Housing
36
H6000027
8
Lock Washer Φ6
37
H6000028
8
Screw M6x70
38
H6001000
1
Remote Control Switch
39
H6001100
1
Cable Assembly
40
H6000029
1
Strap
41
H6001200
1
Control Section

16
HOIST ASSEMBLY DRAWING(GTD1200)
1
6
2
3
5
4
7
8
11
12
13
1415
16 17 18
19
11
20
21
22
21
2324
25
26
27
28
29 30
31 32
33 34 35
36
39
40
41
42
10
10
1
3738
9

17
HOIST PARTS LIST(GTD1200)
No.
Part #
Qty
Description
Remark
1
H1200001
12
Lock Washer Φ8
2
H1200002
4
Screw M8x 25
3
H1200100
1
Motor Assembly
4
H1200003
1
Ring Seals
5
H1200004
1
Motor Bracket
6
H1200005
8
Flat Washer Φ12
7
H1200006
8
Lock Washer Φ12
8
H1200007
8
Cap Screw M12 x 35
9
H1200008
8
Locknut M12
10
H1200009
2
Bushing-Drum
11
H1200010
2
Ring Seals
12
H1200200
1
Break / Shaft Assembly
13
H1200011
1
Six Angle Bar
14
H1200012
4
Screw M10 x 30
15
H1200013
6
Lock Washer Φ10
16
H1200014
2
Tie Bar
17
H1200300
1
Drum Assembly
18
H1200015
2
Screw M8×10
19
H1200016
1
Coupling
20
H1200017
1
End Bearing
21
H1200018
2
Gasket
22
H1200019
1
Gear—Ring
23
H1200020
1
Circlip For Hole
24
H1200021
1
Bearing
25
H1200400
1
Gear Carrier Assembly(Output)
26
H1200022
1
Circlip For Hole
27
H1200500
1
Gear Carrier Assembly(Intermediate)
28
H1200600
1
Brake/ Shaft Assembly
29
H1200023
1
Gear—Input Sun
30
H1200024
3
Planetary Gear
31
H1200025
1
Trust Washer
32
H1200026
1
Bearing
33
H1200027
1
Gear ring bolt
34
H1200028
1
Gear—Housing
35
H1200029
8
Flat Washer Φ8
36
H1200030
8
Screw M8x 90
37
H1200031
2
Screw M10 x 35
38
H1200032
1
Tie Bar(I)
39
H1200700
1
Remote Control Switch
40
H1200800
1
Cable Assembly
41
H1200033
1
Strap
42
H1200900
1
Control Section

18
SPECIFICATION(GTD300)
Pull, Speed, Amperes, Volts:
Layer
Line Pull
Line Speed m/min
Current A
kg
12V DC
24V DC
12V DC
24V DC
1
400
3.7
3.9
40
25
2
350
3.9
4.1
42
28
3
300
4.2
4.3
45
30
Line Pull And Rope Capacity In Layer
Layer
Rated line pull kgs
Total rope on the drum ft (m)
1
400
5.3
2
350
11.3
3
300
14.0
Rated line pull
300 kgs
Motor: series wound
12V:Input: 1.7kW / 2.3hp; Output: 0.9kW / 1.2hp
24V:Input: 2.8kW / 3.8hp; Output: 1.2kW / 1.6hp
Gear reduction ratio
172:1
Cable (Dia.×L)
Wire rope
Synthetic rope
Ø4.8mm×14m
Ø5.0mm×14m
Drum size (Dia.×L)
Ø63mm×122 mm
Mounting bolt pattern
159mm×96 mm 4-M8
Overall dimensions
(L×W×H)
391mm×126mm×128mm
This manual suits for next models
2
Table of contents
Popular Chain Hoist manuals by other brands

Tractel
Tractel Tralift Owner's operation and maintenance manual

RED ROOSTER
RED ROOSTER TMH-3000 user manual

KITO
KITO M3 Series operating instructions

Thiele
Thiele Grade 80 operating instructions

Urrea
Urrea 46300 User manual and warranty

HADEF
HADEF 62/05 S Installation, Operating and Maintenance Instructions for the Installer and the User

KITO
KITO Harrington TCR Series owner's manual

Yale
Yale CPA Series Translation of original operating instructions

Stahl
Stahl ST50 TRANSLATION OF ORIGINAL OPERATING AND INSTALLATION INSTRUCTIONS

CM
CM LODESTAR NH Operating, Maintenance & Parts Manual

Verlinde
Verlinde STAGEMAKER SL10 1004 M2 A D8+ manual

KITO
KITO EDIII Series owner's manual