Goodcrafter 939D II User manual

PROFESSIONAL
PYROGRAPHY TOOL
INSTRUCTION


1
IMPORTANT SAFEGUARDS
When using electrical appliances, basic safety precautions should always be followed including the following:
CAUTION!!! WARNING!!!
Read instruction manual before using.
1. To provide continued protection against risk of electric shock, connect to properly grounded outlets only.
2. Do not immerse in water.
3. Hot Surface. Avoid Contact.
4. Shock Hazard. To provide continued protection against electric shock disconnect from the power supply when not in
use.
5. Heat gun, soldering iron, desoldering iron must be placed on its stand when not in use.
6. HOUSEHOLD AND INDOOR USE ONLY.
7. To prevent electric shock, unplug before replace the fuse and other service.
8. Replace only with same type and rating of fuse.
9. This appliance is not intended for use by persons (including children) with reduced physical, sensory or mental
capabilities, or lack of experience and knowledge, unless they have been given supervision or instruction concerning
use of the appliance by a person responsible for their safety.
10. Children should be supervised to ensure that they do not play with the appliance.
11. The soldering iron and desoldering iron is only to be used with the power supply unit provided with the appliance.
12. If the SUPPLY CORD is damaged, it must be replaced by the manufacturer, its service agent or similarly qualied
persons in order to avoid a hazard.
13. Any servicing should be performed by an authorized service representative AND that the product has no user
serviceable parts.
14. To reduce the risk of re or electric shock, do not expose this product to rain or moisture. Store indoors. Read
instruction manual before using.
15. A re may result if the appliance is not used with care, therefore
- be careful when using the appliance in places where there are combustible materials;
- do not apply to the same place for a long time;
- do not use in presence of an explosive atmosphere;
- be aware that heat may be conducted to combustible materials that are out of sight;
- place the appliance on its stand after use and allow it to cool down before storage;
- do not leave the appliance unattended when it is switched on.
16. Hidden areas such as behind walls, ceilings, oors, sot boards and other panels may contain ammable materials
that could be ignited by the heat gun when working in these locations. The ignition of these materials may not be
readily apparent and could result in property damage and injury to persons. When working in these locations, keep the
heat gun moving in a back-and-forth motion. Lingering or pausing in one spot could ignite the panel or the material
behind it.
17. WARNING: Extreme care should be taken when stripping paint. The peelings, residue and vapors of paint may
contain lead, which is poisonous. Any pre-1977 paint may contain lead and paint applied to homes prior to 1950 is
likely to contain lead. Once deposited on surfaces, hand to mouth contact can result in the ingestion of lead. Exposure
to even low levels of lead can cause irreversible brain and nervous system damage; young and unborn children are
particularly vulnerable.
18. Before beginning any paint removal process you should determine whether the paint you are removing contains
lead. This can be done by your local health department or by a professional who uses a paint analyzer to check the lead
content of the paint to be removed.
19. LEAD-BASED PAINT SHOULD ONLY BE REMOVED BY A PROFESSIONAL AND SHOULD NOT BE
REMOVED USING A HEAT GUN.

2
20. Persons removing paint should follow these guidelines:
1) Move the work piece outdoors. If this is not possible, keep the work area well ventilated. Open the windows and
put an exhaust fan in one of
them. Be sure the fan is moving the air from inside to outside.
2) Remove or cover any carpets, rugs, furniture, clothing, cooking utensils and air ducts.
3) Place drop cloths in the work area to catch any paint chips or peelings. Wear protective clothing such as extra work
shirts, overalls and hats.
4) Work in one room at a time. Furnishings should be removed or placed in the center of the room and covered. Work
areas should be sealed o
from the rest of the dwelling by sealing doorways with drop cloths.
5) Children, pregnant or potentially pregnant women and nursing mothers should not be present in the work area until
the work is done and all
clean up is complete.
6) Wear a dust respirator mask or a dual lter (dust and fume) respirator mask which has been approved by the
Occupational Safety and Health
Administration (OSHA), the National Institute of Safety and Health (NIOSH), or the United States Bureau of
Mines. These masks and replaceable
lters are readily available at major hardware stores. Be sure the mask ts. Beards and facial hair may keep masks
from sealing properly.
Change lters often. DISPOSABLE PAPER MASKS ARE NOT ADEQUATE.
7) Use caution when operating the heat gun. Keep the heat gun moving as excessive heat will generate fumes which
can be inhaled by the operator.
8) Keep food and drink out of the work area. Wash hands, arms and face and rinse mouth before eating or drinking.
Do not smoke or chew gum or
tobacco in the work area.
9) Clean up all removed paint and dust by wet mopping the oors. Use a wet cloth to clean all walls, sills and any
other surface where paint or dust
is clinging. DO NOT SWEEP, DRY DUST OR VACUUM. Use a high phosphate detergent or trisodium phosphate
(TSP) to wash and mop areas.
10) At the end of each work session put the paint chips and debris in a double plastic bag, close it with tape or twist
ties and dispose of properly.
11) Remove protective clothing and work shoes in the work area to avoid carrying dust Into the rest of the dwelling.
Wash work clothes separately.
Wipe shoes o with a wet rag that is then washed with the work clothes. Wash hair and body thoroughly with soap
and water. 21. To ensure personal safety, please turn o the power switch after work is completed; When not in use for
an extended period, please unplug the power cord!!!
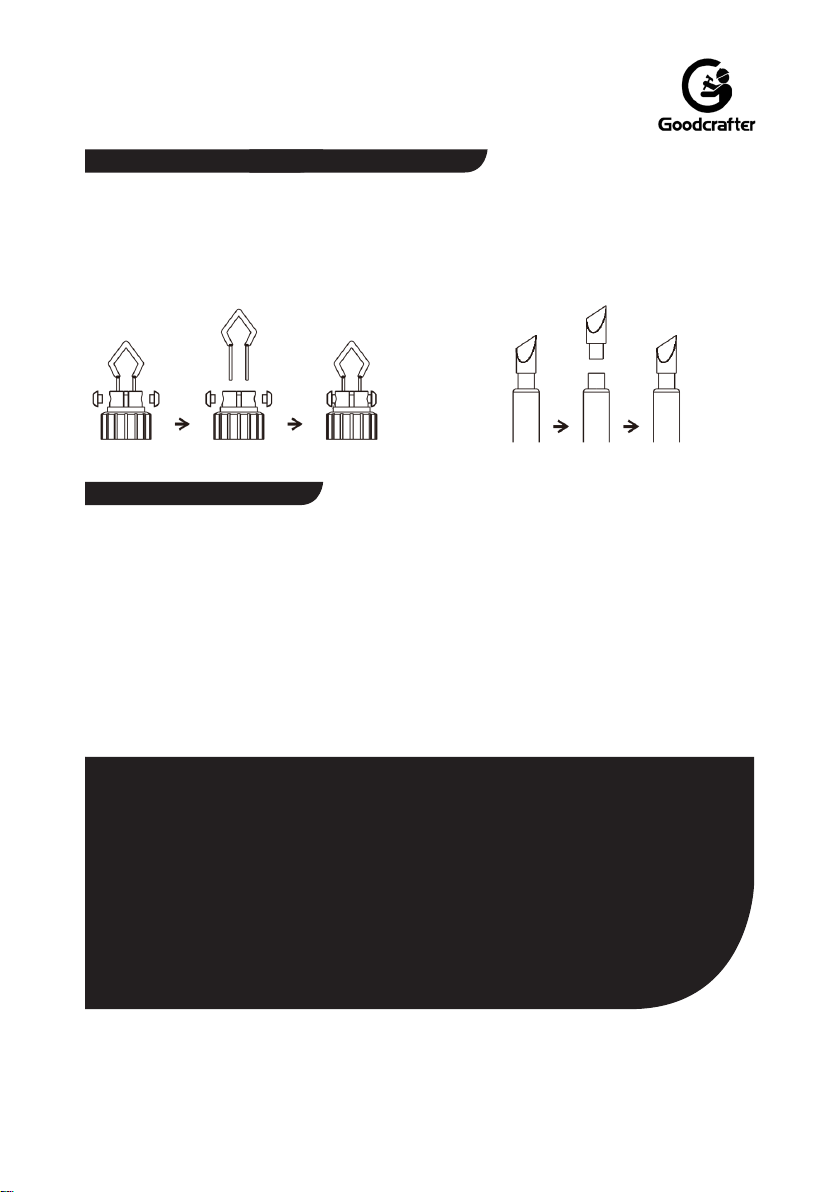
22. Do not install nozzle when the hot air gun is turned on, the heat pipe and the nozzle must be cooling. Then installed
the other nozzle. 23. The soldering iron should only be used for soldering. Do not hit the soldering iron against the
work surface to remove ux residues
(Can be cleaned by the cleaning device of the product), as doing so may seriously damage the soldering iron.
24. Soldering produces fumes, ensure there is adequate ventilation.
25. After used, remember that cooling the unit, the handle should be placed on the handle holder.
26. Longer detachable power-supply cords) are available and may be used if care is exercised in their use.
27. If a long detachable power-supply cord is used:
1) The marked electrical rating of the detachable power-supply cord or extension cord should be at least as great as
the electrical rating of the
appliance;
2) The extension cord should be a grounding type 3-wire cord;
3) The longer cord should be arranged so that it will not drape over the countertop or tabletop where it can be tripped
over, snagged, or pulled on
unintentionally (especially by children).
28. A short power-supply cord(or short detachable power-supply cord)is provided to reduce the risks resulting from
becoming entangled in or tripping over a longer cord.

3
1.SPECIFICATION
Model
Rated voltage
Maximum power
Rated power
Main unit dimensions
Temperature range
(temperature adjustable pen)
Temperature range
(thermostatic pen)
Operating ambient temperature
Storage temperature
Storage humidity
939D II
220V~240V/AC,50Hz 110V-127V/AC,60Hz
150w
48w
L144*W125*H90mm 士5mm
250°℃~750°C / 482°F~1382°F
200℃~480°℃ / 392°F~896°F
0°C~40°℃ / 32°F~104°F
-20°℃~80°C/ -4F~176°F
35%~45%
2.PRODUCT DIAGRAM
( Determine the voltage properties according to your order )
1). Operating lndicator Light
2). Power Switch
(Temperature-Adjustable Pen)
3). Receptacle (Temperature-Adjustable Pen)
4). Temperature Adjustment Dial
(Temperature-Adjustable Pen)
5). Receptacle(Thermostatic Pen)
6). Power Switch(Thermostatic Pen)
7). Temperature Adjustment Dial
(Thermostatic Pen)
8). Temperature Display (Thermostatic Pen)
9). Residue Tray
10). Pyrography Tips Storage Tin
11). Pen Holder
12). Thermostatic Pen
13). Temperature-Adjustable Pen
14). Pen Holder

4
3.OPERATION
(1). Depending on the users' preferences, it is optional to install the pyrography pen
holder either at the side of the station or on top of the station.Install the holder as
per the dia-grams below.
(2). Insert the holder's snap-t joints into the installation slots, → Insert the screw into
the holder's installation screw hole, and fasten the screw to lock the holder into place.
(3).Install the spring tube into the pen holder.
(4).Connect the pen to the station, and place the pen into the pen holder.
(5).Turn on the power switch, and the tip will begin heating.The heating indicator
will turn on.You can then proceed to set the desired temperature.Begin operation
once the tipreaches the set temperature.
(6).Once the operation is complete, place the pen back to the pen holder, then turn o the
power switch. lf the machine is not in use for an extended period, disconnect the powerplug.
(7).Brief lntroduction to the Basic Pyrography Tips.
Installation Slots Snap-t Joints Installation Screw hole (holder)
General Pyrography Tip- For basic wood
burning techniques.
Shader Tip- For light gradient or dark shading,
you cancreate smooth, evenly-colored shades.
Smooth Round-Point Tip-For curved lines,
dots, and fine-detailing, great for calligraphy
and point-shading.
Conical Sharp Tip-For fine-lines, dots, and
curves.

5
(8). The use of pyrography wire nibs.
Point Tip-For outlining, thin
lines,and detailing.
Spoon Nib -For texts,detailing,
low-temperature depth-of-field
shading.
Skewed Point Nib -For shading,
outlining.
Skewed sharp shader -For
Fine-Shading,Fine-Detailing,
and Feathers.
Skewed Flat Shader -For
shading, feathering,outlining
&cutting withthe blade edge.
Curved Tip -Forshading, ne-
outlining,and general drawing.
Diamond Point Nib-For
detailing and outlining.
Round Wire Nib -For outlining
and feathering.
Long Round Point Wire Nib
-For outlining, feathering and
shading.
Long Sharp Flat Nib -For
outlining, fine-feathering,and
ne shading.
Flat Nib -For at surfaces,
shading, low-temperaturemulti-
layer shading.
Knife shader -For feathers,ne-
lines,shading, low-temperature depth-
of-eld shading.
Skewed Round shader -For
shadinglarge surfaces,and
outlining.
Skewed Point Nib -For outlining
small-area.
Skewed sharp Nib -Feathering,
fine-outlining,cutting & carving
and detailing.
Curved Flat Shader -For shading,
fine-feathering,outlining, and
cutting & carving.
Diamond Flat Shader -For
shading, outlining and cutting
&carving.
Flat Round Shader -For outlining,
feathering,and shading.
Long flat shader -For outlining,
feathering,and precision low-
temperature shading.
Long Flat Shader XL -For
outlining, feathering,shading,
and cutting.

6
4.MAINTENANCE & PRECAUTIONS
Replacing the tips
Unscrew the locking screws →
Remove the tip→ Install the new tip
→Put the locking screws back on.
Unscrew the Pyrography Tip, change
intoa new tip, and screw the new tip
into thethermostatic pen.
5.APPLICATIONS
This station is suitable for pyrography works on gourds, woods, leather,
wheatstalks, tree barks, bamboos, furniture, and more.
Fast To Buy Limited
Address: #5009, 5F, Shenzhou Chengyun Building, Bantian Subdistrict,
Longgang District, Shenzhen City,518000, Guangdong, China
Web: www.fasttobuy.com Tel: +86-755-82550561
Facebook: https://www.facebook.com/servicefasttobuy

7
Warranty Terms:
1.The table for feedback from customers should be returned to our company
within a month after the date of purchase.In this way,customers may enjoy one-
month repair warranty.
2.Repair Warranty and Purchase Certicate should be presented.The warranty
only applies when all the required documents are available.
3.The warranty does not apply when the equipment has received damage
through abuse,carelessness,improper installation,accident or mishandling
during shipment,connecting to improper line voltage,or has been serviced by
anyone other than an authorized factory representative.
4.After the warranty period,we are ready to provide charged repair
service,perfect as always.
Dear Sir / Madam:
Thank you for purchasing our products.' To improve our service and ensure the
proper use of our products,please kindly write down your suggestions.
Name of Product:
Date of Purchase:
Your Suggestions:
Package:
Functions:
Others:
Date :
GUARANTEE CARD
The warranty is valid in one year since
the purchase of this ,any quality problem
found,please send back to us with courier fee
to be collected,upon receipt of the returning
unit,we will repair it and send back to
customer within two working days.
Notice:Please enclose the warranty card along
with the returning product, or else we have
the right to reject the repairing,thanks for your
corporation.
GUARANTEE CARD
The product conforms to the technical standards
QC.
Fast To Buy Limited

Table of contents