GOPURE UF-5 User manual

USER GUIDE
5-Stage Water Purifier
UF-5
5-Stage Ultra Filtration


CONTENTS
FLOW DIAGRAM ......................................................... 1
BEFORE YOU START......................................................... 2
WHAT’S IN THE BOX ....................................................... 3
WHAT’S IN THE BOX ....................................................... 4
INSTALLATION (connecting Tee Fitting & Tubing) ....... 5
INSTALLATION (installing the Tap) ................................. 6
INSTALLATION (installing the Pre-Filters) ...................... 7
INSTALLATION (installing the UF Membrane) ..............8
INSTALLATION (installing the Drain Clamp) ................. 9
MAINTENANCE ................................................................ 10
SAFETY INSTRUCTIONS ............................................... 11
TECH SPECS ........................................................................ 11
Keep this User Guide for future reference.

1.
Congratulations on purchasing the GOPURE
UF-5 WATER PURIFIER! You have taken your first
step towards cleaner, better tasting water and a
healthier life for your family.
Your new GOPURE UF-5 WATER PURIFIER comes equipped
with an ADVANCED 5-STAGE ULTRA FILTRATION SYSTEM
(items 2 - 6 below).
Running
water
1
2 3 4
5
6
7
1Tee Fitting
2Spun PP Filter
3Granular Carbon Filter
4Block Carbon Filter
5UF Membrane
6Mineral Ball Filter
7Tap
FLOW DIAGRAM

2.
Read through all instructions before beginning installation and
using this system. Follow all the steps exactly to avoid damaging
the system.
The GOPURE UF-5 WATER PURIFIER contains filters that need to
be replaced at certain intervals. Replacement intervals will vary
according to use, for more details see page 8 of this manual.
Contact Tevo Customer Care on 0861 77 88 88 if you have any
further queries.
This system is intended for installation to potable (drinkable)
water only.
Ensure that the source water pressure is 6 bar (87psi) or less . If
the water source pressure exceeds the maximum pressure
allowed, a reduction valve may be needed. Please consult Tevo
Customer Care for details (0861 77 88 88).
The water source temperature must be between 5˚C - 38˚C. If
the water temperature is less than 5˚C or if it exceeds 38˚C the
system will not function properly. DO NOT INSTALL ON HOT
WATER SOURCE.
Before consuming water from the unit, flush it by running 10
litres of water through the system.
Do not disassemble, open or modify this unit. Tampering
with the unit may cause failure or damage and will void the
warranty.
BEFORE YOU START

3.
WHAT’S IN THE BOX
A) GOPURE UF-5 Water Purifier Unit
B1) Spun PP Filter
B2) Granular Carbon Filter
B3) Block Carbon Filter
B4) UF Membrane
B5) Mineral Ball Filter
C) Blue Tubing
D1) White Tubing
D2) Transparent Self-Sealing Ring
D3) Transparent Tube Reinforcing Insert
D4) Steel Fastening Nut
E1) Tap
E2) Cover Plate
E3) 2 x Rubber Washers
E4) Wing Nut
F1) Large Housing Wrench
F2) Small Housing Wrench
G) Tee Fitting
H) Circlips
I) Red Tubing
J) Drain Clamp Assembly
AB1 B2 B3 B4 B5

4.
WHAT’S IN THE BOX
C D1
F1 F2
I J
E1 E2 E4E3
G H
D2 D3 D4

5.
Connecting the Tee Fitting:
Connecting the Tubing (water supply to Unit):
Note: Use only a cold, potable water
supply. Hot water will damage your
unit. Softened water will extend the
life of the filter cartridges.
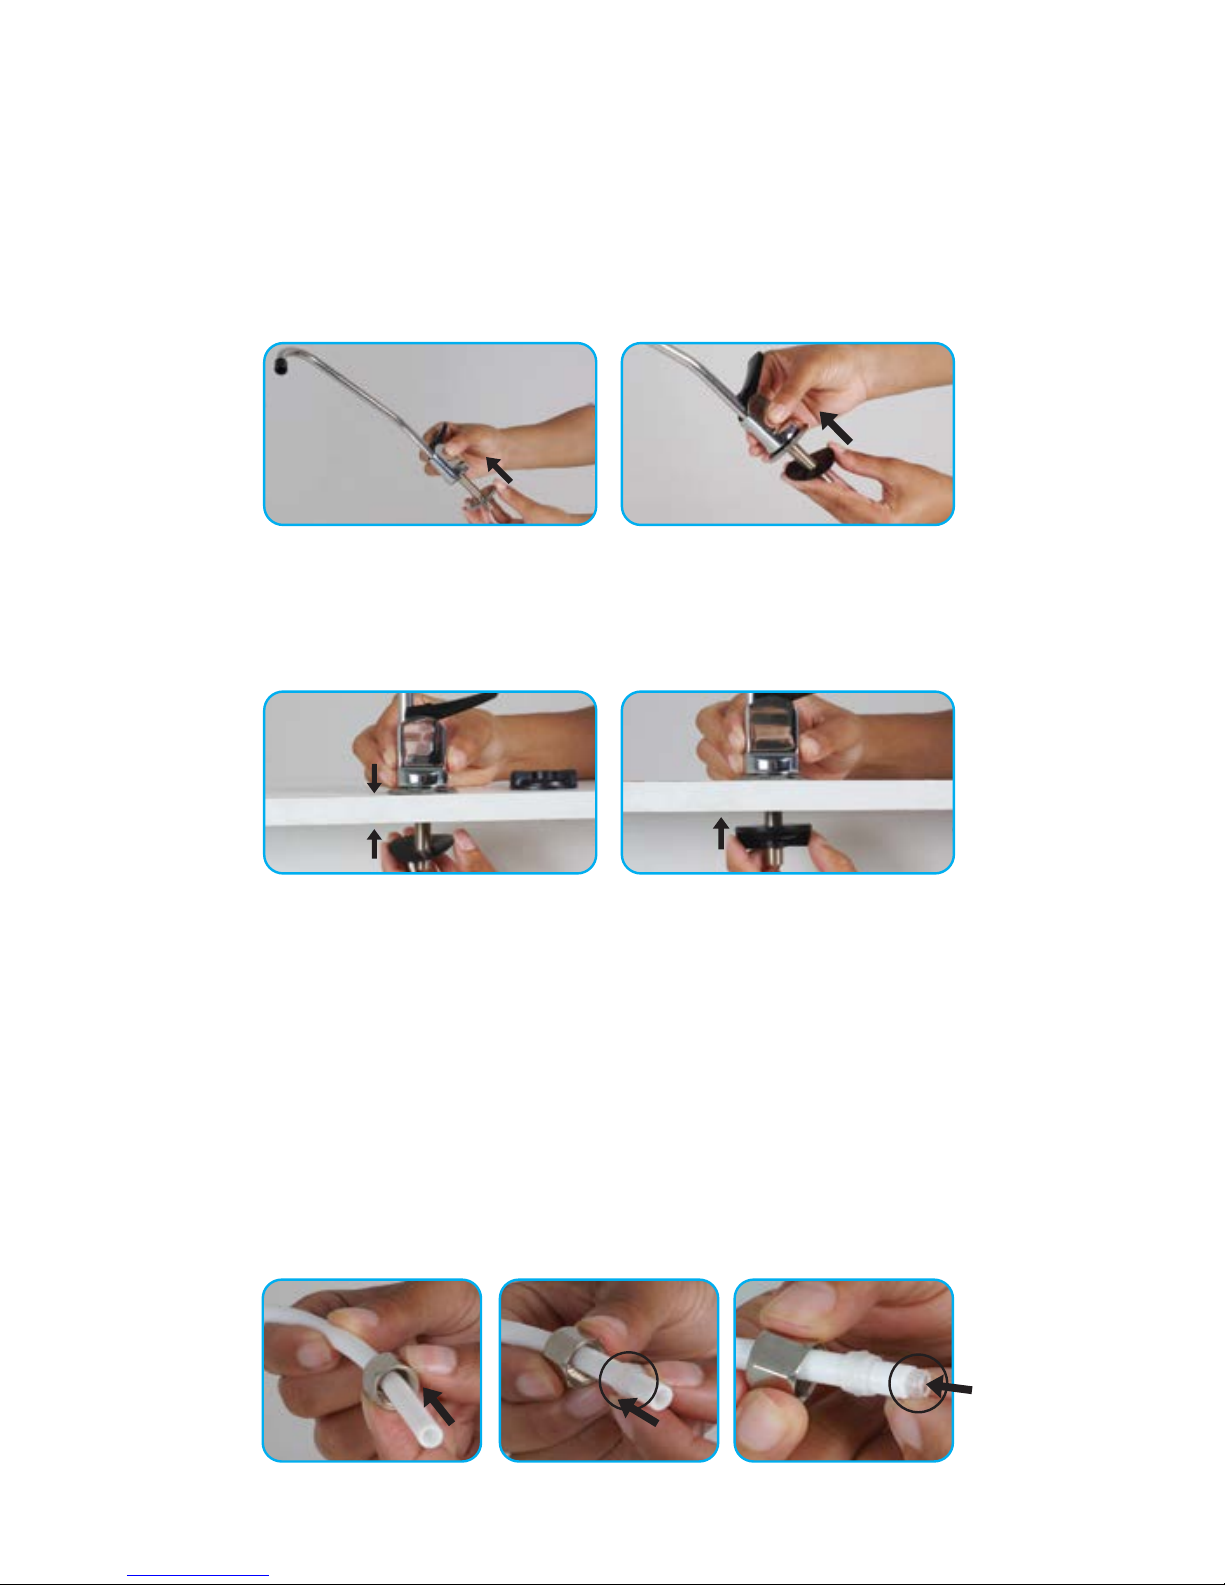
Connect the Tee Fitting (G) to the
cold water supply pipe under your
counter as indicated on the right.
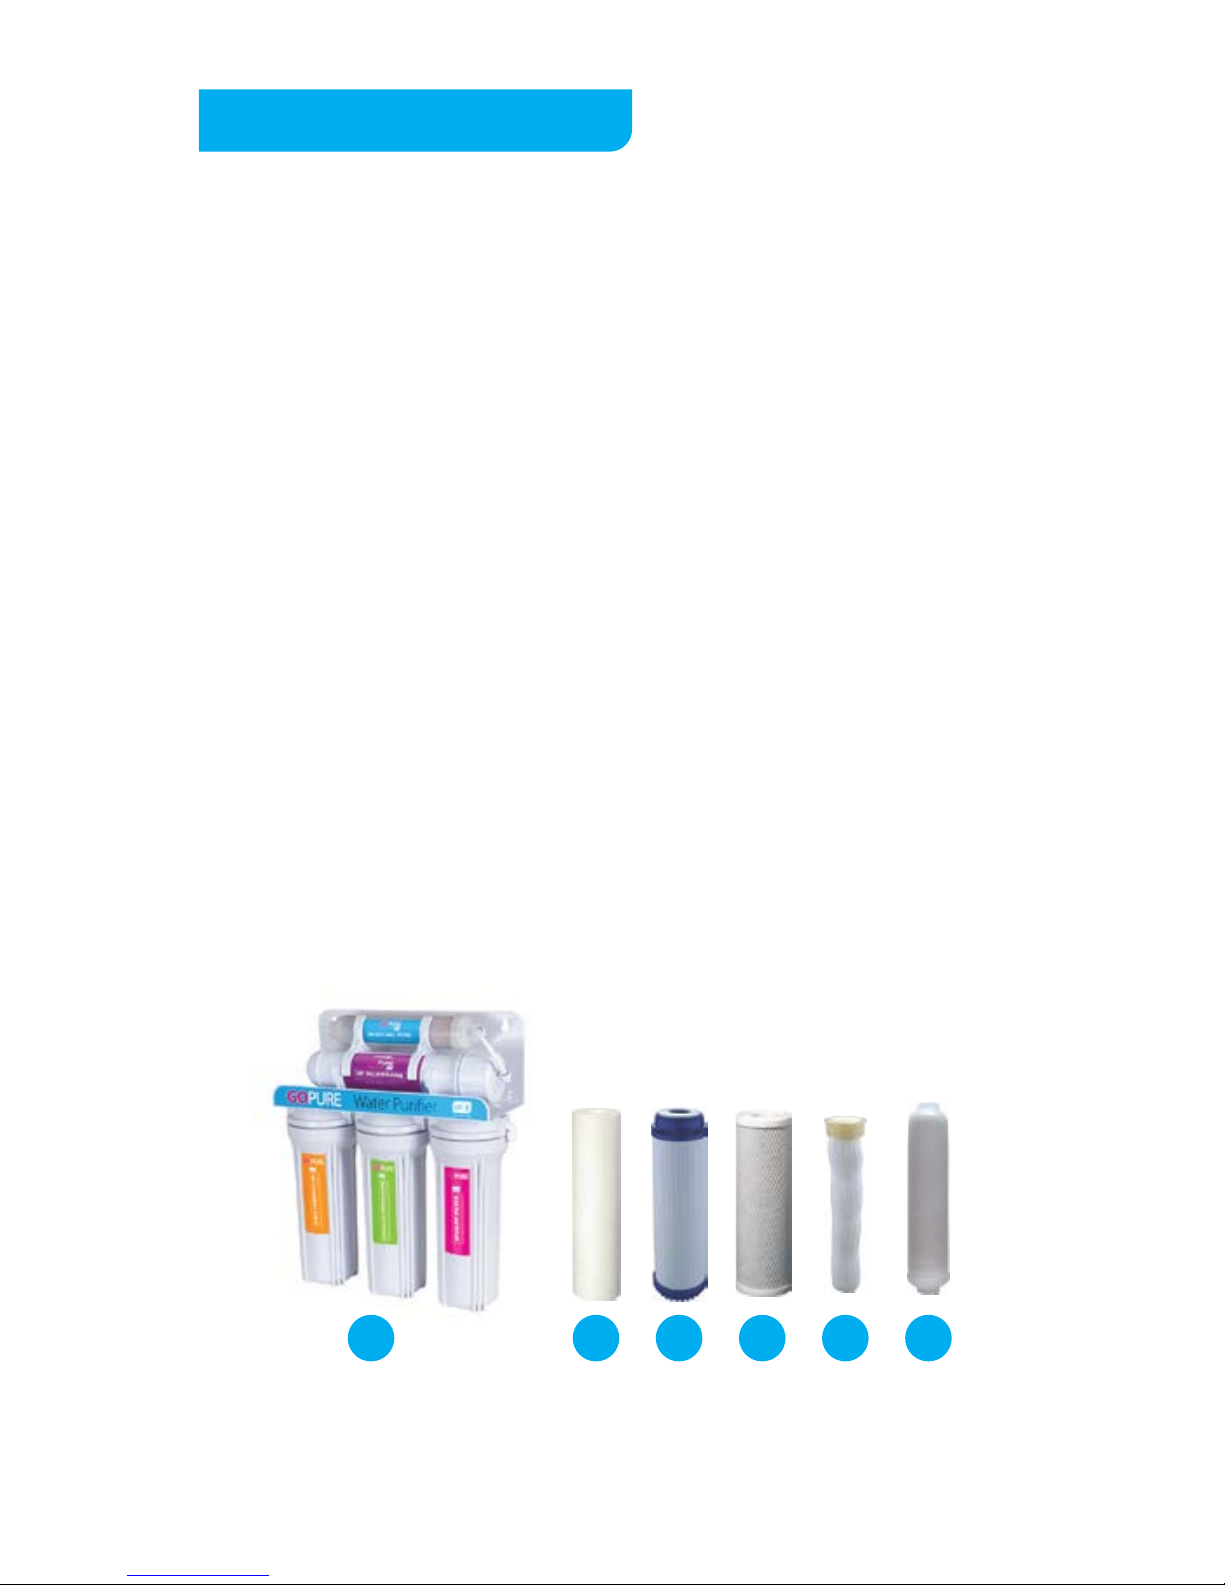
• Place the GOPURE UF-5 Water Purifier Unit under your counter
and as close to the Tee Fitting (G) as possible
• Measure the length of Blue Tubing (C) needed to join the Tee
Fitting to the inlet on the Spun PP Filter Housing, then cut the
Blue Tubing to-size if necessary
• Place one end of the Blue Tubing into the Tee Fitting as shown
below, then fasten with a Circlip (H) in the slot provided
• Place the other end of the Blue Tubing into the inlet on the side
of the Spun PP Filter Housing as shown below, then fasten with
a Circlip in the slot provided
INSTALLATION
COLD WATER PIPE

6.
Installing the Tap:
• Select a convenient location near your sink to place the Tap (E1)
• Drill a hole 12mm in diameter in the counter top (drill & bit not included)
• Place the Cover Plate (E2) and one Rubber Washer (E3) on the Tap
thread as shown below
• Insert the Tap thread into the drilled hole
• Place the other Rubber Washer and Wing Nut onto the Tap thread
under the counter and tighten the Wing Nut as shown below
• Measure the length of White Tubing (D1) needed to join the
bottom of the Tap to the outlet on the Mineral Ball Filter
Housing, then cut the White Tubing to-size if necessary
• Slide the Steel Fastening Nut (D4) over one end of the White
Tubing with the thread facing outwards as shown below (*)
• Place the Transparent Self-Sealing Ring (D2) over this same end
of the White Tubing as shown below (**)
• Place the Transparent Tube Reinforcing Insert (D3) into the end
of the White Tubing as shown below (***)
* ** ***

7.
Installing the Pre-Filters:
• The 3 Pre-Filters are located inside their respective housings
• Open each housing using the Large Wrench (F1) provided
• THE FILTERS ARE WRAPPED FOR PROTECTION. MAKE SURE
TO REMOVE ALL PACKAGING FROM THE PRE-FILTERS
• Place the Pre-Filters back into the appropriate housings
according to the colour-coded labels
• Tighten the housings with the Large Wrench (F1) provided
• DO NOT OVER-TIGHTEN THE FILTER HOUSINGS
• Attach the end of the White Tubing (assembled as on page 5) to
the bottom of the Tap by tightening the Steel Fastening Nut
• Attach the other end of the White Tubing to the output side of
the Mineral Ball Filter and fasten with a Circlip in the slot provided
as shown below

8.
Installing the UF Membrane Element:
• Remove the housing cap using the Small Wrench (F2) as shown
below
• Remove all protective packaging from the UF Element and insert
it back into the housing as shown below
• Replace the housing cap and tighten it with the Small Wrench
• DO NOT OVER-TIGHTEN THE FILTER HOUSING
Flushing the system:
Once the GOPURE UF-5 WATER PURIFIER is fully installed,
flush it by running 10 litres of water through the system.
This must be done before consuming water from the unit.
• Before fully opening the Tee Fitting Valve, open the valve
very slowly to pressure check the housings for any leaks as
shown below

9.
Installing the Drain Clamp:
To prolong the life of your UF Membrane, follow the instructions
below to install the Drain Clamp (J):
• Position the Drain Clamp (J) on your drain pipe above the drain
trap and tighten it securely with the screws and nuts provided.
• Using the drain clamp as a guide, drill a 6mm hole through
ONLY ONE SIDE of the drain pipe. The Red Tubing will pass
through this hole. DO NOT drill through both sides of the pipe.
• Cut the Red Tubing to the desired length, insert one end into the
Drain Clamp and the other end into the UF Membrane outlet. Secure
to the Membrane outlet with a Circlip as shown below.
• Flush the UF Membrane once every 2 months by opening the valve as
shown below. Flush for approximately 20 seconds then close the valve.
NOTE: When cutting the tubing, make clean, square cuts. Failure to do so may result
in poor connection and possible leaks.
CAUTION: The lowest point of the Red Tubing should be the point of connection
to the Drain Clamp. There should be no sag in the line as this may cause excessive
noise as the reject water is flowing to the drain.
RedTubing
CLOSED POSITION OPEN POSITION

To ensure your GO PURE UF-5 WATER PURIFIER operates at
its optimum level, routine maintenance is required. The
frequency of maintenance depends on the feed water
quality and the amount that the system is used.
Water quality varies from place to place and as such the
filters on your GO PURE UF-5 WATER PURIFIER may be
filtering varying quantities of impurities depending on
where you live. As a general rule you should replace the
Spun PP Filter, Granular Carbon Filter, Block Carbon Filter,
UF Membrane and the Spun Mineral Ball Filter every 12
months. However, if at any stage you find that the water
pressure from the tap of your GO PURE UF-5 WATER PURIFI-
ER has been negatively affected, it means that your filters
are clogged up and need to be replaced irrespective of
age.
Changing the UF Membrane:
• Close the Tee Fitting valve
• Open the Tap to drain any remaining water from the system
• Open the membrane housing and remove used membrane
• Follow the same procedure as“Installing UF Membrane”to
replace the UF Membrane
MAINTENANCE
Filter maintenance:
10.

Source water:
Municipal running water
Chlorine level:
≤ 0.2ppm
Inlet water pressure:
6 Bar (87psi) or less
Inlet water temperature(min/max):
5˚C - 38˚C
TECH SPECS
11.
This appliance is intended to operate as per the instructions
in this manual. It is not designed to operate outside the
specifications listed and any attempt to do so, or tamper
with the unit can cause damage and will void the warranty.
This unit is not a toy. Keep it out of reach of small children. If
the unit requires service or repair other than changing the
filters, please contact Tevo Customer Care on 0861 77 88 88.
The water source temperature must be between 5˚C -
38˚C. If the water temperature is less than 5˚C or if it
exceeds 38˚C the system will not function properly.
DO NOT INSTALL ON HOT WATER SOURCE.
If the unit has not been used for an extended period of
time, flush it by running 10 litres of water through the
system before consuming the water.
SAFETY INSTRUCTIONS


Brought to you by:
www.tevo.co.za | info@tevo.co.za
0861 77 88 88
Go pure, advanced 5-stage ltration process
Go clear, removes harmful impurities
Go healthy, adds essential minerals
Go better, improves water taste
Go easy, so simple to install
Table of contents
Popular Water Filtration System manuals by other brands

Spectra
Spectra VENTURA TROPICAL 200 DELUXE owner's manual

Graf
Graf one2clean+ XXL installation instructions

Philips
Philips ADD6910 user manual

ProMinent
ProMinent CHLORINSITU IIa Assembly and operating instructions

Donaldson
Donaldson X770734 Servicing instructions

Oase
Oase Biotec 18 operating instructions