SAFE HOIST OPERATING GUIDELINES
General
There is no one single factor that is more important for minimizing
the possibility of personal injury to the operator and those working in
the area, or damage to property, equipment, or material than being
familiar with the equipment and using Safe Operating Practices.
Hoists/trolleys are designed for lifting and transporting of material
only. Under no circumstances, either during initial installation or in
any other use, should the hoist be used for lifting or transporting
personnel.
No operator should be permitted to use the equipment that is not
familiar with its operation, is not physically or mentally fit, or has not
been schooled in safe operating practices. The misuse of hoists
can lead to certain hazards which cannot be protected against by
mechanical means; hazards which can only be avoided by the
exercise of intelligence, care, and common sense.
Safe Operating Practices also involve a program of periodic
inspection and preventative maintenance (covered in a separate
section). Part of the operator’s training should be an awareness of
potential malfunctions/hazards requiring adjustments or repairs, and
bringing these to the attention of supervision for corrective action.
Supervision and management also have an important role to play
in any safety program by ensuring that a maintenance schedule is
adhered to, and that the equipment provided for the operators is
suitable for the job intended without violation of one or more of the
rules covering safe operating practices and good common sense.
The Safe Operating Practices shown are taken in part from the
following publications:
• American National Standard Institute (ANSI)
• Safety Standards for Cranes, Derricks, Hoists
• ANSI B30.2 - Overhead and Gantry Cranes
• ANSI B30.16 - Overhead Hoists
Do’s and Don’ts (Safe Operation of Hoists)
The following are Do’s and Don’ts for safe operation of overhead
hoists. A few minutes spent reading these rules can make an
operator aware of dangerous practices to avoid and precautions to
take for his own safety and the safety of others. Frequent
examinations and periodic inspections of the equipment as well as a
conscientious observance of safety rules may save lives as well as
time and money.
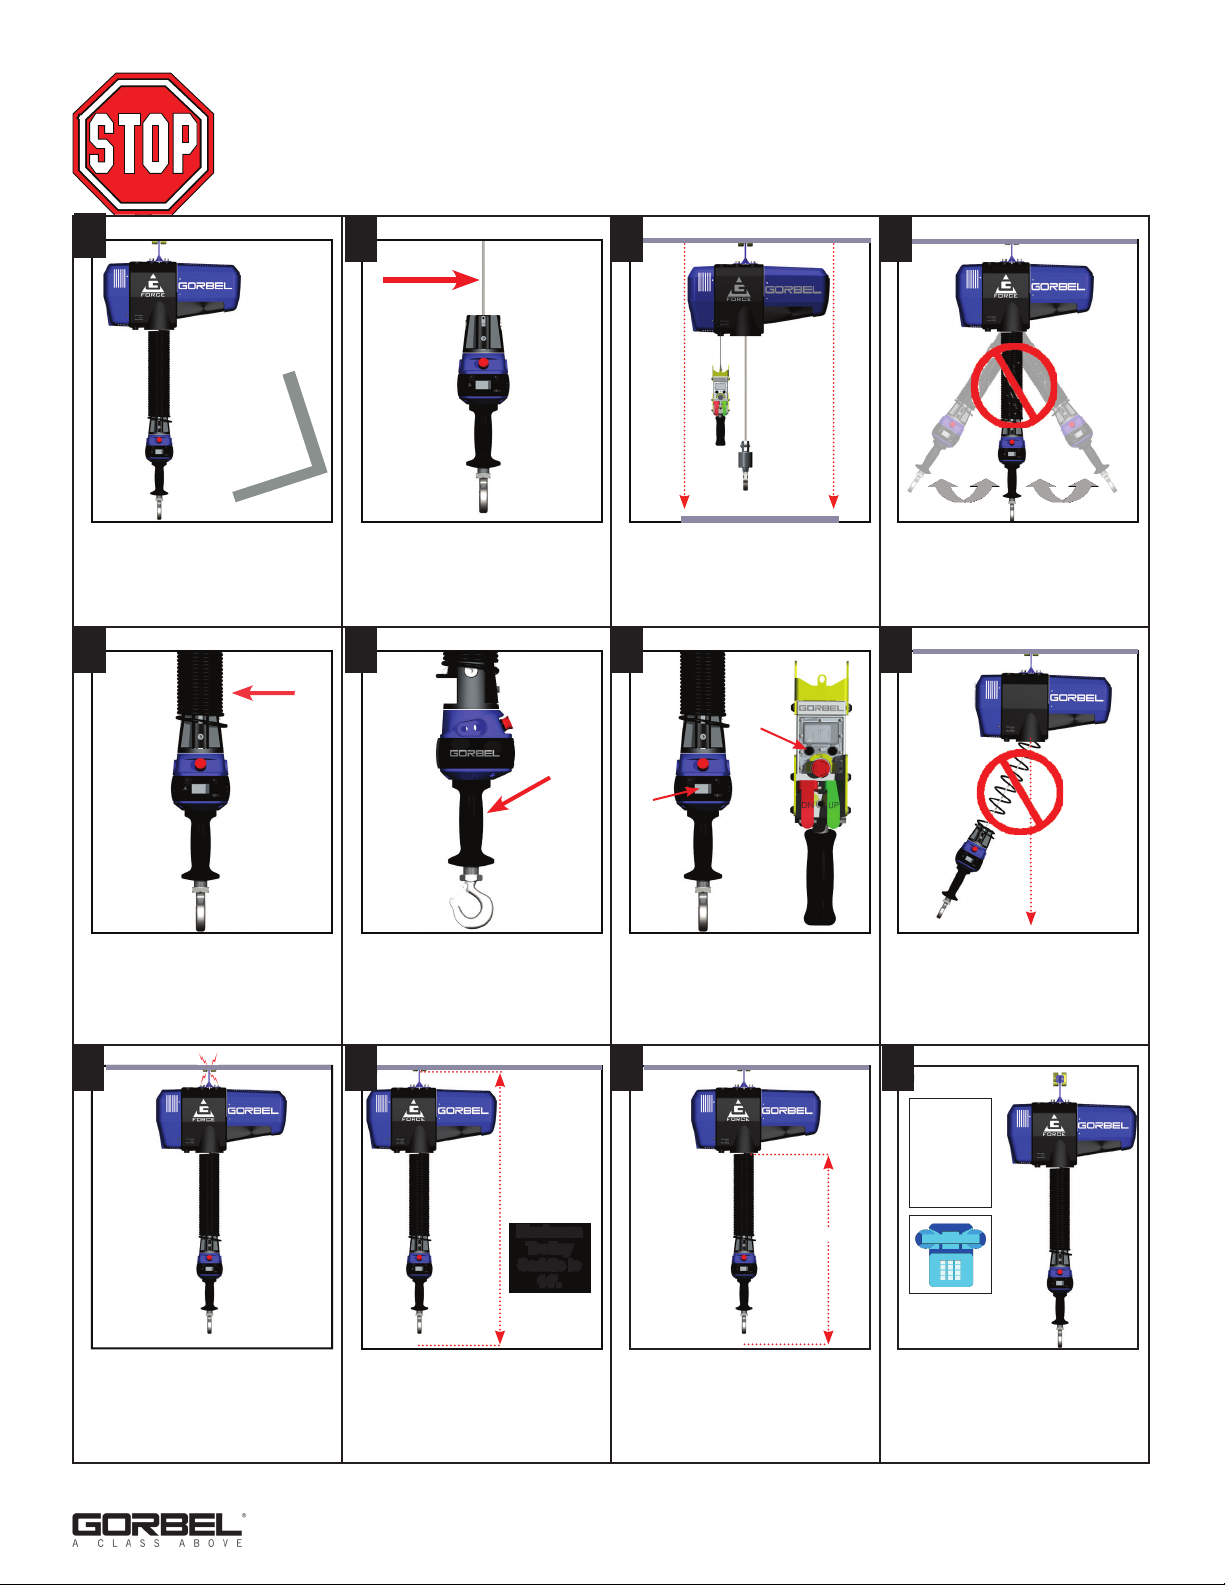
DON’TS - HOISTS
1. Never lift or transport a load until all personnel are clear and do
not transport the load over personnel.
2. Do not allow any unqualified personnel to operate hoist.
3. Never pick up a load beyond the capacity rating appearing on
the hoist. Overloading can be caused by jerking as well as by
static overload.
4. Never carry personnel on the hook or the load.
5. Do not operate hoist if you are not physically fit.
6. Do not operate hoist to extreme limits of travel of cable without
irst checking for proper limit switch action.
7. Avoid sharp contact between two hoists or between hoist and
end stop.
8. Do not tamper with or adjust any parts of the hoist unless spe-
cifically authorized to do so.
9. Never use the load cable as a sling.
10. Do not divert attention from load while operating hoist.
11. Never leave a suspended load unattended.
12. Do not use limit switch(es) for normal operating stop(s). These
are safety devices only and should be checked on a regular
basis for proper operation.
13. Never operate a hoist that has an inherent or suspected
mechanical or electrical defect.
14. Do not use load cable as a ground for welding. Never touch a
live welding electrode to the load cable.
15. Do not jog controls unnecessarily. Hoist motors are generally
high torque, high slip types. Each start causes an inrush of cur-
rent greater than the running current and leads to overheating
and current failure, or burnout, if continued to excess.
16. Do not operate hoist if load is not centered under hoist.
17. Do not operate hoist if cable is twisted, kinked, or damaged.
18. Do not remove or obscure label.
19. Do not permanently activate operator present sensor.
DO’S - HOISTS
1. Read and follow manufacturer’s instruction, installation, and
maintenance manuals. When repairing or maintaining a hoist,
use only manufacturer’s recommended parts and materials.
2. Read and follow all instruction and warning information on or
attached to a hoist.
3. Remove the hoist from service and thoroughly inspect and
repair, as necessary, if unusual performance or visual defects
(such as peculiar noise, jerky operations, travel in improper
direction, or obviously damaged parts) are noticed.
4. Establish a regular schedule of inspection and maintain records
for all hoists with special attention given to hooks, load cables,
brakes, and limit switches.
5. Check operation of brakes for excessive drift.
6. Never lift loads over people, etc.
7. Check for damaged hooks and load cable.
8. Keep load cable clean and well maintained.
9. Check the load cable for improper seating, twisting, kinking,
wear, or other defects before operating the hoist.
10. Make sure a load clears neighboring stockpiles, machinery, or
other obstructions when raising, lowering, or traveling the load
11. Center hoist over the load before operating.
12. Avoid swinging of load or load hook when traveling the hoist.
13. Be sure the load attachment is properly seated in the saddle of
the hook. Balance load properly before handling. Avoid hook tip
loading.
14. Pull in a straight line, so that neither hoist body nor load cable
are angled around an object.
15. Take up slack slowly.
16. Know the hand signals for hoisting, cross travel, and crane
travel if working with cab-operated hoists or cranes. Operators
should accept signals of only those persons authorized to give
them.
19/18 - Rev. U