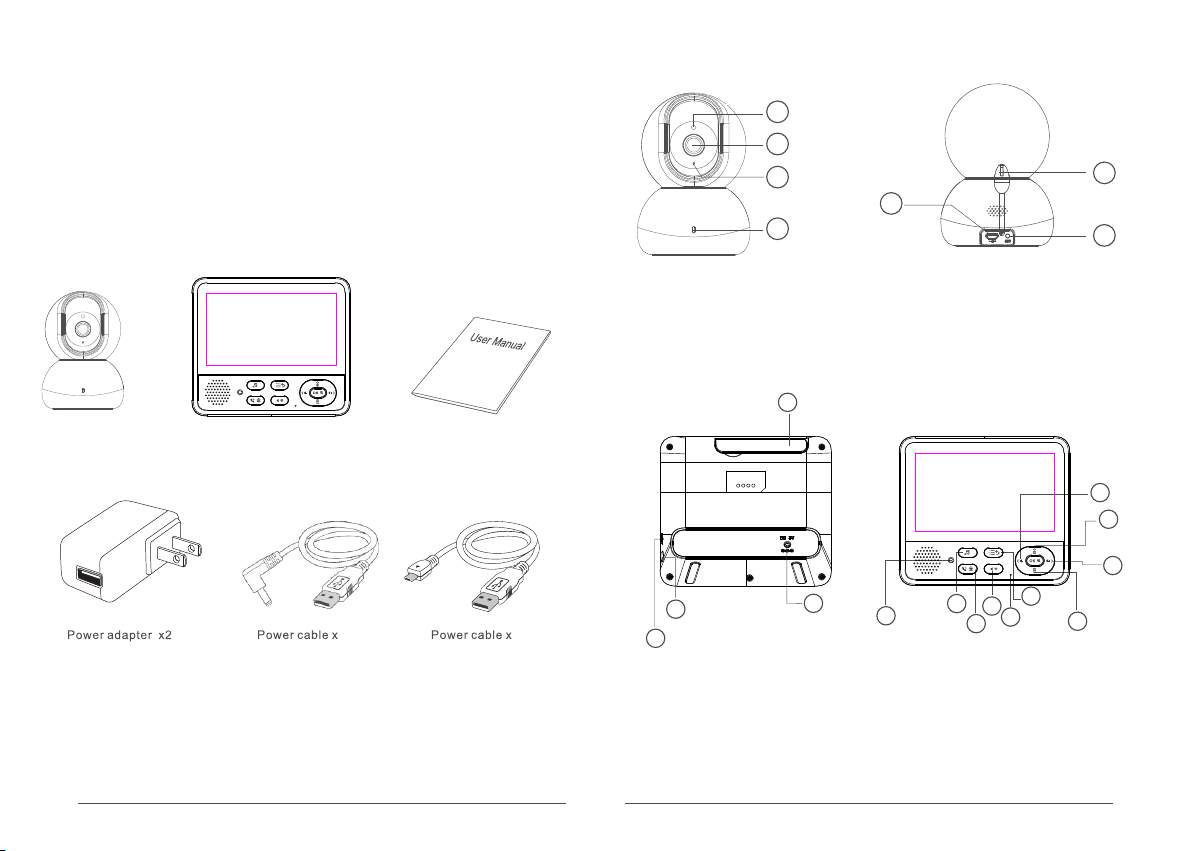
Goscam 8217KP User manual

Model No.: 8217KP

18
19
20
08. Antenna
09. RESET
10. Turn on/off
11. Charging mouth
12. Charging indicator light
13. Music play button
14. Talk (long press)/
Monitor (short press)
15. adjust (short press) button
16. Microphone
19. UP/Brightness+
18. Turn left/Volume-
1. Photo sensitive sensor
5. Power interface
2. Lens
3. Microphone
4. Indicator
6. Temperature sensor
5
6
7
2
1
3
7. SET button
01 02
4
10
Thank you for choosing our baby monitor. Please read the instruction carefully in case of
product damage due to improper operation.
Introduction
Parts in the package
Camera ManualMonitor
Product structure
1 1 9
11
8
12
13
14
17
16
15
17. Menu button/back
21
20. Turn right/Volume+
21. down/Brightness-

03 04
27
Signal strength between the receiver and the camera
No signal connection between the receiver and the camera
The Lullaby function is enabled.
Displaying current room temperature
Show current battery level
Temperature alarm has been turned on
No camera is added or the camera is disconnected from receiver
Audio alarm
Temperature alarm reminder
Message push icon
Feed reminder has been turned on
VOX wake up function is enabled
Feed alarm reminder
Low battery alarm reminder
Message push icon
Explanation for status indicator LED
The red light goes on when charging and off when charging/not charging
Using the Monitor
Place the Camera Unit in a convenient location (e.g. on a table or a shelf) and point the
camera lens toward the area you want to monitor.
NOTE:
Do not place the Monitor Unit within baby's reach. If there is interference with the
picture or sound, try moving the units to different locations, and ensure they are
not close to other electrical equipment.
Children have STRANGLED in cords.
Keep this cord out of the reach of children
(more than 3feet(0.9m) away).
Never use extension cords with AC
Adapters.Only use the AC Adapters
provided.
Mute icon, status bar appears when receiver sound is set to mute

05 06
Preparation before using camera
1. Powering the Camera Unit
Insert one end of the included charging
cable into the USB jack on the back of the
camera.
Insert the other end into the included power
adapter. Then insert the adapter into the
socket.
When energized, the camera will be automatically turned on. (The camera indicator
flashes green. At this point, the camera is turned on successfully).
Preparation before using receiver
1.Power on the receiver (The receiver is provided with a lithium battery, if the receiver has
enough power, please go directly to the Step 2).
Insert one end of the charging cable into the
DC charging jack on the side of the receiver.
2. Receiver starting up
Press and hold the “ON/OFF” button on the receiver to turn it on.
Note: This device has been paired before leaving the factory. If the receiver fails to display
on the monitor screen as described above, please re-try the device pairing operation. For
detailed steps, please refer to Page 8 “Camera Pairing”.
Insert the other end into the included power adapter. Then insert the adapter into
the socket.

07 08
1. Select Camera, and press OK to enter the function.
3. When the device prompts “To start pairing,please press theSET button on the camera.”,
Long press the SET button on the camera for 2 seconds, and at this point, the device
enters pairing mode.After pairing succeeds, the screen will jump to a real-time monitoring
screen.
To start pairing,please press the
SET button on the camera.
Receiver function settings
Functions of the Babysitter is user definable, to best satisfy your demands. Audio and
temperature alarms may offer automatic notification to you. This chapter will introduce the
user-definable settings item by item.
Access receiver menu
In states of live view, press MENU button on the monitor can enter into MENU list;
In states of non-live view, press MENU button on the monitor can return to previous
interface level.
Camera settings (camera pairing and
deletion)
Add camera
2. Select the channel to be paired, and press OK to confirm. Then select “Add Camera”
and press OK to confirm.
12

09 10
Delete camera
Vox mode
1. Select Alarm Settings, press OK to enter the settings page.
2. Select “ ” as needed and press OK to confirm.
(1) Low sensitivity: infants need to make a lot of sounds before using VOX function,
which will be activated. High sensitivity: The baby does not need to make many
sounds to activate the VOX function.
(2) Sound switch button: Enable VOX function; Select any sound sensitivity button.
When VOX level is activated, press “OK”. If the following page is displayed, the
Settings are saved successfully. After the monitoring is complete, press” ” to
return to the monitoring page. - When VOX is OFF: Select the "OFF" button to turn
OFF VOX. The baby's voice will be transmitted as audio to themonitor only, unless
the sound switch button is pressed again.
For example, when the sound switch is turned on, after selecting the required VOX
to wake up the sound sensitivity, the sound icon will appear on the page, and the
indicator light will blink when the alarm is raised. When the sound switch is turned
off, the sound icon will not appear on the page.
2. Select the channel to be deleted, and press OK to confirm. Then select “Delete Camera”
and press OK to confirm.
Note:
1. Select Camera, and press OK to enter the function.
VOX mode allows you to control the sound activation of your baby unit, and can also
saves the battery life of parent unit. If there is no sound around the baby unit within
30 seconds, it will stop audio transmission and turn off the screen of the parent unit.
When the baby unit detects any sounds louder than the sensitivity level, it will start
transmitting the signal of the parent unit again and turn on the screen of the parent
unit.
12
OFF
ON OFF
↩
Temperature alarm settings
When it is too hot or too cold in your baby's room, the temperature alarm will push a
notification to your receiver.
1. Select Alarm Settings, press OK to enter the settings page, and
select “Temperature Alarm” settings.
2. Select “Celsius, Fahrenheit” as needed and press OK to confirm.
3. Select “Alarm” “ON, OFF” as needed.
ON OFF
°
C°
F
≤84
57 ≥
OFF

11 12
Alarm clock settings
You can set the feeding alarm to prevent you from forgetting to feed your baby as busy or
for other reasons, which may affect your baby's healthy growth.
1. Select Alarm Settings, press OK to enter the settings page and select “Alarm”
Settings.
2. Select "ON" to open the alarm reminder switch, and then select the alarm interval to be
reminded (1-8h can be set), and then select the required alarm times (1-10 times), and
finally click "OK". The breast-feeding reminder icon will be displayed on the screen panel,
and you can turn it OFF by clicking "OFF" when it is not needed
ON OFF
1
2.0 H
The digital wireless baby monitor has 5 lullabies. They can help you lull your baby to sleep.
Notice: In the current interface, press
keys to switch lullabies; press keys
to adjust the volume.
Lullabies
1. Select Music Play, and press OK to enter the function.
2. Select the music you want to play, press OK to confirm, and the camera will play the
lullaby of your choice. Press OK again, and the lullaby pauses. Select “All” to play all the
lullabies in a loop. After settings are completed, press MENU to return.
12 3
45ALL
3. You can also play music quickly through the music play button on the panel.
Time settings
Calibrate time on the receiver.
Other settings
1. Select Settings, and press OK to enter the settings page.
2. Select Time Settings, and press OK to enter the settings page. After settings are
completed, press OK to confirm.
Language selection
Switch language displayed on the receiver.
1. Select Settings, and press OK to enter the settings page.
2. Select Language Settings, and press OK to enter the settings page. Select a
language you need and press OK to confirm.
ON OFF
20 - 07 - 2020
18 : 51 : 23

13 14
All the specifications are subject to minor change without prior notice.
Specifications
X2
135.1*118.1*49.4 (mm)
5" TFT LCD monitor
LCD
Image Zoom
Dimensions(W*D*H)
15~85%RH
0℃~40℃
Operation temperature
Operating humidity
Number of pixels 1280*720
Power supply
-20℃~60℃
Storage temperature
1/4",CMOS
0℃~40℃
3m
Image sensor
Video resolution
Rotation angle
Dimensions(W*D*H)
Operation temperature
108.5*75.5*75.5(mm)
1280*720
Pan: 345° Tilt:92°
Night visual range
Operation humidity 15~85%RH
-20℃~60℃
Storage temperature
Power supply
Camera
Receiver
Viewing Angle 60±5°
YES NO
Restore to default settings?
Restore to default settings
Restore the receiver to default settings.
1. Select Settings, and press OK to enter the settings page.
2. Select Restore to Default Settings, and press OK to enter the settings page.
3. The device will prompt “Restore to default settings?”. Select YES and press OK to
confirm. The device begins to execute a factory reset.
Tip: After restoring to default settings, all individualized settings on the receiver will not
exist. So, please be cautious.
Rx:
Rx Date:
Tx:
Tx Da te:
Tx:
Tx Da te:
View version information
View version information of the receiver and camera.
1. Select Settings, and press OK to enter the settings page.
2. Select Version Information, and press OK to enter the version information view page.
1
2
USB5V/1A
DC 5V/1A

15 16
EU Environmental Provisions
E-waste cannot be mixed with household
garbage; corresponding local government
sector or recycling stations shall be
responsible for circular process.
Note: This equipment has been tested and found to comply with
the limits for a Class B digital device, pursuant to part 15 of the
FCC Rules. These limits are designed to provide reasonable
protection against harmful interference in a residential
installation. This equipment generates, uses and can radiate
radio frequency energy and, if not installed and used in
accordance with the instructions, may cause harmful interference
to radio communications. However, there is no guarantee that
interference will not occur in a particular installation. If this
equipment does cause harmful interference to radio or television
reception, which can be determined by turning the equipment off
and on, the user is encouraged to try to correct the interference
by one or more of the following measures:
—Reorient or relocate the receiving antenna.
—Increase the separation between the equipment and receiver.
—Connect the equipment into an outlet on a circuit different from
that to which the receiver is connected.
—Consult the dealer or an experienced radio/TV technician for
help.
Changes or modifications not expressly approved by the party
responsible for compliance could void the user's authority to
operate the equipment.
This device complies with Part 15 of the FCC Rules. Operation is
subject to the following two conditions:
(1) this device may not cause harmful interference, and (2) this
device must accept any interference received, including
interference that may cause undesired operation.
FCC Certification lnfo
RF exposure warning :
This equipment complies with FCC radiation exposure limits set
forth for an uncontrolled environment. This equipment shall be
installed and operated with minimum distance 20cm between the
radiator & body.
This device is acting as slave and operating in the 2.4 GHz (2410
~2477 MHZ) band.
Ad Hoc function is supported but not able to operate on non-US
frequencies.
Do not use the device with the environment which below
minimum 0 ℃ or maximum over 40℃ .
Hereby, we declares that this device is in compliance with the
essential requirements and other relevant provisions of Directive
2014/53/EU.
Notice: Observe the national local regulations in the location
where the device is to be used. This device may be restricted for
use in some or all member states of the European Union (EU).
Table of contents
Other Goscam Baby Monitor manuals