Gourmia GMF2600 User manual


© 2016 Gourmia
www.Gourmia.com
The Steelstone Group
Brooklyn, NY
All rights reserved. No portion of this manual may be reproduced by any means whatsoever
without written permission from The Steelstone Group, except for the inclusion of quotations in a
media review.
Although every precaution has been taken in the preparation of this manual, The Steelstone
Group assumes no responsibility for errors or omissions. Nor is any liability assumed for damages
resulting from the use of the information contained herein. Although every eort has been made
to ensure that the information contained in this manual is complete and accurate, The Steelstone
Group is not engaged in rendering professional advice or services to the individual consumer;
further, The Steelstone Group shall not be held responsible for any loss or damage allegedly
arising from any information or suggestion in this manual.
10 9 8 7 6 5 4 3 2
1
Printed in China

Welcome to Delicious Entrees, Snacks, Desserts
& More from Gourmia!
With the purchase of the Extreme Multi Fryer & Rotisserie, you’ve opened the door
to amazingly flavor-packed foods without the heavy fat of typical deep-fried foods.
In fact, you won’t need to add oil to this versatile Multi Fryer!
Consider all the foods you can easily prepare using the features of the truly hands-
free Extreme Multi Fryer & Rotisserie: golden roast chicken; thick, juicy beef steaks;
delicate fish fillets; luscious desserts and tender-crisp fresh vegetables. And, as a
handy bonus feature, many of your favorite prepared frozen foods can be easily
heated in mere minutes for your convenience. We are sure you and your family will
love all the delicious one-dish dinners, snacks, vegetables, desserts and more that
come from inside your easy and innovative Extreme Multi Fryer & Rotisserie.
The following pages of this manual give you full and complete instructions
for all the functions and features of the Extreme Multi Fryer & Rotisserie. Inside these
pages, you’ll find cooking guides, information on Cooking Modes, and complete
step-by-step instructions for assembly, operating and maintenance of your Multi
Fryer. Please read all safety instructions and complete directions carefully for safe
usage at all times.
Thank you for your purchase! We hope you will enjoy all the innovative
products brought to you by our family at Gourmia.


5
SAFETY FIRST p. 6
FEATURES & FUNCTIONS p. 8
PRE-PROGRAMMED CONTROL PANEL p. 10
Selecting Auto Modes
Selecting Manual Mode
ASSEMBLY BEFORE USE p. 12
STEP-BY-STEP COOKING p. 16
Chicken Pieces
Rotisserie Chicken
Grilled Entrées
Stir-Fried Favorites
French Fries
Bakery Goods
Pizza & Flatbreads
Fish & Seafood
MAINTENANCE & SERVICE p. 20
TABLE OF CONTENTS

SAFETY FIRST
6
IMPORTANT SAFEGUARDS
When operating this electric appliance, basic safety instructions should always be
followed. Refer to the following for these instructions.
1. READ ALL SAFETY & USAGE INSTRUCTIONS BEFORE USING THE Extreme
Multi Fryer & Rotisserie.
2. EXERCISE EXTREME CAUTION: Do not allow liquids of any kind to touch the
interior of Multi Fryer Base. Use extreme caution when moving the Fry & Cook
Pan onto or o of the Fryer Base to ensure that liquids or foods DO NOT spill
into the Base. Spills may cause electrical shock or severe injury.
3. Before using, place the Base on a heat-resistant glass, wood or stone surface.
Do not place on any counter or table that may be aected by high heat.
4. AVOID ELECTRICAL SHOCK. DO NOT immerse cord, plugs or the Multi Fryer
Base in water or other liquid.
5. DO NOT touch the surface of the Multi Fryer Base or Fry & Cook Pan when HOT.
Use pot holders or oven mitts when handling the hot Fry & Cook Pan, Base
or Lids.
6. Allow sucient space around the Multi Fryer for proper air ow and movement
of the Pan while cooking.
7. UNPLUG Multi Fryer from outlet when not in use or before cleaning. Do not let
cord hang over edge of table or counter or touch hot surfaces, including the
Multi Fryer.
8. DO NOT add or remove parts or accessories while HOT.
9. Children should never use the Extreme Multi Fryer & Rotisserie; close
supervision is required when appliance is used near children.
10. Never touch, cover or obstruct the Heat Release Vents on the Multi Fryer during
operation. Hot steam will escape while cooking; serious burns may occur. Keep
children away from the Heat Release Vents.
11. Operate the Multi Fryer on a level surface well away from any hot gas or
electrical burner, heat source, combustible spray cans or pressurized items.
12. Do not operate the Extreme Multi Fryer & Rotisserie outdoors.
13. Never operate the Extreme Multi Fryer & Rotisserie with a damaged cord

SAFETY FIRST
7
FOR HOUSEHOLD USE ONLY
Electrical Polarized Plug: This Multi Fryer
has a polarized plug (one blade is wider than
the other). To reduce the risk of electrical
shock, the plug is intended to be used by
inserting it into the electrical outlet only one
way. If the plug does not t securely into the
outlet, turn the plug and re-insert. Do not
modify this plug. If the plug does not t the
outlet securely, call a qualied electrician
for assistance. DO NOT use this plug with
extension cords of any kind.
or plug or one that has malfunctioned or been damaged in any way.
Immediately contact Customer Service for analysis.
14. DO NOT add unauthorized accessory attachments. Such use may result in
electric shock, injury or re.
15. Use only factory cord supplied; NEVER add extension cords. When done
using, switch control to OFF then pull plug from outlet.
16. DO NOT operate the Multi Fryer when empty.
17. Do not use the Multi Fryer for any use other than intended. Do not attempt
to deep fry in the Fry & Cook Pan. Do not use Fry & Cook Pan on a stovetop
or other heat source.
SAVE THESE INSTRUCTIONS

A. Fry & Cook Pan- The Fry & Cook Pan has a generous 3-quart capacity, a nonstick
interior and a unique Locking Handle. The Fry & Cook Pan must always be used when
operating in any Mode in the Extreme Multi Fryer & Rotisserie.
The large Fry & Cook Pan is designed to hold solid foods and small amounts of
liquids, however the Extreme Multi Fryer & Rotisserie is not designed to slow cook,
braise, or cook foods in a long, low-heat method. Add only small amounts of liquid,
as needed, for cooking or frying.
The Fry & Cook Pan will accommodate all the accessories that are provided in the
accessory packaging. Always check before cooking to ensure food placed on the
Convertible Rotisserie Rack/Fry Basket, such as a whole chicken or beef roast, will turn
freely and t within the closed Extreme Multi Fryer & Rotisserie.
Always use pot holders when handling or removing the hot Fry & Cook Pan from the
Multi Fryer.
8
A
B
C
E
D

9
FEATURES & FUNCTIONS
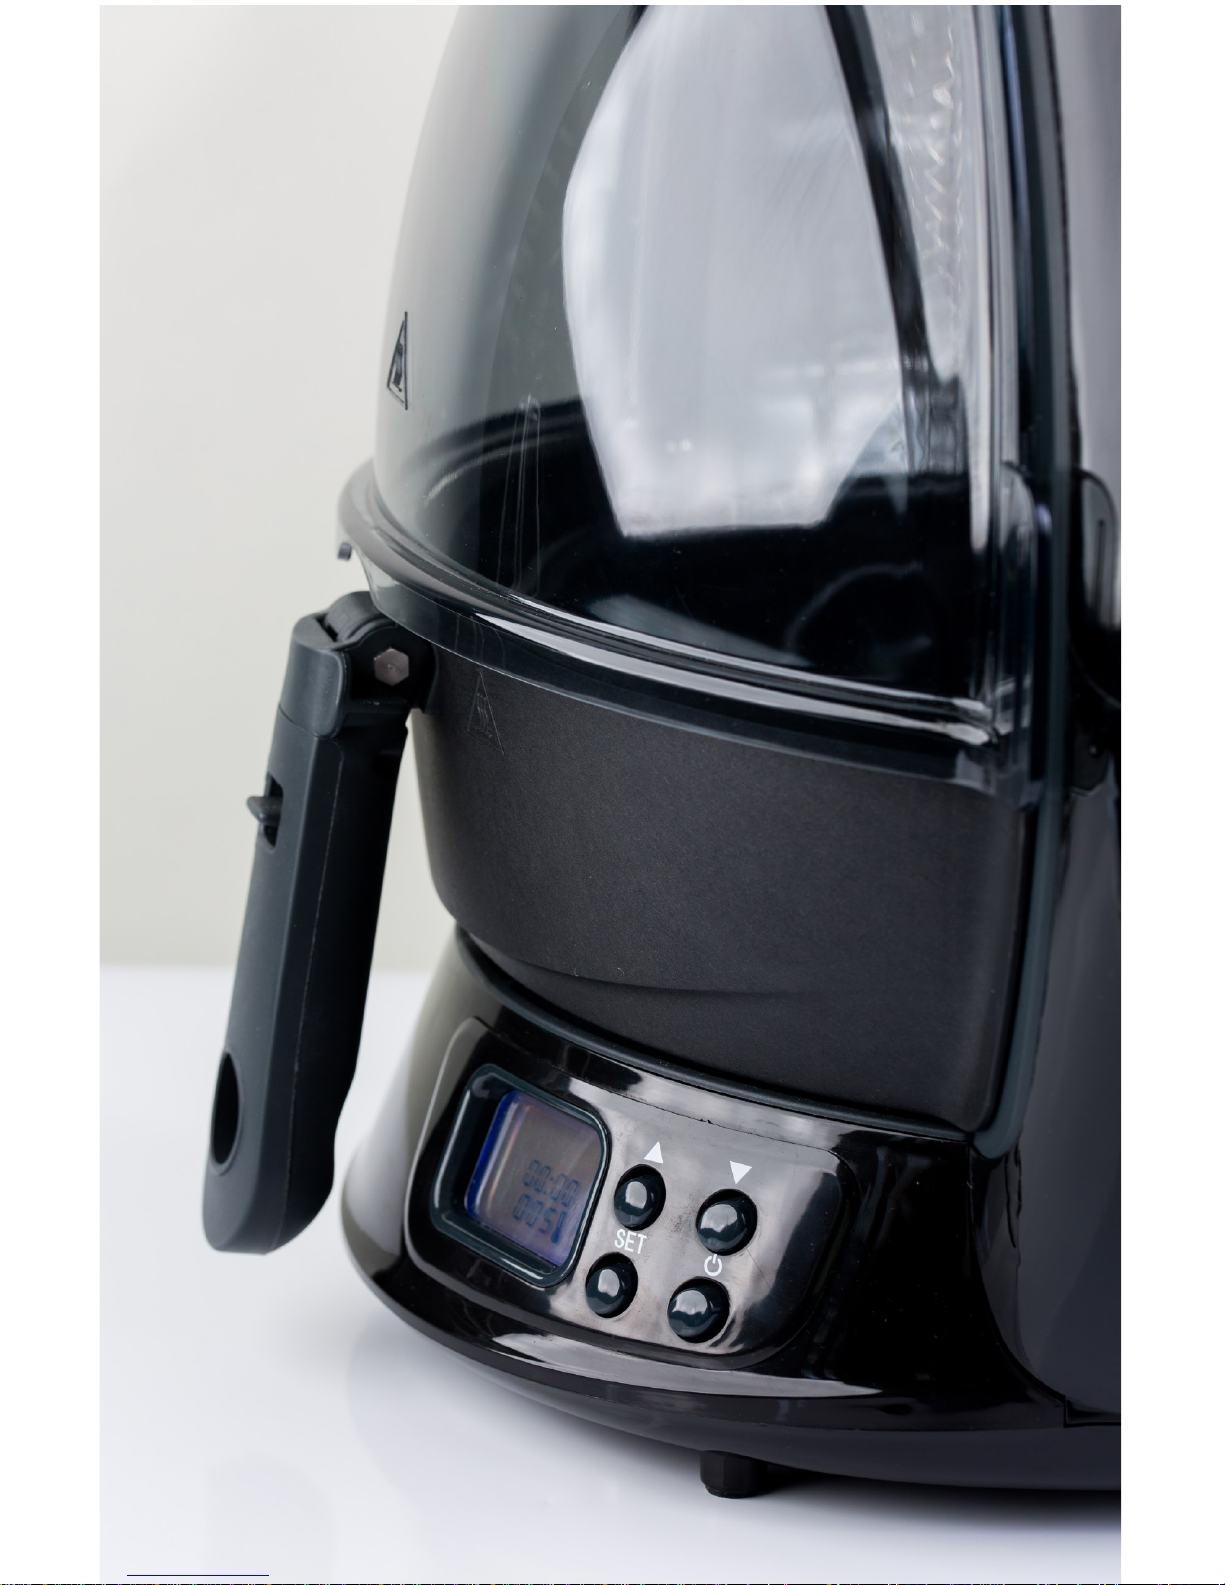
B. The Multi Fryer Base- The Multi Fryer Base holds the Fry & Cook Pan and contains
the following features:
1 RadiVection 360° Cooking System
2 EasyVue Panels to check foods as they fry or cook.
3 Pre-programmed Control Panel with LCD Display
4 Secure-Hold Grips on the bottom of the Base to add non-slip protection
C. Extreme Multi Fryer & Rotisserie Cooking System- The Multi Fryer & Rotisserie has
a powerhouse heating system, using super-turbo heat circulation to fry, roast, bake
and stir-fry foods quickly and eciently without using oil. The results? Fresh avors,
lower fat content, tender and moist interiors, super crispy exteriors and compliments
all around from your family and friends.
The turbo system creates intense, directed overhead heat via the vertical element,
allowing foods to become crispy without deep frying. The heat also maintains a
tender, satisfying interior to meat, poultry and other foods because it does not dry
out the food as the frying time progresses. Try rotisserie chicken, hearty beef roasts,
potato wedges, onion rings, chicken wings and all your family favorites!
D. Accessories- With the accessories included in your package, you have a wealth
of options for roasting, stir-frying, rotisserie chicken, baking and grilling at your
ngertips! Check the Assembly section to nd full instructions for using each of these
accessories.
- Convertible Rotisserie Rack/Fry Basket
- Rack Hook
- Automatic Stirring Spatula
- Measuring Cup
E. Pre-Programmed Control Panel- The Pre-Programmed Control Panel houses the
LCD Display and electronic platform for Auto Cooking Modes and Manual Cooking
options. Within the Auto Modes, there are options to increase or decrease the cooking
time. Within the Manual Cooking Mode, the time and temperature can be increased
or decreased.

10
A. Selecting Auto Cooking Modes
1 . Plug the Extreme Multi Fryer & Rotisserie into the wall outlet. The Multi
Fryer will beep once.
2. The LCD Display will ash blue and will indicate“0:00”Time and the current
Temperature.
3. The above settings indicate the Extreme Multi Fryer & Rotisserie is in
Standby Mode.
4. Select the Cooking Mode of your choice by pressing the Button until the
Mode of your choice is illuminated. Control Panel will display the preset
temperature and time for that Mode.
5. Change the cooking time in your Mode by pressing the Up or Down Button
to increase or decrease the cooking time within the Time Range for
that Mode.
6. Press the Start Button.
7. The Fryer will turn ON. The LCD background light will turn orange and the
Timer will countdown the cooking time. The Fryer will begin to rotate.
8. When the countdown ends, the Fryer will automatically turn OFF and go
into Standby Mode. The Display will turn blue. The Fryer will Beep once to
indicate cooking is complete.
9. To stop the cooking process at any time, press the Start Button for several
seconds to stop the cooking process.
PRE-PROGRAMMED CONTROL PANEL
Auto Mode Pre-set Time* Temp Accessories
Chicken Pieces 40 min 475˚ Fry & Cook Pan or Basket
Rotisserie 50 min 75˚ Rotisserie Rack
Grilled Entrees 30 min 475˚ Fry & Cook Pan or Basket
Stir-Fried Favorites 10 min 475˚ Auto Stir Spatula; Fry & Cook Pan
French Fries 30 min 475˚ Fry & Cook Pan or Basket
Bakery Goods 15 min 475˚ Fry & Cook Pan
Pizza & Flat Bread 10 min 475˚ Fry & Cook Pan
Fish & Seafood Option 25 min 475˚ Fry & Cook Pan or Basket
*Add or subtract 5 minutes per pre-set time for desired results.

1111
PRE-PROGRAMMED CONTROL PANEL
*Add or subtract 5 minutes per pre-set time for desired results.
B. Selecting Manual Cooking
1 . Plug the Extreme Multi Fryer & Rotisserie into the wall outlet. The Multi
Fryer will beep once.
2. The LCD Display will ash blue and will indicate“0:00”Time and the current
Temperature.
3. The above settings indicate the Extreme Multi Fryer & Rotisserie is in
Standby Mode.
4. Select the Manual Cooking Mode by pressing the Set Button until the
Manual Mode is reached (no Icon will be displayed). The LCD Display will
ash blue and will indicate “0:01”Time and the pre-set Temperature
of “300°F”.
5. If desired, increase or decrease the Time by pressing the Up or Down arrow.
The Time may be set between “0:01” minute and “1:00” hour.
6. If desired, increase or decrease the Temperature by pressing the Up or
Down arrow. The Temperature may be set between “300°F and “475°F”.
7. Press the Start Button. The Fryer will turn ON. The LCD background light
will turn orange and the Timer will countdown the cooking time. The Fryer
will begin to rotate.
8. When the countdown ends, the Fryer will automatically turn OFF and go
into Standby Mode. The Display will turn blue. The Fryer will Beep once to
indicate cooking is complete.
9. To stop the cooking process at any time, press the Start Button
for several seconds to stop the cooking process.
PRE-PROGRAMMED CONTROL PANEL

12

1313
ASSEMBLY BEFORE USE
ASSEMBLY BEFORE USE
Before First Use
1. Place the Extreme Multi Fryer & Rotisserie on a level, at surface that is
heat-resistant.
2. Ensure that the Multi Fryer is several inches away from obstructions, such
as walls, cabinets, doors, and other appliances. Allow enough room above
the Multi Fryer so the panels can be fully opened.
3. Open the EasyVue Panel completely until it audibly “clicks.” (g 1) Wipe
the interior and exterior of the Multi Fryer with a damp cloth, water and
a mild detergent. Dry thoroughly. Wipe and dry the Fry & Cook Pan and
Convertible Rotisserie Rack/Frying Basket.

14

ASSEMBLY BEFORE USE
1515
ASSEMBLY BEFORE USE
1. When ready to operate, follow the easy instructions for either cooking
with Auto Modes or Manual Mode. Do not press Start until assembly is
complete, as follows:
2. Center poultry on the Convertible Rotisserie Rack, if using, as directed in
the Step-by-Step Cooking instructions (g 2). Place the Rack in the Fry &
Cook Pan. (g 3)
3. Assemble the Frying Basket, if using. (g 4 and 5) Fill with food to be
fried or cooked, as directed in the Step-by-Step Cooking instructions
(see p. 16). Place the Basket in the Fry & Cook Pan (g 6). Do not ll the Pan
with ingredients beyond the MAX Fill Line. (g 7)
4. Place the Auto-Stir Spatula in the Fry & Cook Pan, seated on the center nut
(g 8), and ll with stir fry mixture or French fries.
5. Insert the Fry & Cook Pan with contents into the Multi Fryer and seat
over the center nut in the bottom of the Multi Fryer Base. (g 9). Check to
ensure food will not hit the Multi Fryer as the food in the pan rotates.
6. Press the Start Button to begin cooking.
NOTE: To change a Cooking Mode to a dierent Mode after setting, the Multi
Fryer must be turned OFF by unplugging the unit at the wall outlet. After 1
minute, plug in again and re-start the Cooking Mode of your choice.
NOTE: The Cooking process can be interrupted by removing the Fry & Cook
Pan from the Multi Fryer. This action will immediately stop the cooking
process. Replacing the Fry & Cook Pan will re-start the cooking process.

1616

17
Refer to the following hints and tips when using the various Modes and
options in your Extreme Multi Fryer & Rotisserie. Because the Multi Fryer fries
and cooks at super-fast speeds, always watch food to ensure it does not
over-cook.
STEP-BY-STEP COOKING
MODE: Chicken Pieces
Time: 40 min Temp: 475˚ Accessories: Fry & Cook Pan
» Use this Mode to create your newest favorite fried chicken pieces! Dip
chicken pieces in beaten eggs, roll in seasoned crumbs and arrange in
the Basket. Set the Auto Mode and sit back to relax while the chicken
pieces cook to tender perfection.
MODE: Rotisserie Chicken
Time: 50 min Temp: 475˚ Accessories: Fry & Cook Pan; Rotisserie Rack
» Make a perfect rotisserie chicken for any occasion! Select a 2-3 pound
whole chicken, clean and pat dry (remove giblets and discard).
Season liberally with your favorite spices and place on the Convertible
Rotisserie Rack, neck end up. Use cooking string to securely tie the
wings and legs to the whole bird, if needed. Set the Auto Mode and
relax. When done, use the Hook to safely remove the food and Rack
from the Multi Fryer.
MODE: Grilled Entrees
Time: 30 min Temp: 475˚ Accessories: Fry & Cook Pan; Basket
» Grilling in a fry pan or open griddle typically involves a lot of hot
grease or oil. Use this Mode to prepare sautéed stued chicken breasts,
hamburger patties, combination entrées and much more.
MODE: Stir-Fried Favorites
Time: 10 min Temp: 475˚ Accessories: Fry & Cook Pan; Auto-Stir Spatula
» One of the easiest ways to cook a fast weeknight meal, stir-frying oers
delicious avors in a minimum amount of time. Thinly slice chicken
breast meat, beef, or use prepped shrimp. Add broccoli, carrots, onion,
or any assortment of thinly sliced vegetables. Toss in soy sauce, sesame
oil, seasonings and set the Auto Mode to stir fry your favorites with ease.
MODE: Fish & Seafood
Time: 25 min Temp: 475˚ Accessories: Fry & Cook Pan; Basket
» Delicate llets can be battered and dipped in crumbs, placed in the
Basket and pan-fried for a perfect sh fry, or try whole shrimp or scallops
pan-fried using the Auto-Stir Spatula. It all adds up to delicious!

18

STEP-BY-STEP COOKING
19
MODE: French Fries
Time: 30 min Temp: 475˚ Accessories: Fry & Cook Pan; Auto-Stir Spatula
» Make perfect fries every time with the Auto Mode feature in the Multi
Fryer. Like crispy shoestrings? Or your favorite homestyle fries? Use the
Auto-Stir Spatula in the Fry & Cook Pan, drizzle with a bit of oil and add
potatoes cut into matchsticks, wedges or thick rounds. Set your Auto
Mode and let the Auto-Stir Spatula do all the work for you. Golden and
crispy goodness…without all the fat!
MODE: Bakery Goods
Time: 15 min Temp: 475˚ Accessories: Fry & Cook Pan
» Who doesn’t love a warm croissant, fresh from the oven? This Mode
bakes tender rolls, delicious breads and buttery pastry in a hot, fast
oven. Use the Pan or Basket and watch carefully to avoid burning and
enjoy the results of the wait.
MODE: Pizza & Flatbreads
Time: 10 min Temp: 475˚ Accessories: Fry & Cook Pan
» Arrange cut slices of your favorite pizza in the Basket and quickly heat to
cheesy perfection. Flatbreads and focaccia breads also bake quickly in
the Basket or Pan to a crispy, fresh nish.

20
Table of contents
Other Gourmia Fryer manuals

Gourmia
Gourmia GAF826 User manual

Gourmia
Gourmia GAF476 User manual

Gourmia
Gourmia GAF-570 User manual

Gourmia
Gourmia GTF7950MEX User manual

Gourmia
Gourmia GAF-678 User manual

Gourmia
Gourmia GAF686 User manual

Gourmia
Gourmia GAF-645 User manual

Gourmia
Gourmia GAF1220 User manual

Gourmia
Gourmia GAF798 User manual

Gourmia
Gourmia GAF798 User manual

Gourmia
Gourmia GAF856 User manual

Gourmia
Gourmia GAF-645 User manual

Gourmia
Gourmia GAF612 User manual

Gourmia
Gourmia GDF450 User manual

Gourmia
Gourmia GAF-228 User manual

Gourmia
Gourmia GAF-328 User manual

Gourmia
Gourmia GTF7460 User manual

Gourmia
Gourmia GAF799 User manual

Gourmia
Gourmia GAF486 User manual

Gourmia
Gourmia GAF236 User manual