GPO WINCHESTER User manual

V1 | SEPT 2018
USER MANUAL
GPO_Winchester_user_Manual EU - Sept 2018 V1.indd 1 10/09/2018 09:21

2
GPO_Winchester_user_Manual EU - Sept 2018 V1.indd 2 10/09/2018 09:21

3
Content
English 5
German 19
French 33
Dutch 47
Spanish 61
Italian 75
GPO_Winchester_user_Manual EU - Sept 2018 V1.indd 3 10/09/2018 09:21

4
GPO_Winchester_user_Manual EU - Sept 2018 V1.indd 4 10/09/2018 09:21

5
English
5
GPO_Winchester_user_Manual EU - Sept 2018 V1.indd 5 10/09/2018 09:21

6
Where to put your radio
It is important that you consider carefully in advance where your radio
will be situated and make sure that it is:
* On a at and stable surface with sufcient ventilation
* Within 1.4metres of a power socket (if using mains power)
* Where you can fully extend the telescopic aerial
* Away from bright sunlight or heat sources, such as a radiator or
naked ame and lighted candles must not be placed on the radio
* Away from humidity
Important safety instructions
Please read this instruction manual carefully before attempting to use
the radio and keep the manual for future reference
The radio is for indoor use only
Do not move the radio while it is connected to the mains supply via the
adapter
Clean the radio with a slightly damp cloth and do not use abrasive
cleaners
Children should be supervised to ensure that they do not play with the
radio
WARNING: If the exible cable of the adapter is damaged, it must
be replaced by the manufacturer, service agent or similar qualied
personnel.
GPO_Winchester_user_Manual EU - Sept 2018 V1.indd 6 10/09/2018 09:21

7
General Descriptions:
1.1 DAB&FM Digital Tuning System ,30 DAB+ 30 FM Stations Preset
1.2 Aux input / Headphone output
1.3 Automatic time update via FM-RDS or DAB
1.4 12|24 Hour clock display
1.5 Built in calendar with auto leap year from 2017-2099
1.6 Dual alarm can be set to daily, weekday, weekend and
one-off modes
1.7 Alarm output can be set to DAB/FM or as Buzzer sound
1.8 AMS function (Automatic Memory System)
1.9 Auto scan and manual scan
1.10 Volume Control (16 level)
1.11 Automatic switch to standby mode after 15 minutes following
period of inactivity
1.12 Radio Frequency range:
FM: 87.5 ~ 108.0 MHz , 50kHz | Step
DAB Band III 5A-13F
1.13 Power Supply : AC input 100-240V, DC output 6V / 1A
1.14 Output power : 2W
1.15 Controls and outputs
GPO_Winchester_user_Manual EU - Sept 2018 V1.indd 7 10/09/2018 09:21

8
11
10 9
12
1 8
11
7
6
5
14
4
3
2
GPO_Winchester_user_Manual EU - Sept 2018 V1.indd 8 10/09/2018 09:21

9
1. Power: Press the power knob to turn the unit on or off
2. Function: Switch functions among DAB, FM and Aux-in
3. Sleep: Set sleep modeThe sleep function allows you to program
your radio to switch itself off after a set period of 90,60,45,30,15
minutes
4. Scan: Auto-Scan
5. Alarm: 2 alarms available
6. Preset: Stations preset entry stored stations review
7. Menu/Info: Function Setup / Exit Setting / press to show
information of station
8. Select/Snooze : Enter or Conrm / Snooze
9. Radio Tune: +/--
10. Volume Control: +/--
11. Aux Input
12. DC 6V Input
13. Headphone output
14. LCD Display
15. Telescopic Aerial
GPO_Winchester_user_Manual EU - Sept 2018 V1.indd 9 10/09/2018 09:21

10
Setting up
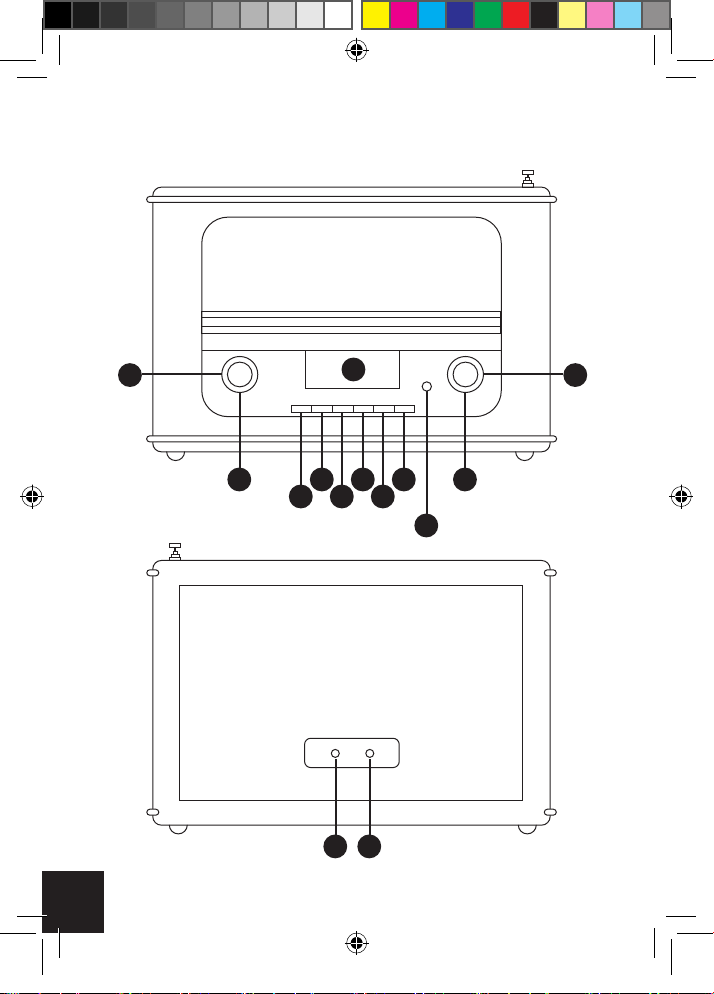
Connect the mains power lead into the socket on the back of the radio
(DC IN) and plug the power adaptor into the mains power wall socket.
Fully extend the radio aerial in a vertical position to obtain the
maximum signal strength.
When switching on for the rst time, press the power knob for
2 seconds, LCD will illuminate “Welcome to digital radio” will be
displayed. Then it will show the clock. (This process may take a few
moments depending on signal strength.)
The date and clock are defaulted to 00.00.2017
The alarms are defaulted to 0:00 and off
The unit is defaulted to clock auto update mode
Time Set Up
Each step needs to be conrmed by pressing the “Select” button
Press and hold “Menu” button, Select “main menu” – Select “time
setup”—Select “set clock”
To set clock, rotate “Tune +/- ” clockwise or anticlockwise to adjust
clock by 01 hour and 01 minute.
To change from set clock to set date turn the Tune +/- clockwise or
anticlockwise, press select
To set date, rotate “Tune +/- ” clockwise or anticlockwise to adjust date
by 01 day and 01 month.
To change from set date to auto update turn the Tune +/- clockwise or
GPO_Winchester_user_Manual EU - Sept 2018 V1.indd 10 10/09/2018 09:21

11
anticlockwise, press select
To set auto update, press the “Select” button to turn it on/off.
To change from auto update to set clock display format turn the Tune
+/- clockwise or anticlockwise, press select
To set clock display format, rotate “Tune +/- ” to choose between 12/24
Hour.
Alarm Set Up
Each step needs to be conrmed by pressing the “Select” button
This unit can set two alarms.
Press “Alarm” button, rotate “Tune +/- ” to choose Alarm 1/ Alarm 2.
To set time, rotate “Tune +/- ” clockwise or anticlockwise to adjust clock
by 01 minute and 01 hour.
To set days, rotate “Tune +/- ” to select 4 modes one-off , weekdays ,
weekends and daily.
To set modes, rotate “Tune +/- ” to select 3 outputs DAB , FM and
Buzzer.
To set volume, rotate “Tune +/- ” clockwise or anticlockwise to increase
or decrease the volume.
Press “Select” button once to turn on the clock, press “Select” button
again to turn off the clock.
Press “Save” after all settings being done.
The Alarm symbol will be displayed on the LCD after it is successfully
set.
You can set two alarms at the same time.
GPO_Winchester_user_Manual EU - Sept 2018 V1.indd 11 10/09/2018 09:21

12
Alarm wake up options:
DAB radio, the radio will play DAB program.
FM radio, the radio will play FM program.
Buzzer, Beep tone rings.
The alarm will sound for 1 hour, you can press any button to terminate
the alarm or press the “Snooze” button to enter snooze mode. You can
choose snooze for 5 minutes, 10 minutes, 15 minutes and 30 minutes
by pressing “Snooze” button repeatedly, stop when you are on the time
you wish to set , the snooze time will be stored automatically. If you
set 5 minute snooze, after 5 minutes, alarm will sound again, press
“Snooze” button again to keep on snoozing if needed. Only 1 alarm can
enter Snooze mode.
Sleep Mode Operation
Press “Sleep” button to enter sleep mode, sleep mode is defaulted off
and “sleep timer” will be displayed on the LCD , press “Sleep” button
again to turn on the “sleep timer” , press “Sleep” button repeatedly to
set sleep timer among 15 min , 30 min , 45 min , 60 min and 90 min ,
stop when you are on the timer you wish to set , the “sleep timer” will
be stored automatically.
After the “sleep timer” is successfully set, sleep time will be displayed
on the LCD.
GPO_Winchester_user_Manual EU - Sept 2018 V1.indd 12 10/09/2018 09:21

13
EQ Operation
1. Press MENU/INFO button
2. Rotate “Tone” and press to adjust “Main menu”
3. Rotate “Tone” and press to adjust “EQ”, you can choose “Rock”
“Classic” “Jazz” “Bass” etc.
DAB Mode Operation
1. Switch to DAB mode, press “Function” button repeatedly until
the display shows “DAB”. Press “Scan” button to activate a full station
search. A progressive bar will show the progress of the scan and the
number of stations found during the scan. The stations scanned will be
stored automatically when the scan is complete.
You may see some symbols displayed alongside the station names,
these are dened as follows:
* ? – This indicates that the station is not active or available
* >>- This symbol indicates that the station is a primary station
*<<- This symbol indicates that the station is a secondary station
2. The rst station available will be played automatically.
3. You can rotate “ Tune +/- ” to switch among stations stored.
4. Rotate “Tune +/- ” clockwise or anticlockwise to seek your favorite
stations.
5. Rotate “Volume +/-” to adjust the volume.
6. To store a station preset, you must rst tune to the station you wish
to set as a preset. Then press “Preset” button to activate store function.
“Preset Empty 1” will be displayed on lower line of the screen, and the
number “1” will ash. Rotate “Tune +/- ” to scroll through the numbered
preset locations (1-20), press and hold “Select” button to store the
GPO_Winchester_user_Manual EU - Sept 2018 V1.indd 13 10/09/2018 09:21

14
station. Frequency will be displayed on the upper line. “Preset x Stored”
will be shown on the screen to indicate after you store the station
successfully. 20 stations can be stored in total. To tune to a preset
DAB station, use “Tune +/- ” to scroll through the preset stations. Press
“Select” button or wait a few seconds to conrm when you see the
station you would like to listen. The radio will begin to play. If you have
already saved a station in that preset position, the new selection will
override the previous saved station.
7. Prune stations
You can delete all the preset stations or return the DAB radio to its
factory settings.
Press and hold the “Menu” button, select “main menu”-“prune station”,
press “Select” button to prune station.
Press and hold the “Menu” button, select “main menu”-“factory reset” ,
press “Select” button to conrm reset.
8. In DAB mode, the radio will synchronize with the time and date of the
station.
9. In DAB mode, press “INFO” button, the information such as DLS,
station name, time and date, frequency, bit rate, signal quality will be
displayed.
10. In DAB mode, press and hold “Menu” button , select “station scan”
- “manual tune”. Rotate “Tune +/- ” knob to scroll through channel
5A-13F and select the stations you would like to listen. Press “Select”
button to conrm the channel.
11.DAB Menu options
The menu button allows you to change system settings on your DAB
radio.
FM Mode Operation
GPO_Winchester_user_Manual EU - Sept 2018 V1.indd 14 10/09/2018 09:21

15
1. Press “Function” button and switch into FM mode.
2. To scan stations manually, rotate “Tune +/- ” knob to adjust stations
by 0.05MHZ until you get your favorite stations.
3. To auto scan stations, press “ Scan” button to search stations , if
station signal is available, scan will stop automatically and the radio
will play this station. Press “Scan” button, it will activate a full station
search. A progressive bar will show the progress of the scan and the
number of stations found during the scan. The stations scanned will
be stored automatically when the scan is complete.
4. You can rotate “ Tune +/- ” to switch among stations stored.
5. Rotate “Volume +/-” to adjust the volume.
6. To store a station preset, you must rst tune to the station you wish
to set as a preset. Then press “Preset” button to activate store
function. “Preset Empty 1” will be displayed on lower line of the
screen, and the number “1” will ash. Rotate “Tune +/- ” to scroll
through the numbered preset locations (1-20), press and hold
“Select” button to store the station. Frequency will be displayed
on the upper line. “Preset x Stored” will be shown on the screen
to indicate after you store the station successfully. 20 stations can
be stored in total. To tune to a preset FM station, use “Tune +/- ” to
scroll through the preset stations. Press “Select” button or wait a few
seconds to conrm when you see the station you would like to listen
to. The radio will begin to play. If you have already saved a station
in that preset position, the new selection will override the previous
saved station. Long press “ Preset ” button , you can review all the
stored stations.
7. In FM mode, press “INFO” button to display the information such as
RDS, audio type, station frequency, time and date, signal quality,
program text, program type.
GPO_Winchester_user_Manual EU - Sept 2018 V1.indd 15 10/09/2018 09:21

16
8. In FM mode, press and hold “Menu” button, enter into audio setting,
you can select between Stereo and Mono.
9. Factory reset You can return the FM radio to its original factory
settings.Press and hold the “Menu” button, select “main menu”-
“factory reset” , press “Select” button to conrm reset.
10. In FM mode, when received RDS information, the radio will
synchronize with the time and date of the station automatically.
11. FM Menu Options The menu button allows you to change system
settings on your FM radio.
AUX-IN Mode Operation
1. Press “Function” button to switch into AUX-IN mode, plug the aux-in
cable into the 3.5mm AUX-IN jack at the back of the radio. It will play
the music from external audio devices.
2. Rotate “VOL+” or “VOL-“ to adjust volume Headphone Mode
Operation
1. Connect the headphone lead into the “PHONES” Jack in the front of
the radio and listen to radio privately.
2. Rotate “VOL+” or “VOL-“ to adjust volume
GPO_Winchester_user_Manual EU - Sept 2018 V1.indd 16 10/09/2018 09:21

17
GPO_Winchester_user_Manual EU - Sept 2018 V1.indd 17 10/09/2018 09:21

18
GPO_Winchester_user_Manual EU - Sept 2018 V1.indd 18 10/09/2018 09:21

19
German
19
GPO_Winchester_user_Manual EU - Sept 2018 V1.indd 19 10/09/2018 09:21

20
Wo Sie Ihr Radio platzieren können
Es ist wichtig, dass Sie sich im Voraus genau überlegen, wo sich Ihr
Radio benden wird und dass Sie es wie folgt platzieren:
* Auf einer achen und stabilen Fläche mit ausreichender Belüftung
* Innerhalb von 1,4 Metern von einer Steckdose (beim Betrieb mit
Netzstrom)
* Wo Sie die Teleskopantenne vollständig ausfahren können
* Weg von direktem Sonnenlicht oder Wärmequellen, wie Heizkörpern
oder offenen Flammen, und brennende Kerzen dürfen nicht auf dem
Radio platziert werden
* Weg von Feuchtigkeit
Wichtige Sicherheitshinweise
Bitte lesen Sie diese Betriebsanleitung sorgfältig durch, bevor
Sie versuchen, das Radio zu benutzen und bewahren Sie die
Bedienungsanleitung für künftige Zwecke auf.
Das Radio ist nur für den Einsatz im Innenbereich gedacht
Bewegen Sie das Radio nicht, während es über das Netzteil an das
Stromnetz angeschlossen ist
Reinigen Sie das Gerät mit einem leicht feuchten Tuch und verwenden
Sie keine Scheuermittel
Kinder sollten beaufsichtigt werden, um sicherzustellen, dass sie nicht
mit dem Radio spielen
WARNUNG: Wenn das exible Kabel des Netzteils beschädigt
ist, muss es durch den Hersteller, einen Dienstleister oder ähnlich
qualiziertes Personal ausgetauscht werden.
GPO_Winchester_user_Manual EU - Sept 2018 V1.indd 20 10/09/2018 09:21
This manual suits for next models
1
Table of contents
Languages:
Other GPO Radio manuals