Page 4
©2017 GPS Insight. All rights reserved.
Page 3 ©2017 GPS Insight. All rights reserved.
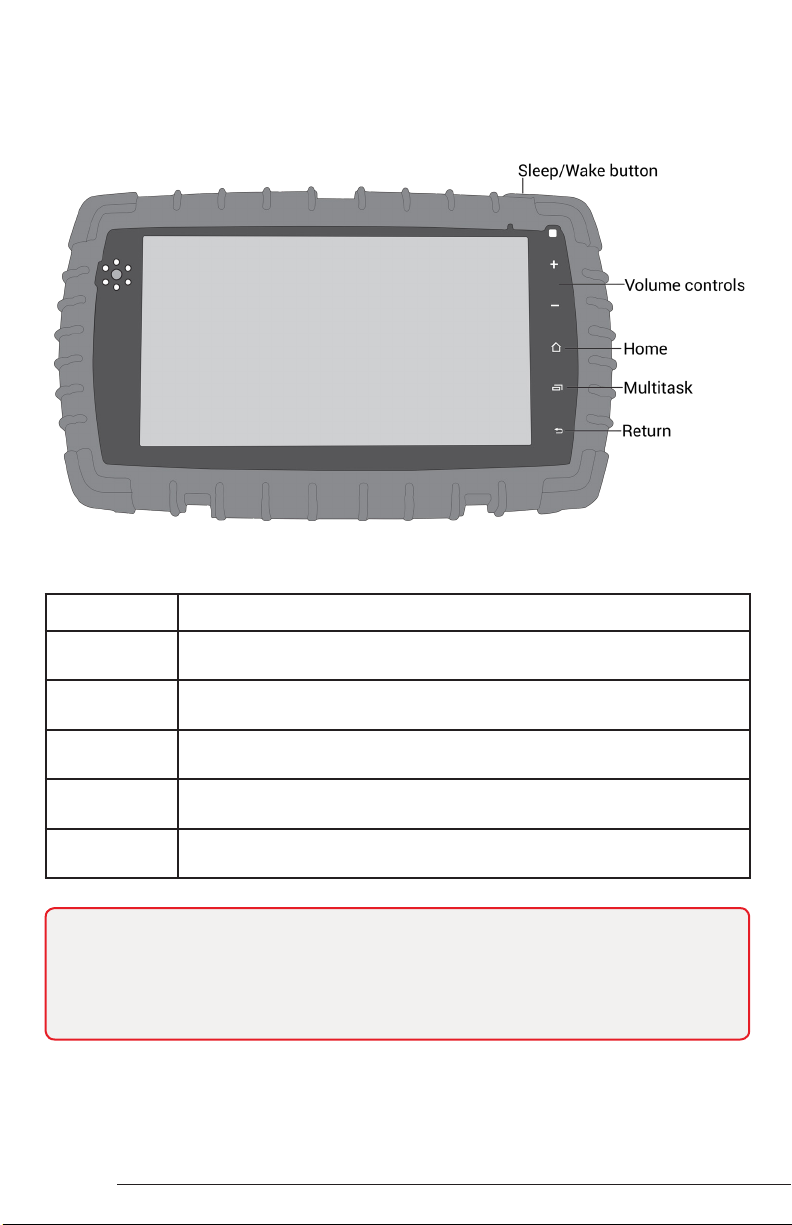
USING YOUR ELD TABLET
The ELD tablet has several physical buttons that allow you to operate the tablet. Below
are the most commonly used buttons that will help you in getting started with your new
ELD tablet.
Button Description
Sleep/Wake Press this button to wake the tablet. Press and hold to power off or
reboot the tablet.
Volume Press either of these buttons to control the master volume on the
tablet.
Home Press this button to return to the tablet home screen from any
application.
Multitask Press this button to quickly switch between open application
windows.
Return Press this button to return to the previous screen within the active
application window.
Note: The ELD tablet should always remain connected to the dock installed in your
vehicle, unless you are instructed to remove the tablet by your fleet administrator
or a Support representative. Certain functions on the tablet are disabled while the
vehicle is motion. You will see a Vehicle In Motion notication at the bottom of the
screen when this mode is enabled. Messages using the GPS Insight Messaging app
will still be received and can be accessed when the vehicle has stopped.
EXPLORING THE WELCOME SCREEN
The eFleetSuite Welcome Screen will automatically display when the vehicle’s ignition is
turned to the ON position. If you do not see the Welcome Screen, tap on the eFleetSuite
app from the tablet home screen.
Menu Bar
Section Description
Comms Status The ELD’s connection status for:
GPS : GPS lock on location data.
• Green: Location received.
• Yellow: Location data received but unable to get a
valid x on the vehicle’s location.
• Red: No location data received.
Communications : Connectivity to the host software.
• Green: Connected and sending data.
• Yellow: Connection is temporarily turned off; there is
no data to send.
• Red: No connection; unable to connect.
Diagnostics : Connectivity to the GPS hardware.
• Green: Connected and recording data from GPS
hardware.
•Gray: Data has stopped being received and paper
logs should be used.
• Red: Connection to GPS hardware has been lost and
paper logs should be used.
Date and Time System date and time against which activity is logged.
eFleetSuite Version
number
Current eFleetSuite software version.
Resource status Resource list status:
Trailer : If present, no trailer information has been
added to your driver log.
Shipment : If present, no shipment information has
been added to your driver log.