Gram Precision INDICATOR SC2 User manual

1
USER MANUAL
MANUAL DE UTILIZACION
MANUEL D´UTILISATION
INDICATOR SC2
INDICADOR SC2
INDICATEUR SC2
REV. 2A11M103T

2

3
INDEX
Specifications
5
Power
5
Before using
5
System power consumption
5
Connect the loadcell to the indicator
5
Display description
6
Basic function operation
7
Standard functions setup
8
- Internal value / battery voltage
8
- Piece weight auto-average
8
- Auto-power off
9
- Backlight setting
9
- Accumulation
9
- RS-232 output
10
- A/D update rate
10
- Display condition at zero
10
Standard calibration
11
- Weight calibration
11
- Zero calibration
11
- Span calibration
11
Guarantee
12
EC Declaration of Conformity
29
INDICE
Especificaciones
13
Alimentación
13
Antes de su utilización
13
Consumo
13
Conexión de la célula de carga al indicador
14
Descripción del display
14
Operación básica
15
Configuración de funciones standard
16
- Valor interno / Voltaje de la batería
16
- Promedio automático del peso unitario
16
- Autodesconexión automática
17
- Iluminación del display
17
- Acumulación
17
- Salida RS-232
18
- Velocidad del convertidor analógico digital (A/D)
18
- Condiciones del cero del display
19
Calibración standard
19

4
- Calibración de peso
19
- Calibración del cero
19
- Calibración del span
20
Garantía
20
Declaración CE de Conformidad
29
SOMMAIRE
Caractéristiques
21
Alimentation
21
Avant d´utilisation
21
Consommation
21
Conexión de la cellule de charge a l´indicateur
22
Description de l´écran
22
Fonctions de base
23
Configuration des fonctions standard
24
- Valeur interne / Voltage de la batterie
24
- Moyenne automatique du poids unitaire
25
- Déconnexion automatique
25
- Éclairage de l´écran
25
- Accumulation
26
- Sortie RS-232
26
- Vitesse du convertisseur analogique digital (A/D)
26
- Remise à zéro de l´écran
27
Calibrage standard
27
- Calibrage de poids
27
- Calibrage du zéro
28
- Calibrage du span
28
Garantie
28
Declaration CE de Conformité
29

5
SPECIFICATIONS
Accuracy: Class III
Loadcell sensitivity range: 1.5
~
3.0mV/V
Nonlinear: ≤0.01%F.S
System working voltage: DC:5V
Division value: 1/2/5 auto setting
Large LCD display connector: Sampling serial output way
Sample rate: 20 times per second (can select)
Internal resolution: 300000
~
600000
POWER
Input: 120
~
240V
Output: 12
V/
1A
Rechargeable battery: 6
V/
4AH
BEFORE USING
1) Place this product on a firm and smooth place, don´t place it in vibration or
shaking, use bench for use on four only adjust foot, adjust the balance using the
bubble level.
2) Use independent source, avoid other electrical disturbance.
3) Don´t put any object on the platter when turn on the balance.
4) Please, turn on 2-3 minutes before using.
5) Avoid temperature change too large and air flow strenuous sites.
6) Don´t overload the balance, don´t exceed the maximal capacity.
SYSTEM POWER CONSUMPTION
Main system power consumption: about 25mA
Main system power consumption (with backlight): about 44mA
Main system power consumption (with backlight and RS-232): about 52mA
Battery life: about 160 hours (backlight off)
about 90 hours (backlight on)
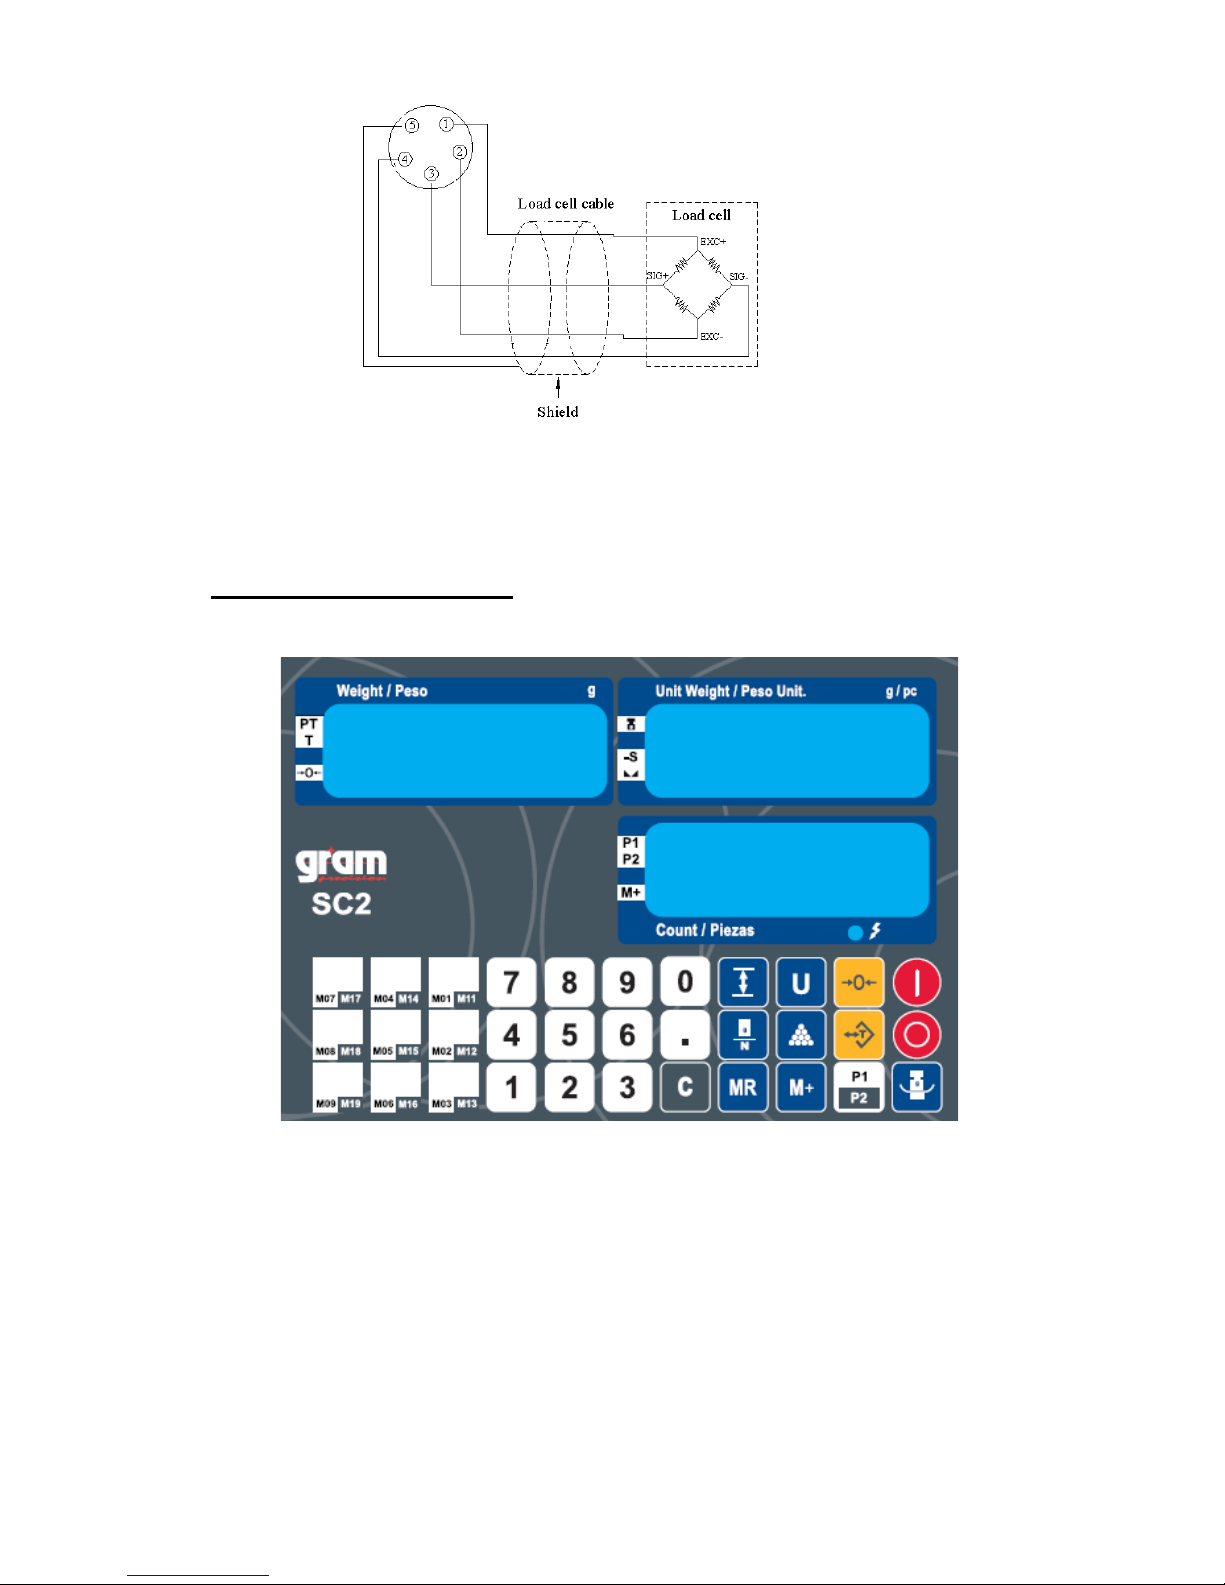
CONNECT THE LOADCELL TO THE INDICATOR
1) The loadcell connector is 5 pins.
2) When the indicator in power, it is forbidden that take off the loadcell plug, if take
off the plug, the indicator maybe be damaged.
3) It is forbidden that weld the indicator, when there is thunder storm, please make
solution for avoiding the thunder, in this way, it can protect the safe of scales and
stuff.
6
PIN 1:E+ (EXC+) PIN 2:E- (EXC-) PIN 3:S+ (SIG+)
PIN 4:S- (SIG-) PIN 5:Ground
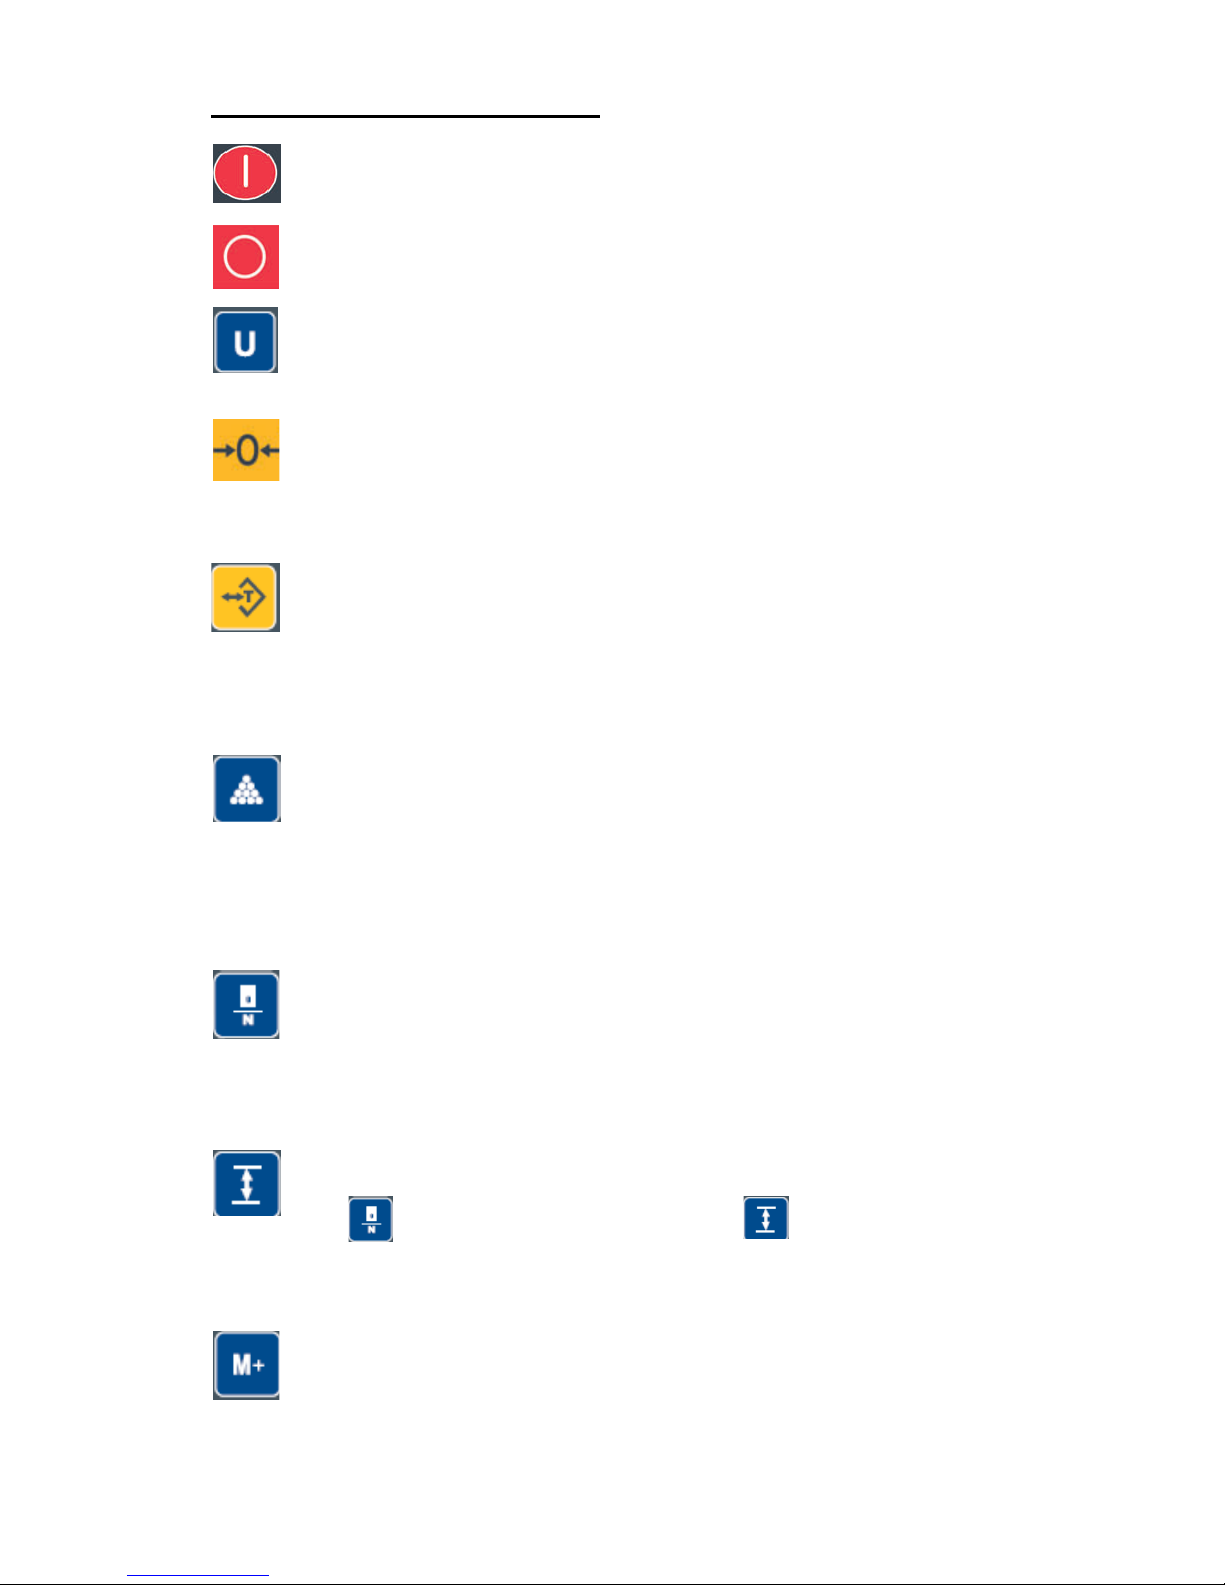
DISPLAY DESCRIPTION
7
BASIC FUNCTION OPERATION
Press and hold this key for 2 seconds to turn off the balance.
Press this key to turn on the balance
To select the desired weight unit.
To reset the weight to zero “0”, but the display value has to be lesser
than
±
2% of maximum capacity.
Function 1. To subtract the container´s weight. Maximum tare: full capacity
Function 2. To preset a tare value. Press this key with empty pan and use
the numerical keys to introduce the desired preset tare weight value, press
again this key to confirm.
To clear the preset tare value, press this key when do not place any object
onto the pan.
To setup the unit weight.
Place the object onto the pan, use 0 – 9 keys and decimal (.) key to input
the piece weight value, then press this key to confirm. The weight window
will show the total weight, the piece weight window will show the piece
weight and the total count window will display the total of pieces.
To setup the sample quantity.
Use 0 – 9 keys to introduce the desired sample quantity, then press this
key to confirm. Weight window will show the weight, piece window will
show the unit weight and the total count window the total of pieces.
To fix a quantity high limit.
Example: Put on the pan the quantity sample, for example 100 units, press
the to confirm and then press the key to fix the limit. Remove
the items from the platter, from now, the balance will beep when the
quantity of pieces placed on the platter arrives to 100pcs.
To accumulate weights and total count, the max accumulation count can
accumulated 99 times
Accumulation function can auto setup, see UF-5 function specification.
8
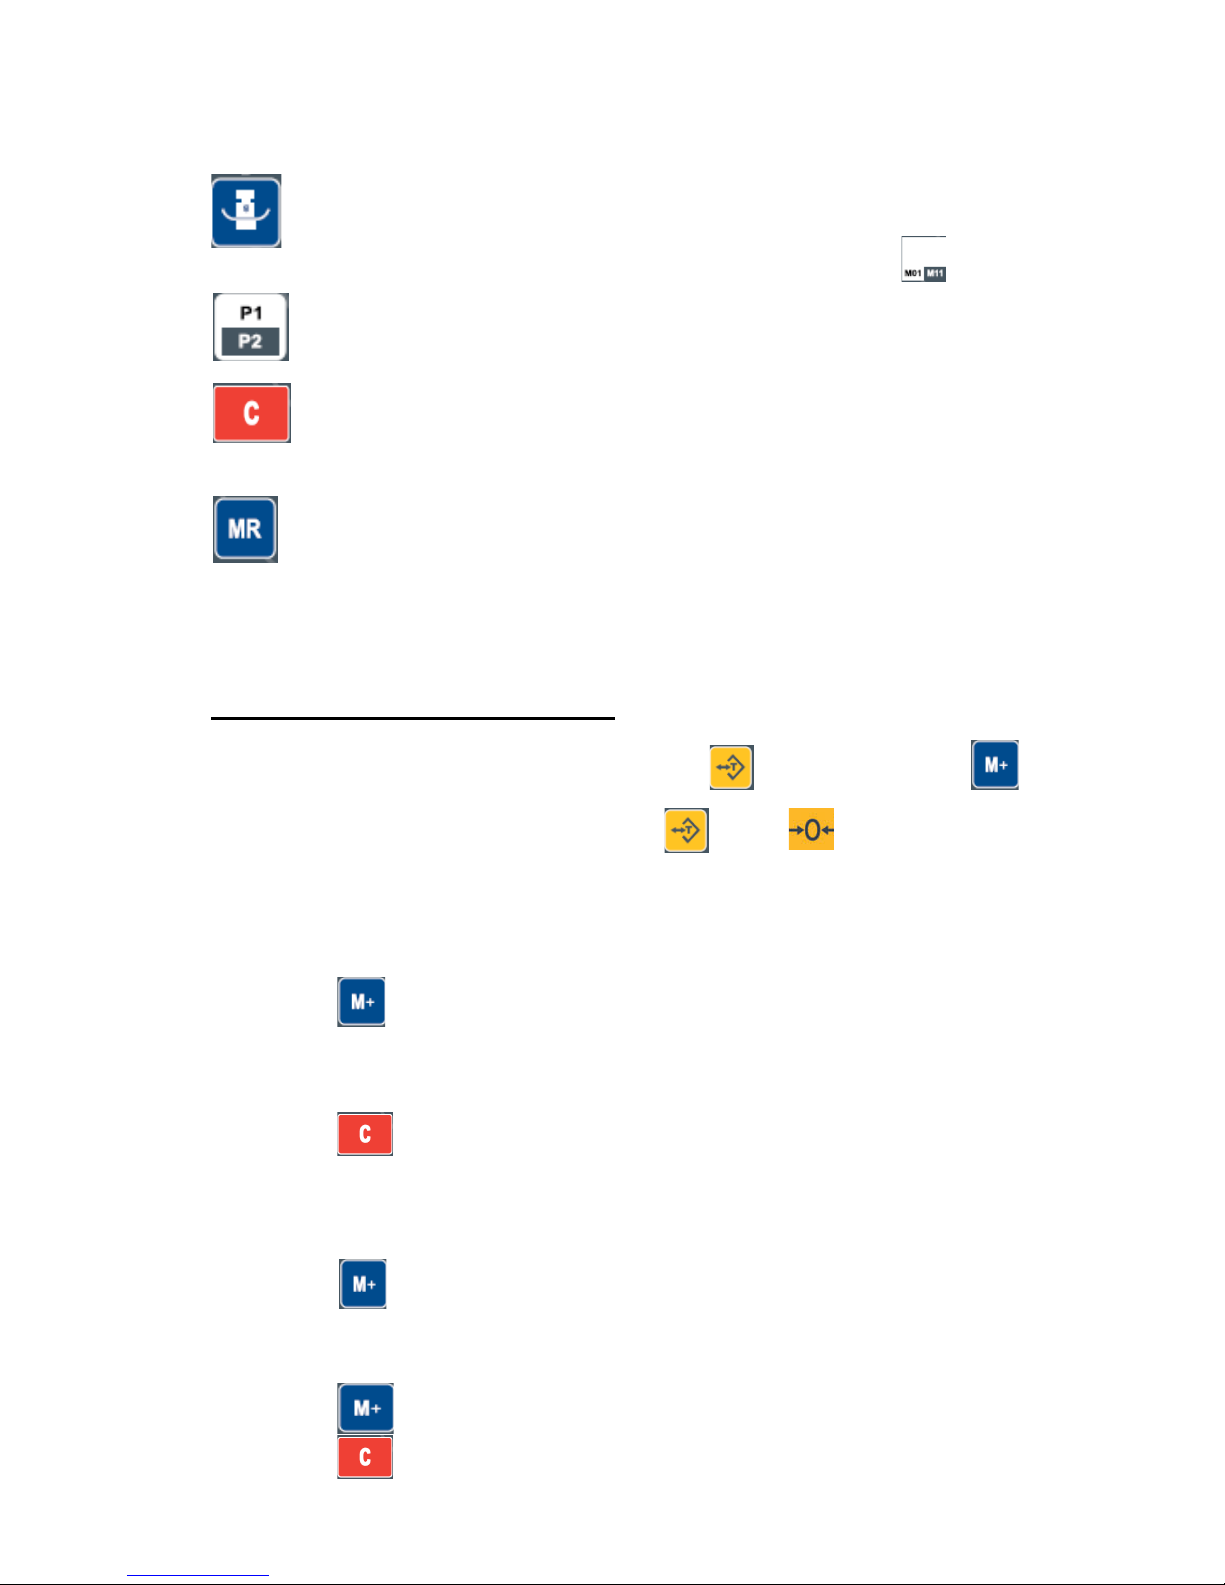
Piece weight memory key.
Input piece weight using the 0 – 9 keys, then press this key to memorize
and press the keep where you want to save it, for exemple:
Press this key to select the PLU (M01 – M09) and press again to select the
PLU (M11 – M18)
Press this key to clear the piece weight window.
Press this key to display the total accumulation count, total accumulated
weight and total count.
To clear accumulation data, press and hold this key until buzzer beeps
twice.
STANDARD FUNCTIONS SETUP
To access to functions setting, press and hold the key, then press the
The weight window will show UF-1, press the key or key to select the
desired parameter (UF-1 to UF-8)
UF-1 Internal value / battery voltage
1. Press the key to enter.
2. Weight window will show the internal value (SPAN), piece weight window will show
the actual battery voltage and the total count window will display the the internal
value (ZERO).
2. Press the key to exit.
UF-2 Piece weight auto-average
1. Press the key to enter.
2. The display will show the message A A U G 1 (factory default).
3. Use 0 and 1 keys to enable or disable the auto-average function.
4. Press the key to confirm.
5. Press the key to exit.

9
AAUG 0 : Disable
AAUG 1: Enable
UF-3 Auto-power off
1. Press the key to enter.
2. Use the 0 – 9 keys to enter the auto power-off time.
3. Press the key to confirm.
4. Press the key to exit.
Factory default: 00
UF-4 Backlight setting
Modes:
- Lit 0: Automatic
- Lit 1: Backlight on
- Lit 2: Backlight off
1. Use 0 – 2 keys to select backlight mode.
2. Press the to confirm.
3. Press the to exit.
Factory default: Lit 0 – Automatic
UF-5 Accumulation
Modes:
ACCU 0 0
A B
A: 0---Stable required 1----Stable not required
B: 0---The weight has to return to zero to accept next accumulation
1---The weight does not have to return to zero to accept next accumulation
2—No tare weight to accept next accumulation
1. Use 0 – 2 keys to select the accumulation conditions.
2. Press the to confirm.
3. Press the to exit.
10
Factory default: ACCU 0 0
UF-6 RS-232 output
1. Use the 0 – 4 keys to enter RS-232 output formats.
2. Press the key to confirm:
232 0 0
A B
A: Baud rate setup
0: 1200 1: 2400 2: 4800 3: 9600 4: 19200
B: Output mode setup
0: RS-232 output disable 1: Manual output (formats 2)
UF-7 A/D update rate
1. Use the 0 -2 keys to enter ADC speed.
2. Press the key to confirm:
Speed 0: low speed
Speed 1: standard speed
Speed 2: Hight speed
3. Press the key to confirm.
4. Press the to exit.
Factory default: 0
UF-8 Display condition at zero
1. Use the 0 – 5 keys to enter.
2. Press the to confirm
ZP 1: 1 division not to display at zero
ZP 2: 2 division not to display at zero
ZP 3: 3 division not to display at zero
ZP 4: 4 division not to display at zero
Table of contents
Languages:
Other Gram Precision Accessories manuals


