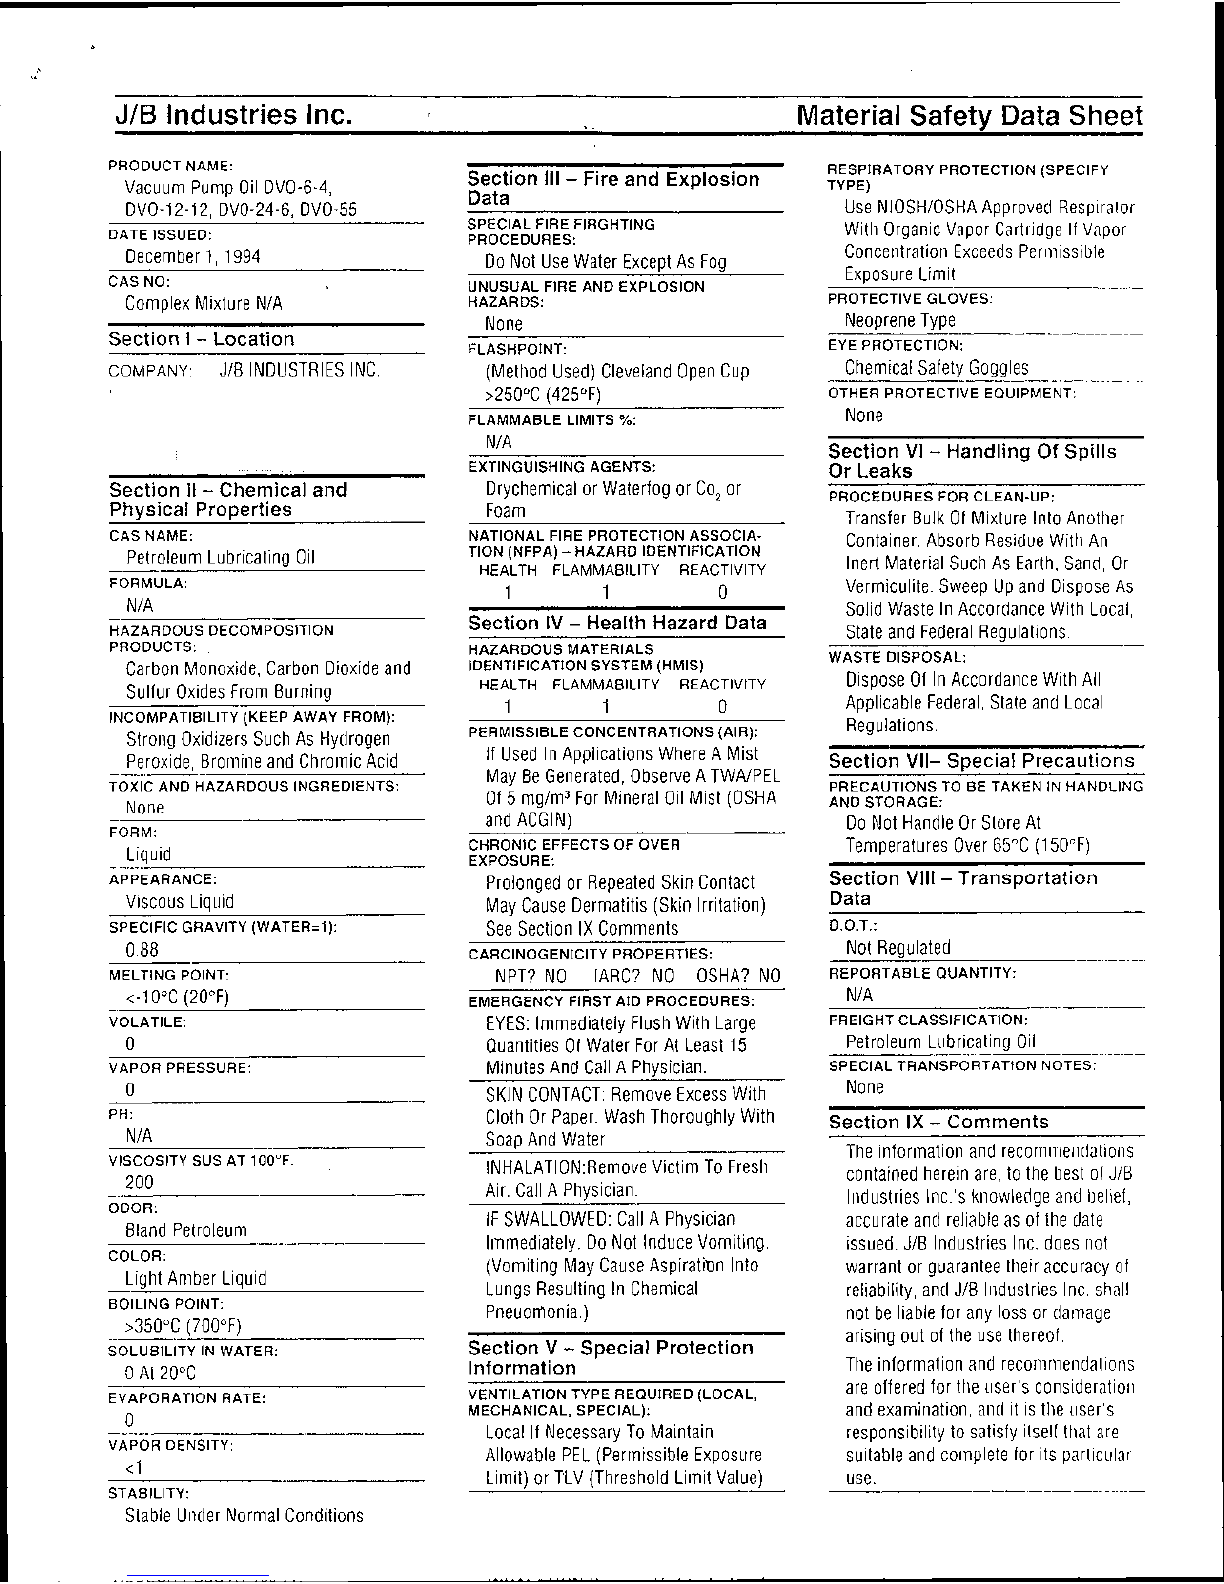
Grams Medical Aspirator S-300 Installation and operation manual

Grams
Medical
Operatinu
&
Maintenance Instructions
For Grams Aspirator
S-300
Turnina The Aspirator On
The center position of the switch on the electrical panel is OFF. Placing switch in the UP position
bypasses the foot pedal and turns the aspirator on manually. To use the Pneumatic foot pedal, place the
switch in the DOWN position. The foot pedal is a "Push On
-
Push Off" operation.
*
For best results using the foot pedal, press quickly and firmly.
*
The pilot light is illuminated when the aspirator is on.
"
In the event of electrical overload there is a circuit breaker on the electrical panel that
can be manually reset.
SP-320 Pump Module
The pump module is of a two stage rotary, oil type construction. This
type was chosen due to it'sdurability, low noise factor and it's
capability of producing vapor pressure vacuum. During high vacuum
procedures vaporization of moisture will occur. This vapor will pass
through the system (includingthe intake filter) and is collected by the oil.
*
You must service module every TEN HOURS OF OPERATION to
remove this moisture.
Level
Service Pump Module
*
Hint: Module should becool and allowed to stand 24 hours or
more after last use. The water and oil will separate and water will
collect on the bottom of the pump.
1.
Removing pump from chassis: Unplug from electrical panel,
1-JI
oil
+
remove the two hoses, and lift straight up
Drain
(the pump sits on springs and is not fastened).
2.
Place pump on drain counter with oil drain facing sink. Place container under pump to capture the
011
3.
Open
011
drain (removecap or open valve depending on model) water will come out f~rst,then the
011,
let out about 2oz.(20cc)ofoil, or until it looks reasonably clean. Close drain (or cap).
*
You should make a total oil change every 50 hours of use, or when the oil does not
look reasonably clean.
4.
Add new oil to level indicated in window.
USE "VACUUM PUMP OIL" ONLY.
DO
NOT USEAUTOMOTIVE OIL (because the oil and water will not separate).
5.
It is important and beneficialthat additional oil be added to the pump. Place the switch on the motor
in the off position, using an extension cord plug the pump in to a wall electrical outlet. Turn pump on
and squirt about 1/2oz.(4to6cc)of oil directly into "INTAKE", turn off pump. Unplug the pump and
turn the switch back on.
6.
Install pump back into aspirator chassis

Replacina Filters
Changing the EXHAUST filter shouldbedone
about every
10
hours of operation, or when the
exhaust filter is saturated with oil about
2"
up
from the bottom. To removethe filter housing:
Remove hose(s) and lift filter
housing-straightout of the bracket.
The top section of the housing threads onto the
bottom section of the housing, simply unscrew the
top from the bottom, removethe filter, clean the
inside of the housing, and replace with a new filter.
*
NOTE-Makesure the "0-Ring" in the lid of the
housing isin its grove. Lubricate the 0-Ringwith
EXHAUST
FILTER
HOUSING INTAKE
FILTER
HOUSING
vaseline. HAND TIGHTEN ONLY.
*
The INTAKEfilter should be replaced about once a year. You must
change the filter inthe event of an overflow, or
if
there has been contamination.
*Also available is a see through, clear exhaust filter housing (PIN: EFH-S5CL) to replacethe
old style bluefilter housing,this allows for a quick visual check of the filter to see if it needs replacing.
Check Valve
The function of the check valve is to prevent back flow
from the pump into the intake filter. Should your unit not'have
a Check Valveinstalled, simply cut the tubing 1 112 to two
inches from the module intake fitting and insert
!la
check valve. See diagram (Note direction of arrow).
Additional Notes
*
It is normal for a pump to have a sluggish start, after a period of
non use of a week or more.
*
It isalways good practice to start the aspirator
prior to surgery.
*
The best assurance is to have a spare pump avail-
able.
The stand by pump should always be stored with
(DO
NOT
DISCARD)
fresh oil.
*
When installing pump, make sure the switch on
the motor is in the "ON" position. Use this switch
when servicing the pump outside the chassis with
an extension cord.
*You can trace a leak by removing the gauge from
the small bottle and plugging it directly into the
hose from the pump, and tracing it back one
component at a time.
Installation of
O~tional
Gauae Extension Kit
PIN:
GXK-322-3
Remove vacuum gauge from green lid, place it
inthe hole on top of the canister bracket.
Insert stainless steel tube (3/8"x2 112") into green
lid, attach silicone hose (31811x13
112")
to bottom of gauge.
J

S-300
Assembly Instructions
Unpacking
Unpack all three boxes. Remove everythingout of its
wrapping and packing. Discard packing, except the pump
box (box "20f3") its foam and two little redvinyl caps from the
pump. You might needthis later to send.the pump infor
service.
Vacuum Pump Preparation
*Remove the two red vinyl caps that cover the intake and
Oil Level
exhaust hoseconnections.
Set the pump on a table top or a counter. Add vacuum pump
oil to the level indicated inthe window in the front of the pump
Proper
Oil
(about 314 of the bottle) See fig.
1.
Level
*Openaspiratorchassis, notethe three springs inside.There
are three rubber feet on the bottom of the pumpthat set right
on the springs, no tools required! The front of the pump faces
the opening of the chassis.
*Plug the pump into the top electrical outlet (insidethe chassis)
@
and the fan intothe bottom electrical outlet.
*NOTE: Make sure the switch on the motor is inthe "on'position
Front
View
of Pump
Installation of Filters
The intake filter housing has
TWO
hoseconnections. Placethis filter housing into the holder closest
to the fan, so the hoses arefacing the pump. See fig. 2, The short hose connectsto the "INTAKE"
side of the pump (note sticker on pump). Feedthe long hose out the hole inthe top of the chassis.
*The exhaust filter housing has
ONE
hoseconnection. This very short hoseconnectsto the
"EXHAUST"side of the pump (note sticker on pump). See fig. 2.
Close the chassisyour all donewith the inside.
Fia. 2
EXHAUST FILTER HOUSING INTAKE
FILTER
HOUSING

Installation of Canister Bracket
&
Vacuum Jar
Placethe canister bracket inthe large holder on top of the chassis, so the loop faces the end
of the chassiswith the electricalpanel,then snap the clasps into place.
*Place green lid on top of small bottle, set the jar in the small holder, so that the two stainless
steel hoseconnectionsface towards the canister bracket. Usethe 'small'strap to fasten the
jar to the chassis.
*Connectthe vacuum hose sticking out of the lid
(fromthe inside) to the bleeder valve (ablack plastic
hoseconnectionthat is attachedto the small
bottle).
*Insert vacuum gauge into green lid.
*Place 318"~12"silicon hose onto the red plastic
hosetee on the outer canister. Set the outer
canister in the loop so the hosefaces the
bracket,then thread the hosethrough the slot
inthe bracketand attach to strait stainless
steel fitting in smalljar. For complete
instructionson the disposable lids
&
liners
(CL-340)see separate instructionsinthe lids
&
liners box.
Installationof Foot Pedal
Push hose (fromfoot pedal) onto tube on
the electrical panel marked
"pneumaticfoot pedal".
(if it does not fit snugly trim about 1"off the
hose) That's it your done!
Installationof
Optional
Gauae Extension Kit
PIN:
GXK-322-3
Removevacuum gauge from green lid, place it
in the hole on top of the canister bracket.
Insertstainless steel tube (318x2 112") with
silicone hose attached into green lid, attach
silicone hose (3/8"x13 112") to bottom of
gauge.
P/easedon
Y
hesitate toca//thefactoyforpersona//hsfruction
Grams
Medical
-
-
-
-
-
-
-
-
-
design and production of medical instrumentation

JIB
lndustries Inc. Material Safetv Data Sheet
PRODUCT NAME:
Vacuum Pump Oil DVO-6-4,
Section
111
-
Fire
and
Explosion
Data
RESPIRATORY PROTECTION (SPECIFY
TYPE)
Use NIOSHIOSHA Approved Resp~rator
With Organic Vapor Cartridge If Vapor
Conceritratioli Exceeds Perlilissible
Ex~osureLirnit
DVO-12-12, DVO-24-6, DVO-55
DATE ISSUED: SPECIAL FlRE FlRGHTlNG
PROCEDURES:
December 1, I994
CAS NO:
Do Not Use Water Exceot As Foa
UNUSUAL FlRE AND EXPLOSION
HAZARDS:
None
Complex Mixture NIA
PROTECTIVE GLOVES:
Neo~reneTVD~
Section
I
-
Location
COMPANY.
JIB INDUSTRIES INC.
EYE PROTECTION:
Chemical Safety Goggles
FLASHPOINT:
(Method Used) Cleveland Open Cup
>250°C (425°F)
OTHER PROTECTIVE EQUfPMENT:
None
Section
VI
-
Handling
Of
Spills
Or
Leaks
FLAMMABLE LIMITS
%:
NIA
-
--
Section
II
-
Chemical
and
Phvsical Pro~erties
EXTINGUISHING AGENTS:
Drychemical or Waterfog or Co, or
Foam
PROCEDURES FOR CLEAN-UP:
Transfer Bulk Of Mixture lnto Anotlie~
CAS NAME:
Petroleum Lubricating Oil
FORMULA:
N/A
NATIONAL FlRE PROTECTION ASSOCIA-
TION (NFPA)
-
HAZARD IDENTIFICATION
Container. Absorb Residue With Ari
HEALTH FLAMMABILITY REACTIVITY
Inert Material Such AS Earth, Sand, Or
1
1
0
Vermiculite. Sweep Up and Dispose As
Solid Waste In Accordance With Local,
Section
IV
-
Health
Hazard
Data
State and Federal Reaulatioiis.
HAZARDOUS DECOMPOSITION
PRODUCTS:
Carbon Monoxide, Carbon Dioxide and
Sulfur Oxides From Burning
INCOMPATIBILITY (KEEP AWAY FROM):
Strong Oxidizers Such As Hydrogen
Peroxide, Bromine and Chromic Acid
HAZARDOUS MATERIALS
IDENTIFICATION SYSTEM (HMIS) WASTE DISPOSAL:
HEALTH
FLAMMABILITY
REACTIVITY
Dispose Of In Accordalice Witti All
1
1
0 Applicable Federal, State and Local
PERMISSIBLE
CONCENTRATIONS
(AIR):
Regulations.
If Used In Applications Where
A
Miit
Section
VII-
Special
Precautions
May
Be
Observe
A
TWAIPEL
PRECAUTIONSTO BETAKEN
IN
HANDLING
Of
5
mg/m3For Mineral Oil Mist (OSHA
AND
STORAGE:
TOXIC AND HAZARDOUS INGREDIENTS:
None
and ACGIN)
--
CHRONIC EFFECTS OF OVER
EXPOSURE:
Prolonged or Repeated Skin Contact
May Cause Dermatitis (Skin Irritation)
See Section IX Comments
CARCINOGENICITY PROPERTIES:
NPT? NO IARC? NO OSHA? NO
--
EMERGENCY FIRST AID PROCEDURES:
EYES: Immediately Flush With Large
Quantities Of Water For At Least 15
Minutes And Call A Physician.
SKIN CONTACT: Remove Excess With
Cloth Or Paper. Wash Thoroughly With
Soap And Water
INHALATI0N:Remove Victim To Fresh
Air. Call A Physician.
IF SWALLOWED: Call A Physician
Immediately.
Do Not Induce Vomiting.
(Vomiting May Cause AspiratiDn lnto
Lungs Resulting In Chemical
Pneuomonia.)
Do Not Handle Or Store At
Teniperatures Over 65°C (I50°F)
Section
Vlll
-
Transportation
Data
FORM:
Liouid
APPEARANCE:
Viscous Liq~rid
SPECIFIC GRAVITY (WATER=l): D.O.T.:
Not Regulatecl
-
----
REPORTABLE QUANTITY:
NIA
MELTING POINT:
-
<-I0°C (20°F)
VOLATILE: FREIGHT CLASSIFICATION:
Petroleum Lubricatinu Oil
0
VAPOR PRESSURE:
n
SPECIAL TRANSPORTATION NOTES:
None
Section
IX
-
Comments
PH:
N/A The information and recom~iierirlat~o~ls
contained herein are, to the best of JIB
llidustries Iric.'sknowledge and belief,
accurate ancl reliable as of the date
issued.JIB Industries Inc. does not
warrant or guarantee their accuracy of
reliability, and JIB Industries Inc,sliall
not be liable for ariy loss or ria~nage
VISCOSITY SUS AT 100°F.
200
ODOR:
Bland Petroleurn
COLOR:
Light Aniber Liquid
BOILING POINT:
>350°C (700°F) arising out of the use thereof.
Section
V
-
Special
Protection
Information
The inforniation and recornmendations
SOLUBILITY IN WATER:
0
At 20°C
VENTILATION TYPE REQUIRED (LOCAL,
are offered for the user's consideratioil
MECHANICAL,
SPECIAL):
and examination, and it is tile user's
EVAPORATION RATE:
0
--
VAPOR DENSITY:
<1
Local If Necessary To Maintain responsibility to satisfy itself that are
Allowable PEL (Permissible Exposure suitable and complete for its particirlar
Limit) or T'LV (Threshold Litnit Value) use.
-
-
.-
-
-
--
STABILITY:
Stable Urider Normal Coriditioris
Table of contents
Popular Medical Equipment manuals by other brands

Getinge
Getinge Arjohuntleigh Nimbus 3 Professional Instructions for use

Mettler Electronics
Mettler Electronics Sonicator 730 Maintenance manual

Pressalit Care
Pressalit Care R1100 Mounting instruction

Denas MS
Denas MS DENAS-T operating manual

bort medical
bort medical ActiveColor quick guide

AccuVein
AccuVein AV400 user manual