manuals.online logo
Brands
  1. Home
  2. •
  3. Brands
  4. •
  5. Grange Fencing
  6. •
  7. Outdoor Furnishing
  8. •
  9. Grange Fencing COLONNADE PERGOLA User manual

Grange Fencing COLONNADE PERGOLA User manual

COLONNADE
PERGOLA
ASSEMBLY INSTRUCTIONS
GRANGE FENCING LIMITED
Halesfield 21, Telford TF7 4PA
Tel: 01952 588088 Fax: 01952 581522
Email: [email protected] Web: www.grangefen.co.uk
1.8m
TOP
ELEVATION
SIDE
ELEVATION
FRONT
ELEVATION
4.8m
PLAN
3m
All Grange Pergola Projects are made of planed, pressure treated and FSC certified timber and as such is
guaranteed against rot for a minimum of 15 years. However, it must be remembered that as a natural
product, timber is subject to movement and weathering as it seasons. It is not uncommon for small splits to
occur when drying and warping when timber is allowed to dry too rapidly. These will normally go back
when humidity rises. It is nature at work and not considered a fault.
Its colour will also change with time. A retreatment, as required with a proprietary wood treatment is recommended.
CARE OF YOUR COLONNADE PERGOLA
ISSUE2 - JAN.’09
STEP 7
Fix the Rafters (3) to the assembled
sections starting with the ones at
the top of the posts.
STEP 8
Fix the two intermediate ones
equally between the posts.
STEP 9
Ensure the structure is level
and upright and fix the posts
into position using the selected
method.
1
3
2
ALL PRODUCTS ARE
MEASURED TO THE
HIGHEST AND WIDEST
POINT AND ALL SIZES
ARE APPROXIMATE.
By buying products with the
FSC label you are supporting
the growth of responsible
forest management worldwide
CERT No. SGS-COC-000100
© 1996 Forest Stewardship Council A.C.
Thank you for choosing this garden structure from Grange Fencing Ltd. In order to gain
the most benefit from it please read the following instructions carefully.
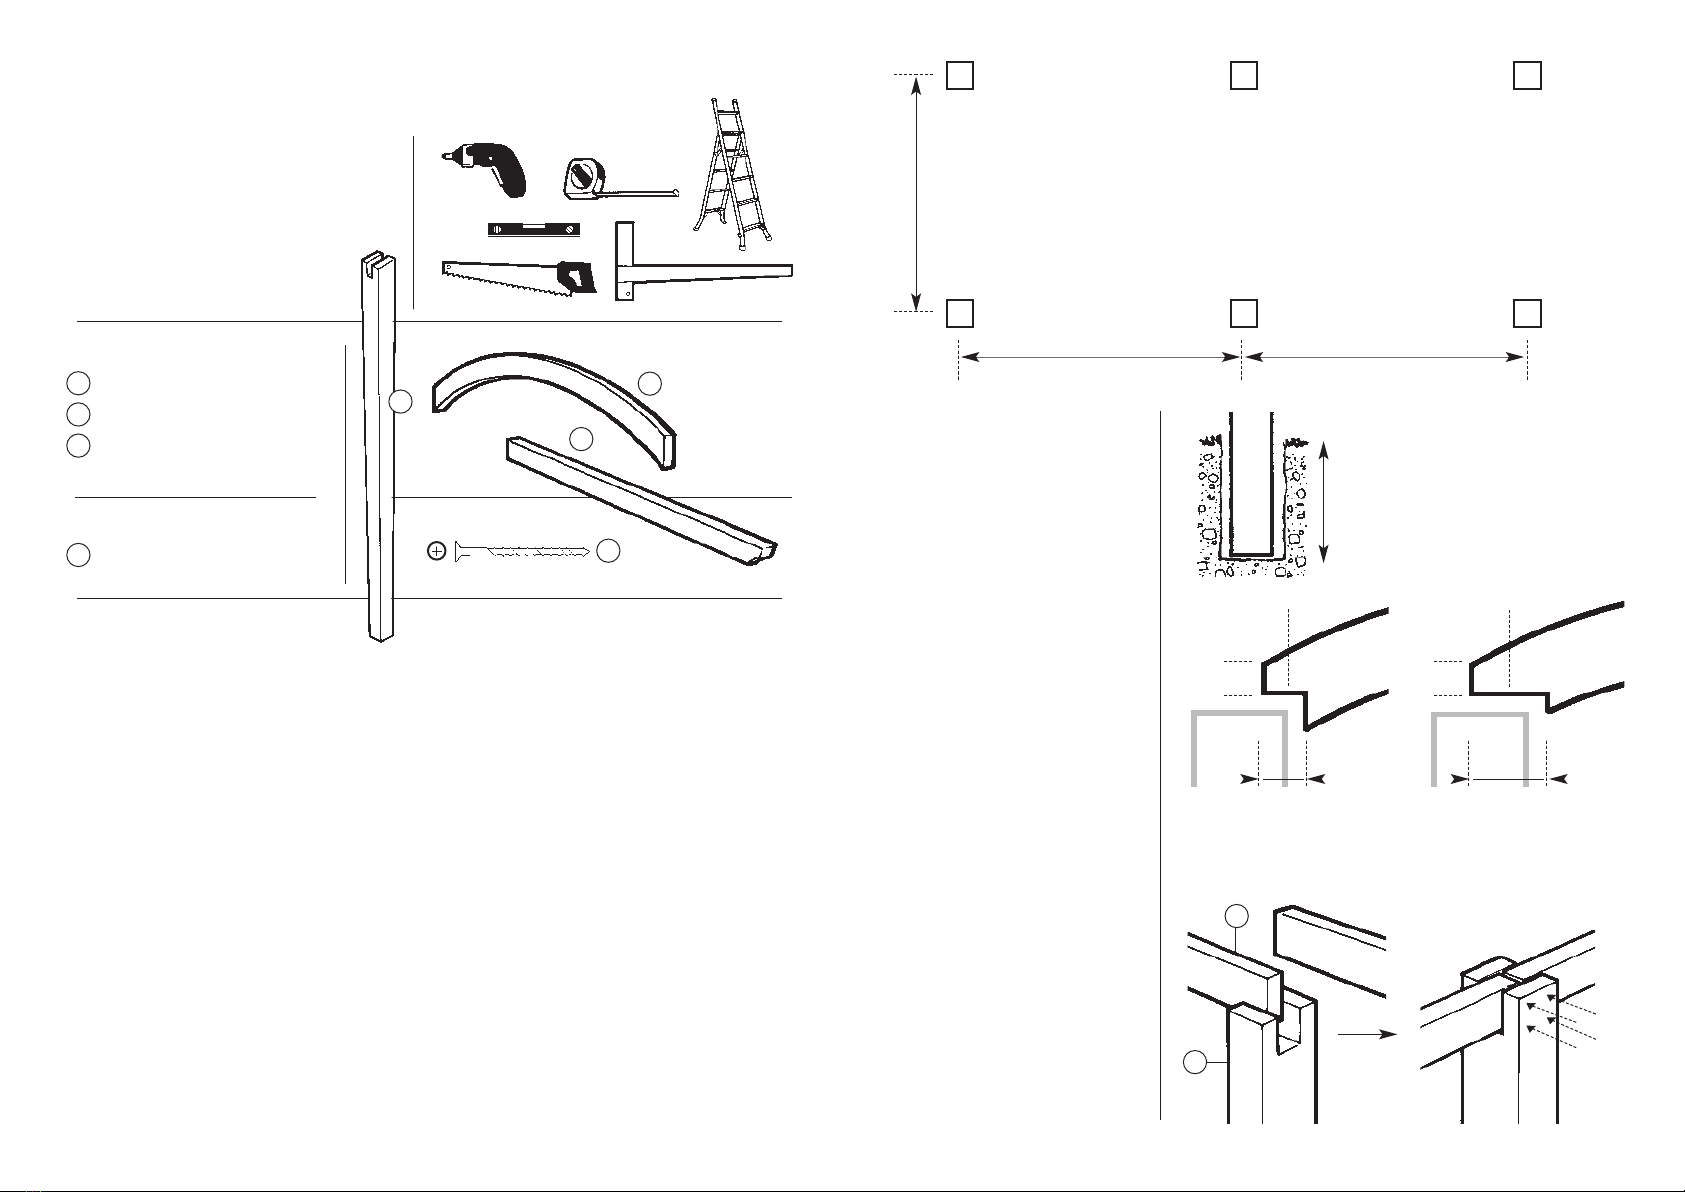
TOOLS REQUIRED (Not Supplied)
POWER DRILL (+ crosshead screwdriver bit)
5mm DRILL BIT
SPIRIT LEVEL
TAPE MEASURE
STEPLADDER
SAW
SQUARE
PARTS LIST
TIMBER POSTS 6
RAFTERS 4
CURVED BEAMS 5
HARDWARE PACK
SCREW (No.10 x 3”) 28
ASSEMBLY INSTRUCTIONS
STEP 1
Using the layout shown (above)
mark out the area where the
structure is to be sited.
STEP 2
Prepare the holes where the
posts will be positioned to a
depth of 300mm.
Allow adequate room for the
preferred method of fixing
(ie. Postcrete).
STEP 3
The Curved Beams (3) require
birdmouth joints to be cut in
them for fitting. Two will need
to be cut (as Fig.1) and three
cut (as Fig.2) at both ends of
the Curved Beams.
STEP 4
Pre-drill clearance holes in the
Curved Beams for fixing screws.
STEP 5
Site three of the Posts for one
side and locate two Rafters (2)
in the slots to join at the centre
post. Fix the Rafters at the
centre post using screws (x).
STEP 6
Repeat for the other side of
the Colonnade.
BEFORE YOU START
•Please ensure that you check all the component parts for quantity and quality before
you commence building the product. Report any missing parts immediately. The
manufacturer will not accept any responsibility for damaged items once any part of the
product has been fitted or altered in any way.
•Timber is a natural material and will react to varying levels of moisture content - ie. will
swell or shrink. All of the Timber components are pressure treated green. However,
should extra protection be required, they should be treated using a wood preservative
treatment, following the manufacturers instructions.
HEALTH AND SAFETY
Do not lean or stand on the roof assembly at any time -
the structure is not of a load bearing design.
Do not overstretch when working from the step ladder.
In order to reduce the risk of suffocation please keep all plastic bags and small parts away
from children.
•When you are ready to start, make sure you have the right tools to hand, plenty of space
and a clean, dry area for assembly. It is advisable for two people to carry out the work.
1
2
3
xx
COLONNADE
PLAN
1750mm
1925mm 1925mm
AB C
DE F
showing
measurement
between the
centres
of the posts
1
2
Note: should you need to site your pergola
on a deck or patio then you will need to use
Bolt Down Anchors (PACK B).
Where the ground is too hard or too near to
tree roots then you will need to use a
Pergola Spike (PACK C).
Note: the two Curved Beams
cut as Fig.1 should be used
at either end of the Pergola.
Note: the three Curved Beams
cut as Fig.2 should be used
between the end Beams.
pre-drill clearance
holes in curved beams
300mm
25mm
3
Fig.1 Fig.2
25mm
45mm 70mm
1
2
x
x
x
x

Other Grange Fencing Outdoor Furnishing manuals

Grange Fencing REGIS User manual

Grange Fencing

Grange Fencing REGIS User manual

Grange Fencing Elite Arch User manual

Grange Fencing

Grange Fencing Elite Arch User manual

Popular Outdoor Furnishing manuals by other brands

Courtyard Creations TMS24BJ-WM Assembly instructions

Courtyard Creations

Courtyard Creations TMS24BJ-WM Assembly instructions

Sunnydaze Decor MERANTI FRN-511 quick start guide

Sunnydaze Decor

Sunnydaze Decor MERANTI FRN-511 quick start guide

Green Furniture Concept nova c series manual

Green Furniture Concept

Green Furniture Concept nova c series manual

Nuu Garden SCD001-01 instruction manual

Nuu Garden

Nuu Garden SCD001-01 instruction manual

World Market Samar 608712 Assembly instructions

World Market

World Market Samar 608712 Assembly instructions

Flexispot FlexiHome EB012Q installation guide

Flexispot

Flexispot FlexiHome EB012Q installation guide

LIVARNO 407440-2207 Operation and safety notes

LIVARNO

LIVARNO 407440-2207 Operation and safety notes

Kontiki St. Lawrence Wicker Post Gazebo installation instructions

Kontiki

Kontiki St. Lawrence Wicker Post Gazebo installation instructions

Woodline Shade Solutions Papillon Assembly instructions

Woodline

Woodline Shade Solutions Papillon Assembly instructions

IKEA FAGELON manual

IKEA

IKEA FAGELON manual

Patio Festival PF20275 Assembly instructions

Patio Festival

Patio Festival PF20275 Assembly instructions

nest ADIRONDACK CHAIR instructions

nest

nest ADIRONDACK CHAIR instructions

Garden Treasures 4 PC. CONVERSATION SET FZA64018B Assembly instructions

Garden Treasures

Garden Treasures 4 PC. CONVERSATION SET FZA64018B Assembly instructions

CAZEBOO COM-000473 instruction manual

CAZEBOO

CAZEBOO COM-000473 instruction manual

Club Piscine Maestrale Assembly instructions

Club Piscine

Club Piscine Maestrale Assembly instructions

CERLAND Carport Double Victor manual

CERLAND

CERLAND Carport Double Victor manual

Costway OP70823 user manual

Costway

Costway OP70823 user manual

PATIOJOY HW67329 quick start guide

PATIOJOY

PATIOJOY HW67329 quick start guide

manuals.online logo
manuals.online logoBrands
  • About & Mission
  • Contact us
  • Privacy Policy
  • Terms and Conditions

Copyright 2025 Manuals.Online. All Rights Reserved.