Grason-Stadler GSI 70 User manual

Setting The Clinical Standard www.grason-stadler.com
Grason-Stadler, 7625 Golden Triangle Drive, Suite F, Eden Prairie MN 55344
800-700-2282 • 952-278-4402 • fax 952-278-4401 • e-mail [email protected]
GSI 70™
Part Number 1770-0100 Rev A

Title: GSI 70
Automated OAE Screener
User Manual
Date: November 2009
Copyright © 2005
All rights reserved. No part of this publication may be
reproduced or transmitted in any form or by any means without the prior written permission of
The information in this publication is proprietary to
.
Part number:
1770-0100
Printing history: August, 1999 First printing Rev 1.0
January, 2000 Second printing Rev 2.0
February, 2001 Third printing Rev 3.0
February, 2003 Fourth printing Rev 4.0
September, 2003 Fifth printing Rev 5.0
March, 2004 Sixthprinting Rev 6.0 DCO 1770-0303
March, 2005 Seventh printing Rev 7.0 DCO 1770-0302
Electromagnetic compatibility (EMC)
Please refer to the Electromagnetic Compatibility Reference Guide on CD (part number 482-6387xx)
for EMC information concerning your system.
Compatibilité électromagnétique (CEM)
Veuillez vous reporter au guide de référence de compatibilité électromagnétique sur CD
(numéro de pièce 482-6387xx) pour des informations sur la CEM relatives à votre système.
Elektromagnetische Verträglichkeit (EMV)
Informationen über die EMV des Systems finden Sie im Referenz-Handbuch
Elektromagnetische Verträglichkeit auf der CD (Teilenummer 482-6387xx).
Compatibilità elettromagnetica (EMC)
Vedere la guida alla consultazione per la compatibilità elettromagnetica contenuta sul CD (numero di
parte 482-6387xx) per informazioni sulla compatibilità elettromagnetica relativa al sistema in dotazione.
Compatibilidad electromagnética (CEM)
Consulte la Guía de referencia sobre compatibilidad electromágnetica incluida en el CD (número
de pieza 482-6387xx) para obtener la información sobre la CEM de su sistema.

Addenda
Addendum to Chapter 4:
Using the GSI 70 Single-Patient Screener
Two default protocols are available:
OAE 1: GSI Default
OAE 4: 2 OUT OF 3
Selecting a Protocol
1. Turn the GSI 70 Automated OAE Screener on by pressing any button. (The Screener
can be in the Printer/Charger cradle during this procedure.)
2
.
When the DPGram appears on the display, simultaneously press the LEFT (blue)
and RIGHT (pink) buttons to enter the UTILITY MENU.
3
.
Use the down arrow button (blue) to highlight
CHANGE PROTOCOL. The Select Protocol screen
appears.
4
.
Use the down arrow button (blue) or up arrow
button (pink) to highlight either:
OAE 1: GSI Default or
OAE 4: 2 OUT OF 3
Once highlighted, press the SELECT button (green)
to choose the desired protocol.
5. The UTILITY MENU is now displayed. Use the down arrow
b
utton (blue) o
r
up
arrow button (pink) to scroll to and highlight the word EXIT. Press RUN to return to
the DPGram screen.
The label to the right of the Pass/Refer line indicates the protocol being used
once the TEST (green) button is pressed.
S
E
L
E
C
T
P
R
O
TOCOL
4
1: GSI DEFAULT
4
:
2
O
U
T
O
F
3
CANCEL
▼
S
E
L
E
C
T
▲

Addenda
Protocol Scoring Rules
OAE1: GSI Default
■
Scores the test result as PASS when all three responses are at or above the
Pass/Refer line and each response is individually scored as a Pass.
■
Scores the test result as REFER when at least one response is below the Pass/Refer
line and its response is individually scored as a Refer.
■
Scores the test result as NOISE when at least one response is individually scored as
noise.
OAE4: 2 OUT OF 3
■
Scores the test result as PASS when at least 2 out of 3 responses are at or above the
Pass/Refer line and these 2 responses are individually scored as Pass.
■
Scores the test result as REFER when at least 2 out of 3 responses are below the
Pass/Refer line and these 2 responses are individually scored as Refer.
■
Scores the test result as NOISE when at least 2 out of 3 responses are individually
scored as Noise.
■
If one response is PASS, one is REFER, and one is NOISE, the test result is scored
as NOISE.
Selection of protocol OAE 1 versus OAE 4 depends upon the program's
performance objective for hearing screening.
It is possible to save and print one ear with OAE 1 and the other ear with
OAE 4.
GSI 70 User Manual

Addendum to Chapter 5:
Using the GSI 70 Multi-Patient Screener
Two default protocols are available:
OAE 1: GSI Default
OAE 4: 2 OUT OF 3
Selecting a Protocol
1. Turn the GSI 70 Automated OAE Screener on by pressing any button. (The Screener
can be in the Printer/Charger cradle during this procedure.)
2
.
Once the DPGram appears on the display, simultaneously press the NAME (blue)
and DATA (pink) buttons to enter the UTILITY MENU screen.
SELECT PROTOCOL
(OAE)
CANCEL
1: GSI DEFAULT
4: 2 OUT OF 3
: EMPTY
: EMPTY
: EMPTY
E
R
A
S
E
S
E
LE
C
T LOAD
3
.
Use the down arrow button (blue) to select
CHANGE PROTOCOL. The Select Protocol
screen appears.
4
.
Use the stylus to select either the GSI Default
(OAE1) or the 2 OUT OF 3 (OAE4) protocol.
Once highlighted, press SELECT to activate this
protocol and return to the Utility Menu screen.
The first 2 positions on this CHANGE
PROTOCOL screen are now reserved for factory default protocols.
Both
protocol positions cannot be overwritten by a user-defined protocol.
The
three remaining protocol positions may be used to store user-defined
protocols and may be overwritten.
The OAE 4 protocol is loaded into the GSI 70 DMS program when the first
test results for OAE 4 are collected from the Screener.
5. Scroll to the word EXIT by using the down arrow button (blue) or up arrow button
(pink) and press RUN (green button) to return to the DPGram display.
The label to the right of the Pass/Refer line indicates the protocol being used
once the TEST (green) button is pressed.

Addenda
Protocol Scoring Rules
OAE1: GSI Default
■
Scores the test result as PASS when all three responses are at or above the Pass/
Refer line and each response is individually scored as a Pass.
■
Scores the test result as REFER when at least one response is below the Pass/Refer
line and its response is individually scored as a Refer.
■
Scores the test result as NOISE when at least one response is individually scored as
noise.
OAE 4: 2 OUT OF 3
■
Scores the test result as PASS when at least 2 out of 3 responses are at or above the
Pass/Refer line and these 2 responses are individually scored as Pass.
■
Scores the test result as REFER when at least 2 out of 3 responses are below the
Pass/Refer line and these 2 responses are individually scored as Refer.
■
Scores the test result as NOISE when at least 2 out of 3 responses are individually
scored as Noise.
■
If one response is PASS, one is REFER, and one is NOISE, the test result is scored
as NOISE.
Selection of protocol OAE 1 versus OAE 4 depends upon the program's
performance objective for hearing screening.
If the results for the left and right ears are run with both default protocols
(i.e., OAE 1 and OAE 4), the right and left ear results will be paired for printout in
the time sequence that they were acquired.
GSI 70 User Manual

Sample Printouts
OAE 1:
GSI Default
OAE 4: 2 OUT OF 3

Addenda
GSI 70 User Manual

Contents
1
Introduction ...........................................................
1
Product Information.........................................................................
1
About This Manual ..........................................................................
2
Conventions ...............................................................................
2
Product Symbols..............................................................................
3
2
Getting Started ...................................................... 5
Unpacking and Verifying Contents..................................................
5
Precautions.................................................................................
6
Automated OAE Screener Features...........................................
7
Printer/Charger Features ............................................................
8
Setting Up the Automated OAE Screener ...............................
10
Installing the battery ..........................................................
10
Setting the Screener date and time ....................................
10
Attaching the Footswitch to the Screener..........................
10
Mounting the Screener or Printer Charger to the optional
Rolling Stand .....................................................................
10
Checking the Battery ..........................................................11
Adjusting the LCD Contrast ...............................................11
Installing the GSI 70DMS Software into your Computer 12
Connecting the Optional Infrared (IrDA) Adapter to a
Computer
...........................................................................
12
Setting Up the Printer/Charger ................................................
12
Connecting the Printer/Charger to Mains Power...............
13
Connecting the Printer/Charger to a Computer .................
13
Preparing for a Test..................................................................
14
Selecting an Eartip.............................................................
14
Attaching an Eartip to the Probe Tip .................................
15
Securing the Pod and Probe to the Screener......................
16
1

3
Understanding the display................................... 17
Common Displays .........................................................................
17
Power-Up Display....................................................................
17
Version Information ...........................................................
17
Blank DPGram ..................................................................
18
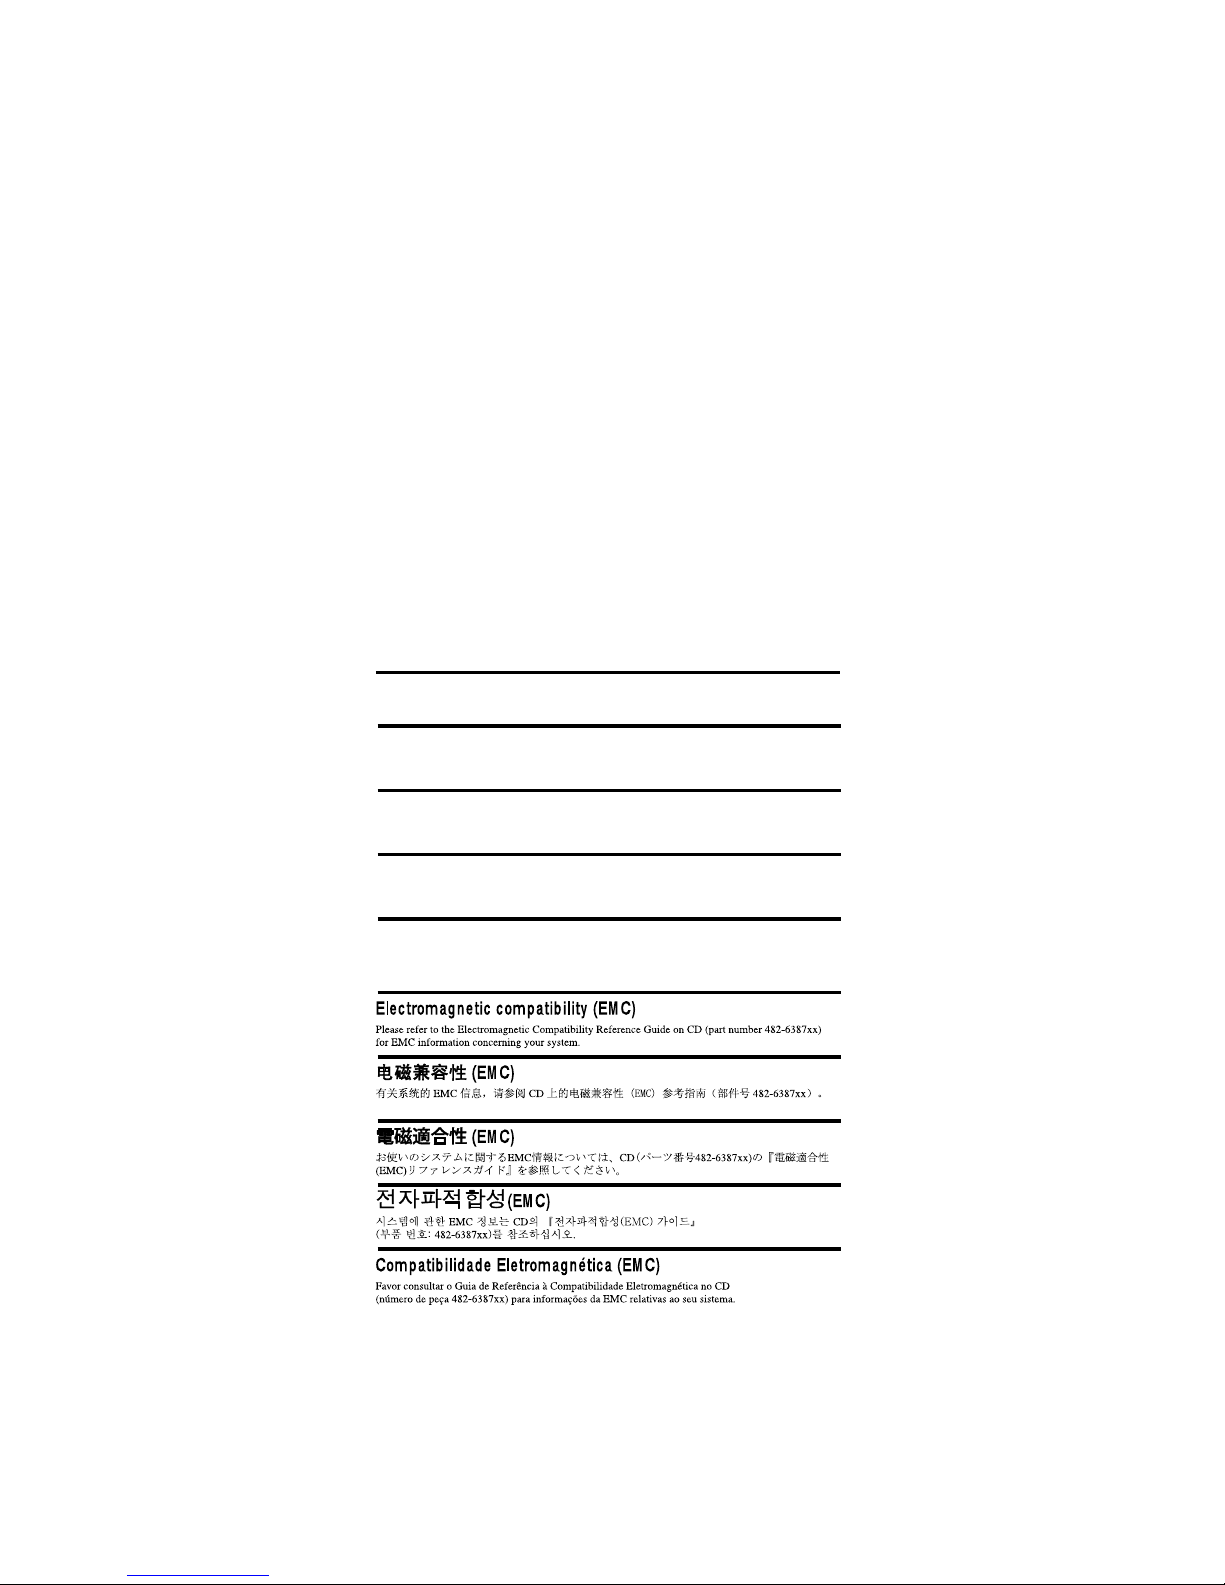
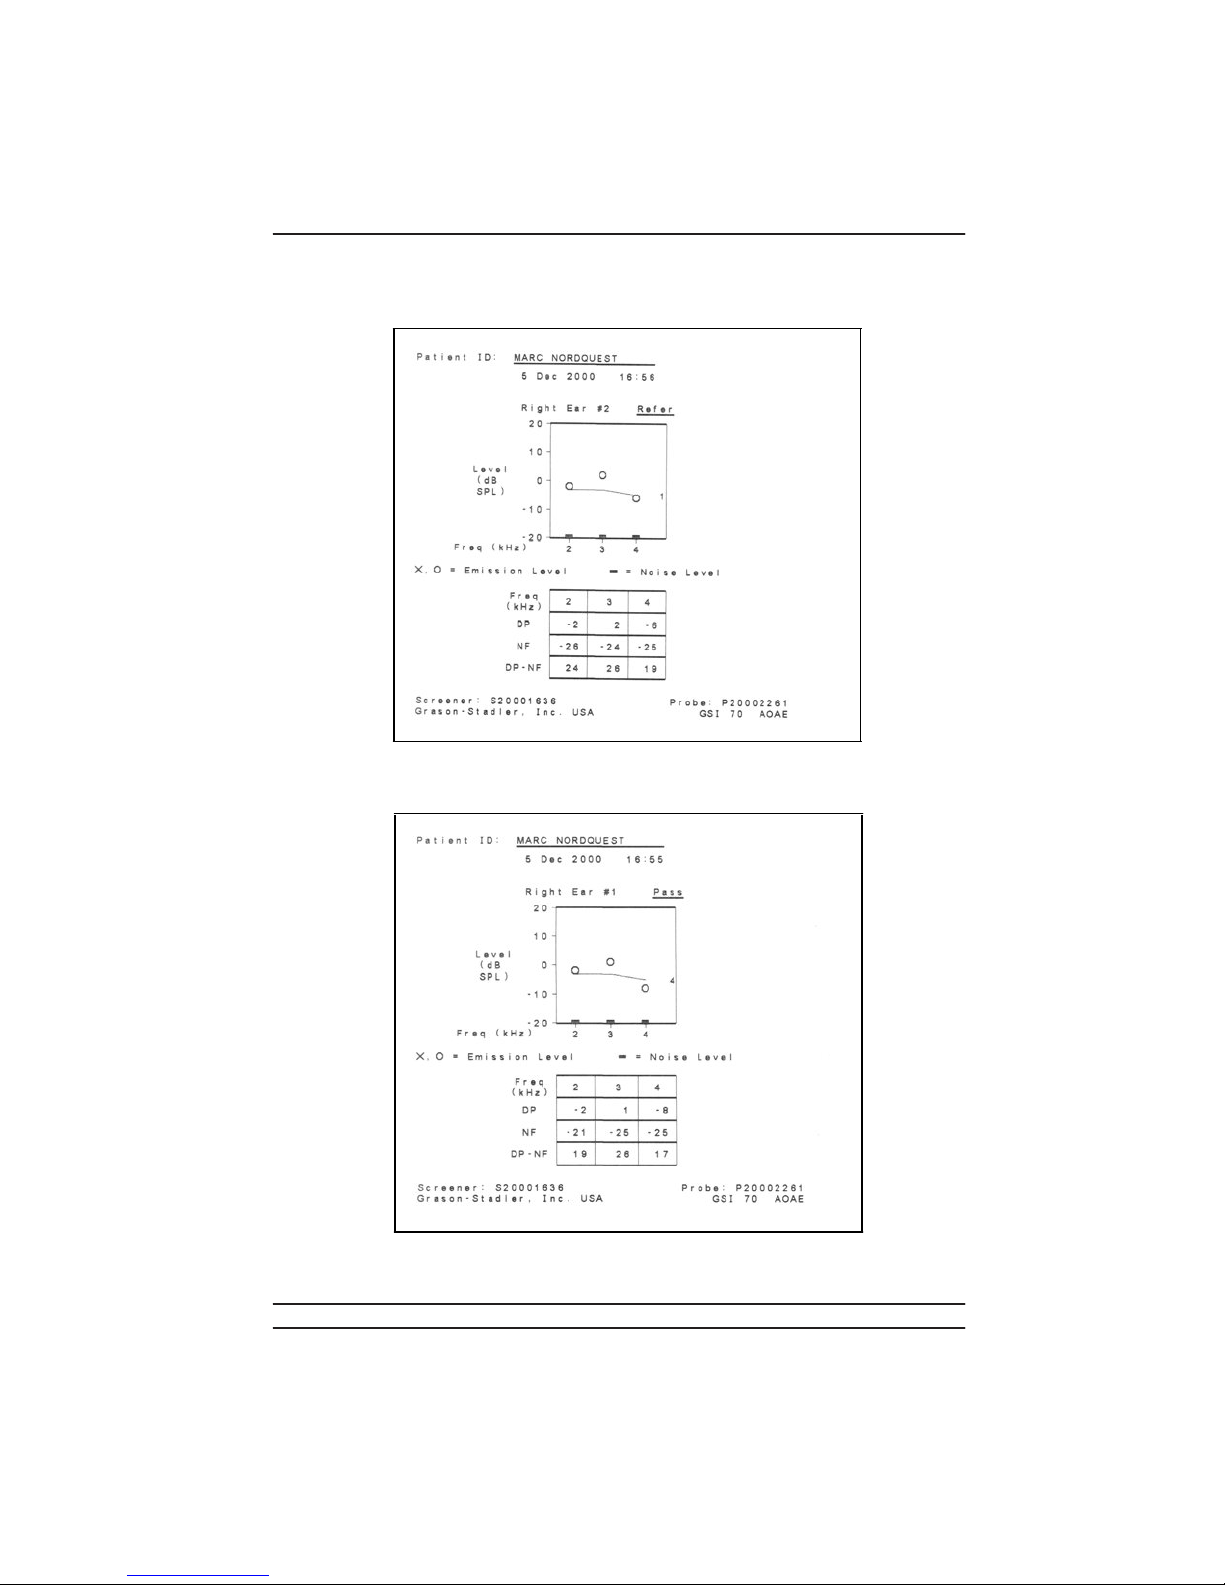
Completed DPGram ..........................................................
19
Stored DPGram........................................................................
20
4
Using the GSI70 Single-Patient Screener........... 21
Checking the Screener’s Performance ...........................................
21
Running a Test ...............................................................................
22
Message CHECK SEAL..........................................................
23
Storing a Test .................................................................................
24
Reviewing a Test............................................................................
24
Printing a Test ................................................................................
24
Contents of the Printout...........................................................
25
Canceling the Printout .............................................................
26
Advancing the Paper................................................................
26
Stopping a Test ..............................................................................
26
Erasing a Test.................................................................................
26
Power-Saving Mode ......................................................................
27
Power-Down ..................................................................................
27
Low-Battery Icon ...........................................................................
28
Battery Discharge Time .................................................................
28
5
Using the GSI70 Multi-Patient Screener ............. 29
Setting Up the Screener .................................................................
30
Setting the Screener’s Date and Time......................................
30
Transferring a Patient List from the Computer........................
30
Entering Patient Names or ID Numbers from the Screener.....
31
Selecting a Patient from the List..............................................
33
Erasing a Patient Name from the List......................................
34

Selecting a Test Protocol .........................................................
34
Transferring a New Test Protocol from the Computer ............
35
Deleting a Test Protocol...........................................................
35
Testing Patients..............................................................................
37
Running a Test .........................................................................
37
Message CHECK SEAL....................................................
38
Stopping a Test ........................................................................
38
Storing a Test ...........................................................................
38
Managing the Test Results.............................................................
39
Sending Test Results to the GSI 70 DMS................................
39
Erasing a Test...........................................................................
41
Reviewing a Test......................................................................
42
Printing a Test ..........................................................................
43
Printing All Tests for a Patient...........................................
44
Printing Selected Tests.......................................................
44
Printing Individual Test Results.........................................
45
Contents of the Printout.....................................................
45
Canceling the Printout .......................................................
47
Advancing the Paper..........................................................
47
Power-Saving Mode ..........................................................
47
Power-Down ..................................................................................
47
Low Battery Icon ...........................................................................
48
Battery Discharge Time .................................................................
48
6
Reviewing the Test Results ................................. 49
Test Result PASS ...........................................................................
49
Test Result REFER ........................................................................
50
Test Result NOISE.........................................................................
51
Test Result ABORT .......................................................................
52

7
Maintenance........................................................ 51
Setting the Date and Time (GSI 70 Multi-Patient Screener Only) 53
Setting the Date and Time from the Computer..................
53
Setting Date and Time Using the Touchscreen..................
54
Cleaning.........................................................................................
56
Cleaning the Housings, Display, and Cables ...........................
56
Cleaning the Probe Tips...........................................................
56
Removing the Probe Tip....................................................
57
Cleaning the Probe Tip ......................................................
57
Attaching the Probe Tip to the Probe.................................
58
Cleaning the Infrared Port Windows and Charging Contacts..
58
Recharging the Battery ..................................................................
59
Removing or Replacing the Battery...............................................
60
Disposing of the Battery ..........................................................
61
Checking the Screener ...................................................................
62
Running the Quick Check Test ................................................
62
Quick Check Passed ..........................................................
63
Quick Check Failed ...........................................................
63
Calibrating the Touchscreen ....................................................
64
Checking the Printer/Charger ........................................................
65
Printing a Test Pattern..............................................................
66
About the Printer Paper .....................................................
66
When to Replace the Paper................................................
67
Replacing the Paper .................................................................
67
8
Troubleshooting................................................... 69
Error Codes....................................................................................
69
Troubleshooting Tips .....................................................................
70
Screener Problems ...................................................................
70
What to Check First.................................................................
70
Printer/Charger Module Problems...........................................
74
What to Check First.................................................................
74

9
Guide to Otoacoustic Emmissions ...................... 75
What are Otoacoustic Emissions? .................................................
77
How is an OAE Generated and Detected?.....................................
77
Testing with the GSI 70 Automated OAE Screener ......................
77
10 Service and Warranty Information...................... 79
Warranty for the Screener and Printer/Charger..............................
79
Repair.............................................................................................
79
Technical Service Department .................................................
79
Recalibration..................................................................................
80
11 Replacement Parts and Accessories.................. 81
Ordering Information.....................................................................
81
Eartips............................................................................................
82
Screener Parts and Accessories......................................................
83
Printer/Charger Parts and Accessories...........................................
85
12 Specifications ..................................................... 87
General Specifications ...................................................................
87
GSI 70 Automated OAE Screener Specifications .........................
91
Charging Time .........................................................................
91
Probe Tones and Test Protocol.................................................
91
Eartips......................................................................................
91
Display.....................................................................................
92
Dimensions ..............................................................................
93
DIP Switch Functions ..............................................................
94
Changing the Language Setting for the Screener ....................
94
Printer/Charger Specifications.......................................................
96
Dimensions ..............................................................................
96
Plain Paper...............................................................................
96
Adhesive-Backed Paper...........................................................
96

Optional Charging Transformer Specifications .............................
97
Dimensions ..............................................................................
98
Index ..................................................................
Index-1

Introduction
1
Thank you for purchasing the Grason-Stadler GSI 70 Automated OAE Screener.
The GSI 70 provides a quick, reliable way to screen for cochlear function, particularly
among patients from birth to age four or five. This promotes earlier diagnostic testing and
earlier intervention for those with cochlear hearing loss. The Screener offers the
following features:
■
Quickly evaluates cochlear function
■
Displays results as they happen
■
Stores data from two ears before printing (Single-Patient Model)
■
Prints out hardcopy on demand
■
Electronically stores test results in database (Multi-Patient Model)
The Printer/Charger Module prints data stored in the GSI 70 and charges the rechargeable
battery in the GSI 70
.
The Printer/Charger is sometimes referred to as the Printer/Charger
Module (PCM).
This manual describes how to operate and maintain the GSI 70 and Printer/Charger.
Please follow these instructions to ensure many years of accurate and reliable service.
For additional information on the technology used in the GSI 70, see the Guide to
Otoacoustic Emissions on page 77.
Product Information
For future reference, record the Screener’s serial number here.
The serial number is printed on a label on the back of the instrument, and has the
following format: 1999 0914 where the first four digits are the year of manufacture and
the next digits are a unique product number assigned by the factory.
1

Chapter 1 Introduction
About This Manual
This manual assumes a certain level of medical knowledge, particularly how to perform
tests on infants and small children
.
Some of the newborns that will be tested with this
instrument may be cared for in a Neonatal Intensive Care Unit (NICU) and may have
been born quite premature
.
In addition, we assume that you have used other medical
screening devices and are familiar with a graphical interface and using buttons to select
different options.
Conventions
Throughout this manual, the following typeface: EXAMPLE OF MESSAGE indicates
the following items:
■
Messages that appear on the Screener LCD display
■
Names of buttons and LEDs on the Screener and the Printer/Charger
Messages that appear on the printouts from the Printer/Charger appear in
Courier
.
This manual also uses icons and symbols, described below.
Provides important related information, reminders, recommendations, and
suggestions.
Indicates patient safety alerts. Also indicates that a specific action could cause
harm to your instrument or result in lost data.
Indicates an electrical danger to you or a patient
.
Follow the guidelines in the
manual or on the instrument itself when handling electrical equipment.
2
GSI 70 User Manual

Product Symbols
Product Symbols
The symbols on the GSI 70 Automated OAE Screener and Printer/Charger Module
(PCM) are defined below.
Table 1 – Product Symbols
Symbol
Means
Refer to User Manual.
Disconnect from the Mains.
Disassembly of the Screener, Probe/Pod, or Printer/Charger beyond
the extent described in this manual voids the warranty
.
Refer all
servicing to Grason-Stadler or a Grason-Stadler Authorized Service
Representative.
Charge the Screener battery only in the Printer/Charger or with the
specified Charging Transformer
.
Do not use either the Printer/Charger
or the Charging Transformer with any other instruments.
Disassembly of the Printer/Charger presents a possible electrical
shock hazard
.
Refer all servicing to Grason-Stadler or a Grason-
Stadler Authorized Service Representative.
3

Chapter 1 Introduction
4
GSI 70 User Manual

Getting Started
2
Unpacking and Verifying Contents
Inspect the packaging for any damage incurred during shipping
.
If you find any damage,
notify the carrier
.
Complete and return the warranty registration card
.
It validates the
warranty and allows Grason-Stadler to send announcements of product enhancements.
When you unpack your new GSI 70 Automated OAE System, verify that the following
items are included:
■
Automated OAE Screener
■
Screener battery
■
User Manual (this document)
■
Quick-Reference Guide
■
Starter Kit, Single-Use Eartips
■
Quick Check Cavity
■
Cleaning Kit
■
Calibration Certificate
■
Videotape and Training Booklet
■
Printer/Charger Module
■
Two rolls of paper (one thermal paper, one adhesive backed)
■
Hospital-grade Power Cord to connect the Printer/Charger to Mains outlet
In addition, you may have some of the following, depending on the system and optional
components you purchased:
■
Charging Transformer, for systems with no Printer/Charger
■
Footswitch
■
Stand
■
RS232 Cable and 9 to 25 pin adapter
■
Infrared (IrDA) communication adapter
■
GSI 70 DMS software installation disks (or CD ROM) and User’s Guide
If you believe any items are missing, contact your Grason-Stadler representative.
5

Chapter 2 Getting Started
Precautions
If the Automated OAE is not at room temperature, allow 30 minutes for it to return to
operating temperature range before using.
Do not charge the battery (do not place the Screener in the Printer/Charger
Module or attach the Screener to the Charging Transformer) at temperatures
greater than 113°F (50°C).
Do not store the Automated OAE or Printer/Charger Module at temperatures that exceed
158°F (70°C).
The following is a Key to Screener, Pod and Probe Features Shown on the Next Page:
1 Display Screen (Touchscreen in Multi-Patient Models only)
2
LEFT Ear memory Button (Blue)
3 TEST Button (Green)
4 RIGHT Ear Memory Button (Pink)
5 Pod Storage Cavity
6 Pod (contains probe calibration information)
6A Probe Storage Cavity
6B Start/Stop Button (Green)
6C Yellow LED: Poor Eartip Seal Indicator
6D Green LED: Test Progress Indicator
7 Probe (shown with probe tip attached)
8 Stylus (in Multi-Patient Models only; for use with Touchscreen)
The stylus has a pointed end
.
Keep stylus out of reach of infants and small
children.
9 Access Door for Battery and Language Selector Switches
10 Connector for Charging Transformer and Footswitch
11 Charging Contacts for Battery
12 Infrared Port Window
6
GSI 70 User Manual
Table of contents