GRAUPNER PRX-3A User manual

Best.-Nr.
Order No.
Réf.Cde
Réf.Cde
4135
4135
4135
4135
Bedienungsanleitung
Operating manual
Notice d’utilisation
Stabilisierte Empfängerstromversorgung
Stabilised receiver power supply
Alimentation récepteur stabilisée
PRX-3A
Power for Receiver
Seite 2
page 11
page 20
GRAUPNER GmbH & Co. KG D-73230 Kirchheim/Teck Germany
Keine Haftung für Druckfehler, Änderungen vorbehalten - No liability for printing errors; modifications reserved -
Sous réserve d’erreurs d’impression et de modifications PN.OA-01

PRX-3A
Power for Receiver
2
Warnhinweise
Herzlichen Glückwunsch zum Kauf der stabilisierten Empfängerstromversorgung PRX von
Graupner. Eine erfolgreiche Anwendung setzt die Einhaltung bestimmter Grundsätze voraus.
Lesen Sie bitte vor der Inbetriebnahme diese Bedienungsanleitung aufmerksam durch.
- Das CE-Zertifikat dieses Gerätes entbindet nicht der Verpflichtung, äußerste Vorsicht zu
wahren.
- Verwenden Sie nur zur PRX passende Akkus von Graupner oder GM-Racing. Achten Sie
hierbei auf die richtige Zellenzahl des Akkus und dessen Ausgangsspannung.
- Wählen Sie an der PRX eine Ausgangsspannung, die für den angeschlossenen
Empfänger und Servos geeignet ist (informieren Sie sich beim Hersteller der Komponenten).
- Wählen Sie an der PRX vor dem Einschalten den richtigen Akkutyp aus, um die dazu
passenden Betriebszustände des Gerätes angezeigt zu bekommen.
- Akkus zum Laden immer von der PRX abstecken und am besten aus dem Modell nehmen.
- Lassen Sie Ihr RC-Modell niemals unbeaufsichtigt, solange ein Akku angesteckt ist. Im Falle
eines Defektes, könnte dies Feuer am Modell oder seiner Umgebung verursachen.
- Die PRX oder andere elektronische Komponenten dürfen niemals mit Wasser in Berührung
kommen. Die PRX ist vor Staub, Schmutz, Feuchtigkeit, Vibration, extreme Kälte oder
Hitze und anderen Fremdteilen zu schützen.
- Alle Kabel und Verbindungen sollen gut isoliert sein. Kurzschlüsse können zur Zerstörung
der PRX führen. Anschlüssen nicht verpolen!
- Nicht für Kinder unter 14 Jahren, kein Spielzeug!
- Die PRX ist ausschließlich für den Einsatz in Akkubetriebenen, funkferngesteuerten Modellen
vorgesehen, ein anderweitiger Betrieb ist nicht zulässig. Der Gebrauch in einem Modell zur
Personenbeförderung ist verboten!
- Motoren, Getriebe, Schiffs- oder Luftschrauben sind gefährliche Gegenstände. Halten Sie
sich daher niemals neben oder vor dem Gefährdungsbereich des Antriebes auf!
- Führen Sie immer zuerst einen Reichweitetest und Funktionstest am Boden durch (halten
Sie dabei Ihr Modell fest), bevor Ihr Modell zum Einsatz kommt. Wiederholen Sie den Test
bei laufendem Motor und mit kurzen Gasstößen.
- Es dürfen keinerlei Veränderungen an der PRX durchgeführt werden.
-
Haftungsausschluss:
Haftungsausschluss:
Sowohl die Einhaltung der Montage- und Bedienungsanleitung, als auch
die Bedingungen und Methoden bei Installation, Betrieb, Verwendung und Wartung der
PRX können von der Fa. Graupner nicht überwacht werden. Daher übernimmt die
Fa. Graupner keinerlei Haftung für Verluste, Schäden oder Kosten, die sich aus
fehlerhafter Verwendung und Betrieb ergeben, oder in irgendeiner Weise damit
zusammenhängen.
Es dürfen nur von uns empfohlene Komponenten und Zubehörteile verwendet werden.
Verwenden Sie nur zueinander passende, Original GRAUPNER - Steckverbindungen und

Zubehörteile.

PRX-3A
Power for Receiver
3
Allgemeine technische Merkmale
Die Verwendung der PRX ermöglicht Ihnen den Einsatz von z.B. 2-zelligen LiPo/LiFe Akkus
an Ihrem Empfänger (achten Sie auf die zulässige Betriebsspannung des Empfängers und der
angeschlossenen Servos). Somit können sämtliche Vorteile der neuen Akkutechnologie genutzt
werden. Servos und Empfänger werden durch eine stabilisierte Spannung versorgt um somit
ihre volle Leistung zu entfalten. Spannungseinbrüche durch eventuell unterdimensionierte Akkus
werden speichernd angezeigt.
- Die Ausgangsspannung der PRX kann durch einen Drehschalter in drei Stufen gewählt
und wenn nötig während des Betriebes umgestellt werden.
5,1V | 5,5V | 5,9V
können je nach Einsatzgebiet und Vorlieben des Piloten gewählt
5,1V | 5,5V | 5,9V können je nach Einsatzgebiet und Vorlieben des Piloten gewählt5,1V | 5,5V | 5,9V
werden. Egal auf welcher Spannungslage sich die Akkus befinden, Empfänger und
Servos werden mit einer stabilisierten Spannung versorgt um höchste und vor allem
konstante Leistung unabhängig vom Ladezustand des Akkus zu erbringen.
Die „Lebenszeit“ der Servos wird unter Umständen sogar erhöht, da diese nicht mit einer
zu hohen Spannung (z.B. vollgeladene 5-zellige NiMH Akkus) betrieben werden.
-
2-zellige LiPo
2-zellige LiFe
2-zellige LiIon
5-zellige NiMH/NiCd
und
6-zellige NiMH/NiCd
Akkus können verwendet werden.
Der Akkutyp muss vor dem Einschalten der PRX durch einen Drehschalter gewählt werden.
- Für den Akku steht eine 2-farbige ultrahelle LED zur Verfügung um Betriebs- und
Warnzustände eindeutig und einfach ablesbar anzuzeigen.
- Der Ein- bzw. Ausschaltvorgang durch einen hochwertigen Wippschaltkontakt wird parallel
mit einem elektronischen Schaltkreis gehalten, d.h. wenn eingeschaltet war, muss
mechanisch definiert ausgeschalten werden. Bei einem Defekt des Schalters, ohne dass
dabei explizit ausgeschaltet wird, bleibt die PRX eingeschalten.

PRX-3A
Power for Receiver
4
Allgemeine technische Merkmale
- Die PRX ist auf Basis eines Linearreglers aufgebaut, um im Gegensatz zu Schaltreglern
keine unnötigen Störungen auf z.B. das Empfangssystem zu verursachen.
- Der geradlinige Aufbau von Schalter, LED und Befestigungslöchern ermöglicht den
einfachen und optisch ansprechenden Einbau in Ihr Modell.
- Akkus mit folgenden Steckkontakten können ohne Löten durch beiliegende Adapterkabel
verwendet werden.
GRAUPNER|JR
G2
G3,5
BEC
- Um das Gerät zu schützen, wird eine Eingangsspannung über 9V durch einen
Fehlercode angezeigt und der Ausgang schaltet nach einer Sekunde ab.
- Bei Eingangsspannungen über 12V kann die PRX beschädigt werden.
- Akkutypen:
2-zelliger LiPo
2-zelliger LiFe
2-zelliger LiIon
5-zelliger NiMH/NiCd
6-zelliger NiMH/NiCd
- Eingangsspannung:
4V bis 9V
(unter 4V kein stabiler Betrieb möglich)
- Max. Eingangsspannung:
12V
- Ruhestrom: ca.
0,3µA
(ausgeschaltet)
- Max. Dauerstrom: ca.
3A
(für 1 MIN. bei LiPo 5,9V)
3A (für 1 MIN. bei LiPo 5,9V)3A
- Max. Spitzenstrom: ca.
10A
(für 1 SEK. bei LiPo 5,9V)
10A (für 1 SEK. bei LiPo 5,9V)10A
- Max. Spitzenstrom: ca.
20A
(für 100 MSEK. bei LiPo 5,9V)
20A (für 100 MSEK. bei LiPo 5,9V)20A
Die Angaben beziehen sich auf den Betrieb der PRX ohne aktive Kühlung durch z.B. umströ-
mende Luft. Bei einer Kühlung liegen die Werte noch höher.
- Gewicht: ca.
31g

PRX-3A
Power for Receiver
5
Inbetriebnahme
An dieser Stelle wird davon ausgegangen, dass Sie die komplette Anleitung, insbesondere be-
züglich Hinweisen, Merkmalen, Spannungsbereiche und Akkutypen gelesen und verinnerlicht
haben.
Im Folgenden wird von passenden, voll geladenen Akkus ausgegangen.
Fehlerzustände werden danach beschrieben!
1. Wählen Sie den passenden Akkutyp durch Einstellen des Drehschalters an der PRX.
2. Wählen Sie die passende Ausgangsspannung durch Einstellen des Drehschalters an
der PRX (kann auch im laufenden Betrieb umgeschaltet werden).
3. Verbinden Sie Ihren Akku, Typ wie eingestellt, mit der PRX (
BAT
), verwenden Sie
eventuell die beigelegten Adapterkabel.
4. Verbinden Sie den Ausgang (
RX
) der PRX mit Ihrem Empfänger.
5. Schalten Sie die PRX ein (
ON
). Akkus an- und abstecken nur bei ausgeschalteter
PRX (
OFF
).
6. Nach dem Einschalten blinkt die LED des Eingangs grün, mit dem Code des
eingestellten Akkutyps (
BAT
).
2x blinken:
2-zellige LiFe
4x blinken:
2-zellige LiPo
5x blinken:
5-zellige NiMH/NiCd
6x blinken:
6-zellige NiMH/NiCd
oder
2-zellige LiIon
7. Nach der Blinksequenz des Akkutyps leuchtet die LED (
BAT
) dauerhaft grün, wenn
der verwendete Akkus voll geladen ist.
8. Bei anderen Anzeigezuständen der LED (
BAT
) als oben beschrieben, handelt es sich
um Warn- bzw. Fehlercodes.
BAT
RX
LED BAT
OFF / ON
Drehschalter
Akkutyp
Drehschalter
Ausgangsspannung

PRX-3A
Power for Receiver
6
Inbetriebnahme
Die folgende Tabelle zeigt die zulässigen Akkutypen mit Ihrer Nennspannung und die dazugehö-
renden Blinkcodes (grün) der LED (
BAT
) sowie die Warnschwellen.
Blinkcode
Akkutyp
Unterspannung
Akku laden
2x blinken
2-zellige LiFe (6,6V)
6,0V
6,3V
4x blinken
2-zellige LiPo (7,4V)
7,0V
7,4V
5x blinken
5-zellige NiMH/NiCd (6,0V)
5,5V
5,8V
6x blinken
6-zellige NiMH/NiCd oder
2-zellige LiIon (7,2V)
6,6V
6,9V
Akku laden
Diese Schwelle wird 5 Sekunden nach dem Einschalten aktiviert. Sie wird bei unterschreiten
durch grünes blinken angezeigt. Diese Meldung ist nicht speichernd, d.h. die Meldung wird nur
so lange angezeigt, wie auch ein Unterschreiten der Schwelle vorliegt.
--> Nicht mehr starten.
--> Akku laden.
--> Während dem Flug sollte möglichst rasch gelandet werden.
Unterspannung
Unterspannung
Diese Schwelle ist nach dem Einschalten sofort aktiv und wird bei Unterschreiten direkt nach
dem Blinkcode des Akkutyps durch rot/grünes blinken angezeigt. Wird die Schwelle für mehr
als 4 Sekunden unterschritten, wird die LED permanent rot. Diese Meldungen sind speichernd,
d.h. die Meldungen werden aktiviert, sobald die entsprechende Schwelle unterschritten wurde
und bleiben erhalten, auch wenn die Schwelle wieder überschritten wird. Dies soll auch kurze
Spannungseinbrüche durch eventuell unterdimensionierte Akkus anzeigen.
--> Nicht mehr starten.
--> Akku laden.
--> Während dem Flug muss sofort gelandet werden!
ACHTUNG
Achten Sie bei der Wahl Ihrer Akkus auf eine angepasste Kapazität und
Güte abhängig von der Anzahl und Art der angeschlossenen Servos!

PRX-3A
Power for Receiver
7
Akkuspannung und PRX-Verhalten
Die folgende Tabelle beinhaltet eine Kurzbeschreibung der LED bzw. PRX.
LED
Status
blinkt grün direkt nach dem Einschalten
Blinkcode des Akkutyps
permanent grün
Spannung liegt über Akku laden (alles OK)
blinkt grün
Akku laden (landen)
blinkt rot/grün
es gab kurzen Spannungseinbruch kleiner als 4
Sekunden unter Unterspannung
permanent rot
Unterspannung (sofort landen)
blinkt langsam rot
Akku leer
blinkt schnell rot
Akkufehler
blinkt schnell rot/grün
zu hohe Eingangsspannung
Die folgende Aufstellung zeigt das Verhalten der PRX bzw. der LED bei unterschiedlichen
Eingangsspannungen (Akku). Beschrieben wird ein Verlauf, beginnend bei Überspannung.
Zu lesen ist die Tabelle: „Akkuspannung grösser/kleiner als Spannungslage, PRX reagiert.......“
Status
Spannungslage
Verhalten
größer als
9V
Beide LEDs blinken schnell rot/grün *
größer als
Akku laden
LED permanent grün
kleiner als
Akku laden
LED blinkt grün
größer als
Akku laden
LED permanent grün
kleiner als
Unterspannung
LED blinkt rot/grün (speichernd)
größer als
Unterspannung
LED blinkt rot/grün (speichernd)
kleiner als
Unterspannung für mehr als 4 Sek.
LED permanent rot(speichernd)
größer als
Unterspannung
LED permanent rot(speichernd)
kleiner als
4,3V
LED blinkt langsam rot (speichernd) **
größer als
4,3V
LED blinkt langsam rot (speichernd) **
kleiner als
3,3V
LED blinkt schnell rot (speichernd) ***
größer als
3,3V
LED blinkt schnell rot (speichernd) ***
kleiner als
3,3V für mehr als 2 Sek.
LED und Gerät wird abgeschaltet.
* Die Eingangsspannung kann für 1 Sek. am Ausgang anliegen, danach wird
der Ausgang abgeschaltet.
** Akku leer.
*** Akkufehler.

PRX-3A
Power for Receiver
8
Je nach Höhe der Akkuspannung und gewünschter Ausgangsspannung (5,1V | 5,5V | 5,9V)
liefert die PRX entsprechende Ausgangsspannungen für den Empfänger.
- Um die gewünschte Ausgangsspannung zu erhalten, muss die Akkuspannung mehr als 0,1V
über der gewählten Ausgangsspannung liegen.
- Ist dies nicht der Fall, dann liegt die Ausgangsspannung um 0,1V unter der Akkuspannung.
- Liegt die Akkuspannung unter 4V ist kein stabiler Betrieb möglich.
Lieferumfang
Lieferumfang
Nr.
Anzahl
Bezeichnung
01
1
Stabilisierte Empfängerstromversorgung PRX
02
2
Adapterkabel für Akkus mit
GRAUPNER|JR
Stecker
03
2
Adapterkabel für Akkus mit
G2
Stecker
04
2
Adapterkabel für Akkus mit
BEC
Stecker
05
1
Vibrationsdämpfer
06
1
Bohrschablone / Aufkleber
07
2
Befestigungsschraube
08
1
Bedienungsanleitung
Akkuspannung
Akkuspannung
/
/
Ausgangsspannung / Weiteres
01
02
03
04
05
06
07
08

PRX-3A
Power for Receiver
9
Einbau / Gallerie
Einbau / Gallerie
Der Einbau der PRX ist denkbar einfach, da sämtliche benötigten Durchbrüche und Bohrungen
am Rumpf mittels der beigelegten Bohrschablone angezeichnet werden und danach vorgenom-
men werden können (Bohrungen für die LED 5mm, für die Befestigungslöcher 3mm).
Nachdem dies erfolgt ist, wird zuerst der Vibrationsdämfer und dann die PRX im Rumpf pla-
ziert (Als Orientierung beim verkleben des Vibrationsschutzes können die Schrauben dienen).
Befestigt wird die PRX durch 2 Schrauben von Aussen her durch den Rumpf hindurch. In die
Befestigungslaschen der PRX wird durch die Schrauben ein Gewinde geschnitten, ziehen Sie
diese deshalb mit Gefühl an.
Der Vibrationsdämpfer sollte bei Antrieben mit Vi-
brationen immer eingesetzt werden.
Abschliessend kann der Aufkleber aussen am Rumpf zur Beschriftung der PRX aufgebracht
werden.
Natürlich kann die PRX auch im Rumpf plaziert werden ohne Durchbrüche zu machen,
allerdings geht Ihnen dabei die optische Kontrolle der LED während des Betriebs verloren.

PRX-3A
Power for Receiver
10
Konformität
Für die folgende bezeichneten Erzeugnisse
Empfängerstromversorgung PRX-3A stabilisiert Best.-Nr. 4135
wird hiermit bestätigt, dass es den wesentlichen Schutzanforderungen entspricht, die in der
Richtlinie des Rates zur Angleichung der Rechtsvorschriften der Mitgliedstaaten über die elek-
tromagnetische Verträglichkeit 2004/108/EC festgelegt sind.
Zur Beurteilung des Erzeugnisses wurden folgende Normen herangezogen:
EN 61000-6-1
EN 61000-6-3
Diese Erklärung wird verantwortlich für den Hersteller/Importeur
Graupner GmbH & Co. KG
Henriettenstr. 94-96
73230 Kirchheim/Teck
abgegeben durch den Geschäftsführer Hans Graupner
73230 Kirchheim/Teck, den 22.03.10 Unterschrift
Hinweise zum Umweltschutz
Das Symbol auf dem Produkt, der Gebrauchsanleitung oder der
Verpackung weist darauf hin, dass dieses Produkt am Ende seiner
Lebensdauer nicht über den normalen Haushaltsabfall entsorgt
werden darf. Es muss an einem Sammelpunkt für das Recycling
von elektrischen und elektronischen Geräten abgegeben werden.
Die Werkstoffe sind gemäß ihrer Kennzeichnung wieder verwertbar. Mit der Wiederverwendung,
der stofflichen Verwertung oder anderen Formen der Verwertung von Altgeräten leisten Sie ei-
nen wichtigen Beitrag zum Umweltschutz.
Bitte erkundigen Sie sich bei der Gemeindeverwaltung nach der zuständigen
Entsorgungsstelle.

PRX-3A
Power for Receiver
11
Warning notes
Warning notes
Congratulations on your decision to purchase the Graupner PRX stabilised receiver power sup-
ply. If you wish to use the unit successfully it is important to understand its features and operate
it correctly. Please read these operating instructions carefully before using the unit for the first
time.
- The fact that this device has been granted a CE certificate does not relieve you of the
obligation to use it with due care and attention.
- It is important only to use Graupner or GM-Racing batteries which are suitable for use with
the PRX. Ensure that the battery or batteries contain the correct number of cells, and that
the output voltage is as stated in the Specification.
- At the PRX select an output voltage which is suitable for the receiver and servos connected
to it (if you are not sure, check with the component manufacturer).
- At the PRX select the correct battery type before switching the system on; this ensures that
the LED indicators correctly reflect the actual state of the system.
- Batteries should always be disconnected from the PRX for charging. We also recommend
that you remove them from the model.
- Never leave your RC model unsupervised when a battery is connected. If a fault should
occur, this could cause a fire in the model or to other objects in the vicinity.
- Never allow the PRX or other electronic components to come into contact with water.
Protect the PRX from dust, dirt, damp, vibration, extreme cold and heat and foreign bodies.
- All cables and connections must be well insulated, as short-circuits could wreck the
PRX. Always take great care to avoid reversed polarity.
- The PRX is not a plaything, and is not suitable for young persons under fourteen years
of age.
- The PRX is intended exclusively for use in battery-operated radio-controlled models; we do
not condone its use for any other type of application. It is absolutely prohibited to use the unit
in any vehicle designed to carry people.
- Motors, gearboxes, boat propellers and aircraft propellers are potentially dangerous objects.
For this reason keep well away from the hazard zone around and in front of the power system.
- Always check the aircraft’s working systems before flying the model, and carry out a
range check on the ground (hold your model securely) before you fly it. Repeat the check
with the motor running, opening the throttle occasionally to check its effect on the RC system.
- It is not permissible to carry out modifications of any kind to the PRX.
-
Liability exclusion:
As manufacturers, we at Graupner are not in a position to influence the
way you install, operate and maintain the PRX. For this reason we are obliged to deny all
liability for loss, damage or costs which are incurred due to the incompetent or incorrect use
and operation of our products, or which are connected with such operation in any way.
Use only the components and accessories which we recommend, and be sure to use
genuine and compatible GRAUPNER connectors and accessories.

PRX-3A
Power for Receiver
12
General technical characteristics
Installing the PRX in your receiving system enables you to use batteries such as two-cell LiPo
/ LiFe packs to power your receiver (check the manufacturer’s maximum permissible operating
voltage for the receiver and the servos connected to it). The net result is that the PRX allows
you to exploit all the advantages of the new-technology battery types. A stabilised voltage is
fed to the servos and receiver, allowing them to develop their full performance. If the batteries
are not “up to the task” and produce momentary voltage collapses, these events are stored and
displayed subsequently.
- Three levels of output voltage can be selected on the PRX using a rotary switch; if
necessary, the voltage can even be changed when the system is in use.
Any of the values
5.1 V | 5.5 V | 5.9 V
can be selected, according to your particular
5.1 V | 5.5 V | 5.9 V can be selected, according to your particular5.1 V | 5.5 V | 5.9 V
application and personal preference. No matter what voltage the batteries produce, the
receiver and servos are fed a stabilised voltage in order to produce their best possible
performance at an absolutely constant level, regardless of the state of charge of the battery
or batteries.
Under certain circumstances the effective life of your servos can even be increased, since
they are never operated on an excessive voltage (e.g. fully charged five-cell NiMH battery).
-
Two-cell LiPo
Two-cell LiFe
Two-cell LiIon
Five-cell NiMH / NiCd
and
six-cell NiMH / NiCd
batteries can be used.
The battery type must be selected using the rotary switch before the PRX is switched on.
- A two-colour ultra-bright LED is provided for the battery, designed to indicate operating
modes and warnings in a clear and easily legible form.
- The unit is switched On and Off using a high-quality rocker switching contact wired in
parallel with an electronic switching circuit. Once the PRX is switched on, it can only be
switched off by a mechanically defined action. If the switch itself should develop a fault, the
PRX remains switched on until the user explicitly switches it off.

PRX-3A
Power for Receiver
13
General technical characteristics
- The PRX is based on a linear regulator, as - unlike switch-mode regulators - this form of
circuit generates no unnecessary interference to the receiving system.
- The in-line layout of the switch, LED and mounting holes makes the unit simple to install
in your model, and looks visually attractive.
- A set of adapter leads is supplied in the set. Batteries fitted with the following connector
contacts can therefore be used without any soldering:
GRAUPNER|JR
G2
G3,5
BEC
- If the input voltage is above 9 V, the unit generates an error code to protect the circuit;
if this should occur, the output is switched off after one second.
- An input voltage above 12 V may permanently damage the PRX.
- Battery types:
Two-cell LiPo
Two-cell LiFe
Two-cell LiIon
Five-cell NiMH / NiCd
Six-cell NiMH / NiCd
- Input voltage:
4V to 9V
(below 4V: stable operation impossible)
4V to 9V (below 4V: stable operation impossible)4V to 9V
- Max. input voltage:
12V
- Idle current: approx.
0.3µA
(switched off)
0.3µA (switched off)0.3µA
- Max. continuous current: approx.
3A
(for 1 MIN. with LiPo, 5.9 V output)
- Max. peak current: approx.
10A
(for 1 SEC. with LiPo, 5.9 V output)
- Max. peak current: approx.
20A
(for 100 MSEC. with LiPo, 5.9 V output)
These figures are valid when the PRX is used without active cooling, such as a forced
airflow. With effective cooling the values are even higher.
- Weight: approx.
31g

PRX-3A
Power for Receiver
14
Using the PRX for the first time
At this point we assume that you have read and absorbed the complete operating instructions,
especially in respect of special notes, characteristics, voltage ranges and battery types.
In the following section we assume that your system incorporates
suitable batteries, and that they are fully charged.
Error states are described in the later section.
1. Select the appropriate battery type using the rotary switch on the PRX.
2. Select the appropriate output voltage by setting the rotary switch on the PRX
(can also be changed when the unit is in use).
3. Connect your battery (type as set) to the PRX (
BAT
), using the adapter lead
supplied if necessary.
4. Connect the output (
RX
) of the PRX to your receiver.
5. Switch the PRX on (
ON
). Never connect or disconnect batteries unless the PRX is
switched off (
OFF
).
6. When the unit is switched on, the input LED flashes green in the sequence which indicates
the code for the set battery type (
BAT
).
2 x flashes:
two-cell LiFe
4 x flashes:
two-cell LiPo
5 x flashes:
five-cell NiMH / NiCd
6 x flashes:
six-cell NiMH / NiCd
or
two-cell LiIon
7. When the flashing sequence for the battery type is finished, the LED (
BAT
) glows a
constant green - assuming that the battery in use is fully charged.
8. If the LED (
BAT
) display a different flashing code from those described above,
it is indicating a warning or an error.
BAT
RX
LED BAT
OFF / ON
Rotary switch
battery type
Rotary switch
output voltage

PRX-3A
Power for Receiver
15
Using the PRX for the first time
The following table shows the approved battery types with their nominal voltage. It also shows
the associated flashing codes (green) of the LED (
BAT
) and the warning thresholds.
Flashing code
Battery type
Low voltage
Charge battery
2x flashes
Two-cell LiFe (6.6 V)
6.0V
6.3V
4x flashes
Two-cell LiPo (7.4 V)
7.0V
7.4V
5x flashes
Five-cell NiMH/NiCd (6.0 V)
5.5V
5.8V
6x flashes
Six-cell NiMH/NiCd or
Two-cell LiIon (7.2 V)
6.6V
6.9V
Charge battery
Charge battery
This threshold is activated five seconds after switching on: the green LED flash when the voltage
falls below this threshold. This indicator is not stored, i.e. it is only displayed as long as the bat-
tery voltage lies below the threshold.
--> Do not fly again.
--> Charge the battery.
--> If you are already flying, land the model as soon as possible.
Low voltage
Low voltage
This threshold is activated immediately after the unit is switched on: directly after the flashing
code indicating the battery type, the LED flash red / green if the voltage is below this threshold.
If the voltage remains below the threshold for more than four seconds, the LED changes to a
constant red. These indicators are stored, i.e. they are triggered as soon as the battery voltage
falls below the appropriate threshold, and persists even if the voltage rises above the threshold
again. This is intended to indicate to the operator that at least one voltage collapse has occurred,
possibly due to batteries which are not “fit for purpose”.
--> Do not fly again.
--> Charge the battery.
--> If you are already flying, land the model immediately.
CAUTION
When selecting your batteries it is essential to choose types of suitable
capacity and quality, depending on the number and type of servos con-
nected to the unit.

PRX-3A
Power for Receiver
16
Battery voltage, behaviour of the PRX
The following table contains a brief description of the LED and / or the PRX.
LED
Status
Flashes green directly after switching on
Flashing code for battery type
Constant green
Voltage above ‘Charge battery’ (all OK)
Flashes green
‘Charge battery’ (land now)
Flashes red / green
A brief voltage collapse to below ‘Low voltage’
has occurred (shorter than four seconds)
Constant red
‘Low voltage’ (land immediately)
Flashes red, low rate
Battery flat
Flashes red, high rate
Battery defective
Flashes red / green, high rate
Input voltage excessive
The following table shows the behaviour of the PRX and / or the LED in response to various input
voltages (i.e. battery voltage). The table shows a typical response to a battery as it is discharged,
commencing at excessive voltage. The table should be read as follows: “Battery voltage higher /
lower than that stated: PRX responds by ...”
Status
Voltage
Response
More than
9V
Both LEDs flash red / green, fast *
More than
‘Charge battery’
LED constant green
Less than
‘Charge battery’
LED flashes green
More than
‘Charge battery’
LED constant green
Less than
‘Low voltage’
LED flashes red / green (stored)
More than
‘Low voltage’
LED flashes red / green (stored)
Less than
‘Low voltage’ for more than 4 sec.
LED constant red (stored)
More than
‘Low voltage’
LED constant red (stored)
Less than
4.3V
LED flashes red, slow (stored) **
More than
4.3V
LED flashes red, slow (stored) **
Less than
3.3V
LED flashes red, fast (stored) ***
More than
3.3V
LED flashes red, fast (stored) ***
Less than
3.3 V for more than 2 sec.
LED and device switched off.
* The input voltage may be present at the output for one second; after this the output is
switched off.
** Battery flat. *** Battery defective.

PRX-3A
Power for Receiver
17
The PRX delivers the set output voltage to the receiver according to the desired value
(5.1 V | 5.5 V | 5.9 V) - provided that the battery voltage is high enough.
- The battery voltage must be more than 0.1 V above the selected output voltage, otherwise
the PRX will be unable to deliver the desired output voltage.
- If this is not the case, then the output voltage will be 0.1 V below the actual battery voltage.
- If the battery voltage falls below 4 V, stable operation of the PRX is impossible.
Set contents
No.
Quantity
Description
01
1
PRX stabilised receiver power supply
02
2
Adapter lead for batteries with
GRAUPNER|JR
connector
03
2
Adapter lead for batteries with
G2
connector
04
2
Adapter lead for batteries with
BEC
connector
05
1
Vibration absorber
06
1
Drilling template / sticker
07
2
Retaining screw
08
1
Operating instructions
Battery voltage / Output voltage / Additional notes
01
02
03
04
05
06
07
08

PRX-3A
Power for Receiver
18
Installation / Illustrations
The PRX could hardly be easier to install, as all the openings and holes required in the fuselage
can be marked out using the drilling template supplied. The holes should then be cut (5 mm Ø
holes for the LED, 3 mm Ø holes for the retaining screws).
Once you have completed this stage, place the vibration absorber in the fuselage followed by
the PRX (use the retaining screws to line up the vibration absorber when sticking it in place). The
PRX is secured using two screws which are fitted through the fuselage from the outside. The
action of tightening the screws cuts a thread in the mounting lugs of the PRX, so please take care
not to over-tighten them.
The vibration absorber should always be used where
the PRX is installed in a model subject to vibration.
The final step is to apply the sticker to the outside of the fuselage, so that you can read the
printed legend. Of course, the PRX can also be installed inside the fuselage, in which case you
do not need to cut holes in the outer skin; however, you will then not be able to make use of the
LED for in-flight checking.

PRX-3A
Power for Receiver
19
Conformity
Conformity
We hereby confirm that the product defined below:
PRX-3A stabilised receiver power supply, Order No. 4135
fulfils the essential protective requirements as described in the Directive of the Committee
for harmonising legal regulations of member states relating to electro-magnetic compatibility,
2004/108/EC.
The product was assessed with reference to the following norms:
EN 61000-6-1
EN 61000-6-3
On behalf of the manufacturer / importer:
Graupner GmbH & Co. KG
Henriettenstr. 94-96
73230 Kirchheim/Teck
this declaration is submitted by Managing Director, Hans Graupner
73230 Kirchheim/Teck, on the 22.03.10 Signature
Environmental protection notes
The presence of this symbol on a product, in the user instructions or the
packaging, means that you must not dispose of that item, or the electronic
components contained within it, in the ordinary domestic waste when the
product comes to the end of its useful life. The correct method of disposal is
to take it to your local collection point for recycling electrical and electronic
equipment.
Individual markings indicate which materials can be recycled and re-used. You can make an
important contribution to the protection of our shared environment by re-using the product, recy-
cling the basic materials or re-processing redundant equipment in other ways.
If you don’t know the location of your nearest disposal centre, please enquire at your local council
office.

PRX-3A
Power for Receiver
20
Conseils de sécurité
Félicitations pour l’acquisition de l’alimentation stabilisée PRX Graupner. Une utilisation conclu-
ante et satisfaisante nécessite néanmoins le respect de certaines règles de base. Avant toute
utilisation, lisez attentivement la notice d’utilisation.
- Le certificat CE de cet appareil ne vous dispense néanmoins pas de prendre toutes les
précautions utiles etnécessaires.
- Pour l’alimentation PRX, n’utilisez que des accus appropriés Graupner ou GM-Racing.
Veillez à ce que le nombre d’éléments soit correct ainsi que leur tension de sortie.
- Sélectionnez une tension de sortie sur l’alimentation PRX qui soit compatible avec le
récepteur et les servos qui y sont branchés (renseignez-vous auprès du fabricant de ces
composants).
- Avant d’allumer l’alimentation PRX, veillez à sélectionner le bon type d’accu, pour que
les paramètres de l’appareil puissent s’afficher correctement.
- Pour charger les accus, débrancher l’alimentation PRX et les retirer du modèle.
- Ne laissez jamais votre modèle RC sans surveillance tant qu’un accu est branché. Dans
le cas d’un dysfonctionnement, le modèle pourrait prendre feu, feu qui pourrait se
propager aux alentours.
- L’alimentation PRX ou les autres composants ne doivent jamais être en contact avec l’eau.
L’alimentation PRX doit être protégée contre la poussière, la saleté, l’humidité, les
vibrations, les froids ou chaleurs extrêmes et d’autres corps étrangers.
- Tous les cordons et fiches doivent être isolés correctement. Ne pas inverser la polarité
des fiches !
- Ne convient pas aux enfants de moins de 14 ans, ce n’est pas un jouet !
- L’alimentation PRX est exclusivement réservée aux modèles réduits nécessitant des
accus, tout autre utilisation n’est pas autorisée. Une utilisation sur des modèles vraie
grandeur, transportant des passagers est interdite !
- Les moteurs, réducteurs, les hélices de bateaux ou d’avions sont des éléments dangereux.
Ne restez jamais à coté, ou dans la zone à risques, d’une motorisation !
- Faites toujours un essai de portée et vérifiez le bon fonctionnement des commandes, au
sol, avant de décoller avec votre modèle (au cours de ces essais, maintenez correctement
le modèle). Refaites ce essais moteur tournant, en donnant des coups de Gaz.
- N’effectuez aucune modification au niveau de l’alimentation PRX, c’est interdit !
-
Exclusion de responsabilité:
Etant donné que la société Graupner ne peut intervenir, ni
sur le montage, ni sur le respect de la notice, encore moins sur les conditions de montage
et d’installation, sur l’utilisation et de l’entretien de l’alimentation PRX, elle décline toute
responsabilité en cas de pertes, de dégâts ou de coûts ayant été provoqués par une
utilisation non conforme ou qui y serait liée. Seuls les composants et accessoires
recommandés par nos soins sont à utiliser. N’utilisez que des accessoires et fiches
originaux GRAUPNER.
Table of contents
Languages:
Other GRAUPNER Power Supply manuals

GRAUPNER
GRAUPNER SWITCHING POWER SUPPLY 13.8V 0-40A User manual

GRAUPNER
GRAUPNER PRX-4A User manual

GRAUPNER
GRAUPNER POWER SUPPLY 13.8V 0-20A User manual

GRAUPNER
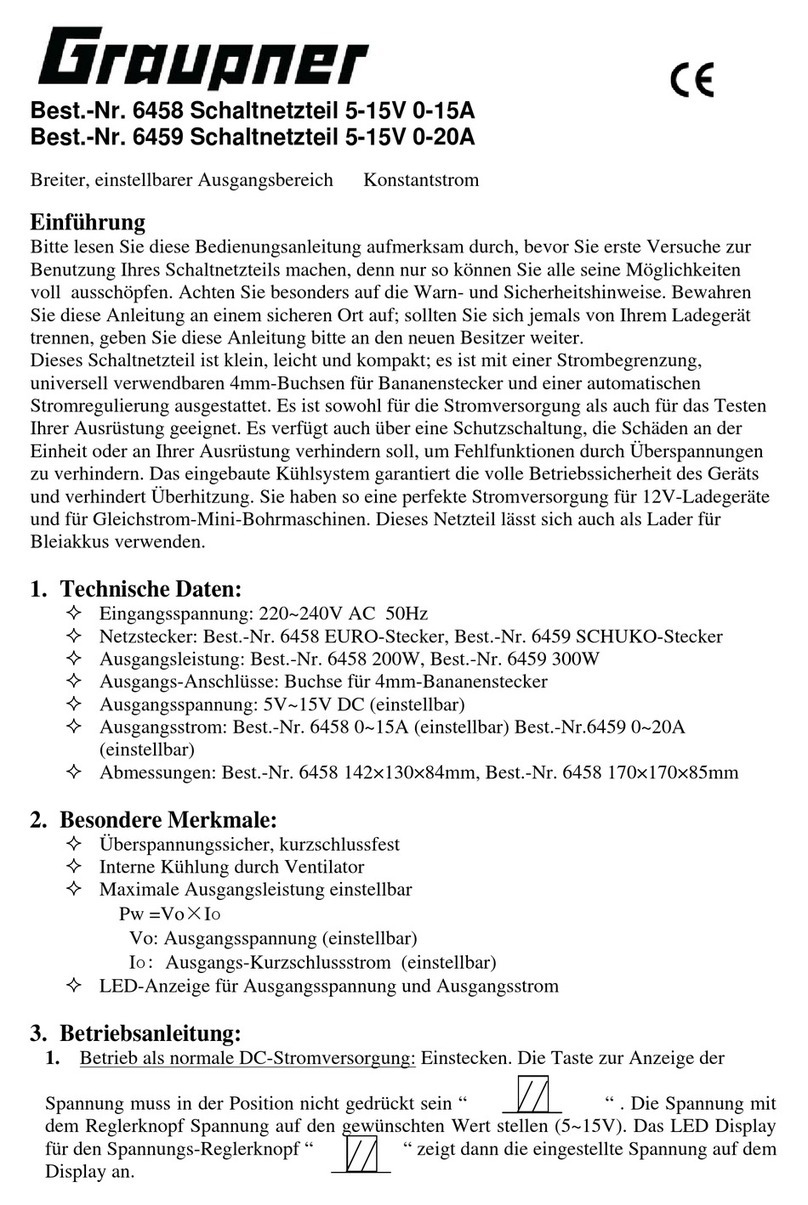
GRAUPNER SWITCHING POWER SUPPLY 5-15V 0-15A User manual

GRAUPNER
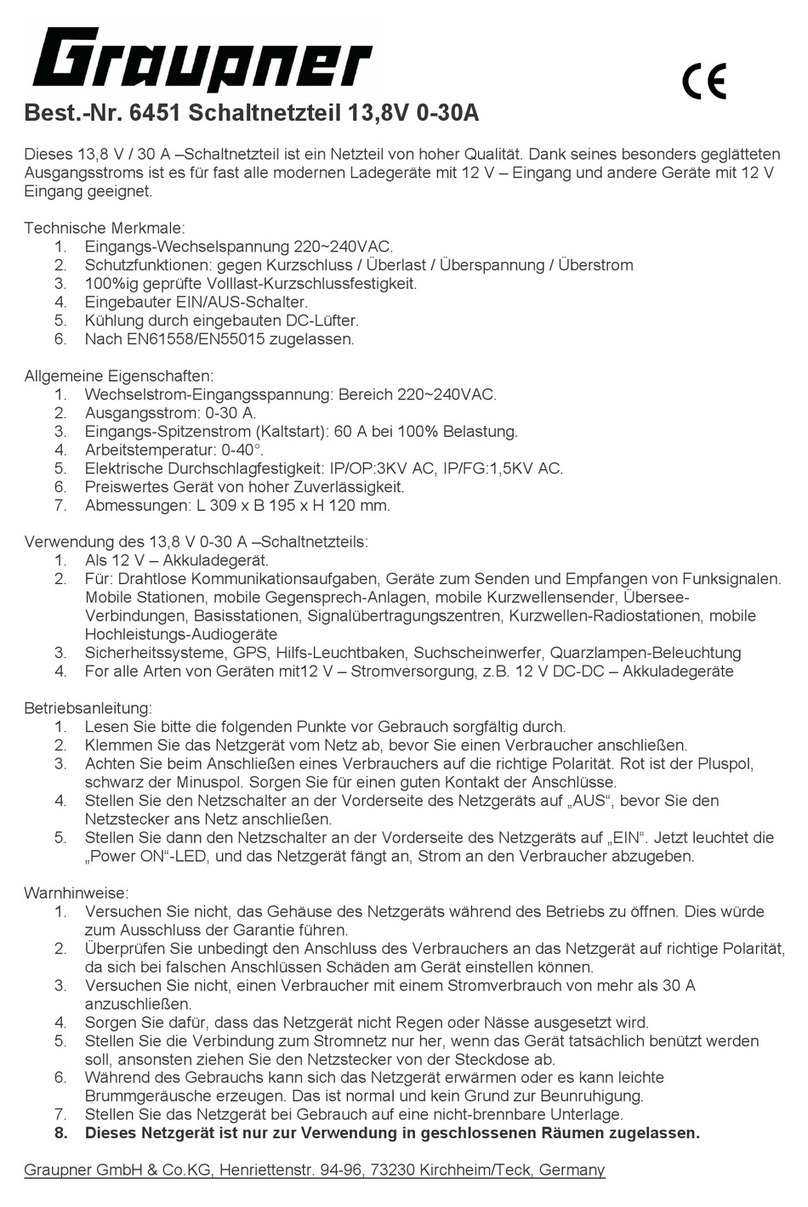
GRAUPNER SWITCHING POWER SUPPLY 13.8V 0-30A User manual

GRAUPNER
GRAUPNER Polaron SMPS 1500 User manual

GRAUPNER
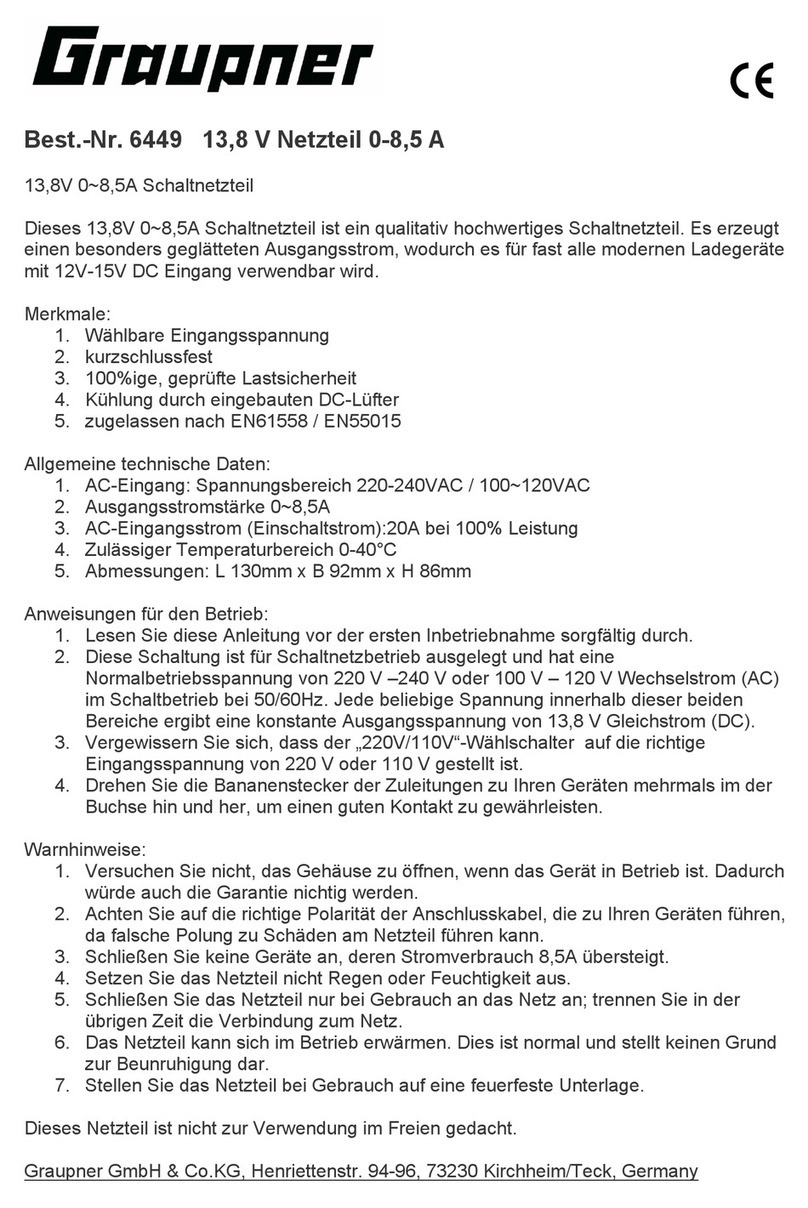
GRAUPNER POWER SUPPLY 13.8V 0-8.5A User manual

GRAUPNER
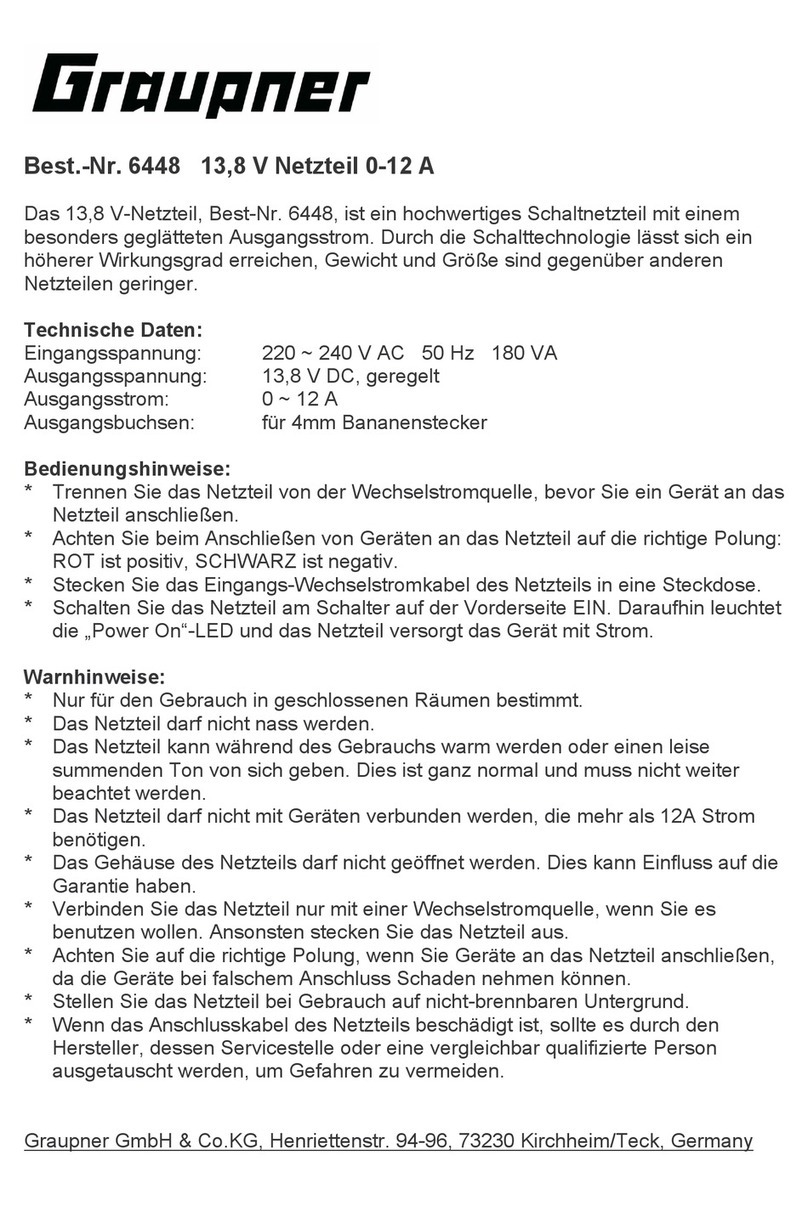
GRAUPNER POWER SUPPLY 13.8V 0-12A User manual

GRAUPNER
GRAUPNER SWITCHING POWER SUPPLY 5-15V 0-40A User manual

GRAUPNER
GRAUPNER LiPo Balancer Plus User manual