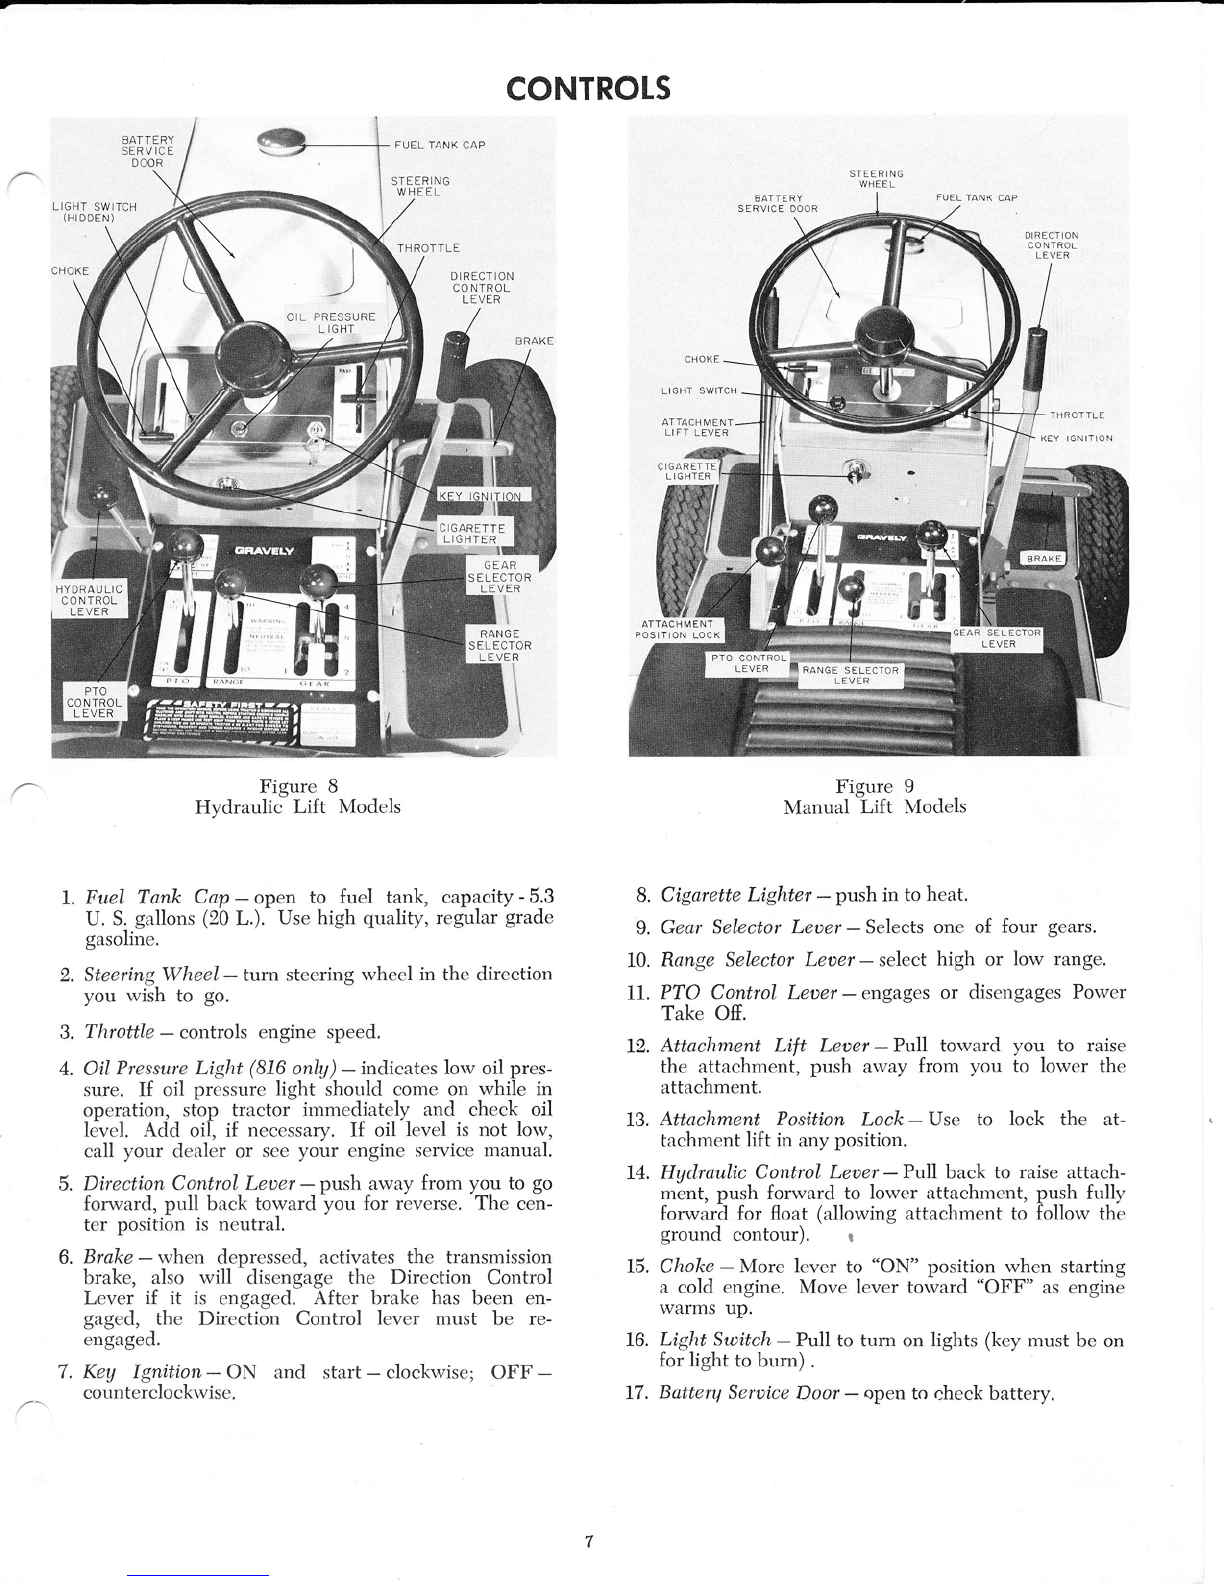
Gravely 810 User manual

-
1^
GRA/ELV
810
8L2
814
816
OWNERS
MANUAL

THANK YOU for your investment in Gravely equipment. It is an investment,
for the Gravely will save you work and worry for many years.
You will gain still greater satisfaction from your powerful Gravely if you
add the tools you need for your other jobs, From time to time we suggest
you consult our catalog for the many Gravely attachments that will eliminate
grounds upkeep and garden drudgery.
Numerous independent dealers and factory branches distribute Gravely
equipment. All are ready to give prompt and efficient service, with parts in
stock and personnel trained in factory-service methods.
Your Gravely tractor and attachments are warranted under terms shown
herein. To qualify for this Warranty, you must register your equipment by
completing the attached Registration Card and returning it. For your own
protection, plr:ase do this right away.
To continue its progrom of quolity cnd design improvement, the
monufocturer reserves the right to chonge specificotions, design
or prices without notice cnd without incurring obligotions.

SAFETY SPECIFICATIONS
1. Know the controls and how to stop quickly - READ
THE OWNER'S MANUAL.
2. Do not allow children to operate vehicle. Do not
allow adults to operate it without proper instructions.
3. Do not carry passengers. Keep children and pets a
safe distance away.
4. Clear work area of objects which might be picked
up and thrown.
5. Disengage all attachment clutches and shift into
neutral before attempting to start engine.
6. Disengage power to attachments and stop engine
before leaving operator position.
7. Disengage power to attachments and stop engine
before making any repairs or adjustments.
8. Disengage power to attachments when transporting
or not in use.
9. Take all possible precautions when leaving vehicle
unattended; such as disengaging power take-off,
lowering attachments, shifting into neutral, setting
parking brake, stopping engine and removing key.
10. Do not stop or start suddenly when going uphill or
downhill. Mow up and down the face of steep slopes;
never across the face.
11. Reduce speed on slopes and in sharp turns to prevent
tipping or loss of control. Exercise extreme caution
when changing direction on slopes.
12. Stay alert for holes in terrain and other hidden
hazards.
13. Use care when pulling loads or using hear,y equip-
ment.
A. Use only approved drawbar hitch points.
B. Limit loads to those you can safely control.
C. Do not turn sharply. Use care when backing.
D. Use wheel weights when suggested in
owner's manual.
14. Watch out for traffic when crossing or near roadways,
15. When using any attachments never direct discharge
of material toward by-standers nor allow anyone
near vehicle while in operation.
15. Hondle gosoline with core - it is highly flomm-
oble.
A. Use approved gasoline container.
B. Never remove cap or add gasoline to a run-
ning or hot engine or fill fuel tank indoors.
Wipe up spilled gasoline.
C. Open doors if engine is mn in garage -
exhause fumes are dangerous. Do not run
engine indoors.
17. Keep vehicle and attachments in good operating
condition and keep safety devices in place.
lB, Keep' all nuts, bolts and screws tight to be sure
equipment is in safe working condition.
19. Never store equipment with gosoline in the tonk
inside of building where fumes moy reoch on open
flome or spork.
20. Allow engine to cool before storing in any enclosure,,-
2I. To reduce fire hazard keep engine free of grass,
leaves or excessive grease,
22. Vehicle and attachments should be stopped and
inspected for damage after striking a foreign object
and the damage should be repaired before restarting
and operating the equipment.
23. Do not change engine governor settings or overspeed
engine.
24. When using vehicle with mower:
A. Mow only in daylight or in good artificial
light.
B. Never make a cutting height adjustment
while engine is running if operator dis-
mounts to do so.
C. Shut engine off when unclogging chute.
D. Check blade bolts for proper tightness at
frequent iptervals.

TABTE OF CONTENTS
Safety Specifications 2
3Introduction
Routine Maintenance
Controls
Operation
Rear Hitch
8
I
11
L2
12
L4
15
16
Center-Mount Attachments
Front-Mount Attachments
Four Bolt Mounting Attachments
Trailing Attachments
Rear Mount Attachments
Axle Mount Attachments
a-
Specifications
Warranty . . .

K.
-{q
' wi*
'*&
LEFT
INTRODUCTION
Your new Gravely tractor will give you long years of highly satisfactory
performance if maintained and operated as outlined in this manual,
It is important that you know the serial number of your tractor. It is
located in the motor mount plate just in front of the engine, and is
It is also important that you know the model number, serial number and
specification number of the engine. They are located on the engine name plate
on the left hand side of the engine shrouding. !
Engine Model Number
Engine Serial Number
Engine Specification Number
Any correspondence concerning your tractor should contain these numbers
to expedite prompt response to your needs.
To continue its program of quality and design improvement, the manu-
facturer reserves the right to change specifications, design or prices without
notice and without incurring obligations.

ROUTINE MAINTENANCE
Figure 1 (816)
Transrnission - (All models)
Capacity - 6 U. S. Quarts (5.7 L.)
Use SAE 30 API classification SC or SD oil for year
round use. Check level only upon evidence of leakage.
Level should be at level plug.
Drain plug is on the right side of the transmission
near the bottom of the transmission case.
FNGINF OII
F ILEF TUBE
AND D]PST CK
Figure 2 (816)
ENGINE O L
,DRAIN PLUG
Engine (816)
Capacity - 4U. S. pints (1.9L.)
Use API classification SC or SD oils
Summer - SAE 30
Winter-SAE5W20
check oil level daily. Maintain at full mark. Do not
overffll.
Change oil after initial 5 hours of operation and then
every 40 hours or oftener under dusty conditions.
Chtrnge oil filter every 200 hours or oftener under
dusty conditions.
Drain plug is on the engine base at the rear left hand
corner.
Engine (810,812,814)
Capacity - 5 U. S. Pints (2.4L.)
Use API classification SC or SD oils
Summer - SAE 30
Winter-SAE5W20
Check oil level daily. Maintain at full mark. Do not
overfill.
Change oil after initial 5 hours of operation and
then every 25 hours or oftener under dusty conditions.
Drain plug is on the right side of the engine base.
Figure 4 (810, BLL,BI )
Attachment Li.ft (Hydra,lti" lift Models)
Do not run tractor without fluid in the hydraulic
system.
Capacity -IV2 U. S, Quarts (1.4 L.1)
Use only Type A Suffix A Automatic Transmission
Fluid such as Shell Donax T-6 or Gulf Dexon Automatic
Transmission Fluid.
Clieck fluid level every oil change. Use care r,vhen
chccking fluid level. Do not allorv dirt to enter the hy-
draulic system.
Maintain lcvcl :rt full mark on dipstick.
ENGINE O]L
FLLLER TUBE
AND DIPST]CK
IRANSIVLSSION OIL
DR,AIN PLUG
Figure 3 (810,812,814)
IRANSM SSION FILLER PLUG

Figure 6
Creasing
These are four (4) grease fittings on a tractor. Grease
with general purpose grease every eight (8) hours.
King Pin Weldments - 2
Axle Pivot Pin - 1
Direction Control Lever - I
Any tirne the tractor is washed or "hosed o{", - it
should be greased to force any moisture out of the
bearing"
If ihe tractor is operated with the tractor wheels in
water above the front rvheel bearings, the front rvheel
bearings should be repacked with r'vheel bea-ring grease'
Periodic light oiting of the pivot points of linkrigc aids
operation.
Air Cleaner
Clean or replace when necessary. A loss of porver
is an indication that air cleaner service is rcquircd.
Do not cletrn' the c.lcmcnt rvith compressed air or
u'ash the element.
The air cleaner element should be cleaned by gently
tappirig orr rr flnt surfacc.
Replace the t'lcment if it is bent, crushed or damtrged
in any way, or if the dirt cloes not readily fall off.
When reirrstalling, be sure the clement fits the
adapter piate and the rving nut is finger tight.
Tires
Proper tire pressure is 12-18 psi (.842-1.265 kglcm'z).
Check regularly and maintain at proper pressure.
Battery
Regularly check electrolyte level. Maintain at proper
levcl by adding distilled water.
Figure 7
PTO Clutch
It is necessary that the PTO lever have free travel.
If the free travel is too great, the clutch r'vill not disen-
gage and if the free travel is too little, the clutch rvill
activate too hard and operation will be afiected. With
the PTO lever engaged (IN position) there should be
1.375 to 1.5 inches (3.49cm --3.81 cm) of frcc travel be-
tween the lever and the back of the slot in the cover
plnte.
- lVhen the free travel reaches one (1) nrch (2,54cm),
adjust the clevis on the PTO rod until there is 1.375 to
1.5 inches (3.493 - 3.81cm) of free travel of the lever
again.
NOTE: When operating the tractor rvithout a porvered
atterchn-ient, engirgc the PTO to iucrease oil circulatiotr
rvithin the transmission.
Figure 5
Clearances 870,812,874 816
Spark plug gap .025" (.636mm) .025" (.636 mm)
Intakevalve .008-.010 (.203-.254mm) .010-012"(.254-.303mm)
Exhaust valve .017-.020" (.432-.508mm) .010-012" (.254-.303mm)
F orw ar d-Reaer s e Clut che s
Gap - .020-.030 inch (.508-.762mm) (Even gap all around)
Readjust clutches when gap exceeds .050' (1.27mm). Ad-
just by tightening nuts on studs.
Be sure nuts are tightened equally.
MEASURE
-s

FUEL TANK C,AP
SIEER NG
WHEEL
LIGHT SW]ICH
(HIDDEN)
HYDRA U LI C
CONIROL
D RECTION
CO NTROL
LEVER
?'5',iJ3-
1
RANGE
FI FCTOR
Ki
coNTROtS
Figure 8
Hydraulic Lift Models
L Fuel Tank Cap -open to fuel tank, capacity-S.3
U. S. gallons (20 L.). Use high quality, regular grade
gasoline.
2. SteeringWheel - turn steering wheel in the direction
you wish to go,
Throttle - controls engine speed.
OiI Pressure Light (816 onlg) - indicates low oil pres-
sure. If oil pressure light should come on while in
operation, stop tractor immediately and check oil
level. Add oil, if necessary. If oil level is not low,
call your dealer or see your engine service manual.
Directi,on Control Leoer - push away from you to go
forward, pull back toward you for reverse. The cen-
ter position is neutral.
Brake - r'vhen depressed, activates the transmission
brake, also will disengage the Direction Control
Lever if it is engaged. Aftcr brake has been en-
gaged, the Direction Control lever must be re-
engaged.
KeU lgnition - ON and start - clockwise; OFF -
counterclockwise.
STEERING
WHEEL
Figure 9
Manual Lift Models
B. Cigarette Lighter - push in to heat.
9. Gear Selector Leaer - Selects one of four gears.
10, Range Selector Leoer- select high or low range.
IL PTO Control Leoer- engages or disengages Power
Take Off.
12. Attachment Lift Leaer - Pull toward you to raise
the attachment, push arvay from you to lower the
attachment.
13. Attachment Position Lock-Use to lock the at-
tachment lift in any position.
14. Hydraulic Control Leaer - Pull back to raise attach-
ment, push forward to lower attachment, push fully
forward for float (allowing attachment to follow the
ground contour). r
15. Choke - More lever to "ON" position when starting
a cold engine. Move lever torvard 'OFF" as engine
w-arms up,
16. Light Suitch - Pull to tum on lights (key must be on
for light to burn) .
17. Battery Seroice Door - open to check battery,
tt.
4.
5.
6.
7.
BATTERY
SERVICF DOOR
ATTACHMENT
LI FT LEVER

OPERATION
This tractor is equipped with a spur gear transmis-
sion and all speeds are obtained by shifting sliding spur
gears. Therefore, it is necessary to stop the fractor before
attempting to shift gears. The Direction Control Lever
must be in Neutral and the tractor stopped before shifting
the Range Selector Lever, or the Gear Selector Lever.
BEFORE STARTING
1, Check gasoline level. Use any high quality, regular
grade gasoline, The fuel tank holds 5.3 U. S. gallons
(20 L.).
2. Check oil level. See "Maintenance" section.
3. Check to see that PTO is in OUT position. Direction
Control Lever is in Neutral (Vertical to ground) and
Gear Selector Lever is in Neutral.
CAUTION: Be sure Direction Control Lever is in Neutral.
STARTING:
1. If engine is cold, move choke lever from OFF to
ON position.
2. Move throttle control to approximately halfway be-
tween "IDLE" and "FAST" position.
3, Turn Ignition Key to start (clockwise). Do not hold
engaged more than 15 seconds without allowing a
30 second cooling period for sharter motor.
4. As soon as the engine starts, release the key.
5. After the engine starts, and as it warms up, move
choke control towards the OFF position.
STARTING TRACTOR MOVEMENT:
1. Move the Gear Selector Lever to desired gear.
2. Move Rang Selector Lever to desired range.
3. To go forward, push the Direction
forward (away from you) gradually
in place.
Control Lever
until it locks
4. To back up, pull the Direction Control Lever back
until it locks in place.
5. To stop tractor motion, apply brake.
NOTE: The transmission linkage is equipped with a
cam so that when the brake is applied, the Direction
Control Lever automatically moves to neutral.
DO NOT SLIP FORWARD.REVERSE CLUTCHES
TO ACHIEVE SLOWER GROUND SPEEDS. DOWN
SHIFT OR TAKE SMALLER SWATH IF GROTIND
SPEED IS TOO FAST FOR THE ATTACHMENT TO
DO ADEQUATE, JOB.
STOPPING TRACTOR:
1- Apply brake.
2. Be sure PTO Lever is in OUT position,
3. Move throttle to idle.
4, Turn ignition key counter-clockwise to shut ofi en-
gine, Removed key. Tractor cannot be started with-
out the key.
Engaging Power Take Off (P.T.O,):
1. Stop tractor motion, slow engine to fast idle. (This
will reduce PTO clutch wear and prolong PTO
clutch life).
2. MOVE PTO Lever from OUT to IN.
Disengaging Power Take OFF (P,T.O.):
1. Move PTO Lever from IN to OUT.
CAUTION: Stop tractor and disengage PTO and turn
ofi ignition key before attempting to work on or adjust
the attachment.
Air cooled engines are designed to be operated at full
throttle (3600 rpm). Operate the tractor wi,th the engine
at full throtfle, particularly when operating under loads.
Low Range mph (km/hr)
Forward
1. .5 (.80)
2. .75 (L.2r)
3. 1.12 (1.80)
4. L.6s (2.72)
Reverse
1.12 (1.80)
t.6e (2.72)
2.53 (4.07)
3.80 (6.r)
High Range mph (km/hr)
1. 2.53 (4.07) 1,12 (1.80)
2. 3.80 (6.11) r.6s (2.72)
3. 5.70 (e.17) 2.53 (4.07)
4. 8.54 (13.74) 3.80 (6,11)
NOTE: When changing directions at higher speeds, allow'
the tractor to stop before shifting into the opposite di-
rection such as forward to reverse.

REAR HITCFI
Figure 10, 816
816
This tractor is equipped with a liftable rear hitch for
mounting of powered and non-powered rear attachments.
It also can be secured in fixed position for use of the
tractor with center-mounted or front mounted attach-
ments. This allows the raising and lowering of the
attachments without affecting the position of the rear
hitch.
The locking strap is secured from the frame to the
rear hitch and the lift rod removed.
Figure 10 shows the hitch liftable. Figure 11 shows
the hitch rigid.
Most non-powered liftable rear attachments mount
with a pin. See ffgure 12.
Be sure to attach liftable rear altachments using the
pin provided with the tractor.
Trailing attachments, such as carts, can be secured to
.he hitch using the trailing hitch kit, See page 13.
810, 812, 814
This tractor is equipped with a rear hitch for mount-
ing trailing attachments using the trailing hitch kit. A
liftable rear hitch is an option
.{,
aw,ee-: --@*" aF ..
Figure 12, 816 Figure 13, 810, 812, 814

ATTACHMENTS
Center - Mount Attachments
50" Rotary Mower - 810, 812, 814' 816
40" Rotary Mower - 810, 812'814
Figure 14
Mounting
Loosen the two jam nuts on the lift rod and thread
them to approximately one inch from the end of the rod.
Do not lock.
Turn the lift rod upside down so the pin of the
mower pivot is up. Insert the mower pivot from the
inside (middle of the tractor) through the second hole
from the end of the lift lever shaft weldment. Rotate
the lift rod so the bend is down.
Place the mower in front of tractor with the gauge
wheel towards the front wheels of the tractor.
Carefully drive thc tractor over the mower until the
mower is approximately cerrtered between the front ancl
rear tires.
Figure 15
Insert the lift rod of the mower through the ring on
the morver deck. Secure with flatlvasher and hair pin
cotter,
Being sure the attachment latches are open, slowly
raise the mower, slipping the pivot arm r'veldment into
the attachment latches and secure with hair pin cotters.
Raise the mower completely, be sure there is no in-
terference is noted, lower the mower and back off the
iam nuts until there is no interference r,vhen the mower
is raised completely. Be sure to jam nuts together. The
mower should be level when raiied and clear the frame
of the tractor .25 to .50 inch (.63 to 1,27cm).
Lower the mower cornpletely and attach the drive
shaft of the mower to the stub shaft of the tractor PTO.
Height Adiustment
Cutting height is controlled by the gauge wheels at
the rear of the mower. Move the Height Adjustment
Control in the quadrant to achieve the proper cutting
height.
Lubrication
The mower has seven (7) grease fittings, these should
be greased every eight (8) use hours.
Spindles (under deck) - I each
Belt idler arm - 1
Drive Shaft - 1
Caster Wheels-I each
The gear housing is filled with good grade of gen-
eral purpose grease. Periodically remove the gear hous-
ing cover and check for lubrication.
Remooal
With the mower is the raised position, remove the
hair pin cotters and open the attachment latches. Lower
the mou'er fully. Rernove lift rod from mower. Remove
the drive shaft of the n-rower from the PTO shaft of
the tractor.
Back tractor over mower. Remove lift rod from
tractor.
Figure 16
BeIt Replncement
In case of belt
proper installation.
P'
I
!r-.*-
/\
/ r'-\ ',
r\ )t
\ .- -.' /
\,--l
DIAGRAM
l0
replacernent, refer to figure 16 for

Front Mounted Attachments
38 - Inch Snowblower
44 - Inch Snowblower
Ihe 19075E1 Front Drive Kit is required.
\\_-\
\S_-:
I
I
I
_L_
\
I
I
L-
I
I
I
I
- - L't\.
/,'-\\'
t(t\
" \--l I
\*-,/
.'
,...:..
$l'' ::.l:rr
,i:,ri{l:
J
&t;
ffi
ffi
ffis
,ffi
Figure 17
L lnstall the Front Drive Kit on the tractor following
instructions witli the kit.
2. Slide the Double Joint Assembly on forward drive
shaft. Position tractor approximately two inches
from the snowblower.
3. Start the Double Joint Assembly on the shaft of the
snowblowcr. Roll tractor forward until the frame on
the snowblor,ver fits in the latches on the bracket as-
semblies on the tractor. Close thc latches and se-
cure in place with hairpin cotters. Raise snowblower
stand and secure in the raised position.
4. Insert the Push Rod Guide Weldment into the Push
Rod and install irr the top hole of the lift lever shaft
weldment of the tractor. Sccure r,vith washer and
!ralrpin cotter, Insert the Push rod through the
hole on the frame of the snowblower and -secure
with u'asher and hairpin cotter.
&!
{i ,r
:$
Figure 19
CAUTION: Use extreme care when operating Snow-
blower. Keep hands and feet away when auger and fan
are turning. Stop engine and blower before making any
adjustments or clearing chute of blockage.
Removal
CAUTION: Be sure the PTO is disengaged and engine
stopped.
1. Lor,ver Snowblower. Lower stand and secure. Re-
move hairpin cotters, raise the latches in raised po-
sition. Remove Push Rod from snor.vblorvcr and
Push Rod Guide Weldment from tractor.
2" Roll tractor away from snowblower. Double fount
Assembly will slide off snowblower shaft or fonvard
drive shaft. Ren'rove Double Joint Asscrnbly from
the snowblor,ver shaft or the iorward drive shaft.
Remove the drive shaft by pulling on the locking
collars on the universal joinls and slicle the drivc
shaft off the PTO shaft ancl the shaft through the
front axle. It is not necessary to remove the Front
Bracket Assemblies.
Figure 18
I1

Four Bolt Mounting Attachments
Requires:
19075E1- Front Drive Kit
11601E1- Front Adapter Kit
]. Mount the Front Drive Kit on the tractor.
2. Start the Double Joint Assembly on the forward drive
shaft and on the- adapter of the adapter Assembly.
Slide thc Assembly in place in the latches, close
latches and secure with hairpin cotters.
Figure 20
Trailing Attachments
Requires ll627El Trailing Hitch Kit.
Figare 22
816
Attach the Rear Hitch to the Rear Hitch Weldment
securing it in place with the hitch pin.
Thread a nut on the ball stud and insert the ball
stud down through the rear hitch. Secure in place with
another nut.
Insert the Push Rod Guide Weldment into the push
rod of the Front Adapter Kit. Attach the Push Rod
Guide Weldment to ihe Lift Lever Shaft Assembly
of the tractor, Attach the push rod to the Adapter
Weldment.
Figure 2l
4. Mount attachment to the Front Adapter Kit as
shown. Secure attachment in place with two bolts
and two nuts.
Stabilize the rear hitch by tightening the bolts against
the pad until the pad secures the hitch in a rigid po-
sition. Jam the nutl on the bolts against the rear hitch
weldment.
Attach the trailing attachment to the ball stud using
the split socket.
Figure 23
810,812, 814
Thread a nut on the ball stud and insert the ball -"-
stud down through the rear hitch, Secure in place rvitl
another nut.
Attach the trailing atttrchment to the ball stud using
the split socket.
3.
L2

Rear Mount Attachments
1888681 Rotary Tiller
Requires:
816-19134E1 Rear PTO
810,812,814 - 19814E1 Rear
- l9803El Rear
Lubrication - Tiller:
Use general purpose grease to lubricate the shaft in the
axle bearing rettriner, Use light oil on the quick dis-
connect of the chain drive assembly before using. Clean
and lubricate after each use. Us! Sef 30 oii in the
chain drivc assembly. Fill the bottom plug level holding
the chain drive assembly vertically (qtiicf: disconnect td
top_, and output shaft on bottom). Check level period-
ically.
Mounting:
Be sure the Rear PTO and hitch are installed on the
tractor.
PTO
Hitch
Recommended:
11924E1 Front Wheel
11925E1 Rear Wheel
Lubrication - Rear PTO:
Weights
Weights
Use general pu{pose grease in Universal joint. Use light
oil on quick disconnect of Universal joint and clean and
lubricate after each usage. Use SAE 90 gear lubricant
in_ gear box. Fill gear box to check plug (plug on side
of gear box) with tiller level. Oil level should ge checked
periodically.
PIO,
SRACKEI
AT TACH F C
rtnp'
FILLER PLUG Figure
Figure 27
Mount the tiller on the rear hitch
next to the tiller gear box. Secure
two pins provided.
Connect the driveshaft to the tiller
from the rear PTO.
\A
A
Wz
t:.
Figure 24
//%- :- FI1 L€A PLUG
using the 2 holes
in place with the
to the driveshaft
LEVEL
(tsroD€Nl
Figure 25
l3

Operation:
The attachment lift system of the tractor controls
the depth of tilling.
Operation of the tiller with the engine at full throttle
is recommended because maximum power is thus pro-
vided.
Engage the direction control lever and then lower thc
tiller. Do not DROP tiller into ground.
Operation at slow ground spceds gives a finer soil
condition (srnaller soil particles).
Select that gear rvhich r.vill produce the desired con-
dition, usually lst year, lor'v range, however experimen-
tation may indicate use of a slightly higher gear is
acceptable.
Overlap cuts slightly to avoid leaving ridges of un-
tilled soil.
SAFETY FIRST:
Clear area to be tilled of all trash such as rocks,
large stones, wire, bones, etc,
Knclw the controls and how to stop tractor and tiller ,-
quickly,
Keep bystanders away.
Disengage all clutches before starting engine.
Disengage all porver and turn off engine before
parking, making adjustment, or clearing trash (rvire,
vines, etc.) from tiller tines,
Use caution rvhen manc.uvering or transporting.
Keep tine cover and shield in place.
Stop and inspect tiller for damage after striking
Iarge objects such as buried stumps or rocks.
Axle Mount Attachments
48" Snowdozer
Front-Mount 50" Rotary
Front-Mount 40" Rotary
Mower
Mower
Figure 28
1. Move tractor over frame of attachment. On Snow-
dozer, removed pins and lay blade angle control
dou'n to prevent tire from running over it.
2, Place the rnounting points of the attachment in the
notches in the rear hitch weldment. Close latches
and secure in place rvith hairpin cotters,
3. N{orvers - Install the lift pivot in the last hole
(closest cross sliaft) of the lift lever shaft rveldment.
Snorvdozer - Install the lift pivot in the next to the
last hole of the lever shaft rveldment,
NOTE: The blade has a lift-lower range of about 10
inches, (25.4cm). The blade can be lorvered more than
the norn"ral tu'o and one-half inchcs (6.35 cm) below
ground level b-v setting the lift pivot assembly in one
of the three holes belolv the normal position. Horvever,
this decrcases the ground clearance in the raised position.
Lii! P,vor qou rr nP\r _o rop 5. e io'
SnowDoze '.
Figure 29
Mowers Only
4. Install the driveshaft of the Front Drive Kit from
the PTO to the shaft through the front axle. Attach
the mower driveshaft to the shaft through front axle.
Cutting Height Adjustment
Cutting height is adjusted with the two level ad-
justment rbds and the adjustment pin. The morver should
be level both front to rear and side to side.
Lubrication 5
Grease u'ith general purpose. Grease all fittings at
least evcry 8 operating hours.
Blade Spindles-l each
Drive Shaft - 1
Idler Pivot Arm - 1
Wheel Ann-1each
Gauge Wheel-l each
Periodically, check thc grease level of the gearbox.
Capacity is one pound (,a5 Kg.) of general purpose grease.
L4

SPECIFICATIONS
MODEL 810 (1e48eEl) 812 (re4e0E1) 812 (r9726E1) 814 (re752Er) 814 (18800E1) 816 (18803E1)
ENGINE
Type
Horsepower @
3600 rpm
Number of Cylinder
Stroke - inches
Bore - inches
Displacement -
cu. in.
Oil Sump Capacity -
US pints
Oil Speciffcations
Winter
Summer
4 cycle
air cooled
10
I
2.87 (72.90mm)
3.20 (82.55mm)
23.90 (391.65cc
5 (2.4L.)
SC or SD
SAE 5W2O
SAE 30
4
a
cycle
ir cooled
3.25 (82.55mm)
3.37 (89.60mm)
29.07 (476.30cc
5 (2.4L.)
SC or SD
SAE 5W2O
SAE 30
12
I
4 cycle
air cooled
t2
1
3.25 (82.55mm)
3.37 (89.60mm)
29.07 (476.30cc
5 (2.4L.)
SC or SD
SAE 2W2O
SAE 30
4 cycle
air cooled
L4
I
3.25 (82.55mm)
3.50 (BB.90mm)
3I.27 (5I2.43cc',
5 (2.4L.)
SC or SD
SAE 5W2O
SAE 30
4 cycle
air cooled
L4
I
3.25 (82.55mm)
3.50 (88.90mm)
3L.27 (5L2.43cci
5 (2.4L.)
SC or SD
SAE 5W2O
SAE 30
air cooled
16.5
2
3.00 (76.20mm)
3.25 (82.55mm)
49.80 (816.08cc)
4 (1.8e L.)
SC or SD
SAE 5W2O
SAE 30
FUEL SYSTEM
Capacity - US gal,
Grade
5.3 (20 L.)
Regular - 90
octane or
higher
5.3 (20 L.)
Regular - 90
octane or
higher
5.3 (20 L.)
Regular - 90
octane or
higher
5.3 (20 L.)
Regular - 90
octane or
higher
5.3 (20 L.)
Regular - 90
octane or
higher
5.3 (20 L.)
Regular - 90
octane or
higher
TRANSMISSION
Oil Capacity -
US qts.
Oil Recommendations
6(5.67 L.)
SAE 30
3(5.67 L.)
SAE 30
6(5.67 L.)
SAE 30
6(5.67 L.)
SAE 30
6(5.67 L.)
SAE 30
3(5.67 L.)
JAE 30
HYDRAULIC SYSTEM
Fluid Type
Capacity
Not Available Not Available Type A
Suffix A
Auto-Trans.
Fluid
172 US qts.
(r.4 L.)
Not Available Type A
Suffix A
Auto-Trans.
Fluid
172 US qts.
(r.4 L.)
Type A
Suffix A
Auto-Trans.
Fluid
l7z US qts.
(1.4 L.)
15

lflilurruntU
Proclucts manufactured by Cravely are warranted to be frce from clefective matcrial ancl workmanship for a period of onc
ai;;rii" of p"."h"re "i,1". "o.*rl use by a homeowner, and for a period of nincty (90) clays from date of purchtrse, whcn
for commercial purposes.
year
used
Any de[, r'tive part manufrLctured by Cravely will
mlnufacturer or by tle manttfacturer's t'xpressll
be rcplaced rvithout charge provided such part is certificcl as
authorizecl reprcsent:rtivc.
IN{PORTANT PROVISIONS
by the
cltrys af tcr clate of pr.rr-
This warranty is not subject to chrrngc or modification by_ficld rep-resentatives or Gravcly clealers. Any r'virrranty other tlian the
warranty expressly stated above rvill not be binding upon the manrtfitcturer.
Certain components carry separ:rte warranties by thc manrrfacturcr of such co-mponents. Defective -components are slrbicct. to their
-""ui""i"."i's warr:rntici, ,nd ,,"y cltrims, work' or r.turn of pitrts mtt:t lr. t]lri'rrqh rn nrtthoriz'-tl Crrrvelr' tlertlt'r' S' n i( r' cosls
i;;'il;1;;;;p"ittrre:"] ;';ia t" ;"ii i;; the i"eler ,rre the^ responsibilities of tlie customer, and rvhen such sen'ic. is lcrformcd
by the dealei, the ?ealer will charge the customer the usual rate for srtch st'rvicc.
It is the customer's responsibility
chase to ensure prompt handling
maii the "Warranty Carcl" to the manufacturer rvithin fottrteen
any warranty claim by thc clealer or the manufactrtrer.
to
of
A.GRA/ELY
A DIVISION OF CLARKE-GRAVELY CORPORATION
ONE GRAVELY LANE
CIemmons, l'|orth Carolina 27012

Other manuals for 810
1
This manual suits for next models
3
Table of contents
Other Gravely Tractor manuals

Gravely
Gravely CONVERTIBLE 10 User manual

Gravely
Gravely D User manual

Gravely
Gravely L Series User manual

Gravely
Gravely 985114 - 16 HP Owner's manual

Gravely
Gravely Rapid M 985403 Owner's manual

Gravely
Gravely 810 User manual

Gravely
Gravely 985103 User manual

Gravely
Gravely L User manual

Gravely
Gravely CONVERTIBLE 7.6 User manual

Gravely
Gravely 5000 Series Manual