GreatCall 5STAR Urgent Response User manual

User Guide
www.greatcall.com
PKG5STARUSEGDGRCOBN-R00
5Star_gen2_UserGuide_111252013_WJC.indd 2-3 11/25/2013 3:47:49 PM

1
MY IMPORTANT INFORMATION
Use this page to take a note of your important contact, device
and account information.
Personal Contact 1
Name: ________________________________________________
Phone:________________________________________________
Personal Contact 2
Name: ________________________________________________
Phone:________________________________________________
Device Serial Number: ___________________________________
Account Number: _______________________________________
5Star_gen2_UserGuide_111252013_WJC.indd 1 11/25/2013 3:47:49 PM

2 3
Welcome to 5Star Urgent Response™ by GreatCall®
With your new 5Star Urgent Response service , you will receive
immediate, reliable access to our Certied Response Agents
who are trained to provide help in any situation – 24 hours a day,
7 days a week.
We welcome your feedback anytime. If we can help you be more
prepared, please write us at GreatCall Customer Service,
P.O. Box 4428, Carlsbad, CA 92018, email us at:
customerservice@greatcall.com or call us at 1-800-463-5412.
Best Regards,
Your Friends at GreatCall
If you purchased 5Star Urgent Response for
a family member, or you are a caregiver, you
should add the GreatCall Customer Service
number (1-800-463-5412)to your personal
contact list or cell phone.
You should store this phone number because
there may be some unique circumstances
when you will need to contact GreatCall Cus-
tomer Service in case of an emergency. The
5Star Response Center can only be contacted
through The 5Star device.
IMPORTANT!
5Star_gen2_UserGuide_111252013_WJC.indd 2-3 11/25/2013 3:47:49 PM

4 5
Turning On The 5Star.......................................................39
Turning Off The 5Star.......................................................40
Making a Test Call............................................................41
Calling the 5Star Service..................................................42
Calling 9-1-1 in an Emergency with The 5Star.................44
Connecting with Urgent Care...........................................45
Answering The 5Star........................................................46
About the Service Indicator .............................................46
About the Battery Indicator .............................................48
Attaching the Accessory Clip ...........................................50
When to use 5Star Urgent Response ..............................51
If your Call to 5Star Requires Emergency Assistance.......53
MANAGING YOUR PERSONAL PROFILE ...............................54
Three Ways to Set Up your Personal Prole.....................56
Using The 5Star Locator Service......................................60
Contents
CHAPTER 1: ITEMS IN THE 5STAR BOX ..................................9
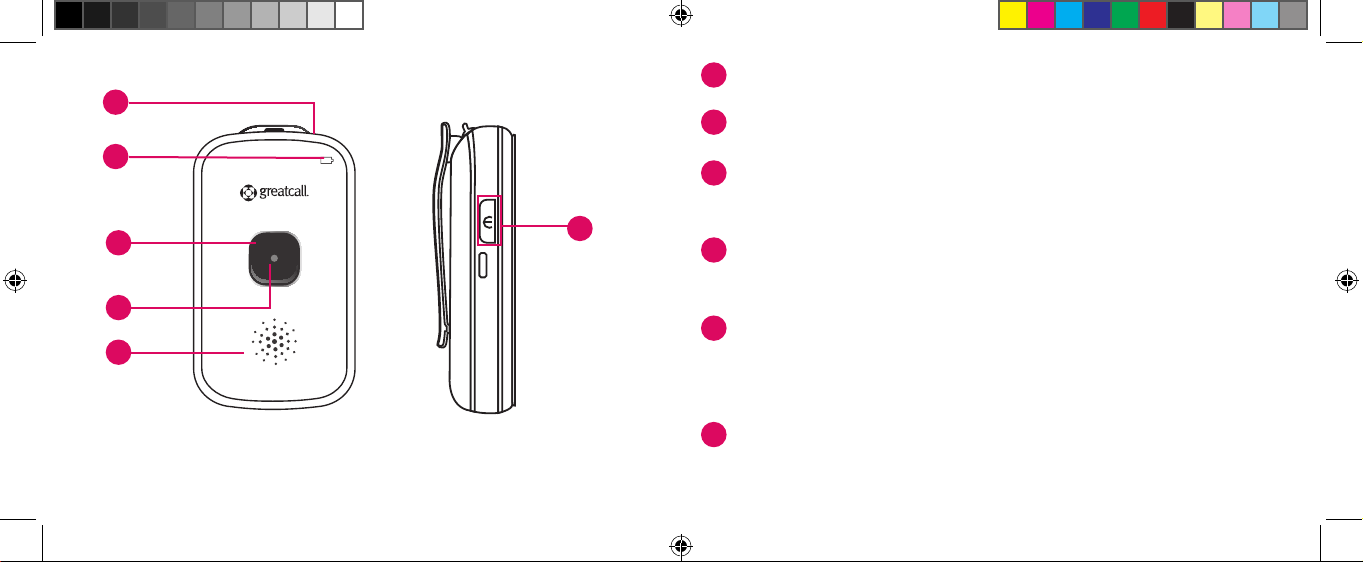
The 5Star .........................................................................10
The 5Star .........................................................................12
CHAPTER 2: ACTIVATING YOUR 5STAR SERVICE ..................19
STEP 1 – Gather required information.............................20
STEP 2 – Go online or call to set up your account. ..........21
STEP 3 – Turn on The 5Star to activate............................22
CHAPTER 3:CHARGING THE 5STAR......................................27
The Charging Cradle ........................................................27
Setting up the Charging Cradle .......................................30
Charging The 5Star ..........................................................32
When to Charge The 5Star...............................................36
CHAPTER 4: USING THE 5STAR............................................39
5Star_gen2_UserGuide_111252013_WJC.indd 4-5 11/25/2013 3:47:49 PM

6 7
Finding a Person with The 5Star......................................62
Sending a “Find 5Star” Tone to your Device ...................63
Recording “Just in Case” Notes .......................................64
Managing your 5Star Account Online..............................65
TERMS AND CONDITIONS....................................................66
MONTHLY CHARGES ............................................................78
OUR 30-DAY RETURN POLICY..............................................78
HEALTH AND SAFETY INFORMATION ....................................79
5Star_gen2_UserGuide_111252013_WJC.indd 6-7 11/25/2013 3:47:49 PM

8 9
CHAPTER 1: ITEMS IN THE 5STAR BOX
• The 5Star
• Charging Cradle
• Wall Power Adapter
• Accessory Clip
• Keychain Attachment
• User Guide
• Quick-Start Guide
• Service Highlights
5Star_gen2_UserGuide_111252013_WJC.indd 8-9 11/25/2013 3:47:49 PM

10 11
The 5Star
6
1
3
5
2
Battery
Indicator
Power
Button
FRONT LEFT SIDE
Microphone
Call
Button
Service
Indicator
Speaker
4
1Microphone – Picks up the sound of your voice for calls.
2Battery Indicator – Shows the device’s battery strength.
3Call Button – Allows you to call the 5Star Response Center or
9-1-1.
4Service Indicator – Indicates the presence of wireless cover-
age and that the device is ready to use.
5Speaker – Allows you to hear the 5Star Response Agent,
9-1-1 Operator, others conferenced in by 5Star, and voice and
tone signals.
6Power Button – Turns The 5Star on and off.
5Star_gen2_UserGuide_111252013_WJC.indd 10-11 11/25/2013 3:47:50 PM

12 13
The 5Star
6
1
3
5
2
FRONT LEFT SIDE
4
1Microphone – Picks up the sound of your voice for calls.
2Battery Indicator – Shows the device’s battery strength.
3Call Button – Allows you to call the 5Star Response Center or
9-1-1.
4Service Indicator – Indicates the presence of wireless cover-
age and that the device is ready to use.
5Speaker – Allows you to hear the 5Star Response Agent,
9-1-1 Operator, others conferenced in by 5Star, and voice and
tone signals.
6Power Button – Turns The 5Star on and off.
5Star_gen2_UserGuide_111252013_WJC.indd 12-13 11/25/2013 3:47:50 PM

14 15
1234567
MODEL: APT230 FCC ID P4M-APT230
QUALCOMM 3G CDMA
Made in China 13.08
1234567
MODEL: APT230 FCC ID P4M-APT230
QUALCOMM 3G CDMA
Made in China 13.08
9
10
11
BACKRIGHT SIDE
Accessory
Slot
Serial
Number
Charging
Contacts
Accessory
Clip
Reset
Button
7
8
7Accessory Clip – Allows you to attach the device to a purse,
backpack, or other items.
8Charging Contacts – Allows charging with the supplied
Charging Cradle.
9Accessory Slot – Allows you to attach accessories such as a
clip or keychain for carrying.
10 Serial Number – This number is used for activating the device
for the rst time.
11 Reset Button – ONLY use if you are instructed to do so by a
GreatCall Customer Service Representative.
5Star_gen2_UserGuide_111252013_WJC.indd 14-15 11/25/2013 3:47:50 PM

16 17
By design, there is no volume control. If you are
in a location where the device’s sounds may be
disruptive, like a movie theater, you may want
to turn off your device. Make sure to turn it back
on afterwards in case you encounter an unsafe
situation. If you are in a noisy area, you will need
to move the device closer to your ear or to your
mouth.
NOTE
To help make the service more convenient for
you, we also offer other accessory options like a
portable car charger and a carrying case. To learn
more or purchase, go to www.greatcall.com or
call Customer Service at 1-800-463-5412.
NOTE
5Star_gen2_UserGuide_111252013_WJC.indd 16-17 11/25/2013 3:47:50 PM

18 19
CHAPTER 2: ACTIVATING YOUR 5STAR SERVICE
Do not turn on or charge your device until you
have set up your account. If you turn it on prior
to setting up your account, the device will fail to
activate. If the device failed to activate, power off
and start with STEP 1.
IMPORTANT!
To ensure that your 5Star service is activated successfully, it is
important that you follow these simple steps when activating.
• If you purchased your 5Star on a website like amazon.com
or through a retail store, please proceed to STEP 1.
• If you purchased your 5Star by calling GreatCall directly or
on greatcall.com, please proceed to STEP 3.
5Star_gen2_UserGuide_111252013_WJC.indd 18-19 11/25/2013 3:47:50 PM

20 21
STEP 1 – Gather required information.
To ensure that your activation process goes smoothly, you will
need to have the following personal information ready when
activating your service. You can take a note of your emergency
contacts and device Serial Number provided at the beginning of
this guide.
• Your name, address and phone number (your address must
be a physical, U.S. based address, not a Post Ofce Box)
• The billing address, if different from your physical address
• Your email address
• A valid credit card or debit card
• Name and phone number of at least one emergency con-
tact
• The 7-digit Serial Number located on the back of the device
(Note: the entire 11-digit serial number is also located on
the side of the box. When using this number please only
use the last 7 numbers for activation.)
STEP 2 – Go online or call to set up your account.
Online Method:
The best way to set up your account is online at:
www.greatcall.com/5StarActivate.
There will be a discount on
your activation fee for activating online.
1. Enter device Serial Number and account information.
2. Enter all required payment information.
3. Enter an emergency contact.
4. Review customer emergency contact, charges and pay-
ment information.
5. Conrm account setup.
6. Make sure to make a note of your account number. You can
take a note of your account number on the rst page of this
5Star_gen2_UserGuide_111252013_WJC.indd 20-21 11/25/2013 3:47:51 PM

22 23
User Guide.
Phone Method:
If you are an existing GreatCall customer and would like to add
a 5Star to your account, do not have access to the Internet, or
you need to activate more than one device, call 5Star Activation
toll-free at 1-800-675-0158. Be sure to have your information
from STEP 1 handy.
STEP 3 – Turn on The 5Star to activate.
Now that your account is set up, The 5Star can be turned on for
the rst time. To complete activation, follow these simple steps:
1. Remove the “DO NOT POWER ON BEFORE ACTIVATING”
sticker from the back of your device and press the Power
Button. DO NOT REMOVE THE SERIAL NUMBER STICKER.
2. After a few moments, you will hear a voice prompt saying
“Setting up device, please wait” followed by “Welcome to
5Star” within a few minutes.
3. The Service Indicator in the middle of the Call Button will
begin blinking green, indicating the device is working
properly.
4. Once the device is turned on, you will soon receive a phone
call on The 5Star conrming activation. Simply press and
release the Call Button rmly to answer the call.
Congratulations! The 5Star service is now activated.
5Star_gen2_UserGuide_111252013_WJC.indd 22-23 11/25/2013 3:47:51 PM

24 25
The device is not ready for use until you hear
“Welcome to 5Star” and the Service Indicator
located at the center of the Call Button is blinking
green.
IMPORTANT!
If you hear a voice prompt saying “Unable to
activate. See User Guide,” please call The 5Star
Activation Team at 1-800-675-0158 for assis-
tance with completing the activation process.
IMPORTANT!
If you do not hear “Welcome to 5Star” after 20 min-
utes, it may be necessary to reboot the device. To
reboot, press and hold the Power Button until you
hear “Powering Off”. Once the device is off, press
the power button again. You will hear “Setting up
device, please wait” repeat several times as the
device activates. After a few minutes you will hear
“Welcome to 5Star,” conrming The 5Star has been
activated and is ready for use. If you do not hear the
“Welcome to 5Star” voice prompt after 20 minutes
again, please call the 5Star Activation team at
1-800-675-0158 for assistance.
NOTE
5Star_gen2_UserGuide_111252013_WJC.indd 24-25 11/25/2013 3:47:51 PM

26 27
CHAPTER 3:CHARGING THE 5STAR
It is very important to always keep The 5Star charged and with
you so that immediate access to help is readily available. Out of
the box, the device is only partially charged. It is important that
you fully charge your device after activating.
The Charging Cradle
The Charging Cradle allows a simple way of storing and keeping
The 5Star charged when not in use. The following will guide you
through how to set up and use the Charging Cradle with The
5Star device.
5Star_gen2_UserGuide_111252013_WJC.indd 26-27 11/25/2013 3:47:51 PM

28 29
1
2
3
TOP VIEW
SIDE VIEW
Position Guide
Charging
Contacts
Power
Receptacle
WALL POWER ADAPTER
Wall Power
Adapter
4
1Position Guide – Shows you how to position The 5Star device
in the Charging Cradle.
2Charging Contacts – Allows charging of The 5Star device
when cradled.
3Power Receptacle – Allows connection with the Wall Power
Adapter to power the Charging Cradle.
4Wall Power Adapter
– Provides power to the Charging Cradle
from any compatible wall outlet.
5Star_gen2_UserGuide_111252013_WJC.indd 28-29 11/25/2013 3:47:51 PM

30 31
Setting up the Charging Cradle
1. Determine where you would like to place your Charging
Cradle. Keep in mind the length of the Wall Power Adapter
cable and what is most convenient to you when determin-
ing a location for your Charging Cradle. DO NOT PLACE THE
CHARGING CRADLE IN A LOCATION WHERE IT COULD GET
WET.
2. Insert the small connector of the Wall Power Adapter into
the Charging Cradle’s Power Receptacle located on the
back.
3. Place the Charging Cradle onto a at surface and plug the
Wall Power Adapter into a compatible wall power outlet.
When determining the location of your Charging
Cradle, ensure that the Wall Power Adapter cable
will not cause a trip hazard. The Wall Power
Adapter cable should not cross hallways or com-
mon trafc areas where a trip hazard would most
likely occur.
IMPORTANT!
5Star_gen2_UserGuide_111252013_WJC.indd 30-31 11/25/2013 3:47:51 PM

32 33
While The 5Star device is waterproof, the
Charging Cradle is not. Do not place the Charging
Cradle in areas where it can get wet. Failure to do
so may cause an electrical shock or re hazard.
IMPORTANT!
Charging The 5Star
1. Align The 5Star device with the Charging Cradle so that it
is oriented in the same way as displayed in the Position
Guide on the Charging Cradle. Aligning The 5Star to the Charging Cradle
2. Lower The 5Star into the Charging Cradle until the Charging
Contacts on both The 5Star and Charging Cradle make
contact. You will hear a tone from the Speaker.
5Star_gen2_UserGuide_111252013_WJC.indd 32-33 11/25/2013 3:47:51 PM

34 35
Inserting The 5Star to the Charging Cradle
3. The Battery Indicator will blink green during the charging
process. Once fully charged it will remain solid green.
4. To remove the device from the Charging Cradle, simply
grasp The 5Star and lift up and away from the Charging
Cradle. You will hear a tone from the Speaker indicating
that it is no longer charging. Unless additional charging is
required, the Battery Indicator will turn off to save power.
5Star_gen2_UserGuide_111252013_WJC.indd 34-35 11/25/2013 3:47:52 PM

36 37
When to Charge The 5Star
Always place The 5Star in the Charging Cradle when not in use so
that it is always ready when you need it most. When the battery
is low, the Battery Indicator will ash red and you will hear a
repeating tone to charge. The tone will repeat more frequently as
the battery level decreases.
If the battery loses all of its charge, the device will power off. The
5Star will power back on when it is placed in the Charging Cradle.
To protect the battery, the 5Star will automatically
stop charging if the device drops below 32°F or over
113°F. Charging will automatically resume when the
device temperature returns to normal levels.
NOTE
5Star_gen2_UserGuide_111252013_WJC.indd 36-37 11/25/2013 3:47:52 PM
Other manuals for 5STAR Urgent Response
2
Table of contents
Other GreatCall Personal Care Product manuals
Popular Personal Care Product manuals by other brands

Orliman
Orliman Manutec MFP-97 Use and maintenance instructions

Bort
Bort ManuStabil Classic manual

Soltec
Soltec SES Z-GEN user manual

Otto Bock
Otto Bock 50S5 MALLEO SENSA Instructions for use

Medi-Direct International
Medi-Direct International Pain Gone manual

Tanita
Tanita InnerScan BC-558 instruction manual