GreatSpeed GS-R250S Plus/Duo User manual

ADSL Router
Installation Guide
GS-R250S
Internet
eXperience
the
@
GreatSpeed!
www.GreatSpeed.com

2
GS-R250S Installation Guide Experience the Internet @ GreatSpeed
Copyright © 2001 GreatSpeed. All rights reserved.
This manual and the software described within may not be copied, reproduced, translated, or converted
in whole or in part, to any electronic or machine readable form, without prior written consent of
GreatSpeed. All product names are trademarks and or registered trademarks of their respective companies.

3
Experience the Internet @ GreatSpeed GS-R250S Installation Guide
Table of Contents
Safety Information for Home Electronic Devices
○○○○○○○○○○○○○○○○○○○○○○○
4
Connector Pin-out
○○○○○○○○○○○○○○○○○○○○○○○○○○○○○○○○○○○○○○
4
About this Manual
○○○○○○○○○○○○○○○○○○○○○○○○○○○○○○○○○○○○○○
5
System Requirements, Product Features, Package Contents
○○○○○○○○○○○○○○○○○○○
6
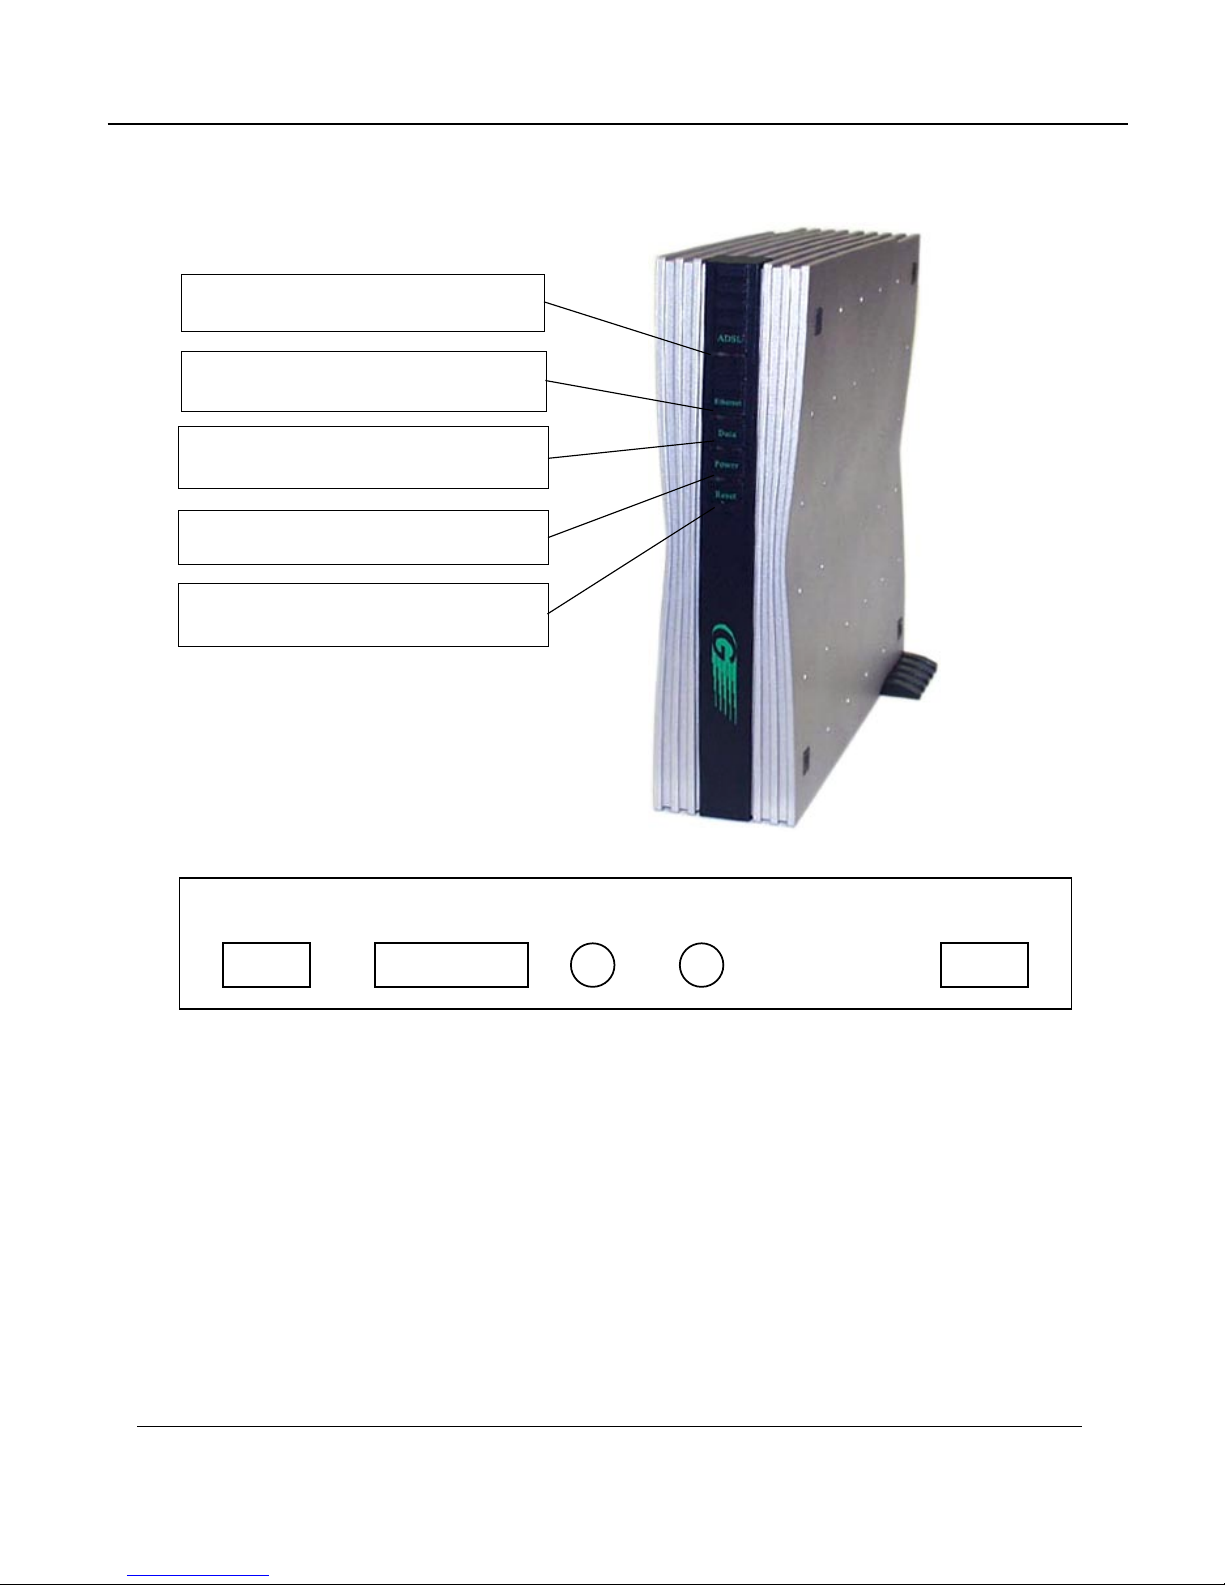
Front and Rear Panel Diagrams
○○○○○○○○○○○○○○○○○○○○○○○○○○○○○○○○
7
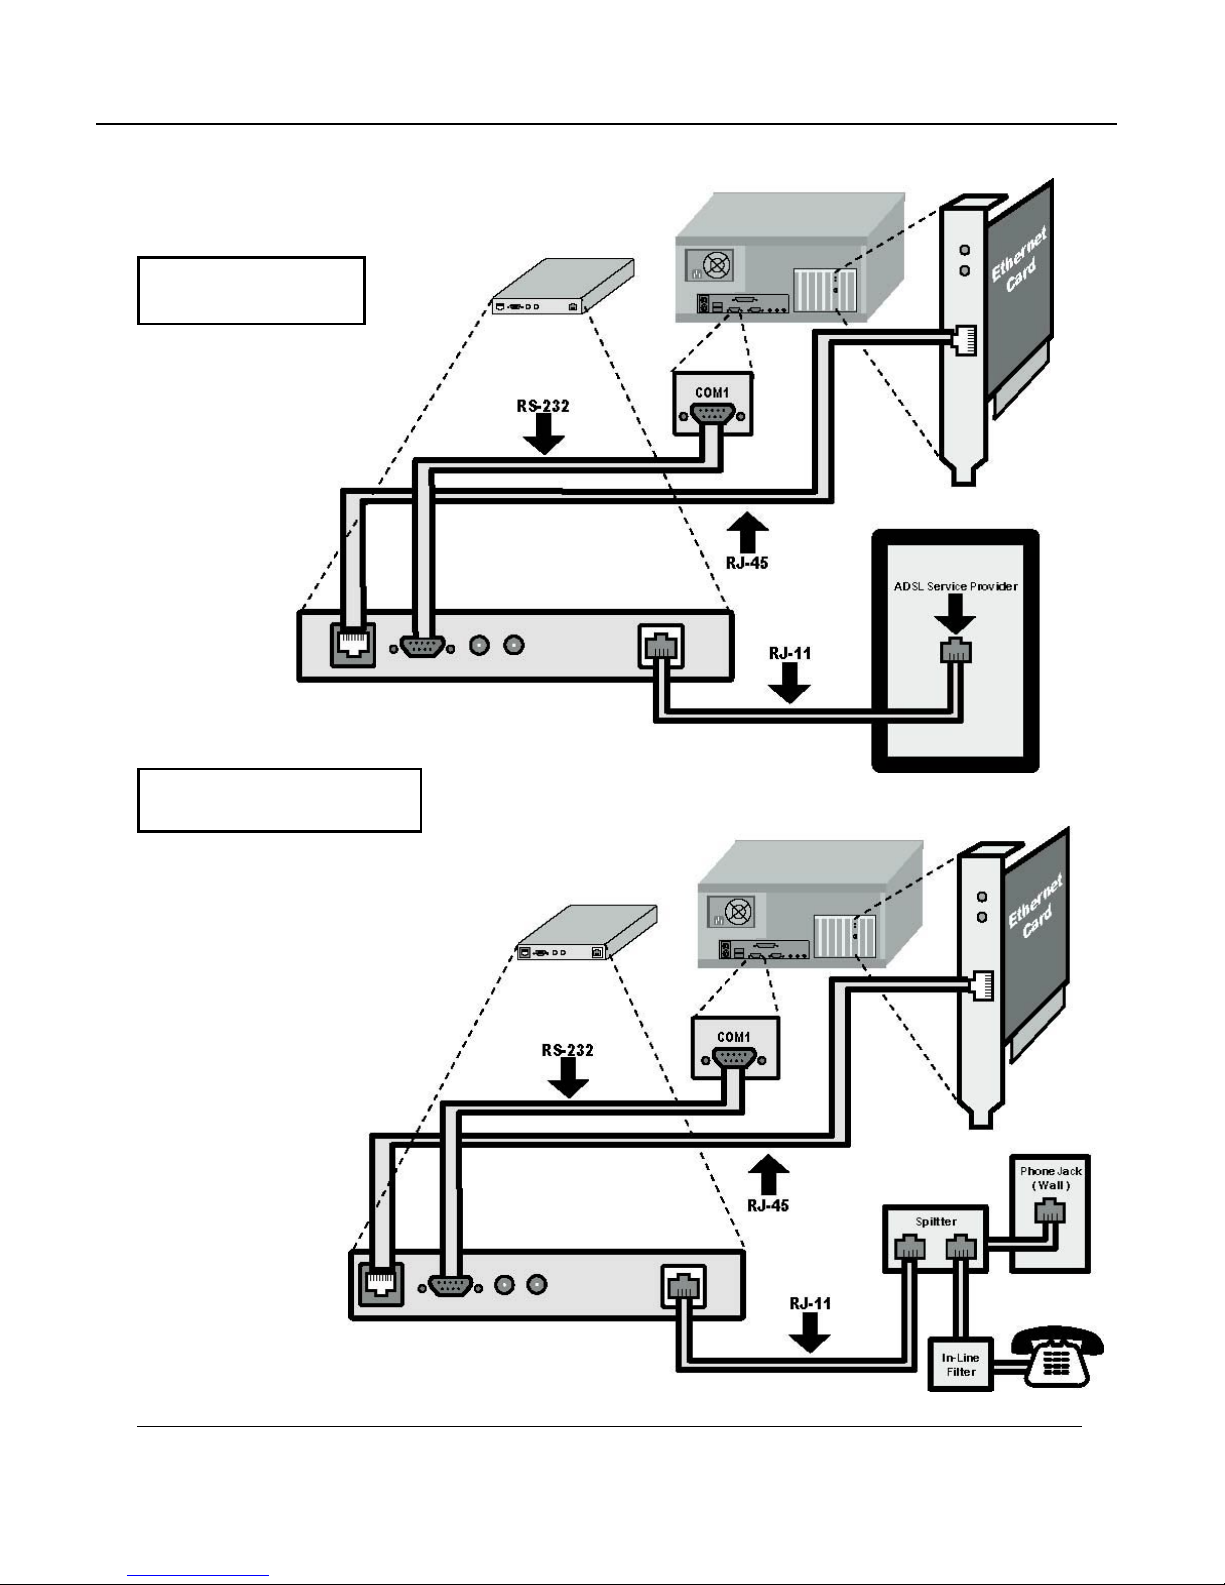
Hardware Connection Diagrams
○○○○○○○○○○○○○○○○○○○○○○○○○○○○○○○
8
Installing and Configuring your ADSL Router
○○○○○○○○○○○○○○○○○○○○○○○○
9
Hardware Installation - Single Computer Connection
○○ ○ ○ ○ ○ ○○○○○○○○○○○○○
10
Hardware Installation - Multiple Computer Connection via Hub
○○○○○○○○○○○○○
12
Configuration
○○○○○○○○○○○○○○○○○○○○○○○○○○○○○○○○○○○○○○○○
14
Bridged Mode
○○○○○○○○○○○○○○○○○○○○○○○○○○○○○○○○○○○○○○
16
Routed Mode
○○○○○○○○○○○○○○○○○○○○○○○○○○○○○○○○○○○○○○
17
DHCP Setup
○○○○○○○○○○○○○○○○○○○○○○○○○○○○○○○○○○○○○○
21
Port Forwarding
○○○○○○○○○○○○○○○○○○○○○○○○○○○○○○○○○○○○○
22
Change User Name and Password
○○○○○○○○○○○○○○○○○○○○○○○○○○○○
23
Web Configuration Flowchart
○○○○○○○○○○○○○○○○○○○○○○○○○○○○○○
24
TCP/IP Configuration
○○○○○○○○○○○○○○○○○○○○○○○○○○○○○○○○○○○
25
Step 1 - Check if TCP/IP is installed
○○○○○○○○○○○○○○○○○○○○○○○○○○○
25
Step 2 - Install TCP/IP if necessary
○○○○○○○○○○○○○○○○○○○○○○○○○○○○
26
Step 3 - Setup TCP/IP
○○○○○○○○○○○○○○○○○○○○○○○○○○○○○○○○○○
27
Bridged Mode: Ethernet over ATM (RFC1483), PPP over Ethernet (RFC2516)
○○○○○○○
28
Routed Mode with DHCP Server: Ethernet over ATM (RFC1483), PPP over ATM (RFC2364),
Classical IP over ATM (RFC1577), PPP over Ethernet (RFC2516)
○○ ○○○○○○○○○○
28
Bridged Mode: PPPoA-PPTP Relay (RFC2364) for Windows 95/98
○○○○○○○○○○○
30
Bridged Mode: PPPoA-PPTP Relay (RFC2364) for Windows 2000
○○ ○○○○○○○○○
35
Routed Mode without DHCP Server: Ethernet over ATM (RFC1483), PPP over ATM
(RFC2364), Classical IP over ATM (RFC1577), PPP over Ethernet (RFC2516)
○○ ○○○○○
38
Product Specifications
○○○○○○○○○○○○○○○○○○○○○○○○○○○○○○○○○○○○
40
Troubleshooting
○○○○○○○○○○○○○○○○○○○○○○○○○○○○○○○○○○○○○○
42
Record your Internet Protocol Details
○○ ○○○○○○○○○○○○○○○○○○○○○○○○○○
44

4
GS-R250S Installation Guide Experience the Internet @ GreatSpeed
Safety Information for Home Electronic Devices
FCC Statement
This equipment has been tested and found to comply with the limits for a Class B digital device, pursuant to Part
15 of the FCC Rules. These limits are designed to provide reasonable protection against harmful interference in a
residential installation. This equipment generates, uses and can radiate radio frequency energy and, if not installed
and used in accordance with the instructions, may cause harmful interference to radio communications. However,
there is no guarantee that interference will not occur in a particular installation. If this equipment does cause
harmful interference to radio or television reception, which can be determined by turning the equipment off and
on, the user is encouraged to try to correct the interference by one or more of the following measure:
• Reorient or relocate the receiving antenna.
• Increase the separation between the equipment and receiver.
• Connect the equipment into a different outlet circuit than the receiver.
• Consult an experienced radio/TV technician for help.
• Shielded cables must be used to comply with FCC regulations.
Environmental Requirements
• Operating Temperature: 0º C to 55º C with airflow
• Non-operating Temperature: -10º C to 85º C
• Operating Humidity: 10% to 90% non-condensing
• Non-operating storage humidity: 5% to 95% non-
condensing
Po er Requirements
• Input: Input: 100-240VAC, 60Hz, 0.5A
Output: +5V 1.0A
Compliance Certification
• FCC Part 15 Class B
• UL approved
Connector Pin-out
The GS-R250S ADSL Router is equipped with a RJ-11 jack for connection to the ADSL
data port. The center two pins, pins 3 and 4, are used for ADSL data. For the router to make
a proper ADSL connection, the installed ADSL data port should also use pins 3 and 4 for
data. If the ADSL data port installation uses pins 2 and 5 for data, then a wiring converter
will be required. Do not alter or remove the wiring converter if present. Consult with your
ADSL provider before attempting any wiring changes.

5
Experience the Internet @ GreatSpeed GS-R250S Installation Guide
About This Manual
This manual provides a comprehensive user’s guide and installation manual for GreatSpeed’s GS-R250S ADSL
Router. It has been organized in such a way to make it easy to follow by users worldwide. In the manual, there are
many examples given in the commands, largely IP addresses and other values. Please realize that these are for
example only and you must use the values provided by your ADSL service provider to achieve a connection. In
order to ensure optimal comprehension, the following list provides brief descriptions of the formatting styles used
throughout this manual.
Commands: Commands are always referred to by using the words “type” or “click” before them.These commands
are always shown as bold-faced words. For example, click Next, click OK, or type: command.
Names of Windows (Dialog Boxes): The names of the windows (also referred to as dialog boxes) that appear
on the PC screen are always referred to in quotes. For example, the “Setup Complete”window.
Names of Options in Windows: The names of options to choose from inside the windows that appear on the
PC screen are always referred to in italics. For example, choose the Yes, I want to restart my
computer now option from the window.
NOTES: In some cases, preparatory or cautionary information is needed before proceeding onto the next step
in an installation process. This kind of information is provided in the form of notes, which are always referred
to in bold-faced and italicized letters. For example, NOTE: To access the Control Panel Application, the driver
must be running.

6
GS-R250S Installation Guide Experience the Internet @ GreatSpeed
Congratulations!
Your new GreatSpeed GS-R250S ADSL Router is a multi-functional broadband access device. It conveniently
interfaces with your computer system for configuration. The router connects directly to your telephone line via a
standard connector.
This guide is designed to walk you through installation of your GreatSpeed GS-R250S ADSL Router in the easiest
and quickest way possible. Please follow the instructions carefully and in no time you’ll be able to experience the
Internet @ GreatSpeed.
System Requirements
• Intel PII/AMD K6 or above CPU
• Windows 95/98/ME/2000/NT4.0
• Mac OS 8.0 or above
• Red Hat Linux 6.2 or above
• Ethernet 10BaseT LAN card
• Netscape 4.0/IE 4.0 or above
• 32Mbytes system memory or more
• 20Mbytes available hard disk space or more
Product Features
• Ethernet interface
• Four (4) LED indicators
• Supports: ANSI T1.413 issue 2, G.992.1 (Full-Rate DMT), G.992.2 (G.Lite), G.994.1 (Multimode), G.994.1
(G.sh)
• Supported Protocols: Bridged RFC1483, Routed RFC1483, RFC1577, RFC2364, RFC2516
• ATM supports AAL5. AATM Traffic shaping supports CBR and UBR
• Transparent Bridging features conformance to IEEE 802.1d and supports spanning tree protocol and bridge
filters
• NAT functionality
Package Contents
• One (1) GreatSpeed GS-R250S ADSL Router
• One (1) power adapter
• One (1) RJ-11 ADSL cable
• One (1) RJ-45 Ethernet cable (straight connect)
• One (1) RJ-45 Ethernet cross connector
• One (1) RS-232 serial cable
• One (1) Installation Guide
• One (1) Getting Started Guide
• One (1) Unit base stand
All packages have been carefully checked for completeness and functionality before shipping. Please contact your
place of purchase should any of the above items be missing or damaged.

7
Experience the Internet @ GreatSpeed GS-R250S Installation Guide
ADSL LED - Flashing= establishing link;
Solid= link established
Ethernet LED - On= Ethernet link is
connected
Data LED - Flashing= data is being
transferred
Power LED - On= power to the unit
Reset Button- Warm reboot of the router
Rear Panel
Front Panel
Ethernet RS-232 On/Off Power Line

8
GS-R250S Installation Guide Experience the Internet @ GreatSpeed
Hard are Connection Diagrams
A Setup Without
a Splitter
A Setup With a Splitter
and In-Line Microfilters
NOTE:
The splitter and in-line
microfilters are not included
in this package. They are
supplied by your ADSL
Service Provider.
GS-R250S Router
GS-R250S Router
NOTE:
The RS-232 cable only needs
to be connected if you will
be configuring the router via
command line.

Experience the Internet @ GreatSpeed GS-R250S Installation Guide
Installing and Configuring your ADSL Router
The major functions of the ADSL Router are performed by using the Ethernet network interface. Your computer
must have an Ethernet Network Interface Card (NIC) installed and set up with the TCP/IP protocol before
beginning to use the router. The router also provides a serial console port for monitoring and configuring the
router via the built-in command line interface. This will be covered largely in the rest of this manual.
Preparation
Before beginning the hardware installation, please gather the following materials for the setup you will be
using.
You will need to know the Internet Protocol supported by your ADSL provider to successfully connect to the
Internet. For future troubleshooting or reinstallation, it is important that you retain these details. Please turn
to page 44 of this manual to record your connection information in the space we have provided for you.
Setup 1 - Connecting directly to one computer
• ADSL service, provided by your ISP/NSP. Also have your connection information ready.
• Computer running a supported operating system, with a Ethernet NIC installed.
• TCP/IP protocol installed for your NIC (See the TCP/IP Configuration section).
• RJ-45 Ethernet cable *
• RJ-45 Ethernet cross connector *
• RJ-11 ADSL cable *
• RS-232 serial cable * (Only used if configuring via command line)
• Power adapter *
*Included in package
Proceed to Page 10
Setup 2 - Connecting to multiple computers - You will need all the above listed items plus the following:
• Additional computer(s) running a supported operating system with an Ethernet NIC installed
• Additional RJ-45 Ethernet cable (one for each additional computer).
• One Ethernet hub supporting the number of computers you will be connecting
• RJ-45 Ethernet cross connector *. Only required if your hub’s uplink port does not have a cascade switch.
*Included in package
Proceed to Page 12

10
GS-R250S Installation Guide Experience the Internet @ GreatSpeed
Be sure the power switch, marked ON/OFF, on
the rear of the unit is depressed, in the OFF
position.
Connect the power adapter to the power
receptacle on the rear of the unit marked PWR,
then plug the AC end into the wall electrical
outlet.
You will now connect the RJ-45 Ethernet cable.
Connect one end of the RJ-45 Ethernet straight
connect cable to the Ethernet jack on the NIC
in the back of your computer.
Hard are Installation - Single Computer Connection
1
2
3
Then connect the other end to the RJ-45 cross
connector supplied in the package.
Then connect the cable, with the RJ-45 cross
connector attached, to the connector marked
Ethernet on the back of the router.
5
4

11
Experience the Internet @ GreatSpeed GS-R250S Installation Guide
Connect one end of the RJ-11 ADSL cable to
the ADSL line jack, marked Line, on the rear of
the router. Then connect the other end to the
ADSL line outlet that your ADSL service provider
has installed.
NOTE: Step 7 and Step 8 are optional. Proceed with
these steps only if you will be configuring
ther router using command line.
Otherwise, skip to Step 9.
Connect the male (9-pin) end of the RS-232 serial
cable to the connector marked RS-232 on the
rear of the router.
6
Then plug the other end of the RS-232 cable into
the serial port of your computer.
Turn the power on by pressing the power switch,
marked ON/OFF on the rear of the unit. The
router will perform a self-test and then will be
ready for use.
7
8
9

12
GS-R250S Installation Guide Experience the Internet @ GreatSpeed
Hard are Installation - Multiple Computer Connection via Hub
Be sure the power switch, marked ON/OFF, on
the rear of the unit is depressed, in the OFF
position.
Connect the power adapter to the power
receptacle on the rear of the unit marked PWR,
then plug the AC end into the wall electrical
outlet.
Connect one end of the RJ-45 Ethernet cable to
any available port on the Ethernet hub.
1
2
3
If you do not use the Uplink port on the hub,
skip this step. If you connect the RJ-45 Ethernet
cable to the Uplink port on your hub and the
hub does not have cascade switch, you must
connect the RJ-45 Ethernet cable to the supplied
cross connector and then into the Uplink port.
4

13
Experience the Internet @ GreatSpeed GS-R250S Installation Guide
Connect the male (9-pin) end of the RS-232 serial
cable to the connector marked RS-232 on the rear
of the router.
Then plug the other end of the RS-232 cable into
the serial port of your computer.
Turn the power on by pressing the power switch,
marked ON/OFF on the rear of the unit.The router
will perform a self-test and then will be ready for
use.
5
Connect the other end of the RJ-45 Ethernet cable
to the connector marked Ethernet on the back of
the router.
Connect one end of the RJ-11 ADSL cable to
the ADSL line jack, marked Line, on the rear of
the router. Then connect the other end to the
ADSL line outlet that your ADSL service provider
has installed.
NOTE: Step 7 and Step 8 are optional. Proceed with
these steps only if you will be configuring
ther router using command line.
Otherwise, skip to Step 9.
6
7
8
9

14
GS-R250S Installation Guide Experience the Internet @ GreatSpeed
In your Internet Browser window, type the default IP address of the GS-R250S ADSL Router, 192.168.7.1
into the URL bar and click GO or hit the Enter key. You will then be prompted to enter a User Name and
Password. The default User Name and Password are:
User Name: admin
Password: broadband
To change the User Name and Password, please refer to page 23.
Configuration
NOTE: The factory default settings for the GS-R250S ADSL Router are as follows:
WAN Port: RFC1483 Bridged Mode LAN Port: IP Address: 192.168.7.1
LLC Encapsulation Subnet Mask: 255.255.255.0
VPI: 0 Telnet/SNMP: Password: adsl
VCI: 35
DHCP Server: IP Range: 192.168.7.10 - 192.168.7.20
Subnet: 192.168.7.0
Netmask: 255.255.255.0
DNS: 206.13.28.11
206.13.29.11
Lease Time: 1 day
If your required configuration matches the above settings, the router will work for you as preconfigured.
In order to establish a connection, you must change the IP address of your computer to be within the
same subnet as the router, e.g. 192.168.7.2. For detailed instructions on modifying TCP/IP settings, see
page 25.
1

15
Experience the Internet @ GreatSpeed GS-R250S Installation Guide
In the Internet Browser window, the “ADSL Configuration Page” message appears.
Using the links in the left frame, click on the proper connection mode you will be using and proceed to
configure the GS-R250S ADSL Router. Enter all values, as provided by your ADSL Service Provider, for the
selected connection mode. Then click Config Now. Following are screenshots from each connection mode.
Refer to the proper one for your connection.
NOTE: After configuring the router for your selected protocol, you have the option to then configure the DHCP
functionality of the router. See the diagram on page 24 for a summary of the steps required for each
protocol.
2
3

16
GS-R250S Installation Guide Experience the Internet @ GreatSpeed
Bridged Mode
Ethernet over ATM (RFC1483)
PPPoA-PPTP Relay (RFC2364)
PPP over Ethernet (RFC2516)

17
Experience the Internet @ GreatSpeed GS-R250S Installation Guide
Routed Mode
Ethernet over ATM (RFC1483)
Classical IP over ATM (RFC1577)

18
GS-R250S Installation Guide Experience the Internet @ GreatSpeed
PPP over ATM (RFC2364)
PPP over Ethernet (RFC2516)
NOTE: When using PPPoE (RFC2516), you must download a utility to change your maximum MTU settings.
You can use the DrTCP utility found at this URL: http://www.dslreports.com/front/drtcp.html. Run
the utility, select your Ethernet adapter in the drop-down menu, then change the value in the MaxMTU
box next to your selected Ethernet adapter to 1492. Click Apply and restart your computer. You must
run this utility on each computer that is connected to the GS-R250S ADSL Router.

1
Experience the Internet @ GreatSpeed GS-R250S Installation Guide
Upon clicking Config Now the application will begin to program the router with your settings. You will see a
countdown window indicating that configuration is in progress. During this process, be sure to not interrupt
the application or router.
Upon finishing the configuration, you will see a “Update Completed” message. Click OK.
4
5

20
GS-R250S Installation Guide Experience the Internet @ GreatSpeed
Verify the ADSL Router status by clicking on the ADSL Status link in the left frame. Then click Read ADSL
Status to show the current configuration.
NOTE: You may now proceed to the following section and configure DHCP functionality for your router if required.
NOTE: If you have changed your router’s IP address during configuration, be sure to also change your computer’s
IP address to be on the same subnet. For example, if you changed the router’s IP address to 192.168.8.1,
you should change your computer’s IP address to 192.168.8.2.
6
Other manuals for GS-R250S Plus/Duo
2
Table of contents
Other GreatSpeed Network Router manuals