Green Speed GT3 User manual

folding trike manual

Pedal
(optional
cleated)
Cranks
Kingpin Assemblies
clamp
Steering Rods
Boom
Cross Members
Spokes
Rim
Tube Valve
Tire
Chain
Front Derailleur
Front Hub
Bar End
Gear Shifters
Brake
Lever
Seat
Tail Light and Flag Mounts
Crank
Extension
Rear Derailleur
Quick Release Nut
Quick Release Skewer
Dyanmo mount
Cluster or Rear Cogs
Fender stay
Chain Stay
Seat Stay
Guide Pulley
Bracket
Quick
Release
Nut
Guide
Pulley
Quick
Release
Lever
Pin
Guide
Pulley
Thru-bolt
Clamp
Screws
Spacer
Front Derailleur Post
Front Light Tag
Accessory
clamp
(optional)
Mirror Mount
or
Accessory post
(optional)
GrabHandle
(optional)
Mirror
(optional)
Chainrings
Chain Guide Tubes
Pulley (fig 3)
fig 2
fig 1
fig 3
Hinge (fig 2)
“T”-piece
Tail Light Mount
(inc with Rack)
Rack
(optional)
Rear
Fender
(optional on
x-series)
pin
elastomer
(inside)
2
trike anatomy

Congratulations on your purchase of a Greenspeed folding
trike. We believe that you have purchased the finest recumbent
tricycle available in the world today. It is also our belief that
the present level of motorised transport on this small planet is
not sustainable, in environmental and social terms. Thus your
Greenspeed has been designed for everyday use, whether it be
shopping, commuting, rehabilitation, touring the world or just
exercising and having fun! With care, it should last a lifetime.
Included in this manual are instructions on how to assemble,
maintain and get the most from your folding trike.
2
3
4
5
6
7
8
a s s e m b l y
The major feature of these trikes is the fold. By removing one
capscrew, with a 6mm key, the seat can be removed.
Then releasing the quick release lever on the frame hinge
allows the rear wheel and frame to be folded over the front,
halving the size of the trike, and allowing it fit into most car
boots (trunks) and other small spaces. To fit into even smaller
spaces, the wheels are easily removed.
Another feature of this trike is the 16" wheels, which make
it more compact than trikes with 20" wheels, and the special
Scorcher tyres give it outstanding performance with a very
smooth ride.
The famous Greenspeed cross over steering now has NSR
geometry, which allows straight line, one handed braking,
and gives a very small turning circle, making it a delight to
ride. A number of accessories are available from GS dealers.
welcome to the family
9
10
11
12
13
14
w h a t ’ s n e x t ?
3
tricycle anatomy
design
tools
frame
fitting your wheels
~ drum
~ disc
~ disc with hollow axles
fitting disc brake calipers
removing hollow axle
wheels
adjusting your handle bars
fitting your seat
fitting your crank
extension
adjusting for your leg
length
check derailluer cables
fitting your chain
joining your chain with
split links
adjusting your brakes
~ drum brakes
~ disc brakes
adjusting your gears
~ front derailleur
~ rear derailleur
alighnment of your
steering
design
18
19
chain
steering
tyre presure
warranty
community
resources
m a i n t e n a n c er i d i n g
15
16
17
17
steering
gears
1st ride, stamina
pedals
negotiating doorways
regular folding
tyre repair
tools to have while riding
Q&A’s
t r o u b l e s h o o t i n g
contents

Your trike’s main feature is its ability to be folded / assembled
with the minimum of tools / effort. Here are the tools required
to build your trike, but there after the quick fold will only require
the 6mm Allen key.
(drum brake
only)
(hollow axle
hubs only)
fig 1
The frame is now ready to unfold. Start by holding the back
section and lifting it away from the frame and straightening the
frame out. Note the pin needs
to be slid to the left to allow
the frame to unfold all the way
(fig 2a). Once it has been
unfolded all the way, you rotate
the Quick Release downward so
the keyway is lined up, push it
through, pull the quick release
twowards the back of the frame
(fig 2b). Once the quick release
in it’s slot you can tighten it up
(fig 2c).
Important. If you are unfamiliar with a quick release
mechanism, PLEASE get a Greenspeed Dealer or bike mechanic
show you the finer points of safe use. The quick release on
the frame is slightly different to a wheel quick release in that
it requires a 10mm wrench to add tightness to it should the
adjustment loosen off with time/wear. Please keep it tight
enough that you can release/tighten with moderate hand effort.
fig 2 a
b c
Assembly of your folding trike is as follows. If you are
assembling from a boxed state, you start by unpacking it all
carefully. Once all the packaging has been removed, the fun bit
begins.
tools
assembly
4

Next you install your wheels. Put the rear wheel in first and
tighten up the quick release. The cogs go on the right hand side of
the trike. That is, as if you are seated in the trike ;-)
fig 3 left wheel right wheel
Outside spoke points to the left Outside spoke points to the right
fitting your wheels
Now install the front wheels. Fig 3a and 3b, shows that there are
left and right wheels. They can be identified by looking at the top
of the hub and following the top outside spoke (that is the spoke
with its head on the inside). When this spoke goes to the right,
it is the right wheel, and vice versa! Be sure to try and install
them this way in the future, as this will prolong spoke life.
fig 4 a
b
~ drum brakes
The brake assembly backing
plate should be checked that
it is sitting hard against the
axle and that the retaining pin
is engaged (fig.4a).
Now is also a good time to
hook up brake cable (fig 16).
~ disc brakes
Disc brake wheels slide straight onto the axle the same way drum
brake hubs do and the screw at the end holds them in place.
The exception however is our hollow alloy axle disc brake set up.
Hollow alloy axles use a different method where by the alloy axle
goes through the hub and then into the kingpin assembly.
Use the provided short cap
screw to hold the wheel on
(fig.4b). Some models are
also provided with a shaped
hub cap washer.
Do the same on the other side.
5

fig 5
First make sure the
kingpin pinch clamp is
undone (fig 5a) so the
axle can be inserted (it’s
a good idea to either
remove this screw or nip
it up when transporting
your trike so as not have it
rattle loose!).
a
b
c
Insert the axle from the
outside of the hub
(fig 5b).
Some times the crush
tube inside the hub may
be misaligned (fig 5c), use
the axle to realighn it.
~ disc brakes with
hollow axles
Place the axle into the kingpin
assembly (fig 5d). The axle
should be a neat fit but
NO hammering should be
required!
fig 5 d
e
f
Once the axle is installed,
cinch up the clamp screw (fig
5e) tighter than finger tight,
but not tensioned right up
(this is to help prevent the axle
rotating whilst performing the
next step).
Insert the axle preload bolt
(fig 5f) and snug it up (6Nm).
Finish tightening up the pinch
clamp (12Nm) and you’re
done! Well one completed….
other side to go!
6

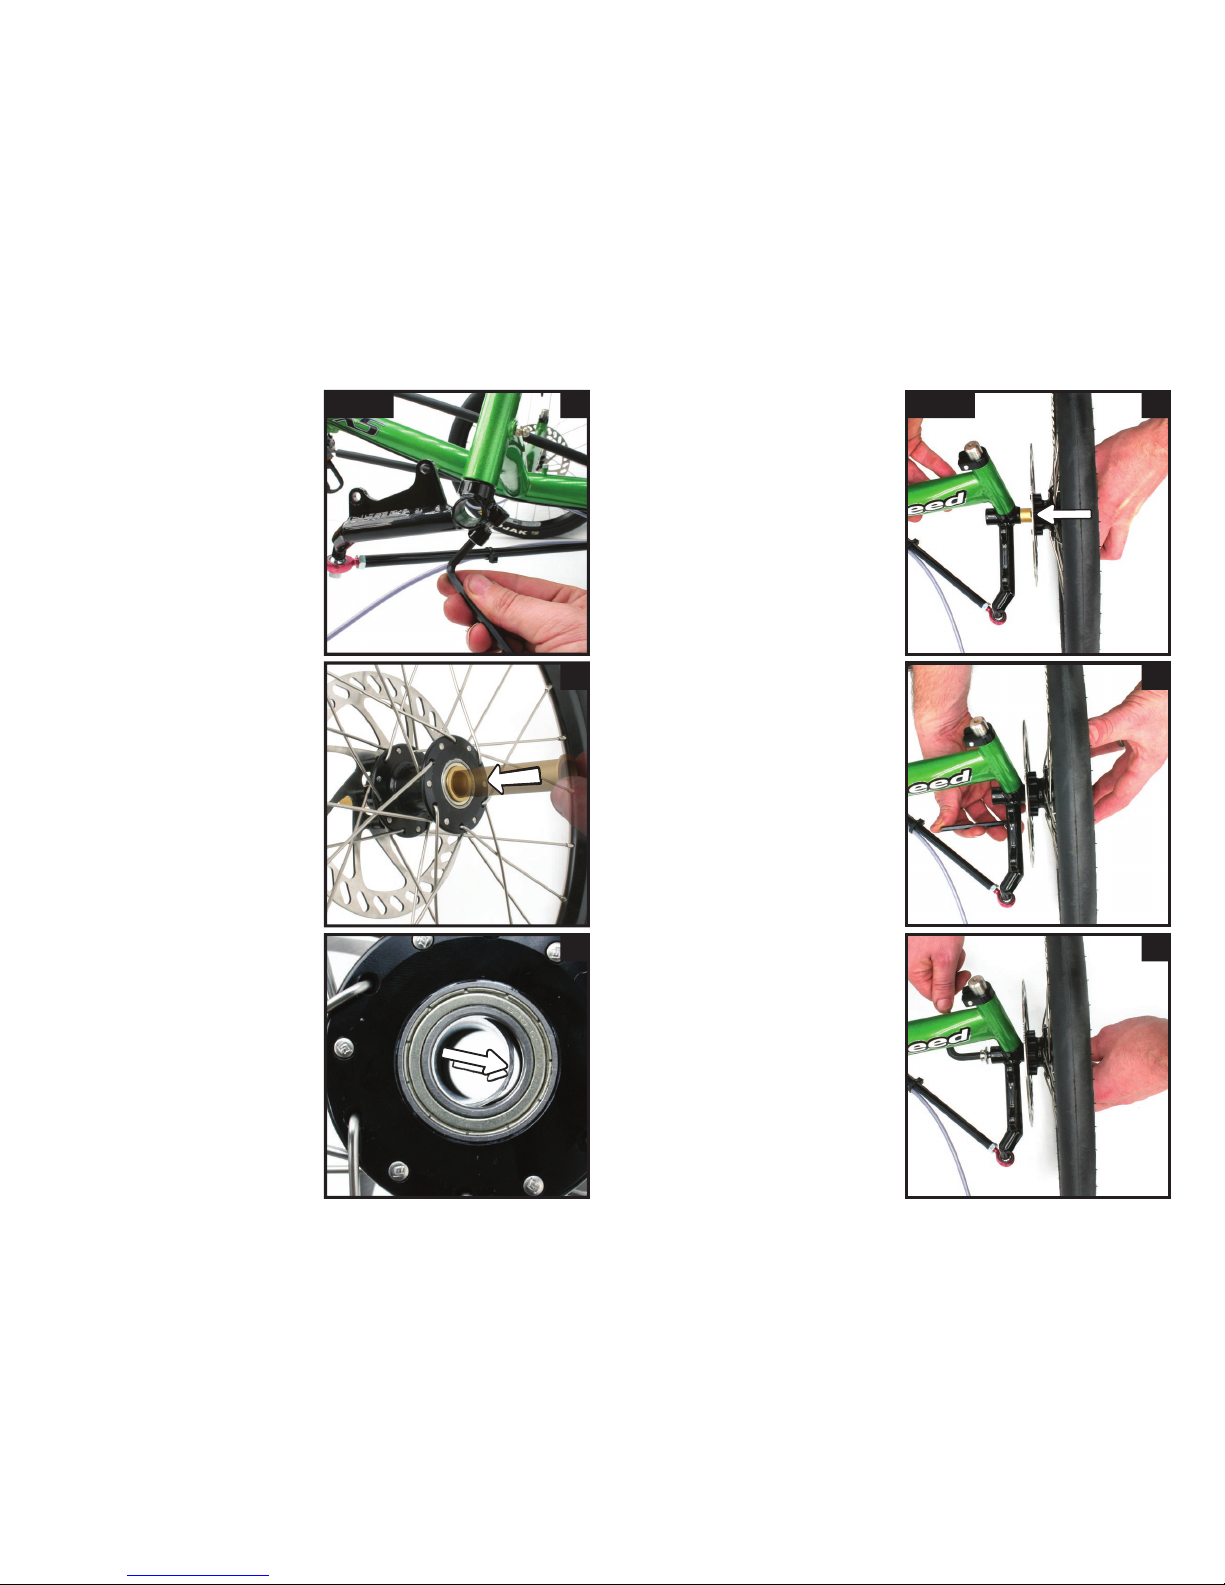
Disc wheels will then need
the calipers installed.
Start with the forward most
screw (fig 6a) and fit one
washers under the screw
head and the other washer
(and any spacers) on the
caliper side of the mount (fig
6b).
Leave this screw loose so it
is easier to put the second
screw in with its washers (fig
6c), and tighten up both of
the bolts.
Your pads are self adjusting,
so should center themselves
either side of the disc after
use.
However, if when you put
the caliper on, you can see
that the slot for the pads is
obviously out of alignment
you may need to see a
dealer for new spacers.
screw
washer
mount
spacers
(if needed)
washer
caliper
fig 6 a
b
c
fitting your
disc brake
calipers
As the brakes are self-adjusting for pad wear, squeezing the
brake levers with no disc between the pads will result in the pads
coming together and the disc
rotor will no longer fit. A flat
blade screwdriver will then be
required to separate them for
installation. If the pads are
quite worn, you chance push-
ing one of the pistons from
the caliper! We suggest you
keep the transporting spacers
that came with your trike and
use them between the pads
when transporting if you plan
to remove the wheels.
Note: Care needs to be taken with hydaulic disc brakes in
general in regards to transporting with the wheels/calipers
removed. Cable discs do not need this.
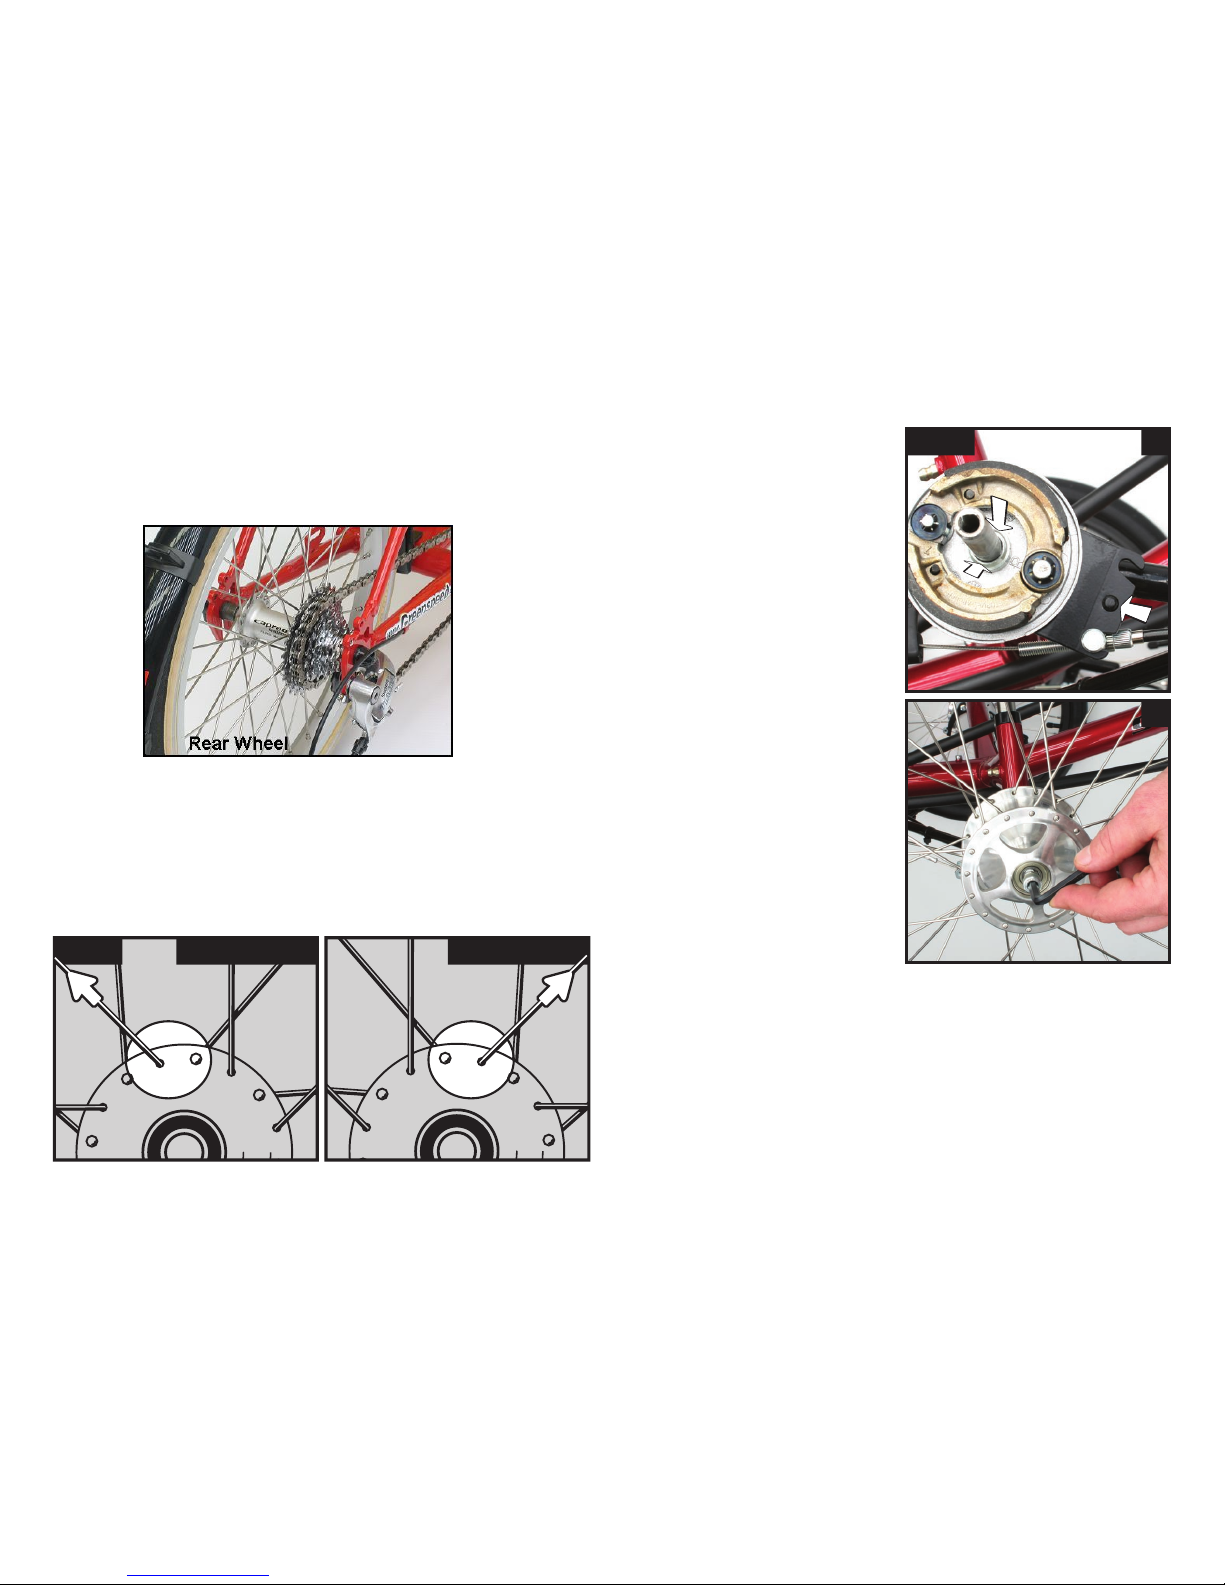
When removing and refitting your hollow axle wheels at a later
point, the caliper can stay in place. In this scenario, to take off
the wheel, simply take out your axle pre-load bolt and loosen the
clamp screw and slide the axle out first, then drop your wheel,
and therefore disc brake rotor, down out of the caliper. To put it
back on, make sure the clamp is undone, offer the wheel up and
insert the disc rotor into the caliper taking care to not dislodge
the brake pads. Insert the axle from the outside of the hub and
straight through into the kingpin. Insert and tighten the bolts as
instructed above in ‘fitting your wheels - disc brake with hollow
axles’.
removing hollow axle wheels
fig 7
7

Now twist the handlebar
ends up into a position that
looks comfortable for you.
There are width markers
on the handles so you can
make them an even spacing
apart. The pinch bolts for the
adjustment (fig 8) require a
6mm Allen key. Note these
need to be done up pretty
tight to avoid unnecessary
movement, some movement
under duress is acceptable in the case of an accident etc. The
bars should not be used for a leverage point like a regular bike,
they are primarily for steering purposes.
fig 8
adjusting your handle bars
Your seat can now be fitted.
Start by inserting the long
screw with it’s washer through
the seat tag and frame (fig 9a)
and doing the cap screw up
finger tight.
The seat can now be pushed
onto the seat pins (fig 9b).
You should just need to apply
pressure to the top of the seat
by pushing down until it stops
(fig 9c).
Now tighten the cap screw
with a 6mm Allen key (fig 9a).
Hint:- If the seat is very tight
on the pins, a SMALL
amount of grease may be
used.
fig 9 a
b
c
fitting your
seat
8

Next you can install your crank extension. This will require some
fiddly work, but you shouldn’t have to remove it again unless you
need to pack it ‘really’ small.
fig 10 a b
Firstly loosen the screws on the underside of the boom with
a 6mm Allen key and completely remove the front screw and
thread it in from the other direction.
Place a coin in the slot (fig 10a) and tighten the screw so that
the slot starts to open (approx two complete turns). Note don’t
place the coin too far in or it will stop the crank extension from
going in, AND careful to not over tighten, as this may make it
harder to fit the extension and possibly damage the frame.
Next step is to insert the extension into the boom taking care to
not damage the protective sleave inside the end of the frame.
Hint: starting it off with a slight angle can help so as not to catch
the edge of the sleeve (fig 10b).
Remove the coin and refit the screw in its correct position and
pinch up one of the screws.
fitting your crank extension
fig 11
Lightly grease the pedal threads and fit the pedals. Hint left
and right pedals have different threads, the right one tightens
clockwise, the left one counterclockwise. Tighten the pedals.
Sit on the seat and place your heels on the pedals and adjust the
extension so that your leg is straight when in the outstretched
position (fig 11).
To align the extension, sight along the top of the bottom bracket
to the front of the seat cover and rotate the extension until they
line up. Tighten screws when happy. Note you may find small
adjustments can make a big difference, so play around with this
setting before you do a long ride.
adjusting for your leg length
9
If you think you will change the leg length regularly, then you
should consider fitting the trike up with a Chain Gobbler. This
means that you will not need to shorten and lengthen the chain.

Your rear deraileur should be in place on the frame so all you
need to do is tighten the cable clasp on the deraileur with
a 5mm Allen Key (fig 12a).
Check the outer casing is sitting propperly in the shifter and
derailleur adjuster and the shifter is in the forward postion and
pull the inner cable tight.
Your front derailleur is similar but the cable has been removed.
Put the outer cable into all the stops, move lever forward and
then clamp the cable in position in the front deraileur (fig 12b).
fig 12 a b
check derailleur cables
10

fig 15 a
b
c
Use the two joining links to
join your chain together.
Slot each link into the
chain ends so that they are
opposite each other (fig 15a)
and slot the pins through
the links (fig 15b) and keep
pushing them towards each
other as you slide them into
position (fig 15b arrows).
Your chain can only be adjusted once
the cranks have been set to the right
leg length. Firstly, shift the chain onto
the large chainring and onto the small
sprocket (left gear shifter all the way
back and right gear shifter all the way
forward) and check to see if it matches
fig 14. Shorten the chain till the two
derailluer cogs are in alighnment. If
you don’t have access to a chain tool
you will need to see your dealer.
fig 14
Fit your chain next following fig 13. Start by feeding the chain
through the front derailleur cage, down the chain tube, under the
pulley, over the sprockets and down through the rear derailleur
(fig 13 step1). Put the rest through the lower tube (fig 13 step2).
fig 13
fitting your chain joining your
chain with
split links
adjusting your chain for length
Note: if this chain length
is not correct, damage may
occur to your rear derailleur.
Note: Make sure the chain is not twisted inside the tubes.
When ever you do or undo
the links, alway push them
together first so that the
head of the pins go over the
retaining teeth (represented
here in fig 15c by the black
arrows).
11

fig 16 a
b
Disc brakes are already set up
with no adjustment needed,
however the fluid may be in
the wrong place to have them
working their best. While your
trike is sitting on it’s wheels,
apply the brakes a few times
(fig 17) which will let the fluid
move to where it should be.
Note: It is advisable to do this
any time when your trike may
have been turned upside down.
fig 17
adjusting your brakes
~ drum brakes
~ disc brakes
Your brake cable should be connected
the same as fig 16.
Also double check that the clasps bolts
(fig 16a circle) are firmly tight with two
9mm spanners.
Check that the Cable outer casing is
seated into the adjusting barrel at the
drum (fig 16a square), and then seated
properly into the Cable adjuster on the
lever (fig 16b square). To adjust the
drum brakes (lets start with the right
hand side) turn the bars first to the left, lift the right hand wheel
so it can spin freely and keep turning out the adjusting barrel
(fig 15b square) at the drum till you can hear the drum pads just
start rub. Back off one 1/4 turn and screw down the locking ring.
Only ever do the locking ring hand tight!!! The barrel is hollow
for the cable to run through it and is not strong enough to have
you tighten the locking ring by mechanical means.
Do the same for the left wheel turning the bars right, but this
time make sure you get an even feel between the two levers. In
other words you should be able to feel the same pressure pulling
the levers back to the same point.
12

Now for the fun of gear adjustment. Your trike has also been
supplied with the component manufacturers instructions for
your reference. Set your trike so the rear wheel is off the ground
and can spin freely, and is stable enough that you can turn the
cranks. The rear derailleur is similar
in that if it won’t go into the
larger sprockets, there is not
enough cable tension, or into
the smaller sprockets if there
is not enough cable slack.
Turn the barrel screw (fig 19
AB) in for slack and out for
tension. As with the front
derailleur, use the limit screws
only as a last resort, as these
don’t effect the indexing of
your gears.
Loosen the ‘H’ screw (fig 19 H) if it won’t go into the smallest
sprocket or tighten if it goes between the smallest sprocket and
the dropout. Loosen the ‘L’ screw (fig 19 L) if it won’t go into the
largest sprocket or tighten it so that the derailleur doesn’t go into
the spokes (not too good if this happens).
If you run out of adjustment with the barrel screw you will need
to wind it all the way back in, put the shifter all the way forward
and loosen the pinch bolt and pull through the excess cable and
tighten the pinch bolt again.
Also check the cable to see if it is still running smoothly by
undoing the pinch bolt, holding the cable in one hand and
shifting with the other hand. Lubricate or replace the cable if it is
hard or rough to pull through.
If neither of these things work, your derailleur could be worn or
your derailleur hanger misaligned (bent through an accident).
Contact you dealer for further assistance.
fig 19
adjusting your gears
~ front derailleur
Check this by returning the chain to the smallest chainring (shift-
er all the way forward) and feeling the cable between the cable
stop and the derailleur, is it excessively slack? If so undo the
cable pinch bolt and pull through the excess cable and tighten
the pinch bolt. Try shifting to the large chainring again. If it still
doesn’t work turn the ‘H’ limit screw (small screws on top of the
derailleur shown in fig 18 H) out by a quarter of a turn each time
and retry the shift. If you unscrew it too far, the chain will fall off
the outer side.
B: Loosen off the ‘L’ limit screw (fig 18 L) slowly and it should
drop down, if not the cable may be too tight. To check this,
undo the cable pinch bolt, loosen the limit screw again until it
drops down and reattach the cable. Double check that it still
goes into the large chainring. Also check the cable to see if it is
still running smooth by undoing the pinch bolt, holding the cable
We will start with the front
derailleur, as it is easier to
adjust, and gives you a good
start for the rear. Firstly
determine the problem you are
having, is it A) will not go into
the large chainring or B) will not
go into the smallest chainring?
A: The cable needs more ten-
sion, or if you’ve been riding for
a while, may have stretched.
fig 18
~ rear derailleur
in one hand and shifting with the other hand. Lubricate or re-
place the cable if it is hard or rough to pull through. If neither of
these things work, your derailleur could be worn or misaligned.
See your dealer for further assistance.
13

aligment of your steering
Steering alignment check should be done once a year or when
excessive tyre wear is noticed. The front wheels should ‘toe in’
between zero and 1/16” (0-2mm). That is, the measurement
across the front of the wheels should be between 0 and 1/16’
less than the measurement across the back of the wheels, at axle
height.
A check can be made with a tape measure, and adjustment
made by undoing one of the steering connections (eg steering
arm on kingpin) and screwing one of the rod ends (ball joints)
in or out half a turn at a time. Note you will notice that the rod
ends have a jam nut (lock nut) to prevent them unscrewing
and to eliminate movement on the thread. This will have to be
loosened first before the rod end will turn and locked up again
before each measurement is made.
A more accurate way is to use a trammel (Fig 20).
A trammel has two pointers on a bar, which sits at the back of
the tyres at axle height. A mark is made on the back of the tyre
with a pen, the trike rolled forward half a wheel revolution, and
the marks compared against the trammel pointers at the front
of the wheels. This
method eliminates any
inaccuracies due to
wheel run out etc.
trammel
toe in
toe out
fig 20
14

Trikes are inherently stable but can be tipped over if cornered
hard, without leaning into the corner. Remember to always lean
into the corners on faster corners. We find riding in a large car
park, basketball court etc around in circles, slowly increasing
speed, to find the limits of stability and your abilities works best.
Note wear protective gloves. With practice you might be able
to ride on two wheels! Just remember once you start to fall,
turn to the direction you are falling which will simultaneously
correct your balance. You may also use the brake as a device to
correct your balance. Note, try to resist taking your hands off the
handlebars if you feel yourself falling. This skill can be useful
for mounting gutters, avoiding obstacles or showing off - skilled
riders can perform figures of eight on two wheels!
Remember braking in a corner with only the inside brake will not
slow you down as it is unweighted and will lock up. Try and use
both brakes in an emergency situation. We have heard stories
of people cornering at speed with their drink bottle in one hand,
having to brake mid-corner, and finding they have very little
brakes to slow them down.
Sliding can be great fun when mastered. Weight distribution is
an important tool in achieving your goal of the perfect slide. By
leaning further forward you unweight the rear tyre causing the
back to slide more. If you lean back the front will slide causing
the rear to regain grip. On long corners, gravel or wet road
etc, a combination of leaning forward and back you can achieve
awesome three wheeled slides.
Try not to carry heavy loads high on the rear of your trike, as
it will make the trike unstable. If you have no choice, take it
very slow around corners. Your trike is not designed for people
carrying on the back. Child trailers etc should be no problem,
but as always, find the limit of stability before you leave on that
riding
Having many gears can be daunting at first. The key to using
the gears is to change down before you have to! To make a
change with the rear derailleur, push the right handlebar end
shifter forward to change into a higher/harder gear and pull back
to change into a lower/easier gear. Note make sure you reduce
the load on the pedals while making the gear change. UNDER
NO CIRCUMSTANCES allow the trike to roll back while changing
the rear cluster, or even pull the trike backwards when the gear
lever has been moved, as this may result in damage to the rear
derailleur. The bar end lever on the left handle controls the front
derailleur in the opposite way. It is moved forward to drop the
chain onto the smaller chainring to lower the gearing and make
hill climbing easier. Again REDUCE the load on the pedals as the
change is made.
steering
gears
journey be it short or long.
Changes in road conditions can also effect how the trike will
react. For example turning on an off camber corner or halfway
down a steep hill will make your trike more likely to tip up than
a banked corner or turning part way up an incline. Just think
of a velodrome as the ultimate cornering situation because it is
already leaning you into the corner, but riding along a slope and
turning suddenly up the slope you are already leaning outward.
Potholes are best avoided by placing the pothole between the
front wheel and the centre of the frame. If unavoidable potholes
are best hit with the front wheels rather than the back, as it
transmits less shock back to you, and the frame.
15

With the seat behind you, you can exert a much greater force
with your legs, so beware of over exertion until you build up your
leg muscles. Non-recumbent riders seem to use their arms when
standing on the pedals, so recumbent riders develop stronger leg
muscles.
Greenspeed highly recommend the use of ‘clipless’ pedal sys-
tems, as they provide a safer attachment to your trike and help
to reduce leg fatigue. Remember you are on a trike now, so you
can crank the tension up on those adjusters, as you only have
to dismount at the end of your journey instead of at every set of
traffic lights.
Fitting your trike through tight spaces, doorways etc, can be
made easier if you push/ride your trike through diagonally. The
diagram (Fig 21) shows how this reduces the width of your trike.
stamina
pedals
negotiating doorways
This little trick
can really open
up the number
of places you
can ride your
trike.
Also your trike is
likely to fit under
more things than
a bike can, just
watch out for
your flag!
fig 21
The first ride is where you may notice yourself having a hard
time keeping a straight line at speed. Try relaxing your grip on
the handlebars, remember it is not a bike you are riding, so let
that killer grip off a bit. Try avoiding pulling on the handlebars as
well, you are riding a recumbent now, the seat provides a place
to exert all your energy.
Remember push into the seat, do not pull on the handlebars. If
the problem persists, try riding using only one hand to steer, as
this will stop you pulling unnecessarily on the handlebars.
1st ride
16
After about a month of riding you should find that you are
quicker overall than say a mountain bike rider of the same
fitness, despite any extra weight of the trike. Also if you ride
together you should find you are less tired at the end of a day’s
riding. The difference will be most noticeable against a head
wind on level roads.

Regular folding should only require removal of the seat and fold-
ing of the main frame. The seat is best removed by loosening
the cap screw, pulling up on the rear of the seat until it releases.
Hint you may need to place a foot on the main frame and pull on
the alternate sides of the seat until it comes free.
Remove the cap screw the rest of the way and the seat is off.
Screw the cap screw straight back into the seat. This way you
will know where to find it again.
Undo the quick release on the frame reversing the steps in Fig
2. Once released, press down on the frame, grab the rear wheel
and fold forwards. Hint if the frame is reluctant to fold you may
need to press down on the hinge with your foot.
regularly folding your trike
Important. If you are unfamiliar with a quick release
mechanism, PLEASE get a Greenspeed Dealer or bike mechanic
show you the finer points of safe use. The quick release on
the frame is slightly different to a wheel quick release in that
it requires a 10mm wrench to add tightness to it should the
adjustment loosen off with time/wear. Please keep it tight
enough that you can release/tighten with moderate hand effort.
We try and place the labels on the tyres in line with the valve to
make finding where the puncture came from a little easier. By
finding what either caused the puncture, or the puncture itself,
place the tube on top of the tyre with the valve in line with label.
You then look across and either find the hole in the tube or what
caused it. Front wheels are the easiest as they don’t need to be
removed. To save kneeling on the ground, tip the trike on its’
side to put the wheel at an easier height to work on (see above).
You can either replace the tube or patch it depending on your
preference.
tyre repair
We recommend carrying at least the following tools when riding.
1. Full set of allen keys to suit your trike.
Definately a 6mm as it does nearly all the main bolts on a folding
trike.
2. A Puncture kit / Spare tube.
3. A Pump
Check with your dealer for products they recommend specific to
your area. If you aren’t confident changing tyres or making other
adjustments, most dealers also run courses at different levels to
help you get more confident in road-side repair and maintance.
tools to have while riding
Q. Why don’t my drum brakes work as well as they used to?
A. Your brake cables may need replacing. If not, try removing
the wheel and checking the condition of the brake shoes. If they
are glazed give them a light sand to remove it. Also remove any
rust if present in drum.
Your drum brakes should actually imporve over time as the shoes
wear in so most perfomance issues can be related back to the
cables. For any other drum braking trouble shooting see the tech
section of the website.
17
trouble shooting

The chain should be kept lubricated with a chain lube that suits
your particular climate/conditions (Greenspeed recommends
Prolink, www.progoldmfr.com); your local bike shop should know
the ideal lube for your particular requirements. If the chain ever
becomes dry and squeaks, it is crying out for lube, and will make
the trike harder to push!
If the kingpins are fitted with
grease zirks (fig 22), they
should be greased about once
a year. At the same time you
lubricate the kingpins, turn
your trike upside down and
add a few drops of oil to the
handle bar pivot. Front hubs,
have sealed bearings that don’t
require lubrication. If you have
any problems with the hubs,
please contact your dealer. The
steering ball joints are nylon
bushed, and don’t require lubrication.
Try experimenting with pressures, lower tyre pressure will give
a more comfortable ride and higher speed on rough roads, but
higher tyre pressure will make it roll easier on smooth roads.
There is usually a good compromise at between 70-80psi. Check
your tyre pressure before each ride and you will find that your
trike will be easier to push.
Your dealer is the best person to suggest a maintenance scedule
specific to your area and the style of riding you do.
Below we’ve covered the bare minimium for you. Any one
proficient in bicycle machanics who is used to looking after their
own bikes will be comfortable looking after a trike as well, as
only the steering is different.
chain
steering
tyre presure
fig 22
Q. My drum brake hub is rubbing on the backing plate.
A. First check that your spacer is in on the correct way with the
tapered ‘ridge’ side facing outwards, and that the backing plate is
sitting right up against the head of the axle bolt. If the Hub still
rubs you may have a damaged backing plate and you should see
your dealer.
Q. Why are my tires wearing out so fast?
A. Your wheel track could be out (page 14) or your tyre pressure
may be excessively low. High corner speed and brake lockups
also cause rapid tyre wear. We have found tourists wear their
tyres least, as commuters can be the opposite, depending on
their route to work and their confidence to push the limits of tire
adhesion.
Q. Where do I put the flag?
A. A small diameter tube is located at the top of the seat tubes
near the tail light mount inside the seat cover.
Q. Why can’t I get first gear?
A. See page 6 Cable Adjustment section.
18
maintenance

what’s next?
accessories
Accessories can expand the usefulness of your trike and
therefore your horizons. We’ve listed some of the more popular
ones below but do check out the website for the full range.
You can also see our list of recommended products from other
manufacturers, we have fully tested these products and believe
they are the best on the market for both their designed purpose
and suitability to our trikes.
Accessorry Post Pannier Rack
Light Mounts Front Mudguards
resources
Print
VeloVision
Recumbent and Tandem Rider Magazine
Web
Official Website www.greenspeedrecumbents.com
Greenspeed on facebook company listing
‘BentRider Online www.bentrideronline.com
Recumbent Journal www.recumbentjournal.com
warranty
Click onto www.greenspeedrecumbents.com an fill out a warranty
form.
community
Join us on our Greenspeed facebook. All the latest new and
photos direct from the factory and shows are presented there
before getting polished up for the website.
Find a recumbent riders group, or cycling group in your area.
Your dealer is likely the best place to start but also check out
‘bentrider Online and the Recumbent Journal.
Take a BIG ride! There are hundreds of fully supported rides that
will carry all your gear for you and offer many great services and
entertainment along the way. It is a great way to meet people
doing what you love.
Come tell us your stories and share them with everyone on the
Greenspeed website. We love to hear how you are using your
trike and how it has enhanced your life.
19

folding trike manual
Table of contents
Other Green Speed Bicycle manuals
Popular Bicycle manuals by other brands

Orbea
Orbea BLUE PAPER OIZ CARBON OMX Technical manual

TRIOBIKE
TRIOBIKE CARGO installation manual

Himiway
Himiway ESCAPE owner's manual

Winora Group
Winora Group LOAD Urban Additional information on the original manual

Derby cycle
Derby cycle PEDELEC IMPULSE 2.0 ERGO user manual

Specialized
Specialized Roubaix owner's manual