GreenDS GDS+ 3 User manual

0

GreenDS Auto Fault Computer Diagnostic Equipment
1
Statement
The publication is designed only for the use of GDS+ 3 products, any organization or individual can’t
reproduce, store or transmit in any form or by any means (electronic, mechanical, photocopying, recording
or otherwise) without the written permission of GDS Company.
The Manual is used exclusively for professional Auto repair and maintenance technicians.
The Manual is only provided for the operating method of GDS products, GDS shall not be liable for any
possible consequence of the use of this method as applied to other equipments.
GDS shall not be liable for the purchaser of this product or third parties for equipment damages, losses,
costs, or expenses incurred by purchaser or third parties as a result of accident, misuse, or abuse of this
product, or unauthorized modifications, repairs or alterations to this product or trouble to strictly comply
with GDS operating and maintenance instructions.
The Manual is based on the latest information, illustrations, and specifications etc available at the time of
publication. The right is reserved to make change at any time without notice.
GreenDS as the logo has already been registered in China. In countries where any of the GreenDS
trademarks, service marks, domain names, logos and company names etc. are not registered, GreenDS
claims to other rights associated with non-registered trademarks, service marks, domain names, logos and
company names etc. Other products or company names, logos, sevice marks etc.referred to in this manual
still belong to their respective owners. You may not use any trademarks, service marks, domain names,
logos of GreenDS or any third company without the written permission from the owner of the applicable
trademarks, service marks, domain names, logos or company names etc.
Registered Trademark
GreenDS as the logo has already been registered in China and several foreign countries. In countries where any
of the GreenDS trademarks, service marks, domain names, logos and company names etc. are not registered,
GreenDS claims to other rights associated with non-registered trademarks, service marks, domain names, logos
and company names etc. Other products or company names, logos, sevice marks etc.referred to in this manual
still belong to their respective owners. You may not use any trademarks, service marks, domain names, logos of
GreenDS or any third company without the written permission from the owner of the applicable trademarks,
service marks, domain names, logos or company names etc.
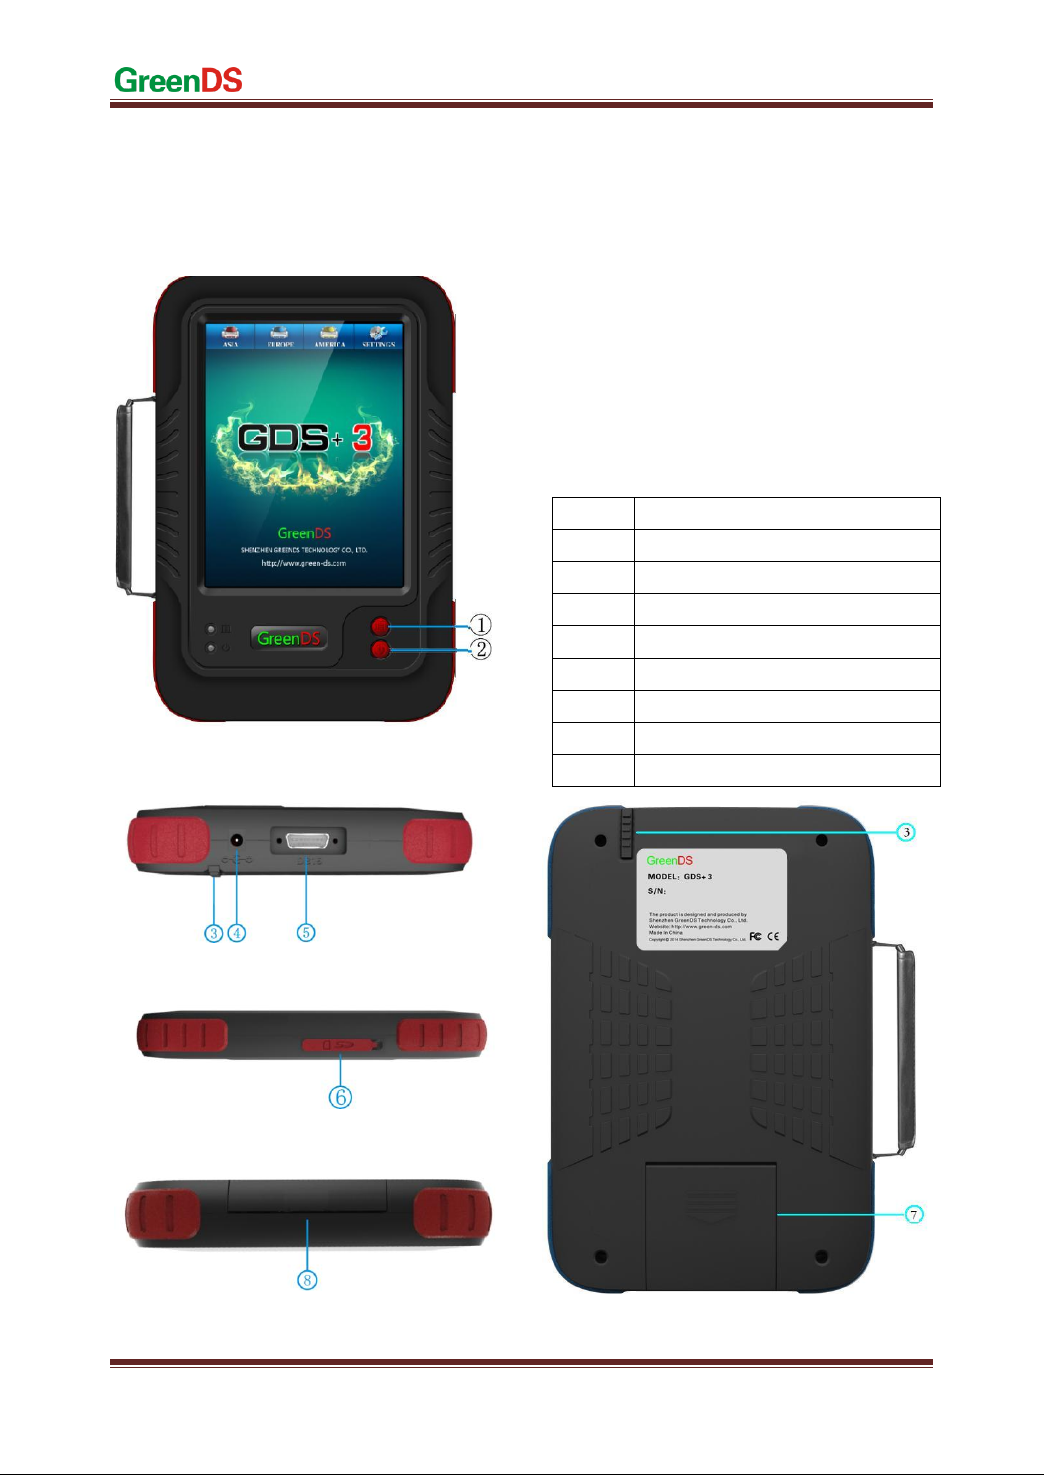
GDS+ 3 Product Operation Manual Instruction
Before using GDS+ 3 product, please read this manual carefully.

GreenDS Auto Fault Computer Diagnostic Equipment
2
This manual is based on the current product features and configurations. If adding new features and
configuration, this manual will subsequently be amended, the new specification can be download at
GreenDS website
Please carefully read the "Note" "Remark" of the user manual to ensure that the user can use our
products properly and safely.
GDS+ 3 Main Unit Maintenance and Use Attentions
Do not allow unauthorized demolition.
Avoid strong impact.
Avoid closing to the magnetic field.
Do not put this machine in a hot environment for a long time.
Do not put this machine at a low temperature environment for a long time.
Do not click on the screen violently or by using weapon.
Do not use water and chemical solvents to clean the machine, using a soft clean cloth and neutral detergent
to clean.
Automobile Inspection Notes
●Shall operate by adhering to auto repair industry safety rules. Special attention to the impact or damage
caused by the environmental factors such as the surrounding pH, poison gas, high pressure heavy.
●Vehicle battery fluid contains sulfuric acid, while sulfuric acid is corrosive to the skin, in operation should
avoid skin having direct contact with battery fluid. Particularly, be careful not to splash into the eyes. Avoid
nearing fire.
Engine exhaust emissions contains a variety of toxic compounds, should avoid inhalation.When operating,
the vehicle should be parked in a well-ventilated place.
When the temperature of the working engine is high, should avoid contact with high temperature
components such as water tank and exhaust pipes.
Before starting the engine, should hold the handbrake, gear lever is placed in neutral (manual transmission)
or〖P〗gear position (automatic transmission), so as to avoid the vehicle rushing out and cause accident
when starting the engine.
Before repairing the vehicles, hold parking brake well, shift transmission gear into the neutral position or P
gear, and lower the driver's seat side glass doors and windows.
If the engine can start, first warm up to normal temperature (water temperature at about 80 ℃), and close
the auxiliary electrical appliances (such as air conditioning, lighting, sound, etc.).
Find the diagnostic socket of this car, and check, confirm the diagnostic socket line intact, connecting the
main unit for diagnosis. Otherwise, do not test, to avoid damage to the main unit, if necessary, using a
multimeter to measure the voltage of diagnostic socket.

GreenDS Auto Fault Computer Diagnostic Equipment
3
Device Use Notes
When use GreenDS products for testing, you must handle with care and be away from heat and
electromagnetic field, to avoid interference with the main unit.
The matched touch pen, rather than any other sharp tool, is recommended to click the touch screen.
When electrical components energized, you can not disconnect the circuit to prevent the self-inductance,
mutual inductance attacking sensors and automotive ECU.
When electrical equipment works, avoid putting magnetic objects close to the vehicle control unit,
otherwise the vehicle control unit may be damaged.
When dismounting vehicle control unit or electrical components, must be carried out 1 minute after turning
off the ignition switch.

GreenDS Auto Fault Computer Diagnostic Equipment
4
CONTENTS
STATEMENT .....................................................................................................................................0
1.PRODUCT INTRODUCTION ...................................................................................................6
1.1INTRODUCTION.....................................................................................................................6
1.2FEATURE .................................................................................................................................6
1.3 CARE AND MAINTENANCE ............................................................................................7
1.3.1STORAGE ENVIRONMENT............................................................................................................7
1.3.2 MAIN UNIT PROTECTION............................................................................................................7
1.3.3 TOUCH SCREEN CARE ................................................................................................................7
1.3.4 PRECAUTION ON OPERATION......................................................................................................7
1.3.5 SD CARD MAINTENANCE...........................................................................................................8
1.4 HELP........................................................................................................................................8
2. PRODUCT CONFIGURATION................................................................................................9
2.1GREENDS HARDWARE INTRODUCTION ..........................................................................9
2.1.1DSMAIN UNIT FRONT SIDE CONFIGURATION..............................................................................9
2.1.2 MAIN UNIT PARAMETERS INTRODUCTION................................................................................10
2.2 PRINTER PARAMETER INTRODUCTION AND PRINTING PAPER INSTALLATION10
2.2.1 PRINTER PARAMETER .........................................................................................................10
2.2.2 PRINTING PAPER INSTALLATION..........................................................................................10
3. OPERATION GUIDE ..............................................................................................................12
3.1 POWER AND TESTING CABLE CONNECTION..........................................................12
3.1.1MAIN UNIT POWER SUPPLY......................................................................................................12
3.1.2CABLE CONNECTION METHOD..................................................................................................12
3.1.3 START UP.................................................................................................................................13
3.1.4 SHUT DOWN ..........................................................................................................................13
3.2 STARTING UP INTERFACE INTRODUCTION .................................................................13
3.2.1 STARTING UP INTERFACE.......................................................................................................13
3.2.2 STARTING UP SCREEN ADJUSTMENT ........................................................................................14
3.2.3 DESKTOP MENU DESCRIPTION .................................................................................................14
3.3 SYSTEM SETTINGS.............................................................................................................15
3.3.1SYSTEM INFORMATION..............................................................................................................15

GreenDS Auto Fault Computer Diagnostic Equipment
5
3.3.2TOUCH AJUSTMENT ..................................................................................................................16
3.3.3UNIT ACTIVATION .....................................................................................................................16
3.3.4LANGUGE..................................................................................................................................17
3.3.5SELF TEST.................................................................................................................................17
3.3.6SD CARD TESTING....................................................................................................................18
4. PRODUCT UPGRADING .......................................................................................................19
5.VEHICLE DIAGNOSIS............................................................................................................20
5.1 CONNECTION OF OBD-II CONNECTOR ........................................................................................20
5.2 CONNECTION OF NON-OBD-II CONNECTOR ...............................................................................20
5.3 STEPS OF VEHICLE DIAGNOSIS....................................................................................................20
6. WARRANT CLAUSE...............................................................................................................21

GreenDS Auto Fault Computer Diagnostic Equipment
6
1.Product Introduction
1.1Introduction
GDS+ 3 is a comprehensive vehicle diagnosis device developed and manufactured by GreenDS in
accordance with China’s 863 plan, mainly focusing on the detection and examinination of electric control system
of gasoline engine. The product is suitable for service companies large and small.
With comprehensive software configuration and authoritative vehicle data, the product can fully meet the
stringent requirements of customers to detect problems in breadth and depth. The software covers tens of
thousands vehicle data of domestic, Europe, America, Japan and provides a powerful data system that allows
users to handle problems in practical work quickly and easily to improve the efficiency and technical level,
presenting the the advantages of professional technics.
The device is elegantly and impressviely designed and equiped with wide color touch-screen. The function
of mode setting can meet the needs of different working environments. In addition, X-168 product adopt flexible
drive technology and has good extensibility, which fully satisfies the test of all kinds of communication bus of
vehicle electronic control system.
1.2Feature
The hardcore of GreenDS auto diagnostic computer follows the international advanced modularized
design technology, with the excellent performance of high speed, stability, data collection accurate, etc.
With openning structure design and independent operating system, making the future upgrade of system
software and diagnostic software more convenient.
Its working power supply is from Vehicle storage battery which can meet the voltage change between
9~27V. Internal power supply adopts separating power supply design which can avoid products to be damaged
when vehicle voltage is abnormal.
Good extensibility, its communication interface adopts flexible drive circuit which not only can satisfy
the current auto bus type test,but also the auto bus type test in the furture. Built-in high and low speed
CAN-BUS supports the CAN-BUS electronic control system vehicles and just only one diagnostic interface
can test all of vehicles with CAN-BUS. The products support all OBD-II protocols.
Build-in high speed thermal printer for the convenience of maintenance personnel to record data and save
trouble code etc..
Screen follows International standard LED true-color industry touch-screen. It can show clear words even
in strong light, is sensitive in touching, and has broad interface and high compressive strength. Therefore, even
in bad environment, it can work well.
Multi-language operation edition has been applicable to different countries and areas.

GreenDS Auto Fault Computer Diagnostic Equipment
7
1.3 Care and Maintenance
1.3.1Storage Environment
1)Store GreenDS on a flat and dry place with suitable temperature.
2)Never put GreenDS in direct sunlight or near to the heating source.
3)Never put GreenDS in the magnetic field.
4) Avoid smoke erosion, water and oil splashing into GreenDS.
5)Avoid shock, dust, moisture and extremely high temperature.
6)Power off the machince and make sure the power cable is removed, then clean the outside surface and touch
screen with soft cloth that is dipped with a little water if main unit is dirty.
7) Periodically startup GreenDS main unit to avoid moisture if it is not in use for a long time.
1.3.2 Main Unit Protection
1)Handle it with care and avoid hitting.
2)Be careful to pulg and unplug the main cable and diagnostic connector. Tighten the screw before operation to
avoid unexpected disconnecting and/or damage to the diagnsotic port
3)Put back the machine and cables, connectors etc. accessories to box to avoid loss.
1.3.3 Touch Screen Care
1)Dust may be accumulated on the LCD screen due to electrostatic. You are suggested to buy the special LCD
screen wiper to clean the screen gently.
2)Don’t wipe the screen with bare finger to avoid fingerprint attached. Never use chemicals to clear the screen.
3)Never put GreenDS close to the electromagnetic wave products to avoid any effect on the screen
4)Never put GreenDS in direct sunlight or ultraviolet radiation for long time to shorten the service life of screen.
1.3.4 Precaution on Operation
1)Forbiden to switch main unit frequently and cut off the power suddently, power supply instability and
abnormal power supply etc.
2)Unplug the power after usage in case of the aging of the products.
3)Never insert or pull out SD card when machine is turned on to avoid sd card damage or sd card data loss.
4)Don’t expose product under the chemical volatility environment to avoid any corrosion of hardware.
5)Never clear product with chemical solubility reagents like banana water, engine cleaning agents,gasoline etc..

GreenDS Auto Fault Computer Diagnostic Equipment
8
6)Don’t put anything on the screen to avoid any damage.
7)Periodically startup GreenDS main unit if it is not operated for long time to avoid moisture.
1.3.5 SD Card Maintenance
1) Do not switch on/off GreenDS main unit frequently;
2)Adopting antistatic precautions to avoid static electricity to contact SD card;
3) Do not operate SD card during upgrade or connection to main unit until data transmission is completed.
4) Do not plug or unplug SD card with electricity or brutal force
5) Please remember the password if encrypt the content of card, or not to encrypt data.
6) Please use high-quality data transmission device during connection
7) Randomly plug and unplug SD card from main unit are strictly prohibited during the operation of main unit.
8) Do not use cleaning liquid or water to clean SD card;
9) When insert SD card, the insert direction must be correct (Error insertion may lead to damage of
SD card or SD card slot)
10) Do not twist and bend SD card.
1.4 Help
GDS+ 3 product, provided with supporting service, is easy and simple to maintain. From purchase, use,
upgrade, to maintenance etc., the marketing network that spread over various regions will provide you with the
most convenient and efficient service.
GreenDS Company provides users with online help. If you want to know the company's latest product, or
automotive diagnostic information, you can log on "GreenDS" Website via the Internet and contact us.

GreenDS Auto Fault Computer Diagnostic Equipment
9
2. Product Configuration
X-168 Main unit (Front side)
X-168 Main unit (Top side)
X-168 Main unit (Right side)
Figure 2.1.1 Main unit structure diagram
2.1GreenDS Hardware Introduction
2.1.1DSMain Unit Front side Configuration
2.1 Figure 2.1.1 is the frontside structure diagram
of GDS+ 3Main unit.
Main unit (Back side)
NO.
Name
1
Printing Paper Out Button
2
Main unit ON/OFF button
3
Touch Pen
4
Power Interface
5
Main Diagnosis Cable Socket
6
SD Slot
7
Printer Cover
8
Printing Paper Outlet

GreenDS Auto Fault Computer Diagnostic Equipment
10
Printer Parameter
2.1.2 Main Unit Parameters Introduction
Main Unit Parameters
Hardware
parts
Parameter
Type
CPU
553MHZ
SAMSUNG ARM
2416
RAM
128M
SMD
Flash
memory
SD
Plug type
Power
12V/3A
DC direct voltage
Diagnose
interface
---
DB15
SD card
interface
---
National standard
Display
8-inch LED
TFT LCD Color
Touch Screen
Resolution
600*800
dot-matrix
External
dimension
282*192*43
mm
Net weight
1390
gram
2.2 Printer Parameter Introduction and Printing
Paper Installation
2.2.1 Printer Parameter
GDS+ 3 main unit with built-in mini thermal printer,
adopting the way of direct in and bent out, reduces
the risk of printing stuck.
2.2.2 Printing Paper Installation
1, Put main unit flat on desk or other flat surface, pull
outward printer and take out cover plate on the
lower part of main unit.
Item
Unit/ method
Paramete
r
Print
method
Thermal
dot-matrix
Printing
----
Number of
rows
(dot-matrix/row)
384
Resolution
(dot-matrix/mm)
8
Paper width
(mm)
58±0.1
Print width
(mm)
48
Print speed
(mm/s)
62.5
Paper feed
method
Direct in
Bend out
Detection
mode
Thermal-Printing
head temperature\
Heat inductor
----

GreenDS Auto Fault Computer Diagnostic Equipment
11
Lift up the Cover
Put in the printing paper. Please be aware that the
pringting paper has Face and Back side. If wrongly
installed, the paper can’t show the words. And you
should switch to another side to install again.
Put the Cover back
Push the cover upwards to finish the whole Process

GreenDS Auto Fault Computer Diagnostic Equipment
12
3. Operation Guide
3.1 Power and Testing Cable
Connection
3.1.1Main Unit Power Supply
GDS+ 3 main unit power supply has four kinds of
ways, as shown in Figure 3.1.1
①Power supply by power adapter
②Power supply by main testing cable,
connector and vehicle diagnostic
socket
③Power supply by connection of
cigarette lighter with vehicle
④Power supply by connection of battery
terminal line with vehicle battery
3.1.2Cable Connection Method
3.2 If the diagnostic socket is not equipped with
power supply, you can choose ①③④in
3.1.1 as one of these three power connection
methods to provide power for the main unit.
3.3 If the diagnostic socket is equipped with power,
you do not need to connect another power cord.
The prerequisites for vehicle:
1 Confirm the diagnostic socket location, shape, and
whether there is a need for external power supply.
2 Select the appropriate connector base on vehicle
model and shape of diagnostic socket.
3 Connect one end of the main testing line to the
other end of main unit diagnostic connector.
4 Plug diagnostic connector that connected with the
main testing line into the vehicle diagnostic socket.
5 Confirm that main unit with power and start it up.
Remark: Diagnostic interface is standard OBD-II
interface when connecting, 2 ends of main testing
cable are required to separately connect with
OBD-II connector and GreenDS main unit, plug
OBD-II connector into vehicle diagnostic socket to
finish connection. Not all cars are equipped with
BOD-II connectors, so the connections shall be
subject to the actual connectors.

GreenDS Auto Fault Computer Diagnostic Equipment
13
3.1.3 Start Up
Through any one of the four power supply power
ways introduced in 3.1.1 to supply power, press the
button [POWER] in the bottom left of the main unit
screen. The main unit will be getting started, and
then enter into the running state.
3.1.4 Shut Down
After usage of this equipment, click touch screen to
back to desktop, press the [POWER] key in the
bottom left of the main unit screen to shut down.
Notes: When startup or shutdown, the button
operation time is generally 1 ~ 2ms, long press the
On and Off button can cause key failure.
3.2 Starting Up Interface
Introduction
3.2.1 Starting Up Interface
Connect the power supply, press the power switch
key, GreenDS product identification firstly appears
on the screen, then【if you want to adjust the touch
screen please, click screen directly】appears at the
top of the starting up progress bar.
Notes: If you need adjust touch screen, please at
this time click on anywhere of the screen with the
touch pen to enter adjustment mode. During
adjustment, you must use touch pen to adjust.
If don’t need touch screen adjustment, the system
will automatically enter desktop in 2s.

GreenDS Auto Fault Computer Diagnostic Equipment
14
3.2.2 Starting Up ScreenAdjustment
If you use touch pen to click on anywhere of screen,
the main unit menu enter into the touch screen
adjusting mode.
The main unit screen prompts 【Please click cross
cursor (the more precise click, the better for your
adjustment)】, click on the cross cursor appears on the
4 corners of screen in turn with a touch pen
counter-clockwisely from top left corner of the
screen.
After adjustment, and the main unit shows correct
information, then log on to the desktop menu.
3.2.3 Desktop Menu Description
When the main unit starts normally, the main unit
will enter the desktop menu. The top of desktop is
the menu bar. Desktop background displays product
models, service hotline update Web site, the service
network.
Desktop top from left to right are
1:【ASIA】
2:【EUROPE】
3:【AMERICA】
4:【SETTINGS】
Note: The bottom right position of the menu
shows ****date ** month ** year, representing
the last update time of the software program.

GreenDS Auto Fault Computer Diagnostic Equipment
15
3.3 System Settings
Select the menu 【System settings】with the touch
pen at the top of desktop, then the sub-menu of the
system setting menu appears. :
【System info】
【Touch adjust】
【User infor】
【System theme】
【Language】
【System active】
【Clear saved data】
3.3.1System Information
Select 【System Information】and enter, the main
menu pop up a dialog box for the hardware
information, operating system version, software
version, database version, memory information of
product. Operating the button【OK】on the left side
of menu to return to previous menu.

GreenDS Auto Fault Computer Diagnostic Equipment
16
3.3.2Touch Ajustment
This feature is for screen deviation adjustment in the
operation of main unit functions when using touch
pen to select the main menu, the menu the main unit
entered is not the actual one selected. Operation
method is the same to that of starting up screen
adjustment.
Note: when you can not adjust through the touch
screen adjustment menu, you can adjust it at the time
of starting up.
3.3.3UnitActivation
Every main unit has not been activated permanently
when thay are distributed. Only the users
encountering no malfunction of the main unit after
using for a period of time can the activate the main
unit. Every time the user use the main uint, the
prompt“the version you are using now is trial, you
can use it for another XX times.”
Every starting up and connection to the vehicle
would count as one time. When the remaining times
decrease to zero, the device needs to be activated.
Activation:
Please sign in Company official website to activate
the device.
1,First, log in your username and password
(username password need to be registered by
yourself);
2, Enter the interface of activation and input the
feature code displayed on your device. Then click
Generate.
3,Input the newly generated code to your device.
You can continue using your device if a prompt
informs you that activation has been successful.
Note:If activation failed,it might be caused by the
wrong serial number or feature code. Please do it all
over again.

GreenDS Auto Fault Computer Diagnostic Equipment
17
3.3.4Languge
Multi-language supported. Please mind that the
languge switch needs rebooting the main unit to
come into effect.
Note: Varied language is provided according to
different regions and subject to the actual
configuration of the product.
3.3.5Self Test
This function is used to test the main diagnosis cable
and standard OBD-II connector and only can be
performed with a fitted self test connector.

GreenDS Auto Fault Computer Diagnostic Equipment
18
3.3.6SD Card Testing
Please notice that SD card are divided into Class2
and Class4. The class 4 cards usually have writing
and reading speed of 4MB/s.
Usually the position of write –protection swith
should be at the side without the word LOCK. If it is
at the side with LOCK, then the SD card will be in
the write –protection status. Data can only be read.
Writing, formatting and undating can not be
proceeded.
This function can test the performance of the SD
card.

GreenDS Auto Fault Computer Diagnostic Equipment
19
4. Product Upgrading
The company will continue to update the software program, periodically (eg every three months) to conduct a
product software upgrade, the upgrade method is as follows:
1, first sign in Company website to register
2,Then go to the download center to download the full upgrade package on your computer desktop;
3, Plug the SD card into your PC (computer) USB socket through a card reader;
4,Foemat the SD card and the doule click the upgrade package to upgrade;
5,A prompt will pop out once you finished the upgrade;
6,Unplug the SD card and Insert back to your main unit.
For more upgrading help please visit our website.
Table of contents