GRILLWORKS Architectural Series Quick start guide

®
A MAJOR CAUSE OF GRILL-RELATED FIRES IS FAILURE
TO MAINTAIN REQUIRED CLEARANCES (AIR SPACES)
TO COMBUSTIBLE MATERIALS. IT IS OF UTMOST
IMPORTANCE THAT THIS GRILL BE INSTALLED ONLY
IN ACCORDANCE WITH THESE INSTRUCTIONS.
Architectural Series®
Installation & Use

INTRODUCTION
INSTALLATION
FORWARD CRANKWHEEL
SIDE CRANKWHEEL
GETTING STARTED
FUEL & COOKING
CLEANING & MAINTENANCE
Architectural Series®
3
4
6
8
10
11
13
e Grillworks Architectural Series brings dramatic live-re capability to a
hearth, restaurant line or enclosure of your own design. Rustic or modern,
central to the space or part of a larger look, these grills allow maximum aesthetic
exibility along with unmatched grilling features.
In this guide you’ll nd recommendations for installation, preparation,
operation and care of Grillworks Architectural grills. Be safe—install using
licensed professionals and follow local codes regarding solid fuel installations
and safety guidelines. And once you’re ready to cook, please read every word
here and ensure everyone working around the grill does too—rewarding results
are dependent on a skilled and informed chef.
If you have any questions or comments about your grill do not hesitate to call or
email us. We want to hear from you.
Best regards,
Benjamin Eisendrath
President & CEO
orders@grillworks.com / (855) 434-3473

Architectural Series®
Installation & Use
INTRODUCTION 3
Please read the entire manual before installing the Grillworks Architectural, and distribute to anyone
involved in the installation. Failure to follow instructions may result in property damage, bodily injury
or death. Contact your local building or re ocials about restrictions and installation inspections in
your area.
IF THE GRILL IS IMPROPERLY INSTALLED A FIRE MAY RESULT. FOLLOW THE
INSTALLATION MANUAL TO REDUCE RISK.
KEEP FLAMMABLE ITEMS CLEAR OF THE AREA AROUND THE GRILL: Do not
store ammable liquids such as gasoline, kerosene or lighter uids in the vicinity of the installation.
Always keep the area around it free and clear of any and all combustible materials.
MAINTENANCE AND SERVICE SAFETY: Improper installation, adjustment, alteration, service
or maintenance can cause property damage, injury or death. Read the installation, operating and
maintenance instructions thoroughly before installing, operating or servicing this appliance.
WARNING: Never use gasoline, kerosene, lighter uid or similar accelerants to start or maintain
a re in your grill. Keep all such items well away from the grill when in use.
IMPORTANT: is grill must be installed, maintained, operated and serviced by authorized
professionals.
A MAJOR CAUSE OF GRILL RELATED FIRES IS A FAILURE TO MAINTAIN REQUIRED
CLEANCES TO COMBUSTIBLE MATERIAL. IT IS CRITICAL THAT THIS GRILL BE
INSTALLED IN ACCORDANCE WITH THESE INSTRUCTIONS.
USE SOLID FUEL ONLY—WOOD OR CHARCOAL—DO NOT USE PRODUCTS NOT
SPECIFIED FOR THIS GRILL
READ ALL INSTRUCTIONS BEFORE INSTALLING AND USING THIS APPLIANCE
SAVE THESE INSTRUCTIONS

Architectural Series®
Installation & Use
INSTALLATION 4
CLEANCES & PREPATION
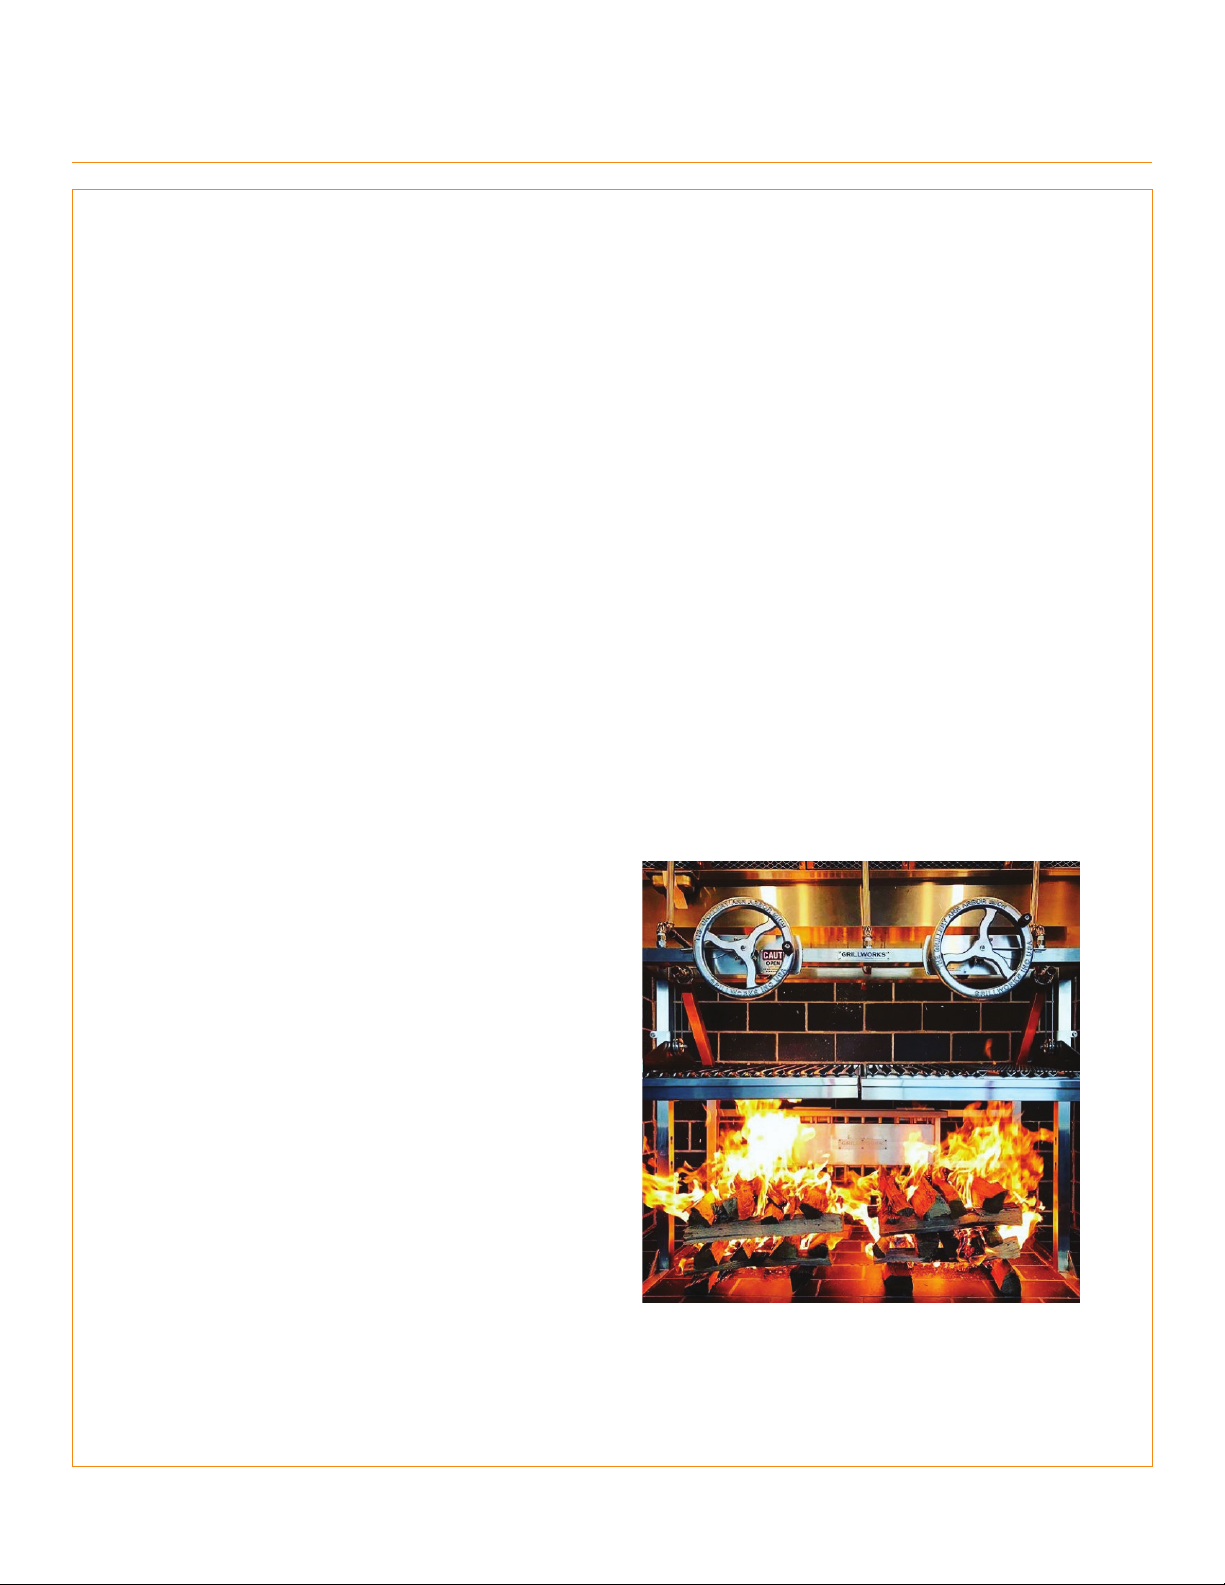
Full Chimney Installation
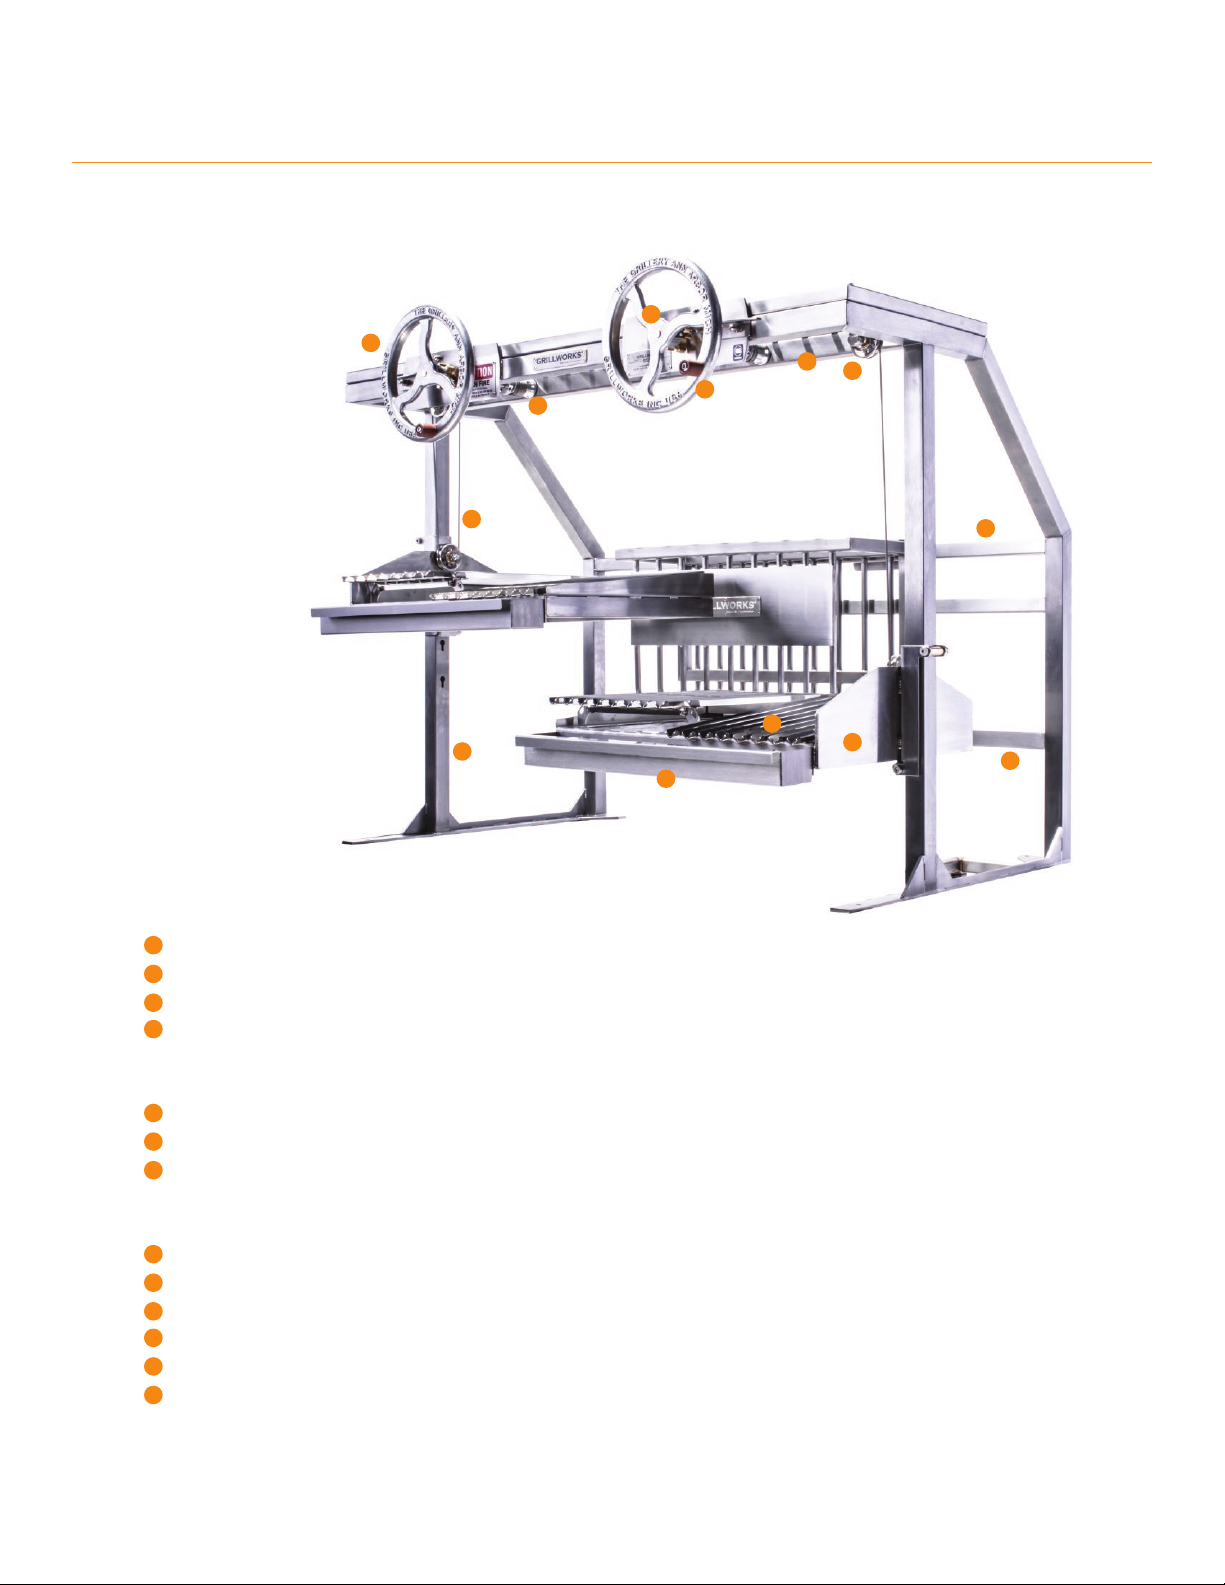
e Architectural grill’s uprights also serve as its travel
track, so should be installed with 2” clearance to the
enclosure walls on models with rollers (Dual-crankwheel
Architecturals) or a minimum of .5” for non-roller grills
(Single- crankwheel Architecturals). e rear of the grill
li frame and cooking surface should have at least 1”
of clearance to the rear wall of the enclosure, or in cases
where the optional Fire Cage is present, 1” minimum
to the cage (to allow easy grill surface travel—not a
safety issue).
ALWAYS USE A PROFESSIONAL FOR
CONSTRUCTION OF THE MASONRY
ENCLOSURE. MASONRY FAILURE COULD
CAUSE COSTLY DAMAGE, FIRE OR DEATH.
Only install the Architectural on a non-combustible base.
A strong substrate such as concrete lined with industry-
standard refractory rebrick is considered ideal. e
base should be 30-36” above the oor for comfortable
cooking operation. Walls should be constructed of
similar noncombustible material, and of a thickness great
enough to prevent excessive transmission of heat to the
outside (the exact amount will vary both with ventilation
and construction). Chefs oen want workspace at the
grill, so if dimensions allow you may set the grill up to
6-8” back from the front lip of the enclosure to provide a
staging area.
Open Installations
is approach leaves the top of the grill exposed. is is
usually done with side-crankwheel grills. ere are two
common types:
Cut Out: e grill stands in a three-sided cutout with
the front OPEN (no wall). e cutout recess should be
10” deep for the best balance of heat containment and
aesthetics. e same clearances to the walls and rear
apply as to the full chimney installation type. e recess
contains the re/cooking heat so is a good choice for
outdoor or residential projects.
Open Hearth: e grill is mounted on a larger at
hearth, without any recess below the grill. is type of
installation is common in restaurant applications as the
ventilation is controlled (no wind) and it allows the chefs
to use the whole hearth for staging, direct coal searing
or other improvised cooking. e re is commonly
moved around to control what area of the grill is hoest,
and most grilling will likely be performed with the
surface very close to the coals as heat dissipates rapidly
without containing walls.
THIS GRILL MUST BE INSTALLED BY A
QUALIFIED PROFESSIONAL. THE ENTIRE AREA
OVER THE GRILL MUST BE NONCOMBUSTIBLE
EXTENDING 48” IN ALL DIRECTIONS. ANY
FAÇADE OR CLADDING MATERIALS MUST ALSO
BE NON-COMBUSTIBLE. IN A PROFESSIONAL
SEING THE GRILL MUST BE INSTALLED
UNDER AN APPROVED TYPE 1 NFPA 96 OR NFPA
96 EQUIVALENT SOLID FUEL HOOD SYSTEM.

Architectural Series®
Installation & Use
INSTALLATION 5
ALERT: Installation, operation and servicing of this
appliance can expose you to ceramic dust.
ALWAYS WEAR PROTECTIVE EYEWEAR AND
RESPITORY PROTECTION AS A PRECAUTION
AGAINST INHALATION OR EYE INJURY.
HAND PROTECTION IS ALSO RECOMMENDED
AGAINST POSSIBLE SHARP EDGES.
PLEASE READ THIS ENTIRE MANUAL BEFORE
YOU INSTALL THE ARCHITECTUL GRILL.
FAILURE TO FOLLOW INSTRUCTIONS MAY
RESULT IN PROPERTY DAMAGE, BODILY
INJURY OR EVEN DEATH. CONTACT YOUR
LOCAL BUILDING OR FIRE OFFICIALS ABOUT
RESTRICTIONS IN YOUR AREA.
VENTING
In a professional seing the hood and ductwork used
over the Architectural grill must be approved for
solid fuel and installed in accordance to all relevant local
and national code requirements for solid fuel appliances.
A SOLID FUEL NFPA 96 COMPLIANT HOOD IS
REQUIRED FOR USE OF THIS GRILL.
As with all solid fuel cooking equipment and ductwork,
regular cleaning and inspection is critical to prevent re
risk. Typically this cleaning and inspection should occur
AT LEAST monthly, but check with local re authorities
to determine frequency.
A re suppression system (ANSUL) is required for the
Architectural grill in a commercial environment. Refer
to local and national requirements to determine the
system required for your installation of this grill, but
commercial installations generally follow the UL 2162
listing standard.
Commercial built-in hearth installations using our grills
can be conrmed and labelled UL 2162 compliant
by scheduling an inspection with a third-party testing
service. Some locales ask for this, some do not. Check
with your local authorities.
If the Architectural is being installed in a residential
(non-commercial) seing, you must comply with codes
and guidelines governing the requirements for your
ue, venting and suppression. USE A PROFESSIONAL
HEARTH BUILDER AND VENTILATION
SPECIALIST. Fireplaces and chimneys that are used
for cooking will need to be cleaned MUCH MORE
OFTEN to avoid the danger of chimney re. KEEP AN
EXTINGUISHER NEARBY AT ALL TIMES.

Architectural Series®
Installation & Use
FORWARD CRANKWHEEL COMPONENTS 6
FRAME
uprights with floor mounting pads
horizontal main tube with wall mounting tabs
lower mounting strap (removed aer installation)
lift pulleys—fastened to the main tube
CARRIAGE
lift frame (guided by the uprights—carries the grilling surfaces and drip pans)
grilling surfaces
drip pans
LIFT SYSTEM
cable system
crankwheel and starwheel
axle
lift system mount (plate with rear bearing tube/axle pass-through)
crank lever
rear support bracket
A
B
C
E
D
H
F
I
G
J
K
L
M
A
B
C
E
D
H
F
I
G
J
K
L
M
Dual Architectural shown

Architectural Series®
Installation & Use
FORWARD CRANKWHEEL INSTALLATION 7
FORWARD CNKWHEEL(S)
Note: in most cases the grill will come fully assembled
in a crate, so these detailed instructions are provided in
the event the grill must be signicantly disassembled
for installation.
Grill Installation
1: Position the frame into the structure as desired. Leave
at least .5” of clearance to the walls on single- wheel
Architecturals, 2” on Dual Architecturals for roller
travel and access. e entire grill should be within the
dimensions of the enclosure’s base, WITH basting
pans aached.
2: Verify that the uprights (A) are vertical with a level.
3: Fasten upright mounting pads (A) using an industry
accepted fastening method, and make sure you anchor
THROUGH the re brick to a stronger substrate—
rebrick is brile and not a good structural element.
4: Fasten the upper corner tabs on the grill uprights
to the enclosure walls, using a spacer if necessary.
Make sure to penetrate through any rebrick to the
underlying structure for stability.
Preparation for Use
1: Ensure the Architectural Series grill’s li system is
clear and traveling up and down freely by raising and
lowering the grill frames using the crank wheels. If the
cables aren’t evenly wrapping, lower the frames all
the way to the base and re-raise—the cables should
correct themselves (recommended before each service
in a restaurant).
2: Remove the lower horizontal mounting strap before
use. is is only in place to keep the grill straight
during shipping and for installation.
The Architectural Series needs only to be secured to a
suitable base inside a fireproof surround—the grills come
ready to go once in place.

Architectural Series®
Installation & Use
SIDE CRANKWHEEL COMPONENTS 8
FRAME
uprights with floor mounting pads
horizontal main tube
lower mounting strap (removed aer installation)
CARRIAGE
lift frame (guided by the uprights—carries the grilling surfaces and drip pans)
grilling surfaces
drip pans
LIFT SYSTEM
cable system
crankwheel and star wheel
axle
crank lever
A
A
B
B
C
C
D
D
G
G
E
E
H
H
F
F
I
I
J
J

Architectural Series®
Installation & Use
SIDE CRANKWHEEL INSTALLATION 9
SIDE CNKWHEEL(S)
Frame Installation
1: With the li frame (D) on both uprights, stand the
frame assembly (1) in the installation space positioned
as desired. Place the grill surfaces (E) on the li frames
and aach the basting pans (F) to their tabs on the
frames. e fully assembled grill should be fully within the
structure with no overhang to the oor.
2: Gauge adequate clearance for the assembled li
frame (D, E) to move freely, leaving at least 1” of
space between the rear of the grilling surfaces and the
masonry. Mounting tabs on the upright tops should be
xed to walls to increase stability.
3: Loosely fasten the base pads (A) and the mounting tabs
(B) to the oor and walls. Unbolt and remove the cross
strap (C). Verify that the uprights are vertical. Bolt
through to structural material under the rebrick—
rebrick does not bear weight well.
4: [ENCLOSED INSTALL ONLY] e crankwheel
(H), mounting plate and star wheel will be loose from
the frame so they can be placed on the outside of the
enclosure with the axle (I) passing through. Install the
plate’s back sleeve into the hole in the structure.
Slide the axle (I) through and into both uprights,
loosely threading the right and le cable barrels onto
it between the uprights. Note the hole or at on the
axle at each end and tighten the barrel hex screws to
that point.
5: [ENCLOSED INSTALL ONLY] Ax the crankwheel
(H), tightening it so the neck bolt passes through the
hole in the axle. Position the mounting plate on the
outside wall such that the crank lever ( J) engages the
star wheel (H) from above. Drill holes into the lower
plate corners to x it to the masonry.
Li System Installation
1: Ensure the li frame (D) is engaged to both uprights.
2: Check that the cable barrels—that the cables wrap
on—(G), are tight to the axle (I)
3: Place the grill surfaces and drip pans, hold the
crankwheel (H) then depress the crank lever ( J)
and turn the crankwheel counterclockwise to lower
the li frame down to the base. Crank it back up to
check even travel. If the li frame is not level the cables
may be adjusted by loosening them from the barrels
with a hex tool.
ALL INSTALLATIONS SHOULD BE
PERFORMED BY A PROFESSIONAL MASON
OR HEARTH BUILDER.

Architectural Series®
Installation & Use
GETTING STARTED 10
GEING STARTED
In order to produce the most consistent results and get
the most out of the exible design of the Architectural,
you’ll need a good re. ere are two approaches to
starting that re.
Conventional Ignition
e Architectural is lit by starting the cooking re on the
hearth under the cooking surfaces. Using paper, kindling
and smaller pieces of wood, build the re directly on
the masonry hearth (raise the surfaces up and out of the
way for easier access). You may use natural starters here
too, like “Fat Wood” or other wood starter bricks. Wait
until they’ve burned away before you do any cooking!
Charcoal chimneys (found in many hardware stores) are
also a good way to build a coal bed, and are very useful
in a restaurant environment where a large coal bed is
desirable.
PROFESSIONAL TIP: It is recommended that the grill
be lit at least one hour before cooking to ensure the grill’s
re box and brick have come up to uniform temperature
for service.
Fire Cage Ignition
e Grillworks Architectural can be equipped with a rear
or side-mounted re cage. is cage is based on the South
American “brasero” which is a basket used to burn whole
pieces of wood down to charcoal. Load the re cage with
paper, kindling and smaller pieces of wood— in that
order from the boom—and LOOSELY to ensure good
air ow. Natural starters can be used here too. Place a few
more pieces of wood and/or chunk charcoal underneath
the cage. is fuel will be ignited by the coals that will
begin falling to the hearth through the boom of the
cage once it is going. Light the cage from the boom and
feed it larger pieces of wood as the re progresses. e
combination of coals produced by the cage and the coals
and wood ignited underneath will fuel the enclosure’s
re bed. Rake the coals under the cooking surfaces when
you’re ready to cook.
WARNING: THE FIRE CAGE PRODUCES A
POWERFUL VERTICAL BURN. MAINTAIN A
SMALL FIRE TO REDUCE THE POTENTIAL
FOR EMBER ESCAPE, CHIMNEY FIRE OR
ANSUL ACTIVATION.

Architectural Series®
Installation & Use
FUEL & COOKING 11
WOOD VS CHARCOAL
Both wood and charcoal are instrumental in running a
successful cooking re in the Architectural.
Charcoal, being dry and burning slowly over a long
period, is a reliable source of heat, but will not add much
in the way of avor to what is being cooked over it.
Well seasoned (10-15% moisture content) wood will
burn relatively quickly and produce a moderate amount
of avorful smoke. You should consider the whole wood
you burn to be the “seasoning” heat. e moisture le
inside it is what will carry the unique avor of that wood
type to the food and ultimately your meal. In a restaurant
seing, balancing the use of both high-quality chunk
charcoal for heat with a smaller amount of excellent
whole wood is oen the most economical and practical
approach to geing the best of both heat and avor
worlds. Consumption levels for both fuels can vary
widely as these grills allow openair ow. e operator can
control this to a degree by using more or less charcoal,
building smaller res, or lighting only a single grilling
station when less cooking area is needed.
THE ARCHITECTUL LIFT SYSTEM
All Architecturals have crankwheel-controlled li frames,
carrying two to four grill surface sections. e wheels
raise and lower the grilling frames through a wide vertical
range over the re to control cooking temperature.
Every grill comes with our signature juice-catching
V-Channel(r) surfaces, and additional accessory surfaces
are available for specialty uses. Note: the V-Channel
surfaces are tilted at a gentle 4 degrees to allow juices
to drain into the basting pans. If a at surface is desired
(for instance to place a pot), fold-out the leveling “feet”
underneath the front of each section.
In order for the cables that li the frames to wrap on their
barrels correctly the grill surfaces should be in place when
the wheel is operated. Turn the crank wheel clockwise
to raise the life frame. To lower it, hold the wheel and
depress the crank lever, then lower the frame gently.
Release the lever at the desired height.
DO NOT FORCE THE WHEEL BACKWARD
WITHOUT RELEASING THE LEVER.

COOKING ZONES
Air ow in an installed Architectural comes in from
the front and naturally ows toward the back of the
enclosure, then up. is creates three distinct heat zones
on the grilling surfaces, front to back. e dierence in
surface temperature just a few inches forward or back can
be dramatic.
Note: because the operator has a very large height range
available for the cooking surfaces, temperatures can
be controlled through a near-innite range.
e zones illustrated below are based on grill surfaces
positioned 4-8” above a wood/coal bed. For precise
readings on surface temperature we recommend the use
of an infrared gun-type thermometer.
Low Heat Zone
e front of the grilling surfaces, closest to the operator,
are the warm zone. Under normal cooking circumstances,
with the grill red and running, this area comprising
the rst six inches of grill surface will be 200-300
degrees Fahrenheit.
Medium Heat Zone
e center of the grill surface, the six inches positioned
more completely over the bulk of the re bed will range
from 300-600 degrees Fahrenheit.
Searing Zone
e rear six inches of the grilling surfaces, closest to the
rear wall of the grill and to the re cage, will be the hoest
area, nearest the rear wall. At 4-8” over the re, this area
will produce very high heat, usually ranging from 600-
900 degrees.
Surface Cooling
Once a grill surface is raised further from the re,
for example to rest an item, it will cool quickly.
Remember this when lowering it again for high heat—
the stainless will need a couple minutes to come back up
to searing temperatures.
Basting Pans
Each grill surface empties into a removable basting
pan aached to the front of the li frame via a keyhole
system. e V-Channel standard surfaces capture oils
and juices to reduce aring and to deliver them to the
chef for use in sauces or to baste back onto the food for
added avor!
Architectural Series®
Installation & Use
FUEL & COOKING 12
L
M
S
L
M
S
Low Heat Zone
Medium Heat Zone
Searing Zone

Architectural Series®
Installation & Use
CLEANING & MAINTENANCE 13
CLEAN UP
e Architectural’s grill surfaces and basting pans all li
o for cleaning. ey are 304 stainless steel and can
be washed by hand or in a commercial dishwasher. If
using a dishwasher, the grill surfaces should be re-oiled
(seasoned) again before cooking as they will be dry aer
going through the machine.
Ashes should be swept into a re-safe container when
cooking is done. Cooling with water is not recommended
as it will cause more mess than allowing the dry embers
to burn out naturally. Sudden cooling could also damage
your masonry. WAIT UNTIL THE GRILL HAS
COOLED BEFORE EMPTYING ASHES. EMBERS
MAY STILL BE IN THE ASH—THE CONTAINER
MUST BE FIRE PROOF TO PREVENT RISK
OF FIRE.
Excess grease or ash buildup around the grill’s moving
parts and external surfaces should be wiped o once the
grill has cooled.
MAINTENANCE & CARE
e Grillworks Architectural’s body is constructed
entirely in 304 stainless steel. e frames on Architectural
models are 1.25”-1.5” square tube, in 11 to 16 gauge,
depending on model. Custom units sometimes use
dierent diameters. e crankwheel is cast aluminum,
which stays cool for operation.
e Architectural’s cooking system is designed for
maximum motion and exibility. All moving parts,
especially the li systems, need to be checked for free
motion BEFORE EVERY USE. Ash and other normal
side-products of cooking and re can build up on the
tracks the li system travels on and can impede motion if
le uncleaned.
BEFORE EVERY USE check that the carriage is free
to move. It is recommended that the rollers on Dual
Architecturals be lightly lubed with cooking oil before use
to ensure they roll smoothly.
BEFORE EVERY USE check the hex screws in the barrels
that pick up the cables to ensure they are tight and seated
correctly. Do the same with the set screws in the star wheel
(the toothed gear behind the crankwheel that holds the
grill at height). Also inspect or clear the rollers that travel
up and down the tracks to ensure they can turn freely.
BEFORE EVERY USE inspect the li cables for any wear,
and make sure they are seated correctly in the pulleys and
wrapping correctly on the barrels. If they are wrapping
unevenly simply lower the surfaces to the lowest point
and raise them back up, this will straighten the wrap on
the barrels. IF THERE IS ANY DAMAGE TO A CABLE
REPLACE IT IMMEDIATELY. e cables loosen via hex
key from the barrels and can be quickly swapped WHEN
THE GRILL IS NOT IN USE.
All of our grills come with spare cables, we can always
provide more. DO NOT USE OTHER CABLES THAN
THOSE PROVIDED BY GRILLWORKS.
The lift pulleys on Dual Architecturals should be checked,
and cleaned to prevent ash build-up. Oil may be applied
occasionally to ensure smooth motion.


All professional Grillworks products are
NSF listed and approved for use in food service.
KEEP THESE INSTRUCTIONS!
Grillworks grills are custom made and continuously evolving.
Please check with us for possible supplements to these instructions
or for help with installation or use. orders@grillworks.com

www.grillworks.com
orders@grillworks.com
(855) 434-3473
The Grillery®, The Grillworks®, V-Channels®, Grillworks Infierno®
and Argentine Inspired, American Made® are registered trademarks
of ® Grillworks LLC. U.S. PAT. 4,462,306, U. S. PAT. D708,889 S,
additional patents pending
Made in USA
Argentine Inspired. American Made.TM
®
Table of contents