GROUND EFX MX400 Stryker Lite User manual

Model # MX400
DIGITAL METAL
DETECTOR
602 Fountain Parkway
Grand Prairie, TX 75050
800.847.8269
“Ground EFX”and“Stryker Lite”are TM trademarks of WGI Innovations, LTD.
“Sport Responsible” is a TM trademark of WGI Innovations, LTD. User’s Manual
5baksov.com.ua

2
Table of Contents
Terms ……………………………… 3-4
Contents ……………………….… 5-6
Assembly ………………………… 7-10
CategoryValue………………………11
Tech LCD Display…………………… 12
How it Works . . . .…………………… 13
Tech Display . . . . . ………………… 14-26
Tech: Shortcuts ………………… 27-28
Traditional LCD Display …………… 29
Traditional Display ……………… 30-32
Detector Modes ………………… 33-34
How to Detect ………………… 35-36
Courtesy …………………………… 37
Tips ………………………………… 38
Warning …………………………… 39
AudioFeatures………………………40
ToneRecognition……………………41
TroubleShooting……………………42
Warranty/Services ………………… 43
FCCStatement………………………44

3 4
TERMS TO KNOW
The terms below are standard words found within this manual and the
detector.
DISCRIMINATION
Discriminating allows you to choose the metals you want to detect and
the ones you want to “eliminate” or not look for. Discrimination makes it
easier to avoid trash or other undesirable objects. Once it detects a metal
it will categorize it to one of the metals you chose to detect for.
IRON
Iron is the most common metal used. It has been used since ancient times
because of how abundant it is. Ferrous metals are made up of iron. Ob-
jects that are ferrous metals are; nails, bolts, stainless steel and cast iron.
PINPOINT
A narrow detection that tells you the exact location of the object that
is buried.
PULL-TABS
Also known as “pop tops.” Discarded pull-tabs come from beverage cans.
They can be all dierent shapes and sizes. They are primarily made of alu-
minum, which can be bothersome to many treasure hunters.
GROUND GRAB
All soils contain minerals. Signals from ground minerals interfere with the
signals from metal objects. If metal is detected in this mode it will make
a sound. It doesn’t detect any of earth’s natural minerals so you can get a
more accurate reading on what you nd.
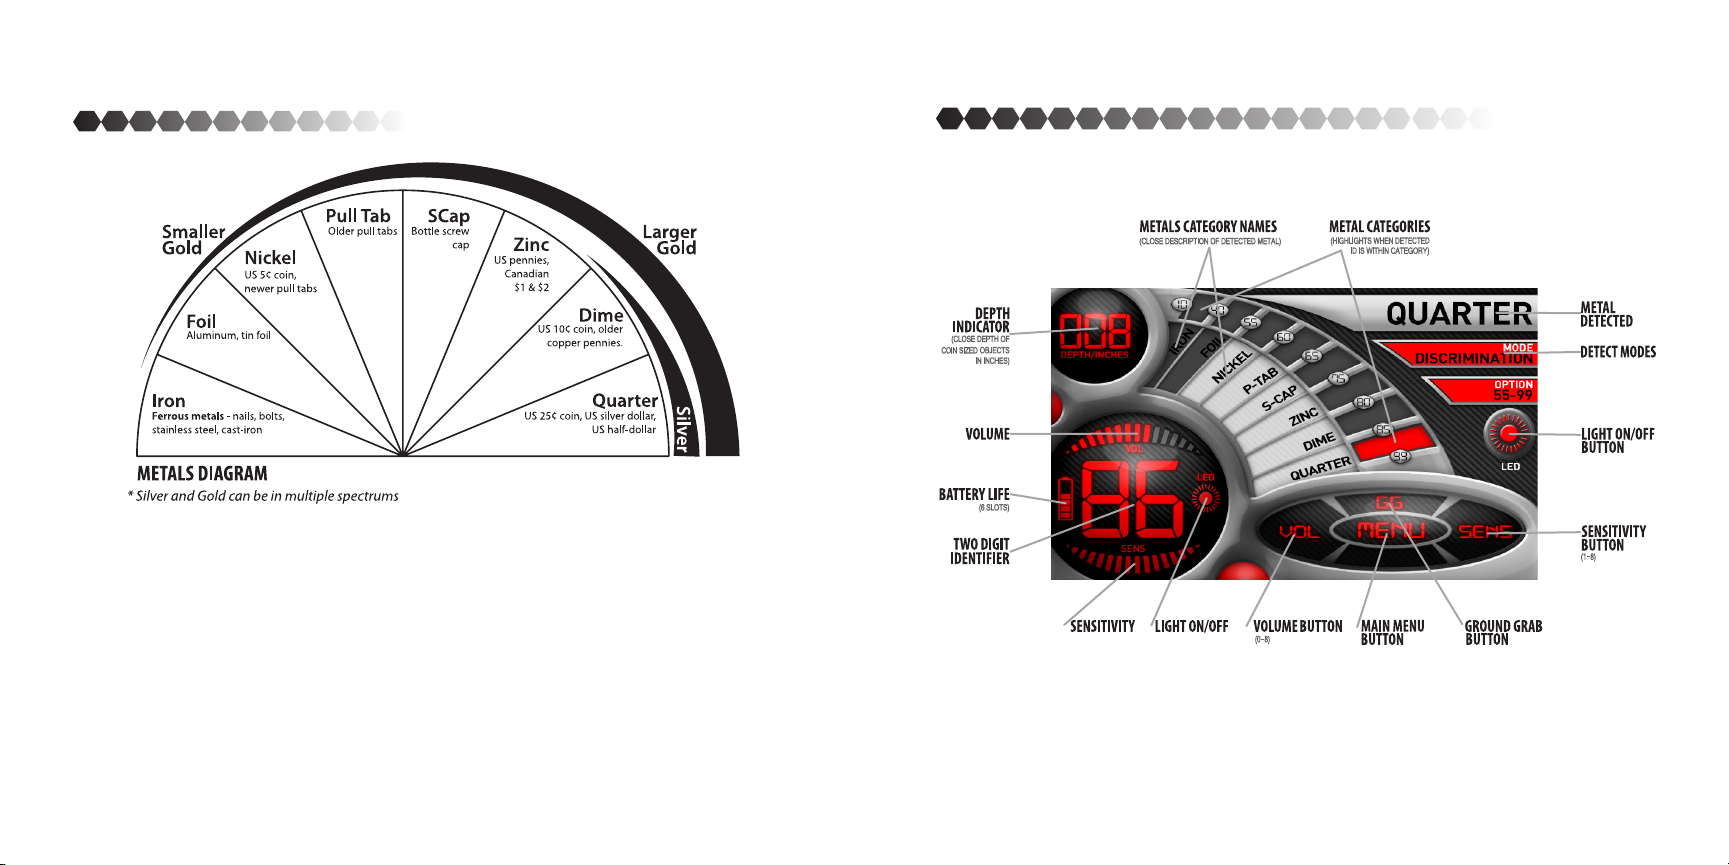
TWO DIGIT IDENTIFIER
The two digit number identies the buried obect with a specic number
to give you a more accurate idea of what you have found. With each pass
over the object, the distance between the object and the coil, and the
angle of the coil can change the two digit number.
5baksov.com.ua

5 6
CONTENTS
Coil
Bracket
Bottom Rod
Lock Bracket
Top Rod
Battery
Compartment
LCD Display
Handle
Unit
Arm cu
with strap
Stand
Wire
Headphone Jack
Pinpoint
Trigger

Connect The Rods
Connect the Top Rod to the Bottom Rod
by sliding the Top Rod with the Locking
Bracket end down. Note: The groove on the
Top Rod needs to face away from you. Align
grooves to one another to ensure rods stay
in place.
Slide the Top Rod to the desired length and
tighten the Locking Bracket by turning it to the Left.
1
2
7 8
ASSEMBLY
Assembling the coil unit
Unscrew the bracket from the bottom rod.
Fit the bottom rod inside the coil and re-
place the bracket. Then tighten but do not
over tighten. NOTE: The large hole faces
down. This is where the cable will enter the
rod.
Connecting the Wiring
Take the Cable Pull and
place it down the Rods.
Screw the end of the Cable
Pull to the end of the wire.
Place the connector in the
opening. Then pull the
hoop at the top to pull the
cable through the rods.
Connecting the Handle Unit
Disconnect the Cable Pull and connect the
wire head to the handles cable. Be careful
to align the white indicator arrow on the
wire head with the alignment arrow on the
handle units cable head to ensure proper
connection.
NOTE: Screw the silver piece to ensure the
cable is locked in place.
3
4

9 10
ASSEMBLY
After the wire is locked in place, check
the handle unit to ensure the latch is in
unlocked. Then place the rod all the way
back into the handle unit and pull the
latch to lock the rod into place. Make
sure everything is secured into place
before use.
Batteries
1
To open the Battery Compartment
door, unscrew the the two screws. Pull
the door towards you and up to take the
door o.
Insert 6 AA batteries according to the
markings within the compartment. Cau-
tion: Never mix old and new batteries. Nev-
er mix alkaline, carbon-zinc or recharge-
able batteries.
2
++
++
++
-
--
--
-
Place the battery compartment back and
screw in the screws.
3
5
Adjusting the display
To adjust the display, tilt the display for-
ward or back to your desired placement.
It should stay throughout use. The dis-
play may need additional adjustment in
very bright or very dark environments.

11 12
TECH LCD NAVIGATION DISPLAY
CATEGORY VALUE
The Category Value accurately provides specic categories to help identify a
buried object. Coins will most likely have a similar value with each pass with the
coil due to their round shape. Gold and silver can actually be detected in various
category values due to their metallic qualities. Smaller gold or silver objects will
have a dierent value than larger gold or silver objects. Trash objects can give
o a dierent value each time you pass over it. The angle of the detector can
aect the identication of an object as well. If you decide to test the detector
by waving a coin over the coil, wave it with the at side parallel to the coil; this
position is how you will nd most buried coins.
10-39
40-54
55-59
60-64
65-74
75-79
80-84
85-99

HOW IT WORKS
To turn on press and hold the Power Button for 5 seconds.
POWER Button
Once on it will begin detecting in Discimination Mode.
13 14
PINPOINT
Trigger
TECH: MAIN MENU
To enter the Main Menu page
press the MENU button.
1From here you can change set-
tings, start Ground Grab, Discrimi-
nation, Notch, GPS, watch Video
Tutorials and read FAQ’S.
2
To go back to detecting in the set-
tings already made press Menu
again.

Press the SETTINGS button to
change the settings.
1
TECH: SETTINGS
To change the brightness of the
screen press the minus (-) or plus
(+) sign button.
2
To change the volume press the
minus (-) or plus (+) sign button.
3
4
15 16
To change the sensitivity of the
coil press the minus (-) or the plus
(+) sign button.
5There are two choices for the
screen style; Traditional and Tech.
Press the button of the style you
want to use.
6The RESET button will reset all the
settings back to default.
To return to the Main Menu press
the BACK button.
7

17 18
Press the GROUND GRAB button
to enter ground grab menu.
1
TECH: GROUND GRAB
Press START to begin ground
grab.
2
Press the BACK button to go back
to the main menu.
3
When it is nished Grabbing you will ei-
ther see GRABBING OK or ERROR.
Press the DISCRIMINATION but-
ton to eliminate metals from de-
tection.
1
TECH: DISCRIMINATION
To eliminate a metal press the
plus (+) sign button.
2
To add a metal press the minus (-)
sign button.
Press the BACK button when you
are nished to start detecting.
4
NOTE: Metals black out when they are elimi-
nated.

19 20
Press the NOTCH button to select
certain metals you want to de-
tect.
1
TECH: NOTCH
There are three pre programed but-
tons that will eliminate metals that
are not found in what you are want-
ing to detect.
2
ALL METAL
COIN
JEWELRY
NOTE: To customize what you are detecting just
press the ON or OFF button next to the metal listed.
CUSTOM
Press the BACK button to begin
detecting.
3

Press the GPS button to save your
location or go back to a saved lo-
cation.
1
GPS: NEW LOCATION
To save a new location press the
NEW LOCATION button.
2
21 22
To change letters/numbers use
the up or down arrow buttons.
3
To move to the next character use
the left arrow, right arrow or EN-
TER buttons.
4
Press SAVE button to save your
location.
5
Press the BACK button to go back
to the main menu.
6
Press DELETE button to erase a character.

To go back to a saved location
press the button with the name of
the saved location. Ie. LOCATION 1
2
GPS: SAVED LOCATION
Press the GPS button to save your
location or go back to a saved lo-
cation.
1The red arrow points you in the
direction of where you need to
go to reach the saved destina-
tion.
3
The smaller buble tells you how
far to go in a certain direction in
Yards.
23 24
Press the MENU button to return
to the Main Menu.
4
TECH:VIDEOTUTORIALS
Press the VIDEO TUTORIALS but-
ton to watch videos on the metal
detector.
1
Press the video you would like to
watch or scroll down to the de-
sired video.
2
NOTE:To scroll down or up press the scroll
area do not drag.

To stop the video press the
button. Press the button again to
play the video.
3
To Fast foward press the >> but-
ton. Press the << button to Re-
wind.
4
Press the BACK button to return to
the Video Tutorial Menu.
5
NOTE: The videos will play continually till
you either press stop or back button.
NOTE: Holding the << or >> button will
make it fast forward or rewind faster.
25 26
TECH: FAQ
Press the FAQ button to read fre-
quently asked questions.
1
Press the scroll area to scroll
down or up.
2
Press the BACK button to return
to the Main Menu.
3

TECH: SHORTCUTS
To enter the Main Menu page press
the MENU button. Press again to
return to detecting.
MENU BUTTON
To change the Volume press the
VOL button. An up ^ and down
will appear. Press either arrow to
your desired volume level.
^
VOL BUTTON
Press the GG button to begin
Ground Grab.
GG BUTTON
27 28
To change the Sensitivity press the
SENS button. An up ^ and down
will appear. Press either arrow to
your desired sensitivity level.
^
SENS BUTTON
To turn ON the light press the LED
button. Press again to turn it OFF.
LED BUTTON
When you press the MODE button
it will take you to the Main Menu
where you can choose Discrimina-
tion or Notch to detect in.
MODE BUTTON
Takes you back to Discrimination
or Notch menu depending on
what Mode you are in. From there
you can change the metals you
want eliminated.
OPTION BUTTON
Each metal category is it’s on but-
ton.
METAL CATEGORY BUTTON

TRADITIONAL
Ground Grab
- Press to enter“Ground Grab” Mode
Discrimination
- Press to enter“Discrimination” Mode
- Press to eliminate metal starting
from left to right 10-99
- Press or wait for 2-3 seconds to detect in
current settings
(This mode uses your last Settings to detect)
Pin Point
- Hold the trigger down to enter“Pin Point”
Mode
Settings
- Press to change volume setting
- Press while Volume is selected to
change Volume
- To save changes wait for 2-3 sec or press
the button
- Press“SENS” to change Sensitivity setting
- While Sensitivity is selected press
to change Sensitivity
- To save changes wait for 2-3 sec or press
the button
MENU
- Press to go to the Main Settings page.
*See page 16 for more details.
PINPOINT
Trigger
MENU
VOL
29 30
DISCRIM
10
99
40
55
60
65
75
80
85
IDENTIFICATION
PINPOINT
I
R
O
N
F
O
I
L
N
I
C
K
E
L
P
-
T
A
B
S
-
C
A
P
Z
I
N
C
D
I
M
E
Q
U
A
R
T
E
R
888
SENS VOL DEPTHYDS
88
ALL METAL
COIN
JEWELRY
NOTCH
WAYPOINT
X
G GRABLIGHT
GPS
MENU
TRADITIONAL LCD NAVIGATION DISPLAY
GPS BUTTON
CUSTOM MODE
BUTTON
BUTTONS
BUTTONS
BUTTON
BUTTON
BUTTON
GROUND
GRAB Button
DISCRIMINATION
Button
NOTCH Button

31 32
Notch Settings
- Press to enter custom mode to detect the metal of your choosing
*It will be set to whatever was selected last
- Press to deselect certain metals to customize detecting
- Press to detect all metals
- Press to detect only those metals found in jewelry
- Press to detect only those metals found in coins
- To save changes wait for 2-3 sec or press the button
LED Light
- Press to turn the light on.
- Press again to turn the light o.
GPS: SAVE - WAYPOINT
- Press to enter“GPS”Mode which defaults to the Save/Waypoint List
- Press to move Up and Down the Save/Waypoint List
SAVE: Press on Save
Press to move between letters
Press to change selected letter
Press to Save and you will see on the display “Save Ok” and then
returned to Save/Waypoint options or press to cancel the current
settings and return the Save options
You will then be returned to Save/Waypoint options
Waypoint: Press on a saved Location to activate GPS function
Press to the saved waypoint you would like to go to
On selected waypoint press and it will show you the Yard metter
that tells you how far it is to the desired location
To delete a waypoint press, hold down the button for 3 seconds to
Delete selected location
Press to switch to another Waypoint
- Press the button to exit out of the“GPS”Mode or press the “POWER” button to turn it
o.
TRADITIONALTRADITIONAL

33 34
DETECTOR MODES
Ground Grab
All soils contain minerals. Signals from ground minerals interfere with the signals from
metal objects. All soils dier, and can dier greatly, in the type and amount of ground
minerals present. This detector incorporates ground balancing algorithms which elimi-
nate interference caused by the ground minerals found in most soils. We therefore rec-
ommend that you use GROUND GRAB to most accurately calibrate the detector to the
specic ground conditions where you are hunting.
This process will maximize the detector’s target identication accuracy and depth detec-
tion capability.
The Steps is as follows:
1. Find a patch of ground which is free of metal. Use the DISCRIMINATION mode, with no targets discriminated out.
2. Hold the detector with the search coil about 6 inches above the ground ,then press G Grab button to activate ground
grab process, then lower the coil down to within 2 inches o the ground.
3. Repeat to lift up and lower down the search coil for several times until the LCD shows“GRAB OK”.
If‘GRAB ER’appears, maybe the ground is too dirty with metal trash or just wet salt soil. Find another clean place ground
grab again till it is grab ok. Ground grab results is crucial to the performance of PP mode.
Discrimination
Pick the discrimination mode you want to detect in. Keep the coil parallel to the ground
moving it from left to right with a stable speed. Out of the metals highlighted it will cat-
egorize the metal detected so you are aware of what metal is buried. It will inform you
in two ways; 1. by highlighting the metal detected and 2. a tone response.
Discrimination identication accuracy can be inuenced by moisture and temperature.
The coil sweeping speed can also aect discrimination, generally faster sweeping mo-
tion has a higher sensitivity.
Pinpointing
Pinpoint does a narrow search that will give you the exact location of a buried object. It will identify an object by a signal
and tone response. Hold the trigger to activate the pinpoint function. Once activated, sweep the coil over the target
area in an “X” pattern. Make a visual note of the place on the ground where the strongest signal is identied. Then dig
in the center of the“X.” When the trigger is released the metal detector will return back to
the previous mode. NOTE: Normally,the detector takes about 5 minutes to stabilize after it
powers on, it is not recommended to do pinpointing during this period of time. The sensi-
tivity of detector will drift over time. If sensitivity drifts upward,the detector will sound o
spontaneously. If sensitivity drifts downward,the detector will become less sensitive. Drift
is exacerbated by the environment condition change especially the temperature change.
so, in case the sensitivity drifts , you can try Ground Grab again.
Notch Modes
When in Notch there are four options:
All Metals: Use this mode if you are looking for a wide range of objects. It is designed to
nd all metal objects.
Coin: When using this mode it will show you the metals found in coins. It is designed to nd
all types of coins and eliminate trash objects such as iron and foil.
Jewelry: When in this mode it will show you the metals common in jewelry. It is designed
to nd jewelry such as rings, bracelets, watches and necklaces.
Custom: Use this mode if you want to choose the specic metals to search for . It is designed
for you to nd certain metal objects that you programmed it to.
When an object is detected it will highlight the name of the metal found as well as use a tone
that identies the metal.
GPS
The GPS mode allows you to save certain locations that you are wanting to return to later. The
farthest it will read you from your saved location is 999 yds. The closer you get to the saved spot
the lower the number will go, 000 yds means you’ve reached your spot. NOTE:While in use, please
keep the control box away from metal objects or magnetic materials because those objects aect
the accuracy of its internal compass.

35 36
HOW TO DETECT
Power ON by pushing the “POWER” button.
Use “SENS” or “ V OL” to change the Sensitivity and Volume (de-
fault is 6/4).
Use “ALL METAL”, “JEWELRY”, “COIN”, “NOTCH” or “DISCRIM”
to enter into corresponding mode.
Press the “G GRAB” button to activate Ground Grab Mode. Dis-
play will show“Grab ok”when ground grab is completed. If“Grab
ERROR” shows, there may be a metal object underground, nd
another clean area nearby to retry ground grab.
While in Discrimination/Notch Mode keep
the coil parallel to the ground moving it
from left to right with a stable speed. If it
nds something it will highlight the metal
found and give o a certain tone (refer to
page 27).
When a metal is detected hold the trigger
to activate Pinpoint function. Sweep the coil
over the target in an “X” pattern. While in Pin-
Point it will show you the depth of the metal
found. So you can accurately know how far
down to dig.
Dig object out.
Once the object is found, ll the hole back up to the way you
found it.

37 38
• Fill holes
• Obey NO TRESPASSING signs
• Respect private and public property
• Obey all laws
• Do not cause any willful damage to property
• Do not destroy property
• Pick up after yourself, do not leave trash
COURTESY
1
If you find that the compass is not so ac-
curate, or sometimes direct the wrong
way, please rotate it 3-5 circles like this:
NOTE: Keep the LCD Display horizontal.
TIPS
2
In order to get the maximum accuracy
of the compass, we suggest rotating it
3-5 times in a circle to calibrate at the be-
ginning of the GPS mode when you change
to a new environment.
3The normal function of the product may be dis-
turbed by strong Electro-Magnetic Interference. If
so, simply reset the product to resume normal opera-
tion by following the instruction manual. In case the
function could not resume, please use the product in
another location.
Table of contents
Other GROUND EFX Metal Detector manuals
Popular Metal Detector manuals by other brands

KTS-Electronic
KTS-Electronic GPA 500 user manual

Metal Defender
Metal Defender MD-33 user manual

Elenco Electronics
Elenco Electronics EDU-37173 instruction manual

HeadHunter
HeadHunter LandPro Owner's instruction manual

Gold Mountain
Gold Mountain GMT 1650 cec operating manual

Eriez
Eriez 1250 ANALOG Installation, operation and maintenance instructions

XP Metal Detectors
XP Metal Detectors ADX100 instruction manual

Bounty Hunter
Bounty Hunter GOLD DIGGER Series owner's manual

Fisher Research Labs
Fisher Research Labs Gold Bug-2 operating manual

Bounty Hunter
Bounty Hunter Quick Silver owner's manual

Velleman
Velleman CS9000 user manual

Centech
Centech 94138 Assembly and operating instructions