Gruetzner IND 220 User manual

IND 220
User manual

2
IND 220
I. Revision history & imprint
I.I Revision history
The present user manual is the original user manual.
This user manual is only valid for
Product Product designation: IND 220
Product revision: 0
User manual Date of creation: 10/2021
Revision of the user manual: 0
This document is protected by copyright.
All rights for layout, content, texts and corporate design are reserved by Gruetzner GmbH, © 2021.
All rights, including those of photomechanical reproduction, duplication and distribution by means
of special processes (e.g. data processing, data carriers and data networks), even in part and/or
in extracts, are reserved by Gruetzner GmbH.
The content and technical specications are subject to change without notice.
I.II Imprint
Adress:
Gruetzner GmbH
Dagobertstr. 15
90431 Nuremberg, Germany
Tel: +49 (0)911 277 399-0
Fax: +49 (0)911 277 399-99
www.G-LUBE.com
Commercial Register of Nuremberg local court:
HRB 12109
VAT ID: DE 160441123
CEO: Volker Grützner

3
IND 220
I.III Table of contents
1. General information about this manual 5
1.1. Signal words 5
1.2. Warning symbols 5
1.3. Structure of the safety instructions 6
1.4. Symbols for information 6
2. Safety 7
2.1. Hazards 7
2.2. Sta 7
2.3. Reasonably predictable misuse 7
2.4. Usage for the intended purpose 7
2.5. Warranty and Liabilty 8
2.6. General safety instructions 9
3. Description of function 10
3.1. Design 10
3.2. Scope of delivery 11
3.3. Nameplate and designation 11
3.4. Technical data 11
4. Transport and storage 13
4.1. Packaging 13
4.2. Transport 13
4.3. Storage 13
5. Commissioning & operation 14
5.1. Control panel 14
5.2. Electrical connection 14
5.3. Place workpiece 15
5.4. Position temperature probe 16
5.5. Heating process in temperature mode 16
5.5.1. Heating process with reheat function 17
5.5.2. Heating process without reheat function 19
5.6. Heating process in time mode 21
6. Troubleshooting 23
6.1. The device does not switch on 23
6.2. The device does not heat up 23
6.3. Error messages on the display 24

4
IND 220
7. Maintenance 25
7.3.1. Visual check 25
7.3.2. Cleaning 25
8. Released accessories 26
9. Appendix 27
9.1. EC/EU Declaration of conformity 27

5
IND 220
1. General information about this manual
This user manual contains all necessary information to use the heating device safely and as
intended. In the event that supplementary sheets are attached to these instructions, the infor-
mation and data contained there are valid and replace the corresponding information in this
user manual. Any contradictory information contained in this user manual thus becomes invalid.
If you have any questions regarding special applications, please contact Gruetzner GmbH
(→chap. I.II
Imprint
).
The actual and factual operator must ensure and guarantee that these instructions,
including any supplementary sheets, have been read and understood by all persons responsible
for the installation, operation or maintenance of the heating device. Therefore, keep these instruc-
tions in a suitable place, ideally in an easily accessible place in the surrounding area of the heating
device.
Inform your colleagues who work in the local area of the device about safety instructions so
nobody gets hurt.
This manual was written in German, all other language versions are translations of this manual.
1.1. Signal words
The following signal words are used in this manual to draw your attention to possible dangers,
prohibitions and other important information:
DANGER This signal word points you to an immediate and threatening risk of
serious injury or death.
WARNING This signal word indicates a potentially imminent danger which can
result in serious injury or even death.
CAUTION This signal word indicates a potentially imminent danger that can result
in minor to severe injuries.
NOTICE This signal word indicates a potentially imminent danger which can
result in damage to property.
INFO This signal word refers to practical application tips or particularly
important information when using the heating device.
1.2. Warning symbols
The following warning symbols are used in this user manual to alert you to hazards, prohibitions
and important information:

6
IND 220
General
warning sign
Electricity
hazard
1.3. Structure of the safety instructions
The safety instructions in this user manual are structured according to the following system:
CAUTION
This text explains the consequences of disregarding the
reference.
• This text shows what to do as an instruction.
1.4. Symbols for information
The following information symbols are used in the text and instructions in this manual:
IRequests you to take action
ÜShows the consequences of an action
iAdditional information about the action

7
IND 220
2. Safety
All persons working with the heating device must follow these operating instructions, in particular
the safety instructions and the rules and regulations applicable at the place of use. Generally appli-
cable legal regulations and other rules as well as the relevant rules and regulations for accident
prevention (e.g. personal protective equipment (PPE)) and environmental protection must be
observed.
2.1. Hazards
In order to avoid danger to the user, the heating device may only be used for its intended purpose
(→chap. 2.4) and in a technically safe condition.
Always inform yourself about the general safety instructions (→chap. 2.6) before starting to work.
2.2. Sta
Only qualied sta who has read and understood this manual may work with the heating device.
Local and/or company regulations apply accordingly.
2.3. Reasonably predictable misuse
Any use of the heating device which exceeds the maximum permissible technical data is generally
considered to be improper and therefore prohibited.
2.4. Usage for the intended purpose
The following points must be observed for the intended purpose of using the heating device:
• The heating device is exclusively approved for industrial use.
• The heating device may be used in accordance with the technical data (→chap. 3.4) exclu-
sively.
• The heating device must not be put into operation as long as no workpiece is positioned on
the heating tower.
• All electronics are designed for use in IND 220 and cannot be used for other applications.
• Unauthorized structural alterations to the heating device are not permitted.
• The heating device may not be opened or disassembled.
• Relevant regulations and rules on work safety, accident prevention and environmental
predction must be observed.
• Work and activities with and on the heating device are only permitted with appropriate autho-
risation (→chap. 2.2
Sta
).

8
IND 220
All other uses than the aforementioned intended usage or the disregard of one of the above points
shall be deemed improper usage. In this case no liability and/or warranty is assumed.
2.5. Warranty and Liabilty
If the following items are disregarded, all warranty and liability claims for personal injury and/or
damage to property are excluded:
• non-observance of the instructions on transport and storage;
• misuse;
• improper or unperformed maintenance or repair work;
• improper assembly / disassembly or improper operation;
• operation of the heating device with defective safety devices;
• modications or alterations which may be carried out without the written permission of the
manufacturer have taken place;
• opening and/or partial or complete disassembly of the heating device.

9
IND 220
2.6. General safety instructions
The following safety instructions are given for the heating device:
DANGER
Damaged or awed electrical connections or unlicensed hot
components lead to heavy injuries or even death.
• All work on electrical connections shall be provided by qualied
personnel only.
• Immediately change damaged cables or plugs.
DANGER
Never use the heating device in potentially explosive areas.
WARNING
The heating device generates a magnetic eld that can cause inter-
ference with pacemakers and electronic devices such as wrist-
watches.
• Electronic devices and persons with pacemakers must keep a safe
distance of 5 metres during operation.
CAUTION
Risk of injury from heated individual parts.
• Keep a safety distance of 50 cm from the workpiece and the heating
tower during the heating process.
• Use heat-resistant gloves when handling the workpiece.
NOTICE
Moisture can damage the heating device.
• Never expose the heating device to high levels of humidity.
• Do not immerse the unit in water or other liquids.
10
IND 220
3. Description of function
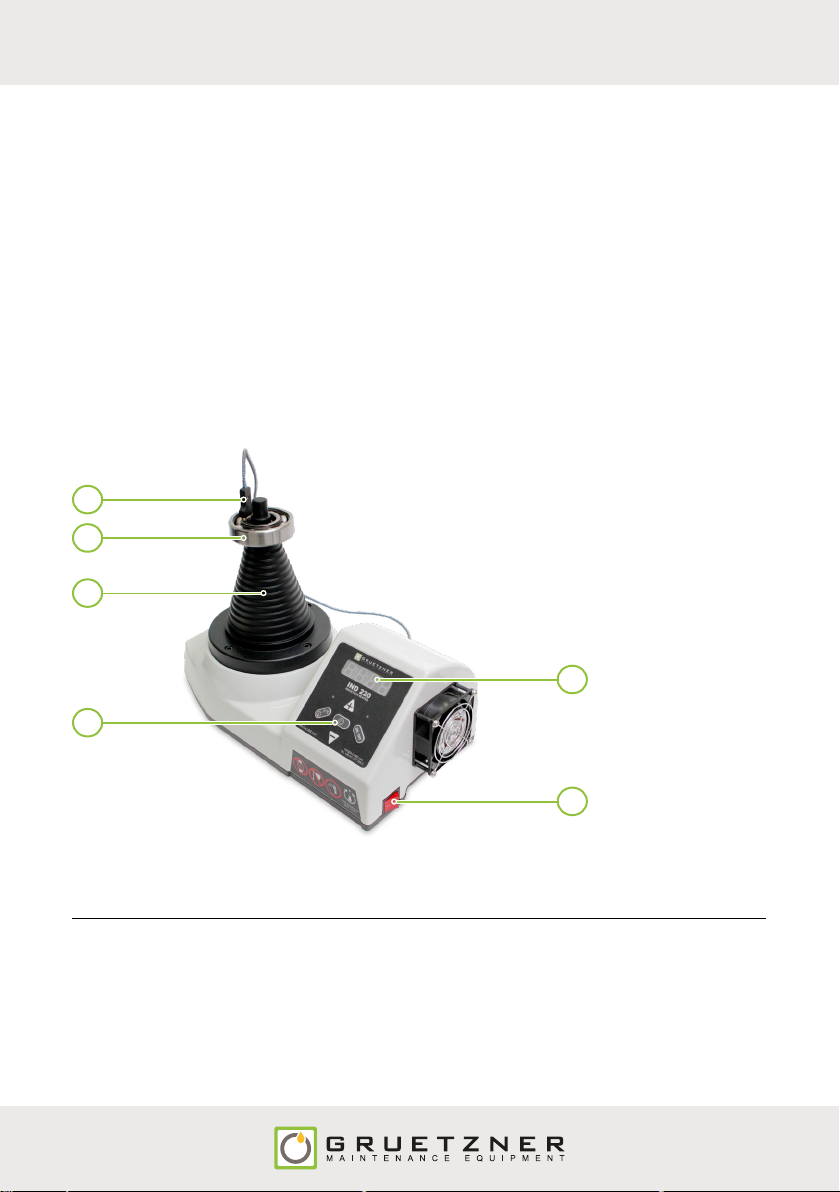
3.1. Design
IND 220 is suitable for mounting all ring-shaped metal parts (e.g. rolling bearings, gear wheels,
anges and pulleys) that are mounted on shafts with press tension. As with an induction cooker, a
magnetic eld is generated in the medium frequency range, which induces a voltage in the inner
ring of the workpiece. The eddy currents thus generated heat the workpiece and expand it so that
it can be mounted on the shaft without applying force. All components of the heater remain cold.
All workpieces to be heated must be made of magnetic metals. This property can be easily checked
by means of the temperature probe supplied.
2
6
5
4
3
1
Fig. 1: Overview IND 220
No. Description No. Description
1 Temperature probe 4 Control panel
2 Workpiece 5 Display
3 Heating tower 6 Master switch
Table of contents
Popular Heater manuals by other brands

oventrop
oventrop Regucor Series quick start guide

Blaze King
Blaze King CLARITY CL2118.IPI.1 Operation & installation manual

ELMEKO
ELMEKO ML 150 Installation and operating manual

BN Thermic
BN Thermic 830T instructions

KING
KING K Series Installation, operation & maintenance instructions

Empire Comfort Systems
Empire Comfort Systems RH-50-5 Installation instructions and owner's manual

Well Straler
Well Straler RC-16B user guide

EUROM
EUROM 333299 instruction manual

Heylo
Heylo K 170 operating instructions

Eterna
Eterna TR70W installation instructions

Clarke
Clarke GRH15 Operation & maintenance instructions

Empire Heating Systems
Empire Heating Systems WCC65 Installation and owner's instructions


