Grupo Sanz PULMIC ANIMAL TRACK User manual

PULMIC
ANIMAL TRACK
Máquina para la
vacunación de gallinas
Machine for the
vaccination of chickens
Machine pour la
vaccination des poules
Máquina para a vacinação
de galinhas


Despiece
Spare part
Pièces détachées
Peças sobresselentes
Español
English
Français
Português
04
06
13
20
27
inDICE / INDEX / SOMMAIRE

4
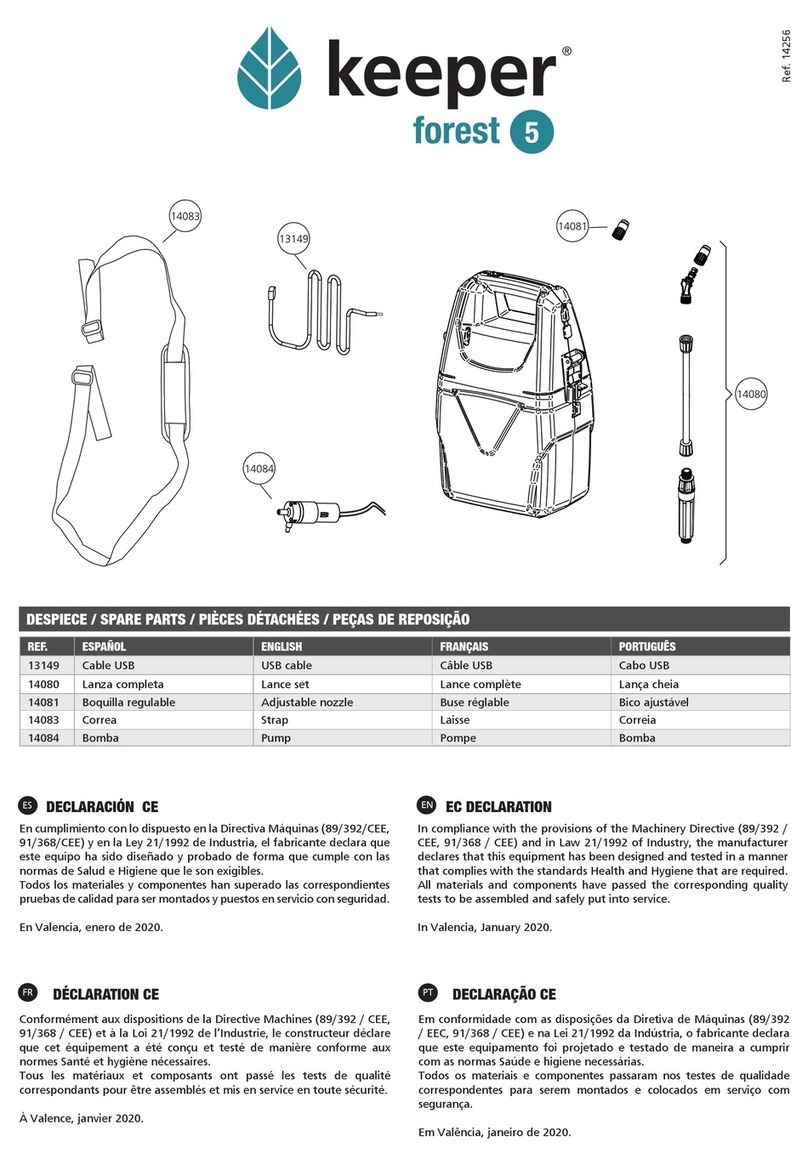
Despiece / Spare part / Pièces détachées / Peças sobresselentes
2050
337
9960
1147
400
11404
11403
10780
521
520
521
1148
181
9962
1326
11417
11418
11419
8886
8885
8884
8889
1446
8891
11387
11388
8890
8890
1925
11898
11899
11900
11902
11901
15

5
Cod. Español English Français Português
15P Abrazadera metálica Metal clamp Anneau métallique Abraçadeira metálica
181P Junta OR G1/2 OR G1/2 Joint Joint OR G1/2 Junta OR G1/2
337P Base enchufe Plug base Base prise Base ficha
400P Bomba Pump Pompe Bomba
520P Racor desagüe G1/2 Drain fitting G1/2 Raccord drainage G1/2 Conexão drenagem G1/2
521P Junta plana G1/2 Flat joint G1/2 Joint plane G1/2 Junta plana G1/2
1147P Racor curvo macho G1/2 Male curved fitting G1/2 Raccord coudé mâle G1/2 Conexão curvada
masculina G1/2
1148P Tuerca pasante G1/2 Through Nut G1/2 À travers Nut G1/2 Através da porca G1/ 2
1326P Tuerca G1/2 Nut G1/2 Écrou G1/2 Porca G1/2
1446P Filtro boquilla Nozzle filter Filtre ouverture Filtro de bocal
1925P Indicador carga batería Battery charge indicator Indicateur de charge de la
batterie
Indicador carga da
bateria
2050P Manómetro Manometre Manomètre Manómetro
8884P Porta-boquillas L L nozzle holder Support pour l’ouverture L Porta-bocais L
8885P Porta-boquillas T t nozzle holder Support pour l’ouverture T Porta-bocais T
8886P Soporte montaje Assembly bracket Support montage Suporte de montagem
8889P Tuerca amarilla + junta Yellow nut +flat joint Écrou jaune + joint Porca amarela + junta
8890P Tuerca verde + junta Green nut +flat joint Écrou vert + joint Porca verde + junta
8891P Tuerca negra + junta Black nut +flat joint Écrou noir + joint Porca preta + junta
9960P Filtro en línea Line filter Filtre en ligne Filtro linea
9962P Racor recto para tuerca
G1/2
Straight fitting for nut G1/2 Raccord droit pour écrou
G1/2
Conexão reta para porca
G1/2
10780P Racor pasapared curvo
macho con tuerca G1/2
Male curved fitting
pass-wall with nut G1/2
Passage de mur cintré
mâle avec écrou G1/2
Parede de passagem
curvada macho com
porca G1/2
11387P Boquilla morada 60º Purple nozzle 60º Buse violet 60º Bico roxo 80º
11388P Boquilla lila 80º Lilac nozzle 80º Buse lila 80º Bico lilás 80º
11403P Batería Battery Batterie Bateria
11404P Racor curvo macho G3/8 Male curved fitting G3/8 Raccord coudé mâle G3/8 Conexão curvada
masculina G3/8
11417P Depósito 50 l Tank 50 l Dépôt 50 l Tanque 50 l
11418P Tapa depósito 50 l 50L Tank Cover 50L Couvercle du dépôt Tampa do tanque 50L
11419P Filtro depósito 50l 50L tank filter Filtre du dépôt 50L Filtro de tanque 50L
11898 Manguera trenzada Braided hose Tuyau tressé Mangueira trançada
11899 Cargador batería Battery charger Chargeur de batterie Carregador de bateria
11900 Interruptor On/O On/O switch Interrupteur Marche/
Arrêt
Indicador On/O
11901 Portaboquillas L completo Complete L nozzle holder Support de buse L
complet
Suporte de bico L
completo
11902 Portaboquillas T completo Complete T nozzle holder Support de buse T
complet
Suporte de bico T
completo

66
Le agradecemos su compra de un equipo PULMIC ANIMAL TRACK, para
un correcto funcionamiento y mantenimiento de su máquina, por favor siga
atentamente las instrucciones del presente manual.
Las principales ventajas de la aplicación de las vacunas con PULMIC ANIMAL TRACK son:
1. Mejora y facilita las condiciones de trabajo.
2. Disminuye el tiempo invertido en la vacunación con respecto a la aplicación
actual con mochilas de pulverización en un 87,5%.
3. Disminuye los tiempos muertos, puesto que la capacidad volumétrica de la
máquina es de 50 L.
4. Control total de la pulverización.
5. Combinación perfecta entre el tamaño de gota y el tipo de vacuna a aplicar.
6. Aumento de la eficacia de la vacuna.
introducción
Hay que tener en cuenta que las distintas tecnologías de pulverización tienen como
objetivo producir poblaciones de gotas que se ajusten lo máximo posible a los
tamaños de gota requeridos para la óptima eficacia de la formulación específica de
la vacuna pulverizada.
Las recomendaciones de tamaño de gota según las distintas vacunas son las siguientes:
• Vacuna NOBILIS MG 6/85: usar boquilla con gota fina.
• Vacunas de Bronquitis Infecciosa (Nobilis IB Ma 5 y Nobilis IB 4-91), Newcastle
(Clone 30) y Neumovirus (Nobilis TRT, Nobilis 11/94 (o Nobilis Rhino CV en otros
países): Usar boquilla de gota gruesa.
• En casos muy excepcionales y cuando la calidad del agua sea mala o cuando la
distribución de la vacuna a través de los bebederos no esté asegurada en todas
las aves, se puede vacunar de Gumboro ( Nobilis GUMBORO D78) por spray
gota gruesa, usar boquilla de gota gruesa.
CARACTERÍSTICAS TÉCNICAS DE PULMIC ANIMAL TRACK PARA LA APLICACIÓN DE VACUNAS

7
PROCEDIMIENTO DE VACUNACIÓN
Para proceder a la vacunación se han de seguir las especificaciones técnicas
que se disponen a continuación:
1. Ajustar la altura de las barras de pulverización para que coincida con cada piso
de las baterías. (0,5 m. aproximadamente). La boquilla deberá estar situada
aproximadamente a la altura del techo de la jaula.
2. Accionar el interruptor manteniendo abiertas las tres válvulas, la de retorno
y las que distribuyen el producto a cada barra de pulverización durante 15
segundos. Seguidamente se regula con la válvula de regulación del retorno
hasta la presión de trabajo deseada.
3. La presión de trabajo ha de ser de 6 bares para las boquillas de gota fina (tapa
verde/boquilla morada) y de 3 bares para las boquillas de gota gruesa (tapa
amarilla/boquilla lila). La bomba incluye un interruptor de presión que actúa
cuando la presión excede de 9 bares, protegiéndola y dejando de funcionar.
Para conseguir la presión requerida se tendrá que abrir o cerrar el regulador de
retorno.
4. Trabajar a paso constante de 0,8 a 1 m/s. Se recomienda hacer una prueba
previa a la vacunación con 10 litros de agua, teóricamente con este volumen
se deberían vacunar unas 10.000 pollitas, y al finalizarlos contar las pollitas
vacunadas. Si la cifra es muy similar este es el paso a realizar el día de la
vacunación.
5. Para obtener una pulverización de gota fina, utilizar la boquilla de color morada
cuya rosca es de color verde. Girar el porta boquillas hasta que dicha boquilla
quede orientada hacia las jaulas.
6. Para obtener una pulverización de gota gruesa utilizar la boquilla lila cuya rosca
es de color amarillo. Girar el porta boquillas hasta que dicha boquilla quede
orientada hacia las jaulas.
7. Si no se desea vacunar alguna fila de la batería girar el porta boquillas hasta que
la rosca de color negro quede orientada hacia las jaulas.
8. Para comprobar la calidad de la vacunación es indispensable la utilización de los
papeles hidro-sensibles. Estos papeles deberán colocarse en el frontal o en el
techo de jaulas situadas a distintas alturas y al inicio, medio y final del pasillo.
9. Durante la vacunación deberá pararse todo el sistema de ventilación. Se pondrá
en marcha a los 20 minutos de haber finalizado.
10. Cuando se observe que la presión empieza a disminuir paulatinamente,
la batería está baja de carga y hay que ponerla a cargar conectando el enchufe
del cargador de baterías en el alojamiento. Es muy importante observar el
indicador de estado de carga, cuando el nivel de carga descienda y se active la
luz amarilla, se deberá detener y poner a cargar.
COMPONENTES DE PULMIC ANIMAL TRACK
Los principales componentes de PULMIC ANIMAL TRACK son:
Cuerpo de tres boquillas o porta boquillas.
• Está diseñado para facilitar el cambio de boquillas de pulverización de forma
rápida y sencilla.
• Cuenta con tres posiciones, dos de pulverización y una de cierre.
• Incluye una válvula que proporciona un cierre anti-goteo.

8
Boquilla morada de chorro cónico de gota fina (Tuerca verde).
• La boquilla de chorro cónico de gota fina combina una boquilla de chorro
compacto y un difusor , produciendo un chorro en cono vacío de gotas
muy finas.
• La tuerca que contiene a esta boquilla es de color verde.
• Caudales conseguidos (l/min) a diferentes presiones:
Boquilla lila de chorro cónico de gota gruesa (Tuerca amarilla).
• La boquilla de chorro cónico de gota gruesa combina una boquilla de chorro
compacto y un difusor, produciendo un chorro en cono vacío de gotas
más gruesas.
• La tuerca que contiene a esta boquilla es de color amarillo.
• Caudales conseguidos (l/min) a diferentes presiones:
Boquilla ciega.
• Es la que se va a emplear en los pisos de baterías donde no hay pollitas en el
momento de vacunación. Generalmente cuando las pollitas sean más jóvenes de 6
semanas. La rosca es de color negro.
Filtro de boquilla.
• Filtro de plástico que impide el emboce de la boquilla. En el caso en que por una
boquilla no salga producto, se debe desenroscar la boquilla y limpiar el filtro.
Filtro de aspiración de malla 50 mesh.
• Filtro de aspiración que retiene partículas impidiendo que lleguen a la bomba.
Para su limpieza hay que desenroscar, sacar el filtro y limpiar.
• Se recomienda limpiar antes de cada tratamiento este filtro.
• Al finalizar, limpiar el circuito, haciendo circular 5 litros de agua limpia.
Bomba.
• Bomba de membrana eléctrica de 12 v
• Intensidad: 12 amperios máximo.
• Caudal: 5,7 l/min máximo.
• Presión: 9 bares máxima.
6 bar 7 bar
Boquilla gota fina 0.27 0.29
4 bar 5 bar
Boquilla gota gruesa 0.3 0.35

9
Batería.
Batería sin mantenimiento, garantizada por el fabricante durante 24 meses después
de la compra. Para dar validez a esta garantía no tire la documentación adjunta a la
máquina.
• Voltaje medio: 12 voltios.
• Capacidad: 18 Ah.
• Autonomía media: 2 horas, en función de la boquilla.
Cargador de batería.
• Voltaje: 12 voltios.
• Corriente de carga 5 A.
• Con la batería al 25 % el tiempo de carga son 3.5 horas, al 50% 2 horas y al 75%
1 hora.
Depósito de 50 litros de capacidad.
• El depósito tiene una capacidad de 50 litros, está provisto de una salida de
aspiración y desagüe, además de una entrada para el retorno
del producto.
Barras de pulverización.
• Dos barras de acero con 6 porta boquillas ajustables en altura según la separación
de las jaulas en batería de cada instalación.
Chasis.
• Estructura de hierro que sirve para el soporte de todos los componentes
• Las ruedas permiten un fácil y cómodo manejo de la máquina.
Cuadro de mandos.
El cuadro de mandos incluye:
• Manómetro
• Válvula que retorna el caudal sobrante hacia el depósito y regula presión.
• Válvula de apertura derecha que distribuye el caudal hacia la barra de
pulverización derecha.
• Válvula de apertura izquierda que distribuye el caudal hacia la barra de
pulverización izquierda.
Caja de bombas.
• Protege la batería y la bomba frente agentes externos como polvo, agua,
productos químicos etc.
• Incluye una base de conexión que sirve para conectar el cargador de batería.
• Incluye un indicador del estado de la carga de bateria.
• Interruptor. A través de él se conecta o desconecta la máquina.

10
1. Desembalar la máquina.
2. Colocar el asa de transporte con las válvulas de control en los alojamientos del chasis,
(figura 1).
3. Conectar las dos mangueras de depósito, (absorción y retorno) en la válvula de
regulación. Para ello previamente se ha de quitar el pasador y una vez introducidos volver
a colocarlo, (figura 2 y 3)
MONTAJE DE LA MÁQUINA
Figura 2
Figura 1
Retorno
Figura 3
Absorción
4. Montar la barra ajustable derecha e izquierda en la máquina, (figura 4).
5. Acoplar la manguera de cada barra ajustable en la parte inferior de las válvulas de control
(izquierda y derecha). Primero debe quitar el pasador y una vez introducido el acople man-
guera se ha de volver a poner, (figuras 5 y 6).
Figura 4 Figura 5
Figura 6

11
7. Accionar el interruptor On/OFF durante dos segundos para comprobar que funciona,
(figura 8).
8. Llenar de agua el depósito (50 litros)
9. Asegurar que las conexiones hidráulicas son correctas, colocar las boquillas deseadas en
posición de trabajo, y hacer la prueba de velocidad.
Absorción y
desagüe
Retorno
6. Pasar las dos mangueras de barras por las abrazaderas de sujeción, (figura 7).
Figura 7 Abrazadera de sujeción
10. Vigilar que la batería nunca esté descargada, cuando se active la barra de color amarillo
este indica que la batería ha llegado a su nivel mínimo de carga y deberá terminar y
recargar. Cuando se active la barra de color rojo, esta indica que el nivel de carga de la
batería esta por debajo del mínimo y puede dañarla si no se detiene y recarga, (figura 8).
Conectar el enchufe
la base del cargador
Interruptor on/o
Indicador de carga
Figura 8

12
Problemas y soluciones
PROBLEMA CAUSA SOLUCIÓN
Bomba no funciona.
interruptor de presión
bloqueado
Ajustar la presión de disparo o
sustituir interruptor.
El interruptor de presión está
actuando.
Abrir ligeramente el retorno.
La bomba falla. Revisar fusible y conexiones.
La bomba falla. Reparar o sustituir la bomba
El sistema eléctrico
no funciona.
El fusible se ha fundido. Cambiarlo.
Alguna conexión falla. Restablecer la conexión.
La batería descargada Cargar la batería o sustituir sino
carga.
Interruptor ON/OFF averiado Sustituir.
Mala pulverización.
No llega el caudal suficiente
porque el filtro de aspiración
está sucio.
Limpiarlo.
El filtro de la boquilla está sucio. Limpiarlo.
Hay un bloqueo parcial en
alguna conducción e impide que
llegue el caudal necesario.
Revisión de tuberías y deshacer
el bloqueo.
La bomba falla. Mirar ese apartado
de problemas.
La boquilla está dañada. Cambiarla.
La bomba no coge presión.
La batería está descargada. Cargarla.
Aire acumulado en el circuito. Abrir el retorno al máximo
durante 15 segundos, luego
ajustar la presión.
La aguja del manómetro
oscila mucho.
El filtro está sucio. Limpiarlo.
Estrangulamiento de alguna
conducción.
Deshacer el estrangulamiento.

1313
Thank you for purchasing PULMIC ANIMAL TRACK equipment, for proper
operation and maintenance of your machine, please carefully follow the instructions
in this manual.
The main advantages of implementing vaccines with PULMIC ANIMAL TRACK are:
1. Improvement and facilitates working conditions.
2. Reduces time spent on vaccination with respect to the current application with
spray backpacks by 87.5%.
3. Reduces the dead times since the volumetric capacity of the machine is 50L.
4. Total control of the spray.
5. Perfect combination between droplet size and the type of vaccine to be applied.
6. Increased eectiveness of the vaccine.
INTRODUCTION
Keep in mind that the various spray technologies aim to produce populations of
droplets as possible accurate to the droplet size required for optimum ecacy
of the specific formulation of the vaccine spray.
The droplet size recommendations for dierent vaccines are:
• Vaccinate NOBILIS MG 6/85: use thin droplet nozzle.
• Vaccinate Bronchitis Infectiouse (Nobilis IB Ma 5 & Nobilis IB 4-91), Newcastle
(Clone 30) & Neumovirus (Nobilis TRT, Nobilis 11/94 (or Nobilis Rhino CV other
countries) Use coarse droplet nozzle.
• In very exceptional cases and when water quality is poor or when the
distribution of the vaccine through the troughs are not insured in all birds, you
can be vaccinated Gumboro (GUMBORO Nobilis D78) by spray thick film, using
coarse droplet nozzle.
PULMIC ANIMAL TRACK TECHNICAL SPECIFICATIONS FOR THE IMPLEMENTATION OF VACCINES

1414
VACCINATION PROCEDURE
To proceed to vaccination have to follow the technical specifications that are
available below:
1. Adjust the height of the spray bars to match every level of the batteries.
(Approximately 0.5 m). The nozzle should be positioned approximately at the
height of the roof of the cage.
2. Activate the switch keeping three valves open, the return and the distributing
the product to each spray bar for 15 seconds. Then regulate with the return
regulator valve to the desired working pressure.
3. The working pressure must be 6 bars for nozzles of thin droplet (green
cap / nozzle purple) and 3 bars for nozzles of coarse droplet (yellow cap /
nozzle lilac).The pump includes a pressure switch which operates when the
pressure exceeds 9 bars, protecting and shutting down. To achieve the required
pressure will have to open or close the return valve (central).
4. Work constant pass of 0.8 to 1 m / s. Test is recommended prior to vaccination
with 10 liters of water, this volume theoretically 10,000 chicks should be
vaccinated, and count vaccinated chicks finalize. If the figure is very similar this
is the thing to do the day of vaccination.
5. For spraying a thin droplet, use the purple nozzle with green thread.
6. Turn the nozzle holder until the nozzle is facing the cages. To obtain a coarse
droplet use the nozzle lilac which thread is yellow. Turn the nozzle holder
until the nozzle is facing the cages.
7. If you do not want to vaccinate some row of the battery turn the nozzle holder
until the black color screw is facing the cages.
8. To check the quality of vaccination is essential to use the hydro-sensitive papers.
These papers should be placed in the front or roof of cages located at dierent
heights and at the beginning, middle and end of the hallway.
9. During vaccination you should stop all the ventilation system. It will start again
at 20 minutes after ending.
10. When it appears that the pressure starts to decrease gradually, the battery
is exhausted and needs to be put to charge by connecting the battery charger
plug into the housing. It is very important to observe the charge status indicator,
when the load level falls and the yellow light is activated, it should be stopped
and put to load.
PULMIC ANIMAL TRACK COMPONENTS
The principal components of PULMIC ANIMAL TRACK are:
Body of three nozzles and nozzle holders
• It is designed to facilitate the change of spray nozzles quickly and easily.
• It has three positions, two spray and one closure.
• It includes a valve that provides a non-drip closure.

1515
Purple nozzle conical jet of thin droplet (green nut).
• The conical jet nozzle of thin droplet combines a compact jet nozzle and
diuser, which produces an empty jet conet of fine droplets.
• The nut containing this nozzle is green.
• Flows achieved (l / min) at dierent pressures (at a voltage of 12 V):
Lilac conical jet nozzle of coarse droplet (yellow nut).
• The conical jet nozzle of coarse droplet combines a compact jet nozzle and
diuser, which produces an empty jet conet of coarsest droplets.
• The nut containing this nozzle is yellow.
• Flows achieved (l / min) at dierent pressures (at a voltage of 12 V):
Blind Nozzle.
• Is to be used on floors where no chicks at the time of vaccination. Usually when
chicks are younger than 6 weeks. The thread is black.
Nozzle filter.
• Plastic filter that prevents clogging of the nozzle. In the event that product does
not come out from nozzle, unscrew the nozzle and clean the filter.
Suction filter grid of 50 mesh.
• Suction filter retains particles from reaching the pump. To clean, unscrew, remove
the filter and clean.
• Is recommended before each treatment clean this filter.
• When finished, clean the circuit, circulating five liters of clean water.
Pump.
• Electric diaphragm pump 12 v.
• Current: 12 amps maximum.
• Flow rate: 5.7 l / min max.
• Pressure: 9 bar maximum.
6 bar 7 bar
Thin droplet nozzle 0.27 0.29
3 bar 4 bar
Coarse droplet nozzle 0.3 0.35

1616
Battery.
Maintenance-free battery guaranteed by the manufacturer for 24 months after
purchase. To validate this warranty do not eliminate documents supplied with
the machine.
• Medium Voltage 12V.
• Capacity: 18 A / h.
• Average autonomy: 2 hours, depending on the nozzle.
Battery Charger.
• Voltage: 12 volts.
• Charging current 4 A.
• With 25% battery the charge time is 3.5 hours, 2 hours with 50% and with 75%
1 hour.
50 Litre capacity.
• The tank has a capacity of 50 liters with a drain and a suction outlet furthermore
an inlet to return the product.
Spray bars.
• Two steel rods with 6 adjustable nozzle holder for heigh according to the
separation of cages for each installation.
Chassis.
• Iron structure which serves to support all the components
• The wheels allow for easy and comfortable operation of the machine.
The control panel.
The control panel includes:
• Manometer
• Valve which returns the excess flow into the tank and regulates pressure.
• Right ball valve that distributes the flow to the spray bar in the right.
• Left ball valve that distributes the flow to the spray bar in the left.
Pump box.
• Protects the battery and pump against external agents like dust, water,
chemicals etc.
• Includes a connection base that serves to connect the battery charger.
• Includes a status indicator of the battery charge.
• Switch. It connects or disconnects the machine.

1717
1. Unboxing the machine
2. Place the carrying handle with the control valves in the chassis housings, (figure 1).
3. Connect the two tank hoses (absorption and return) to the regulating valve. To do this,
the pin must be removed and once inserted, replace it (figure 2 and 3)
Machine assembly
Figure 2
Figure 1
Return
Figure 3
Absorption
4. Fit the right and left adjustable bar on the machine, (figure 4).
5. Attach the hose of each adjustable rod to the bottom of the control valves (left and right).
First you must remove the pin and once you have inserted the hose coupling you have to put
it back, (figures 5 and 6).
Figure 4 Figure 5
Figure 6

1818
7. Operate the On / OFF switch for two seconds to check that it works, (figure 8).
8. Fill the tank with water (50 liters)
9. Ensure that the hydraulic connections are correct, place the desired nozzles in working position,
and perform the speed test.
Figure 8
10. Check that the battery is never discharged, when the yellow bar is activated it indicates that
the battery has reached its minimum level of charge and must finish and recharge. When the
red bar is activated, it indicates that the battery charge level is below the minimum and may
damage it if it does not stop and recharge (figure 8).
Connect the plug to
the base of the charger
Switch on/o
Charge indicator
6. Pass the two bar hoses through the clamping clamps, (figure 7).
Absorption and
drainage
Return
Figure 7 Clamping clamp

19
PROBLEMS & SOLUTIONS
PROBLEM CAUSE SOLUTION
Pump does not work.
Pressure switch blocked Adjust firing pressure or replace
the switch
Pressure swith is working. Open a bit the returning.
Pump is failing. check fuse and connections
Pump is failing. Replace with other.
Electric System does
not work.
Failed fuse. Change it.
Failing connections. Restore the connection.
Battery does not give energy. Charge the battery or replace it
Damaged ON/OFF Switch Change it.
A bad sparying.
Not enough flew, because
aspiration fliter is durty.
Clean it.
Nozzle filter is durty. Clean it.
Partial blockage in some
connection & impeding correct
flew to arrive.
Check hoses & undo bloching.
Pump fails. Look over this specific sunject.
Spoiled nozzle. Change it.
Pump does not
take pressure.
Discharged battery. Charge it.
Acumulated air in the circuit. Open the returning to máximum
for 15 seconds, and adjuste
pressure after.
Manometre needle
ocillates a lot.
Dirty filter. Clean it.
Strangledhold in some
connection.
Undo stranglehold.

20
Nous remercions votre achat de PULMIC ANIMAL TRACK. Pour un correct
fonctionnement et un maintien de l’appareil, nous vous prions de lire attentivement
les instructions du présent manuel.
Les principaux avantages de l’application des vaccins avec PULMIC ANIMAL
TRACK sont:
1. Il améliore et facilite les conditions de travail.
2. Il diminue le temps investi dans la vaccination à l’égard de l’actuelle application
avec sacs à dos de la pulvérisation dans 87,5 %.
3. Il diminue les temps morts, puisque la capacité volumétrique de la machine est
de 50L.
4. Un contrôle total de la pulvérisation.
5. Une combinaison parfaite entre la taille de goutte et le type de vaccin
à appliquer.
6. Une augmentation de l’e cacité du vaccin.
INTRODUCTION
Il faut tenir en compte que les technologies distinctes de pulvérisation ont pour
objectif produire de nombreuses gouttes qui s’adaptent le plus possible à la mesure
des gouttes requises pour l’e cacité parfaite de la formulation spéci que du
vaccin pulvérisé.
Les recommandations de taille de gouttes selon les diérents vaccins sont les suivantes:
• Vaccin NOBILIS MG 6/85: utiliser buse de gouttelette fine.
• Les vaccins de bronchite infectieuse (Nobilis IB Ma 5 et Nobilis IB 4-91).
Nexcaste (Clone 30) et Neumovirus (Nobilis TRT, Nobilis 11/94 (ou la Nobilis
Rhino CV dans d’autres pays): utiliser buse de gouttelette grossier.
• Très exceptionnellement et quand la qualité de l’eau est mauvaise ou quand
la distribution des abreuvoirs n’est pas assurée, on peut vacciner Gumboro
(Nobilis: GUMBO- RO D78) par spray grosse goutte: Utilisez la buse de grosses
gouttelettes.
DES CARACTÉRISTIQUES TECHNIQUES DE PULMIC ANIMAL TRACK POUR L’APPLICATION DES VACCINS
This manual suits for next models
2
Table of contents
Languages:
Other Grupo Sanz Paint Sprayer manuals
Popular Paint Sprayer manuals by other brands

Smith Performance Sprayers
Smith Performance Sprayers S103EX use and care manual

PMC
PMC PH Electrical diagrams

DeVilbiss
DeVilbiss AGB-541 instructions

Nu-Calgon
Nu-Calgon Coil Gun 4774-0 instructions

WALTHER PILOT
WALTHER PILOT PILOT WA 450 operating instructions

Maruyama
Maruyama MS050 Owner's/operator's manual