Grupo Urrea SURTEK PVC765 Dimensions and installation guide

ATENCIÓN: Lea, entienda y siga las instrucciones de seguridad contenidas en este
manual antes de operar esta herramienta.
WARNING: Read, understand and follow the safety rules in this manual, before operating this tool.
PVC765
Placa Compactadora
Plate Compactor
Manual de Usuario y Garantía.
User’s Manual and Warranty.

2
SÍMBOLOS SYMBOLS
PELIGRO, ADVERTENCIA, PRECAUCIÓN:
Indica un riesgo personal o la posibilidad
de un daño.
DANGER, CAUTION, WARNING: Indicates risk of
personal injury and/or the possibility of damage.
ENGLISHESPAÑOL
General safety rules
Features
Operation instructions
Maintenance
Troubleshooting
Technical data
Warranty policy
Normas generales de seguridad
Características
Instrucciones de operación
Mantenimiento
Solucionador de problemas
Especificaciones técnicas
Garantía
10
11
12
13
15
15
16
3
4
5
7
8
9
16
CONTENIDO CONTENT
GENERALIDADES DE USO
IMPORTANTE:
• El tipo de aceite a utilizar es SAE 10W-30.
OPERATION GENERALITIES
IMPORTANT:
• The kind of engine oil to use is SAE 10W-30.

ESPAÑOL•Manual de Usuario
3
NORMAS GENERALES DE SEGURIDAD
Para reducir el riesgo de lesión personal, todos
los operadores y personal de mantenimiento
debe leer y entender estas instrucciones an-
tes de operar, cambiar accesorios, o realizar el
mantenimiento sobre equipo de poder. Todas
las posibles situaciones no pueden ser cubier-
tas en estas instrucciones. Cuidado debe ser
ejercido por todos utilizando, manteniendo o
trabajando cerca de este equipo.
El dispositivo de seguridad más importante
para este o cualquier herramienta es el opera-
dor. Cuidado y buen juicio son la mejor pro-
tección contra las lesiones. Todos los posibles
riesgos que no pueden ser cubiertos aquí, pero
hemos tratado de poner de relieve algunos
de los elementos importantes, los individuos
deben buscar y obedecer a la precaución, ad-
vertencia y señales de peligro puestas en el
equipo, y las que se muestran en el lugar de
trabajo. Los operadores deben leer y seguir las
instrucciones de seguridad incluidas con cada
producto.
Aprenda como trabaja cada máquina. Incluso si
usted ha utilizado previamente máquinas simi-
lares, comprobar cuidadosamente cada máqui-
na antes de usarla Adquiera la "sensación" de
la misma y conozca sus capacidades, limitacio-
nes, riesgos potenciales, cómo funciona y cómo
se detiene. No tenemos ninguna obligación, si
la persona no opera la herramienta como dicen
las instrucciones.
Si no se siguen las instrucciones de este ma-
nual puede provocar lesiones graves o incluso
la muerte. Este equipo debe ser operado por
personal capacitado y calificado. Este equipo
es sólo para uso industrial.
ADVERTENCIA: RIESGO DE EXPLOSIÓN O
INCENDIO.
• El combustible y sus vapores son extrema-
damente inflamables y explosivos. El fuego o
una explosión pueden causar quemaduras se-
veras e inclusive la muerte.
· SIEMPRE apague el motor y deje que se enfríe
al menos 2 minutos antes de agregar combus-
tible al tanque.
· SIEMPRE tenga cuidado al llenar el tanque
para evitar el derrame de combustible. Mueva
la máquina fuera del área de llenado de com-
bustible antes de arrancar el motor.
· SIEMPRE mantenga el nivel máximo de com-
bustible por debajo de la parte superior del
tanque para permitir la expansión.
· SIEMPRE reabastezca de gasolina en áreas
bien ventiladas y libres de obstrucciones. Equi-
pe las zonas con extintores adecuados para in-
cendios de gasolina.
PELIGRO: RIESGO POR MONÓXIDO DE CAR-
BONO.
• El motor encendido de este producto pro-
duce monóxido de carbono, un gas incoloro,
inodoro y venenoso. Respirar monóxido de
carbono puede ocasionar náuseas, desmayos
o incluso la muerte. Algunas sustancias quími-
cas pueden ser perjudiciales si son inhalados o
ingeridos, causando náusea severa, desmayos
o envenenamiento.
· SIEMPRE deje que los gases del escape entren
en un espacio confinado a través de ventanas,
puertas, tomas de aire de ventilación u otras
aberturas.
· NUNCA opere la maquina en lugares ocupa-
dos por los personas o animales.
· SIEMPRE siga las recomendaciones del fabri-
cante, utilice un respirador o máscara siempre
que exista la posibilidad de que los vapores
puedan ser inhalados.
• Siempre que sea necesario, reemplace la pla-
ca de identificación, calcomanías de operación
y seguridad cuando no sean legibles.
• El fabricante no asume responsabilidad por
cualquier accidente debido a modificaciones
en el equipo.
• NUNCA utilice accesorios o complementos,
que no se recomiendan para este equipo. Po-
drían resultar en daños al equipo o lesiones al
usuario.
• NUNCA tocar el colector de escape caliente,
el silenciador o cilindro. Permita que estas par-
tes se enfríen antes de dar servicio al motor o
compactadora.
• SIEMPRE apague el motor antes de dar ser-
vicio, reabastecer combustible y cambiar el
aceite.
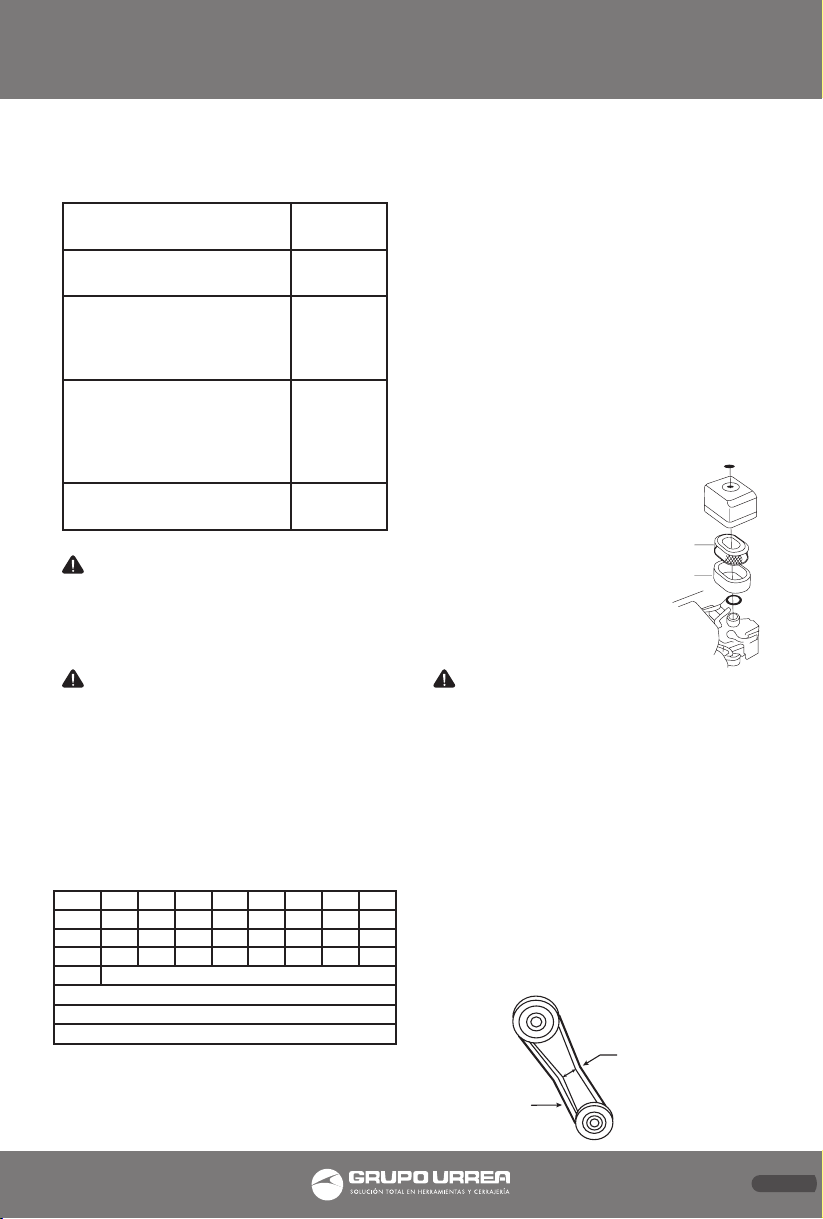
• NUNCA haga funcionar el motor sin el filtro
de aire. Puede producir graves daños al motor.
• SIEMPRE de servicio al filtro de aire con fre-
cuencia para evitar un mal funcionamiento del
carburador.

4
• SIEMPRE revise si la máquina tiene roscas o
tornillos sueltos antes de comenzar.
• SIEMPRE asegúrese de que el operador esté
familiarizado con las precauciones de seguri-
dad apropiadas y operaciones técnicas antes
de utilizar la compactadora.
• SIEMPRE almacene el equipo de manera ade-
cuada cuando no se está utilizando. El equipo
debe ser almacenado en un lugar limpio, seco
y fuera del alcance de los niños.
• NO haga funcionar este equipo a menos que
todos los protectores y dispositivos de seguri-
dad estén colocados en su lugar.
• Se debe tener precaución al dar servicio a
este equipo.
• Modificaciones no autorizadas del equipo
anulará todas las garantías.
• NUNCA vierta o rocié agua sobre el motor.
• Pruebe el interruptor de encendido / apaga-
do antes de operar. El propósito de este inte-
rruptor es para apagar el motor de la máquina.
• Consulte el Manual del usuario del motor so-
bre preguntas técnicas o información recomen-
dada para el equipo.
PELIGROS Y RIESGOS
· Nunca permita a cualquier persona operar la
maquina sin la adecuada instrucción.
· Asegúrese que todos los operadores lean, en-
tiendan y sigan las instrucciones de operación.
· Lesiones serias pueden resultar de un uso in-
debido o negligente de esta máquina.
· Las compactadoras planas son unidades pesa-
das y deben ser posicionadas por dos personas
de fuerza apropiada. Utilizando las agarrade-
ras de transporte previstos en la máquina, jun-
to con las técnicas de levantamiento correctas.
PELIGROS MECÁNICOS
· NO haga funcionar la máquina a menos que
todos los dispositivos de protección están en su
lugar.
· Mantenga las manijas y los pies alejados de
las piezas giratorias y móviles, ya que pueden
lesionar en caso de contacto.
· Asegúrese de que el interruptor de funcio-
namiento del motor está en la posición OFF
y el cable de la bujía de encendido este des-
conectado antes de quitar las guardas o hacer
ajustes.
· Asegure tanto la maquina como al operador
estén estables estableciendo ambos en un te-
rreno a nivel y la máquina no pueda volcar,
resbalar, mientras este en operación o sin su-
pervisión.
· NO deje la máquina en funcionamiento mien-
tras está sin supervisión. Asegúrese de que los
muros de la zanja sean estables y no se derrum-
ben debido a la acción de la vibración, antes de
comenzar la compactación.
· Asegúrese de que el área a compactar no con-
tenga ningún tipo de cables eléctricos, líneas
de gas, de agua o de comunicación "en vivo",
que puedan ser dañados por la acción de las
vibraciones.
· Ejerza cuidado cuando esté operando la uni-
dad. La exposición a vibraciones o acciones re-
petitivas de trabajo puede ser perjudicial para
las manos y los brazos.
· NUNCA se pare sobre la unidad mientras está
en funcionamiento.
• NO incremente la velocidad del motor sin car-
ga por encima de 3 500 r/min. Cualquier incre-
mento puede resultar en lesiones personales y
daños a la máquina.
· Tenga cuidado de no entrar en contacto con
el mofle cuando el motor está caliente, ya que
puede causar quemaduras graves.
· Asegúrese de que las reparaciones en el mo-
tor y la máquina se llevan a cabo por personal
competente.
CARACTERÍSTICAS
La compactadora es una poderosa herramien-
ta de compactación capaz de aplicar una tre-
menda fuerza en impactos consecutivos a una
superficie del suelo. Sus aplicaciones incluyen
compactación de suelos de carreteras, diques y
embalses, así como rellenos de zanjas de tube-
rías de gas, tuberías de agua y obras de insta-
lación de cables.
El movimiento circular se convierte para crear
una fuerza de impacto. La compactadora desa-
rrolla una poderosa fuerza de compactación al
pie ( pisón) de la compactadora. Para mante-
ner un rendimiento óptimo, el funcionamiento
y servicio, son fundamentales.

ESPAÑOL•Manual de Usuario
5
FUNCIONES Y CONTROLES
El motor está controlado por un interruptor de
encendido y apagado (ON/OFF) o un pulsador
el cual está montado sobre el motor y por de-
bajo del tanque de combustible.
La tensión de la banda es ajustable. Afloje las 4
tuercas de los tornillos que aseguran el motor
a la base. Ajuste los tornillos de fijación que se
apoyan contra el cárter del motor para conse-
guir la tensión requerida. Asegúrese de que las
cuatro tuercas y el juego de tornillos de fijación
estén apretadas después del ajuste.
CONOZCA SU HERRAMIENTA
Antes de intentar usar este producto, familiarí-
cese con todas sus características de funciona-
miento y normas de seguridad.
1. PALANCA DEL ACELERADOR.
2. CUBIERTA DE BANDA.
3. PIE (PISÓN).
4. DEPÓSITO DE COMBUSTIBLE.
5. FILTRO DE AIRE DEL MOTOR.
6. MANUBRIO.
INSTRUCCIONES DE OPERACIÓN
ANTES DE OPERAR
INSPECCIONE ANTES DE ENCENDER
La siguiente inspección previa a la puesta en
marcha debe realizarse antes de iniciar una se-
sión de trabajo o después de cada cuatro horas
de uso. Lo que ocurra primero. Si se encuentra
alguna falla, la compactadora no debe ser uti-
lizado hasta que se rectifique.
1. Inspeccione minuciosamente la compactado-
ra en busca de daños. Revise que los compo-
nentes estén presentes y bien asegurados. Pres-
te especial atención a la guarda de protección
de la banda que está montada entre el motor y
la unidad vibratoria.
2. Revise el nivel de aceite del motor y rellene
si es necesario.
3. Revise el nivel de combustible del motor y
rellene si es necesario.
4. Revise que no haya fugas de combustible y
aceite.
ENCENDIDO Y APAGADO DEL MOTOR
1. Abra la llave de la gasolina, moviendo la pa-
lanca ON/OFF completamente hacia la derecha.
2. Si enciende el motor cuando está en frío,
posicione el estrangulador en la posición ON
moviendo la palanca del estrangulador com-
pletamente hacia la izquierda. Si enciende el
motor caliente, no suele ser necesario el es-
trangulador. Sin embargo si el motor se ha en-
friado el uso parcial de estrangulación puede
ser requerido.
3. Gire el interruptor de encendido del motor
en sentido de las manecillas del reloj a la po-
sición “1”.
4. Posicione el acelerador a la posición en vacío
moviendo la palanca del acelerador ligeramen-
te a la derecha. No encienda el motor en máxi-
ma velocidad. La compactadora comenzará a
vibrar al ponerse en marcha el motor.
5. Sujete firme el manubrio de control con una
mano, agarre la manija del arrancador retráctil
con la otra. Jale el arrancador retráctil hasta
que se sienta un poco de resistencia. Entonces
permita que el arrancador regrese.
6. Teniendo cuidado de no jalar completamen-
te hacia afuera la cuerda del arrancador, jale la
manija del arrancador enérgicamente.
7. Repita hasta que el motor encienda.
8. Una vez que el motor encienda gradualmen-
te, posicione la palanca del estrangulador a la
posición OFF moviéndolo hacia la derecha.
9. Si el motor falla para encender después de
varios intentos, siga la guía de resolución de
problemas.
10. Para detener el motor, posicione el acelera-
dor a la posición de vacío y gire el interruptor
del motor ON/OFF al contrario de las maneci-
llas del motor a la posición “0”.
1
2
3
6
4
5

6
11. Cierre el combustible.
· Esta maquina es la mas adecuada para la com-
pactación de asfaltos y materiales granulares,
por ejemplo, suelos granulares tales como limo
y arcilla se compactan mejor con el uso de la
fuerza del impacto producido por un pisón vi-
brante. Siempre que sea posible, el sitio debe
ser clasificado y nivelado antes de comenzar la
compactación.
NOTA: Para más información de encendido y
los correctos procedimientos de operación del
motor, consulte el manual de operación del
motor suministrado con la unidad.
· Incremente la velocidad de motor al máximo
utilizando la palanca del acelerador que se en-
cuentra en el manubrio, antes de comenzar a
compactar.
· Maneje la maquina moviendo el manubrio
hacia la derecha o la izquierda.
· SIEMPRE mantenga un buen equilibrio para
que no resbale y pierda el control al iniciar o
hacer funcionar la máquina.
MANTENIMIENTO
CUIDADO Y MANTENIMIENTO PREVENTIVO
· Revise el nivel de aceite del carter motor dia-
riamente.
· Revise el nivel de aceite del vibrador sema-
nalmente.
· Inspeccione las gomas de montaje anti-vibra-
ción por desgaste o deterioración.
· Limpie la parte de abajo de la placa regular-
mente para prevenir la acumulación de mate-
rial.
· Utilice gasolina sin plomo y asegúrese de que
el combustible esté libre de contaminación.
· El movimiento vibratorio proporciona una ac-
ción de auto propulsión.
· Coloque el manubrio en el extremo opuesto
de la máquina al vibrador.
· Encienda el motor utilizando el arrancador re-
tráctil. (Si el motor está equipado con un inte-
rruptor de encendido y apagado ON/OFF debe
primero posicionarse en la posición ON antes
de comenzar).
· El correcto contenido de humedad en el suelo
es vital para la compactación adecuada.
· El agua actúa como un lubricante para ayudar
a deslizar partículas de suelo juntas.
· Muy poca humedad resultara en una inade-
cuada compactación, demasiada humedad
dejará huecos llenos de agua que debilitan la
capacidad de soporte de carga del suelo.
· Se recomienda el kit de depósito de agua op-
cional cuando se utiliza la máquina en superfi-
cies asfálticas, ya que el flujo de agua evita una
acumulación de material en la parte inferior de
la placa.
PRECAUCIÓN: Inspección y otros servicios
deben llevarse a cabo siempre sobre una super-
ficie firme y nivelada con el motor apagado.
TABLAS DE INSPECCIÓN DE MANTENIMIENTO:
Para asegurarse de que su compactador de pla-
ca este siempre en buenas condiciones de tra-
bajo antes de usar, lleve a cabo la inspección de
mantenimiento de acuerdo con las tablas 1 a 3.
INSPECCIÓN DE LA MÁQUINA
Acelerador
Ahogador
Paso de
gasolina
Revisión de encendido
(Todos los días). Cada 8 hrs
Tornillos flojos o sueltos
(Todos los días). Cada 8 hrs
Daño de cualquier parte
(Todos los días). Cada 8 hrs
Función de control de parte
del sistema (Todos los días). Cada 8 hrs
Revisión del aceite del
vibrador
Cada 100
horas
Reemplazo de aceite del
vibrador
Cada 100
horas
Revisión de banda en V
(embrague)
Cada 100
horas

ESPAÑOL•Manual de Usuario
7
REVISIÓN DEL MOTOR
Para detalles, véase por separado el manual del
motor:
PRECAUCIÓN: Estos intervalos de inspec-
ción son para el funcionamiento en condicio-
nes normales. Ajuste sus intervalos de inspec-
ción basados en la placa compactadora, del
número de horas que está en uso, y las condi-
ciones de trabajo particulares.
PRECAUCIÓN: Las tuberías de combustible
y conexiones deben ser reemplazadas cada 2
años.
Servicio Diario
• Revise por fugas de aceite y combustible. Re-
mueva la tierra y limpie la parte de abajo de la
placa compactadora.
• Revise el aceite del motor. Revise por torni-
llos flojos, incluyendo apriete. Vea la tabla 3
(torque de apriete) para reapretar.
Cambio de aceite del vibrador
Cuando cambie el aceite del vibrador, quite el
tapón para drenar el aceite situado en la parte
inferior derecha del vibrador, y simplemente
incline la máquina para vaciar el aceite. Tenga
en cuenta que el aceite se drena más fácilmen-
te mientras está caliente. Reemplace el aceite
con 200 ml de aceite de motor SAE 10W-30.
Filtro de aire
1. El filtro de aire debe limpiarse porque un
filtro de aire obstruido puede causar un mal
arranque del motor, falta de energía y acortar
la vida del motor substancialmente.
2. Para limpiar o reemplazar el filtro de aire
afloje la tuerca de mariposa de la cubierta del
filtro de aire, remueva la cubierta y retire el
cartucho del filtro.
Si se desea la limpieza
del filtro sople aire a
través del cartucho del
filtro desde el interior,
moviendo el chorro
de aire comprimido
seco hacia arriba y ha-
cia abajo hasta que se
elimine todo el polvo.
PRECAUCIÓN: Nunca intente revisar la ban-
da en V con el motor funcionando. Severas le-
siones pueden ocurrir si su mano queda atrapa-
da entre la banda en V y el embrague. Siempre
utilice guantes de seguridad.
REVISIÓN Y REEMPLAZO DE LA BANDA V Y EL
EMBRAGUE
Después de 200 horas de operación, quite la
tapa superior de la banda para revisar la ten-
sión de la banda en V. La tensión es correcta si
la banda se flexiona aproximadamente de 10
a 15 mm cuando se presiona firmemente con
el dedo entre los ejes. Una banda floja o des-
gastada reduce la eficiencia de transmisión de
potencia, causando una compactación débil de
igual manera reduce la vida de la propia ban-
da.
Fugas de aceite y combustible
(Todos los días). Cada 8 hrs
Tensión de las roscas de
apriete (Todos los días). Cada 8 hrs
Revisión de aceite y reabas-
tecimiento (Todos los días)
(Rellene al nivel máximo
especificado)
Cada 8 hrs
Reabastecimiento de aceite
del motor
Primeras
20 horas
después
cada 100
horas
Limpieza del filtro de aire Cada 50
horas
Material
6 mm 8 mm 10 mm 12 mm 14 mm 16 mm 18 mm 20 mm
4T 70 150 300 500 750 1100 1400 2000
6-8T 100 250 500 800 1300 2000 2700 3800
11T 150 400 800 1200 2000 2900 4200 5600
11T 100 (6 mm) 300 - 350 (8 mm) 650 - 700 (10 mm)
(En caso que la contraparte sea de aluminio)
(Las roscas utilizadas en esta maquina son derechas)
Material y calidad del material están marcadas en cada tornillo.
Filtro de papel.
Filtro de
espuma.
Presión adecuada
de la banda, debe
de flexionarse de
10 a 15 mm en
este punto.
Banda en V.

8
PRECAUCIÓN: Siempre que la vibración de
la compactadora se debilite o se pierda duran-
te el funcionamiento normal, independiente-
mente de las horas de funcionamiento, revise
la banda en V y el embrague inmediatamente.
REEMPLAZO DE LA BANDA EN V
Retire las cubiertas de la banda superior e infe-
rior, acople una llave acodada (13 mm) o algo
similar al tornillo de sujeción de la polea del vi-
brador (inferior). Sujete con un paño desecha-
ble o algo similar por la mitad de la banda en
V en el lado izquierdo y mientras tira de ella
hacia atrás con fuerza, gire la llave acodada
hacia la derecha de manera que la banda en
V se salga.
REINSTALACIÓN DE LA BANDA EN V
Acople la banda en V a la polea inferior del
vibrador y empuje la banda en V al lado iz-
quierdo superior del embrague y, de la misma
manera que en la extracción, gire la llave aco-
dada hacia la derecha de modo que la correa
en V se remonte.
REVISIÓN DEL EMBRAGUE
Revise el embrague simultáneamente con la
revisión de la banda en V. Con la banda reti-
rada, revise el cilindro exterior del embrague
por oxidación y la ranura en "V" por desgaste
o daño a simple vista. Limpie la ranura en "V"
según sea necesario. Desgaste del revestimien-
to o de los bordes debe revisarse con el fun-
cionamiento de verificación. Si los bordes están
desgastados, la transmisión de energía llega a
ser deficiente, resultará en deslizamiento.
BALEROS: Los siguientes baleros están sellados;
Embrague centrífugo-lubricado con grasa; Vi-
brador- lubricado con un baño de aceite.
TRANSPORTE
1. Siempre apague el motor durante la trans-
portación de la máquina.
2. Asegúrese de que el dispositivo de levan-
tamiento tenga la capacidad de soportar la
máquina (vea la placa de identificación para el
peso de la máquina).
3. Utilice el punto central de levantamiento (a)
(c) (como opcional) para levantar la máquina.
4. Ruedas (b) como opcional se utilizan para el
transporte de corta distancia.
SOLUCIONADOR DE PROBLEMAS
Velocidad de avance muy lenta, y la vibra-
ción es débil.
¿Velocidad del motor muy lenta? Seleccione la
velocidad correcta del motor en RPM.
¿El embrague patina? Revise o reemplace el
embrague.
¿La banda en V patina? Ajuste o reemplace la
banda en V.
¿Exceso de aceite en vibrador? Drene el exceso
de aceite y llene hasta el nivel adecuado.
¿Mal funcionamiento en la carcasa del vibra-
dor? Revise los excéntricos, engranajes y con-
trapesos.
¿Falla del rodamiento (balero)? Reemplace el
rodamiento (balero).
¿La potencia del motor es insuficiente? Revise
el motor, compresión etc.
Dificultad para encender, “Combustible
está presente, pero no hay chispa en la
bujía”.
¿Bujías con residuos? Revise la separación del
electrodo, aislamiento o reemplace la bujía.
¿Depósitos de carbón en la bujía? Limpie o re-
emplace la bujía.
¿Corto circuito debido al aislamiento de la
bujía deficiente? Revise el aislamiento de la
bujía, reemplace si esta desgastada.
¿Separación inapropiada del electrodo de la
bujía? Ajuste a la separación correcta.
Dificultad para encender, “Combustible
está presente, pero no hay chispa en la
bujía”.
¿Interruptor ON / OFF está en cortocircuito?
Revise el cableado del interruptor, reemplace
el interruptor.
¿Bobina de encendido defectuosa? Reemplace
la bobina de encendido.
¿Inapropiada separación del electrodo de la
bujía, electrodo sucio? Ajuste a la separación
apropiada y limpie los electrodos.
¿Aislamiento del condensador desgastado o
en cortocircuito? Reemplace el condensador.
¿Cable de la bujía roto o en cortocircuito? Re-
emplace el cableado defectuoso de la bujía

ESPAÑOL•Manual de Usuario
9
Dificultad para encender “Combustible
está presente, chispa está presente, y la
compresión es normal”.
¿Combustible inadecuado? Vacié el sistema de
combustible y reemplace con el combustible
correcto.
¿Agua o polvo en el sistema de combustible?
Vacié el sistema de combustible.
¿Filtro de aire sucio? Limpie o reemplace el fil-
tro de aire.
Dificultad para encender “Combustible
está presente, chispa está presente, y la
compresión es baja”.
¿La válvula de succión de escape pegada o sa-
lida? Asiente las válvulas.
¿Anillo del pistón y/o cilindro desgastado? Re-
emplace los anillos del pistón y/o el pistón.
¿Cabeza del cilindro y/o bujía no apretadas
apropiadamente? Apriete los tornillos de la ca-
beza del cilindro y la bujía.
Combustible no presente en el carbura-
dor.
¿Combustible no presente en el tanque de
combustible? Llene con el combustible correc-
to.
¿Válvula de combustible no se abre correcta-
mente? Aplique lubricante para aflojar la vál-
vula de combustible, reemplace si es necesario .
¿Filtro de combustible obstruido? Reemplace
el filtro de combustible.
¿Respiradero del tapón del tanque de combus-
tible obstruido? Limpie o reemplace el tapón
del tanque de combustible.
¿Aire en la línea de combustible? Purgue la
línea de combustible.
“Débil en poder "compresión es correcta y
no fallos de encendido.
¿Filtro de aire sucio? Limpie o reemplace el fil-
tro de aire.
¿Inapropiado nivel en el carburador? Revise el
ajuste del flotador, reconstruya el carburador.
¿Bujía defectuosa? Limpie o reemplace la
bujía.
“Débil en poder "compresión es correcta
pero existen fallos de encendido.
¿Agua en el sistema de combustible? Vacié
el sistema de combustible y reemplace con el
combustible correcto.
¿Bujía Sucia? Limpie o reemplace la bujía.
¿Bobina de encendido defectuosa? Reemplace
la bobina de encendido.
Motor se sobrecalienta.
¿Valor térmico de la bujía inadecuado? Reem-
place con el tipo correcto de bujía.
¿Tipo correcto de combustible? Reemplace con
el tipo correcto de combustible.
¿Ranuras de enfriamiento sucias? Limpie las
ranuras de enfriamiento.
Velocidad de rotación fluctúa.
¿Regulador ajustado correctamente? Ajuste el
regulador.
¿Resorte del regulador defectuoso? Reempla-
ce el resorte del regulador.
¿Flujo de combustible restringido? Revise todo
el sistema de combustible en busca de fugas y
obstrucciones.
Mal funcionamiento del encendido retráctil.
¿Mecanismo retráctil obstruido con polvo o su-
ciedad? Limpie el ensamble retráctil con jabón
y agua.
¿Resorte en espiral flojo? Reemplace el resorte
en espiral.
ESPECIFICACIONES TÉCNICAS
POTENCIA
FUERZA DE IMPACTO
FUERZA DE COMPACTACIÓN
CAPACIDAD DE ÁREA MÁXIMA
CAPACIDAD DE GASOLINA
TAMAÑO DE PISÓN
VELOCIDAD DE TRASLADO
PESO
6,5 HP (4,8 kw)
15 kN
30 cm
6,5 m²
3,6 L
55 cm x 44 cm
19 m/min
90 kg (198 lb)

10
GENERAL SAFETY RULES
The most important safety device for this or
any tool is the operator. Care and good judg-
ment are the best protection against injury.
All possible hazards cannot be covered here,
but we have tried to highlight some of the
important items, individuals should look for
and obey Caution, Warning and Danger signs
placed on equipment, and displayed in the
workplace. Operators should read and follow
safety instructions packed with each product.
Learn how each machine works. Even if you
have previously used similar machines, care-
fully check out each machine before you use it.
Get the “feel” of it and know its capabilities,
limitations, potential hazards, how it operates,
and how it stops. We has no duty if person
don’t operate as instruction said.
Failure to follow instructions in this manual
may lead to serious injury or even death! This
equipment is to be operated by trained and
qualified personnel only! This equipment is
for industrial use only.
WARNING: RISK OF EXPLOSION OR FIRE.
• Fuel and its vapors are extremely flammable
and explosive. Fire or explosion can cause se-
vere burns or death.
· ALWAYS shut off motor and allow it to cool a
least 2 minutes before adding fuel to the tank.
· ALWAYS use care in filling tank to avoid spill-
ing fuel. Move compactor away from fueling
area before starting motor.
· ALWAYS Keep maximum fuel level below top
of tank to allow for expansion.
· ALWAYS operate and fuel equipment in well
ventilated areas free from obstructions. Equip
areas with fire extinguishers suitable for gaso-
line fires.
· ALWAYS Store fuel in an OSHA approved con-
tainer, in a secure location away from work
area.
DANGER: CARBON MONOXIDE HAZARD.
• Running motor gives off carbon monoxide,
an odorless, colorless, poison gas. Breathing
carbon monoxide can cause nausea, fainting
or death. Some chemicals or detergents may
be harmful if inhaled or ingested, causing se-
vere nausea, fainting or poisoning.
· ALWAYS Keep exhaust gas from entering a
confined area through windows, doors, venti-
lation intakes, or other openings.
· NEVER operate unit in a location occupied by
humans or animals.
· ALWAYS follow manufacturers recommenda-
tions, use a respirator or mask whenever there
is a chance that vapors may be inhaled.
• Whenever necessary, replace nameplate, op-
eration and safety decals when they become
difficult read.
• Manufacturer does not assume responsibility
for any accident due to equipment modifica-
tions.
• NEVER use accessories or attachments, which
are not recommended for this equipment.
Damage to the equipment and/or injury to
user may result.
• NEVER touch the hot exhaust manifold, muf-
fler or cylinder. Allow these parts to cool be-
fore servicing motor or compactor.
• ALWAYS stop the motor before servicing,
adding fuel and oil.
• NEVER run motor without air filter. Severe
motor may occur.
• ALWAYS service air cleaner frequently to pre-
vent carburetor malfunctions.
• ALWAYS check the machine for loosened
threads or bolts before starting.
• ALWAYS be sure the operator is familiar with
proper safety precautions and operations tech-
niques before using compactor.
• ALWAYS store equipment properly when it is
not being used. Equipment should be stored in
a clean, dry location out of the reach of chil-
dren.
• DO NOT operate this equipment unless all
guards and safety devices are attached and in
place.
• Keep all inexperienced and unauthorized
people away from the equipment at all times.
• Unauthorized equipment modifications will
void all warranties.
• NEVER pour or spray water over the motor.
• Test the motor ON/OFF switch before operat-
ing. The purpose of this switch is to shut down
the motor of the compactor.
• Refer to the Engine User’s Manual for mo-
tor technical questions or information recom-
mended for the equipment.

11
ENGLISH•User's manual
HAZARDS AND RISKS
· NEVER allow any person to operate the ma-
chine without adequate instruction.
· ENSURE all operators read, understand and
follow the operating instructions;
· SERIOUS INJURY could result from improper
or careless use of this machine;
Plates compactors are heavy units and should
be positioned by two people of appropriate
strength. Using
· The lifting handles provided on the machine,
along with correct lifting techniques.
MECHANICAL HAZARDS
· DO NOT operate the machine unless all pro-
tective guards are in place.
· KEEP handles and feet clear of rotating and
moving parts as they will cause injury if con-
tacted.
· ENSURE that the motor operation switch is
in the OFF position and the spark plug igni-
tion lead is disconnected before removing the
guards or making adjustments.
· ENSURE both the machine and the operator
are stable by setting up on level terrain and the
machine will not tip over, slide of fall while in
operation or unattended.
· DO NOT leave the machine in operation while
it is unattended.
· ENSURE that the walls of a trench are stable
and will not collapse due to the action of the
vibration, prior to commencing compaction.
· ENSURE that the area to be compacted does
not contain any “live” electrical cables, gas,
water or communication services which many
be damaged by the action of vibration.
· EXERCISE CARE when operating unit. Expo-
sure to vibration or repetitive work actions
may be harmful to hands and arms.
· NEVER stand on the unit while it is operating.
· DO NOT increase the governed no-load mo-
tor speed above 3,500 r/min. Any increase may
result in personal injury and damage to the
machine.
· BE CAREFUL not to come in contact with the
muffler when the motor is hot, since it can
cause severe burns.
· ENSURE that the repairs to the motor and
machine are carried out by COMPETENT per-
sonnel.
FEATURES
The tamping compactor is a powerful com-
pacting tool capable of applying a tremendous
force in consecutive impacts to a soil surface.
Its applications include soil compacting for
road, embankments and reservoirs as well as
backfilling for gas pipelines, water pipelines
and cable installation work.
Circular motion is converted to create impact
force. The tamping compactor develops a pow-
erful compacting force at the foot of the com-
pactor. To maintain optimum performance,
proper operation and service are essential.
FUNCTIONS AND CONTROLS
The motor is controlled by an ON/OFF switch
or push button which is mounted on the motor
below the fuel tank.
Tension of the drive belt is adjustable. Loosen
the four nuts on the bolts which secure the
motor to the base plate, Adjust the set screws
which bear against the motor crankcase to
achieve the required belt tension .Ensure that
the four nuts and the set screw locknuts are
tightened after adjustment.
KNOW YOUR TOOL
Before attempting to use this product, become
familiar with all of its operating features and
safety requirements.
1. THROTTLE LEVER.
2. BELT COVER.
3. FOOT.
4. FUEL TANK.
5. AIR FILTER.
6. HANDLE.
1
2
3
6
4
5

12
OPERATION INSTRUCTIONS
BEFORE OPERATION
PRE START-UP INSPECTION
The following Pre-start-up inspection must be
performed before the start of each work ses-
sion or after every four hours of use. Whichev-
er is first. If any fault is discovered, the compac-
tor must not be used until the fault is rectified.
1. Thoroughly inspect the compactor for signs
of damage. Check components are present and
secure. Pay special attention to the belt drive
safety guard fitted between the motor and the
vibrator unit.
2. Check the motor oil level and top up as nec-
essary
3. Check the motor fuel level and top up as
necessary
4. Check for fuel and oil leaks
START AND STOP PROCEDURE FOR PETROL
MOTOR
1. Open the fuel tap by moving the fuel ON/
OFF lever fully to the right
2. If starting the motor from cold, set the choke
ON by moving the choke lever fully to the left.
If restarting a warm motor, the choke is usually
not required. However, if the motor has cooled
to a degree, partial choke may be required.
3. Turn the motor ON/OFF switch clockwise to
the “1” position
4. Set the throttle to the idle position by mov-
ing the throttle lever slightly to the right. Do
not start the motor on full throttle,
As the compactor will vibrate as soon as the
motor starts.
5. Taking a firm hold of the control handle
with one hand, grasp the recoil starter handle
with the other. Pull the recoil starter until mo-
tor resistance is felt. Then let starter return.
6. Taking care not to pull starter’s cope fully
out, pull the starter handle briskly
7. Repeat until the motor fires
8. Once the motor fires gradually, set the choke
lever to the OFF position by moving it to the
right.
9. If the motor fails to fire after several at-
tempts, follow the trouble-shooting guide.
10. To stop the motor, set the throttle to idle
and turn the motor ON/OFF switch anticlock-
wise to the “0” position.
11. Turn the fuel off
· The machine is best suited to the compac-
tion of bituminous and granular materials e.g.
granular soils such as silt and clay are best com-
pacted using the impact force produced by a
vibrating compactor.
· Where possible the site should be graded and
leveled before commencing compaction.
NOTE: For more information of starting and
correct operating procedures of the motor,
refer to the motor operation manual supplied
with the unit.
· Increase the motor sped to the maximum set-
ting using the hand throttle lever, before com-
mencing compacting.
· Steer the machine by moving the handle side-
ways to the right or left;
· ALWAYS maintain good footing so that you
do not slip and loose control when starting or
operating the machine;
MAINTENANCE
CARE AND PREVENTIVE MAINTENANCE
· Check the oil level in the motor crankcase
daily.
· Check the vibrator oil level weekly.
· Inspect the rubber anti vibration mounts for
wear or deterioration.
· Clean the underside of the plate regularly to
prevent a build up of material.
· Use unleaded grade petrol and ensure that
the fuel is free from contamination.
· The vibratory motion provides a self propel-
ling action. Position the handle at the opposite
end of the machine to the vibrator.
· Start the motor using the recoil starter. (If the
motor is fitted with an on/off switch this must
first be turned to ON before starting. )
Throttle
Choke
Fuel ON/OFF
lever

13
ENGLISH•User's manual
· Correct moisture content in soil is vital to
proper compaction. Water acts as a lubricant
to help slide soil particles together. Too little
moisture means inadequate compaction; too
much moisture leaves water-filled voids that
weaken the soil’s load bearing ability.
· The optional water tank kit is recommended
when the machine is used on bituminous sur-
faces as the water flume prevents a build up of
material on the underside of the plate.
CAUTION: Inspection and other services
should always be carried out on hard and level
ground with the motor shutdown.
INSPECTION AND MAINTENANCE SERVICE
TABLES:
To make sure your plate compactor is always
in good working condition before using, carry
out the maintenance inspection
MACHINE INSPECTION
MOTOR CHECK
For details, see separate motor manual.
CAUTION: These inspection intervals are
for operation under normal conditions. Adjust
your inspection intervals based on the number
hours plate compactor is in use, and particular
working conditions.
CAUTION: Fuel piping and connections
should be replaced every 2 years.
Daily Service
• Check for leakage of fuel or oil. Remove
soil and clean the bottom of compaction plate
• Check motor oil. Check for loose screws in-
cluding tightness. See Table below (Tightening
torque), for retightening.
Changing Vibrator Oil
When changing the vibrator oil, remove the
drain plug located at the bottom-right of the
vibrator, and simply tip the compactor to drain
the oil. Note that the oil will drain more easily
while it is hot. Replace the oil with 200 ml of
SAE 10W-30 motor oil.
Leakage of oil fuel (every day) Every 8 hrs
Tightness of fastening threads
(every day) Every 8 hrs
Engine oil check and replen-
ishment (every day) (Replen-
ish to specified Max. Level)
Every 8 hrs
Engine oil replenishment At first 20
hours, then
every 100
hours
Air cleaner cleaning Every 50
hours
Material
6 mm 8 mm 10 mm 12 mm 14 mm 16 mm 18 mm 20 mm
4T 70 150 300 500 750 1100 1400 2000
6-8T 100 250 500 800 1300 2000 2700 3800
11T 150 400 800 1200 2000 2900 4200 5600
11T 100 (6 mm) 300 - 350 (8 mm) 650 - 700 (10 mm)
(In case counter-part is of aluminum)
(Threads in use with this machine are all right handed)
Material and quality of material is marked on each bolt, and screw.
Starting check (every day). Every 8 hrs
Loosened of lost screws (every
day). Every 8 hrs
Damage of any part (every
day). Every 8 hrs
Function of controlling system
part (every day). Every 8 hrs
Vibrator oil check Every 100
hours
Vibrator oil replacement Every 100
hours
V-belt (Clutch) Check Every 100
hours

14
Air Filter
1. The air filter element should be cleaned be-
cause a clogged air cleaner can cause poor mo-
tor starting, lack of power and shorten motor
life substantially.
2. To clean or replace air filter loosen the wing
nut on the air filter housing,remove the cover
and take out air filter cartridge.
If only cleaning of
the air filter is desired
blow through the air
filter cartridge from
the inside, moving a
jet of dry compressed
air up and down until
all dust is removed.
CAUTION: NEVER
attempt to check the
V-belt with the motor
running.
Severe injury can occur if your hand gets
caught between the V-belt and the clutch. Al-
ways use safety gloves.
CHECKING AND REPLACING THE V-BELT
AND CLUTCH
After 200 hours of operation, remove the up-
per belt cover to check the V-belt tension.
Tension is proper if the belt bends about 10mm
when depressed strongly with finger between
shafts. Loose or worn V-belts reduce power
transmission efficiency, cause weak compac-
tion and reduces the life of the belt itself.
CAUTION: Whenever the compactor’s vi-
bration becomes weak or lost during normal
operation regardless of operation hours, check
the V-belt and clutch immediately.
REPLACING THE V-BELT
Remove the upper and lower belt covers, En-
gage an offset wrench (13 mm) or the like to
vibrator pulley (Lower) fastening bolt. Engage
waste cloth or the like at midway of V-belt on
the left side and while pulling it back strongly,
rotate the offset wrench clockwise so that the
V-belt will come off.
REINSTALLING THE V-BELT
Engage V-belt to the lower vibrator pulley and
push the V-belt to the left side of upper clutch
and, in the same manner as in removal, rotate
offset wrench clockwise so that the V-belt goes
back on.
CHECKING CLUTCH
Check the clutch simultaneously with V-belt
checking. With belt removed, check outer
drum of the clutch for seizure and “V” groove
for wear or damage with your eyes. Clean the
“V” groove as necessary. Wear of lining or shoe
should be checked with running check. If the
shoe is worn, power transmission becomes de-
ficient and slipping will result.
BEARINGS: The following bearing are sealed;
Centrifugal clutch-grease lubricated; Vibrator-
oil bath lubricated
TRANSPORTATION
1. Always shut off motor when transporting
machine.
2. Make sure lifting device has enough capac-
ity to hold machine (see identification plate on
machine for weight).
3. Use central lifting point (a) (c) (as optional)
when lifting machine.
4. Trolley wheel (b) as optional is used for short
distance transportation.
TROUBLESHOOTING
Travel Speed too low, and vibration is
weak.
Engine speed too low? Set motor speed to cor-
rect RPM.
Clutch slips? Check or replace clutch.
V-belt slips? Adjust or replace V-belt.
Excessive oil in vibration? Drain excess oil and
fill to proper level.
Malfunction in vibrator housing? Check eccen-
tric, gears and counter weights.
Bearing Failure? Replace Bearing.
Insufficient motor output? Check motor, com-
pression etc.
Correct V-Belt
tension 10-15 mm
when depressed.
V-Belt.
Paper filter.
Foam
filter.

15
ENGLISH•User's manual
Difficult to start,” Fuel is available, but no
SPARK at spark plug”.
Spark plugs bridging? Check gap, insulation or
replace spark plug.
Carbon deposit on spark plug? Clean or re-
place spark plug.
Short circuit due to deficient spark plug insu-
lation? Check spark plug insulation, replace if
worn.
Improper spark plug gap? Set to proper gap.
Difficult to start,” Fuel is available, but no
SPARK at spark plug”.
ON/OFF switch is shorted? Check switch wir-
ing, replace switch.
Ignition coil detective? Replace ignition coil.
Improper spark gap, point’s dirty? Set correct
spark gap and clean points.
Condenser insulation worn of short circuiting?
Replace condenser.
Spark plug wire broken or short circuiting? Re-
place defective spark plug wiring.
Difficult to start,” Fuel is available, spark
is present and compression is normal.
Wrong fuel type? Flush fuel system, and re-
place with correct type of fuel.
Water or dust in fuel system? Flush fuel sys-
tem.
Air cleaner dirty? Clean or replace air cleaner.
NO fuel present at carburetor.
Fuel not available in fuel tank? Fill with correct
type of fuel.
Fuel cock does not open properly? Apply lubri-
cant to loosen fuel cock level, replace if nec-
essary.
Fuel filter clogged? Replace fuel filter.
Fuel tank cap breather hole clogged? Clean or
replace fuel tank cap.
Air in fuel line? Bleed fuel line.
“Weak in power” compression is proper
and does not misfires.
Air cleaner not clean? Clean or replace air
cleaner.
Improper level in carburetor? Check float ad-
justment, re-build carburetor.
Defective Spark plug? Clean or replace spark
plug.
“Weak in power” compression is proper
but misfires.
Water in fuel system? Flush fuel system, and
replace with correct type of fuel.
Dirty spark plug? Clean or replace spark plug.
Ignition coil defective? Replace ignition coil.
Engine overheats.
Spark plug heat value improper? Replace with
correct type of spark plug.
Correct type of fuel? Replace with correct type
of fuel.
Cooling fins dirty? Clean cooling fins.
Rotational speed fluctuates.
Governor adjusted correctly? Adjust governor.
Governor spring defective? Replace governor
spring.
Fuel flow restricted? Check entire fuel system
for leaks or clogs.
Recoil starter malfunction
Recoil mechanism clogged with dust and dirt?
Clean recoil assembly with soap and water.
Spiral spring loose? Replace spiral spring.
TECHNICAL DATA
POWER
IMPACT FORCE
COMPACTATION
MAXIMUM COVERAGE AREA
FUEL CAPACITY
TAMPER SIZE
TRAVELING SPEED
WEIGHT
6,5 HP (4,8 kw)
15 kN
30 cm
6,5 m²
3,6 L
55 cm x 44 cm
19 m/min
90 kg (198 lb)

16
Notas / Notes

17
Manual de usuario / User’s manual
Notas / Notes

18
PVC765
ESPAÑOL
PÓLIZA DE GARANTÍA
ENGLISH
WARRANT POLICY
Urrea Herramientas Profesionales S.A. de C.V.
Warranties this product for a period of 1 year for
repairing against any manufacture defect from
the purchasing date.
Purchase date: ____/____/____
Product:____________________
Brand:______________________
Model:______________________
______________________________
Distributor seal and signature
Sold and Imported by:
Urrea Herramientas Profesionales S.A. de C.V.
km 11,5 Carretera A El Castillo, El Salto, Jalis-
co, México. C. P. 45680, Tel. (33) 3208 7900,
RFC UHP900402Q29
Terms:
In order to make warranty effective you must pres-
ent the product along with the warranty properly
filled and signed to an authorized distributor or
service center.
This warranty does not cover wear and tear parts
such as spark plug, filter, etc.
This warranty is not applicable in the follow-
ing cases:
· When the product has not been used according
to normal conditions or natural wear of its parts.
· When the product has not been used according
with this user’s manual instructions.
· When the product has been fixed or modified by
unauthorized or unqualified person.
Urrea Herramientas Profesionales S.A. de C.V.
garantiza este producto por el termino de 1 año
en reparación contra cualquier defecto de fabrica-
ción a partir de la fecha de entrega.
Fecha de venta: ____/____/____
Producto: ___________________
Marca: ______________________
Modelo: ____________________
______________________________
Sello y firma de distribuidor
Comercializado e Importado por:
Urrea Herramientas Profesionales S.A. de C.V.
km 11,5 Carretera A El Castillo, El Salto, Ja-
lisco, México. C. P. 45680, Tel. (33) 3208 7900,
RFC UHP900402Q29
Condiciones:
Para hacer efectiva la garantía deberá presentar
el producto junto con la póliza de garantía debi-
damente firmada y sellada por el establecimiento
donde la adquirió, en cualquiera de los centros de
servicio autorizados.
Esta garantía no cubre piezas de desgaste natural
tales como: bujía, filtro, etc.
Esta garantía no será valida en los siguientes
casos:
· Cuando el producto haya sido utilizado en condi-
ciones distintas a las normales o al desgaste natu-
ral de sus partes.
· Cuando el producto no haya sido operado de
acuerdo al instructivo de uso que lo acompaña.
· Cuando el producto haya sido alterado o repara-
do por personas no autorizadas.

Importante: Los periodos de mantenimiento indicados sirven como referencia. Las
labores de mantenimiento se realizarán más frecuentemente si fuera necesario dependiendo
de las condiciones y frecuencia de uso.
Important: The indicated maintenance periods serve as reference. The maintenance work will be
performed more frequently if necessary depending on the conditions and frequency of use.
Importante: No utilice solventes para su limpieza.
Important: Do not use solvents to clean up.
Importante: El no cumplir con los tiempos de mantenimiento ocasionará
que se invalide la garantía.
Important: Failure to comply with this maintenance plan will invalidate the entire warranty.
Nombre de usuario /
User's name:
Fecha de compra /
Purchase date:
Lugar de compra /
Place of purchase:
Ciclos de
Trabajo /
Working Cycle 1 Tanque de combustible x 20 minutos de descanso/
1 Fuel Tank per 20 minutes of rest
El primer cambio de aceite y filtro se tiene que
cumplir a las 25 horas de uso o a la primera
semana / The first Oil and filter change must be within
the first 25 hours of using or 1 week.
¿Quién realiza
la tarea?
Responsible for
maintenance.
PVC765
Máximo 6 hrs diarias/ 6 hr per day
NOTA: Para llevar un mejor control,
es necesario que usted como usuario,
llene estos datos al momento de
compra.
NOTE: To get a better control, is necessary you
fill this chart with your personal data at the
purchasing.
PVC855
Máximo 8 hrs diarias/ 8 hr per day
Cada 8 horas o
diariamente / Daily
or every 8 hours
Cada 200 horas
o 3 meses / Every 3
months 200 hours
1er servicio a las
25 horas o primera
semana / First service
at 25 hours or 1st week
Cada 600 horas
o 6 meses / Every 6
months 600 hours
Usuario /
User
Centro de
servicio
autorizado /
Authorized
service center.
Datos de usuario y compra /
User and purchase data.
P1 S1 S2
Línea de corte / Cutting line
Revisar filtro de aire /Check de air filter
Revisar nivel de aceite (SAE30 o 10W-30) /Check de oil level (SAE30 or 10W-30)
Limpieza general (no usar solventes) /General clean up (do not use solvents)
Limpiar el filtro de aire con aire comprimido /Clean the Air Filter with air pressure
Cambio de aceite (SAE30 o 10W-30) /Oil change (Use SAE30 or 10W-30)
Remplazo de filtro de aire /Replace Air Filter
Remplazo de bujía /Change the spark plug
Limpieza de motor /Clean the engine
Limpieza de carburador /Clean the carburetor
Revisión de aprietes /Joint tightening review
Calibración de válvulas /Valves calibration
Cambio de sellos y juntas /Change of seals and Joints
Cambio de bandas /Change of belts
Cambio de mangueras de combustible /Change the fuel hoses
Cambio de baleros de motor /Change engine bearings
Tipo de mantenimiento /Type of Maintenance

Urrea Herramientas profesionales S.A. de C.V. garantiza es-
tos productos por el termino de 1 año en sus piezas compo-
nentes y mano de obra contra cualquier defecto de fabrica-
ción en motor y sistema de vibración a partir de la fecha de
compra siempre y cuando se cumpla con el plan de mante-
nimiento y servicios aquí contenidos.
IMPORTANTE: Los componentes de desgaste natural
como filtros, válvulas, anillos, baleros, bandas, clutch y ser-
vicios de mantenimiento, no estarán cubiertos como garan-
tía.
Urrea Herramientas profesionales S.A. de C.V. warranties this product for
a period of 1 year in parts and handwork against manufacture defect in
the engine and vibrator system since the purchasing date, provided that
the maintenance plan described here is complied with.
IMPORTANT: The components of natural wear as bearings,
filters,valves, rings, bearings, belts, clutch and maintenance service are
not inlcude as a warranty.
• Check the maintenance prices in your local Service Center.
Garantía/ Warranty
IMPORTANTE/ IMPORTANT
Tarjeta de Servicios/ Service Card
Modelo /Model:
#CSA
Orden de trabajo/ Work order
Firma de CSA y Fecha de servicio/
Signature of ACS and Date of Service
Tipo de
mantenimiento/
Maintenance
Número de serie /Serial number:
Línea de corte / Cutting line
El servicio se debe realizar cada 200 horas o 3 meses de uso
(lo que ocurra primero). Verifique el tipo de servicio como se
indica en la tabla de mantenimiento periódico (en la parte
posterior) en uno de los centros de servicio autorizado Urrea
para mantener valida la garantía.
This maintenance must be done each 200 hours of service or 3 months
(whichever comes first). Verify the type of service in the chart behind in one
of the Urrea Service Center to keep valid the warranty.
Table of contents
Languages: