GSM mistral ML506 User manual

3-In-1
Bathroom Heater
Model: ML506
Instruction Manual

2
Important Safeguards
• This bathroom heater is not intended for use
by persons (including children) with reduced
physical, sensory or mental capabilities,
or lack of experience and knowledge,
unless they have been given supervision or
instruction concerning use of the appliance
by a person responsible for their safety.
• Children should be supervised to ensure that
they do not play with the appliance.(i.e. wall
switch)
• Ensure that the switch is in the off position
when changing the heat lamp (globe) or
light globe.
• Ensure that the wattage of the centre
replacement light globe is the same as the
globe supplied with the unit.
• E27 275W heat globes can be used in this unit.
• Ensure the grille is free of objects, dust build
up, etc. Make sure that the airow through
the grille is not inhibited.
• Means for disconnection must be
incorporated in the xed wiring, in
accordance with the wiring rules.
• Precautions must be taken to avoid the back-
ow of gases into the room from the open
ue of gas or other fuel burning appliances.
• When cutting the ceiling material, care must
be taken to ensure you do not damage
electrical wiring and other hidden utilities.
• This bathroom heater is to be installed so
that switches or other controls can not be
touched by a person in the bath or shower.
• The lamps are extremely hot when in use. Do
not touch to the lamps with any part of your
body when in use. Allow all lamps cool down
sufciently before touching or replacement.
• The appliance shall, under no circumstances,
be covered with insulating material or similar
material.
Cleaning
• Ensure the Mistral bathroom heater is switch
off and cool down sufciently before
cleaning.
• Remove globes when they are at room
temperature. Wipe with a damp cloth, never
immerse.
• Unclip lamp surround and wash in warm
soapy water. Always use a soft cloth, never
abrasives.
• Clean away any excess uff from the inside of
the body, motor blade brackets.
• The exhaust fan requires regular cleaning
to ensure optimum performance. With the
power off, regularly wipe the fan clear of dust
and dirt.
• Clean the exhaust ducting kit, ensuring there
are no obstructions at the exit.
Warning
If the power cord is damaged, the power cord
must be replaced by either the service agent
or similarly qualied persons in order to avoid a
hazard.
This product has not been designed for any uses
other than those specied in this booklet.
Save These Instructions

3
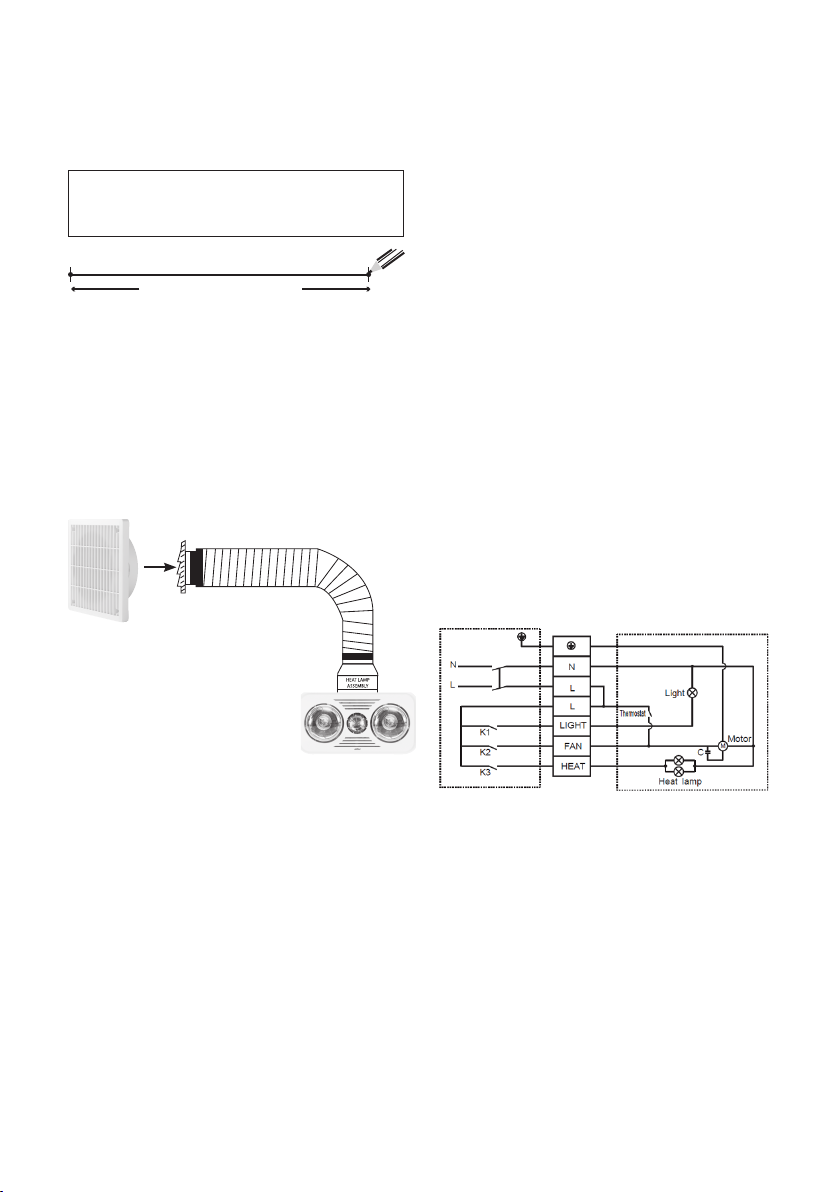
Fitting Instructions
Thank you for purchasing Mistral bathroom
heater. This product combines heat globes
an exhaust fan and light, to provide gentle
radiant heat, clean air and a bright light from
one compact, stylish unit. This model allows for
exhausting of steam and odours right out of your
home. All functions are separately controlled
from a supplied switch plate for convenient
ngertip control.
You can be assured trouble free operation by
getting your Mistral Bathroom heater carefully
installed by a qualied electrician, according
to the instructions. Please read all instructions
before commencing installation.
Mistral Bathroom heater can be mounted in
any room that requires instant, direct, and
radiant heat to ward off winter chills. The light
has separate switching, making it suitable for
bathrooms, ensuites, toilets, dressing & change
rooms.
Suitability
The Mistral Bathroom Heater has been designed
especially for cavity type ceilings. Flat roof
installation is NOT recommended.
This product must not be mounted in areas
subject to direct splashing, and must be
mounted in the horizontal position only.
Unsuitable for ‘cathedral’ or ‘raked’ ceilings.
This model comes with 2 Infrared Heat Globes
which emit harmless radiant heat. It is best
positioned directly above the area requiring
warmth. Before you start, make sure your ceiling
has at least 280mm clearance from the roof (see
to the ‘Mounting’ diagram).
Where to Locate
Radiant globe heaters are not designed to heat
entire rooms. They provide instant, concentrated
heat to persons standing directly below the heat
lamps. Therefore, Mistral Bathroom heater should
be located over the area where drying off takes
place, not directly over a shower or bath.
This Heater is not designed to be left on for
extended periods of time, as this could cause
overheating and premature failure. Mistral
Bathroom Heater, should not be covered or
installed in situations which restrict the natural
ventilation of the units for cooling purposes.
Ceiling insulation should be kept well clear
of the units (at least 100mm). For optimum
performance, models with exhaust fans should
be installed in areas with good ventilation,
to enable fresh air to ow into the room. Any
restrictions on return air entering the room will
impair effectiveness and may contribute to
premature failure.
Radiant Heat
The Mistral Bathroom Heater requires no warm
up period because of its efcient, radiant heat
globes. Heat is directed at you for an instant
warmth you can feel, rather than gradually
warming the entire room. Because of this, Mistral
Bathroom Heater only needs to be turned ON
when you are in the room.
General Illumination
A 6 watt light is designed to provide general
illumination only. Additional lighting may be
required for duties.

4
Mounting
For the purpose of obtaining best heating effect,
from the lamps there should be about 2.4m
overall height from ground.
1. Mark the ceiling with a pencil outline
370mm x 202 mm. BE SURE TO CHECK ABOVE
THE CEILING FOR MINIMUM SPACE OF 280mm
(for optimum performance allow 500mm or
more clearance) AND THE LOCATION OF
CEILING JOISTS. Ensure there is a minimum
of 100mm clear space between the Mistral
Bathroom Heater unit and any ceiling
insulation. Make sure distance between
edges to the wall is not less than 40mm.
Note: Before commencing cutting
ensure that the area behind the
intended location is clear of all cables,
pipes and joists.
2. Use a saw to cut the section along the drawn
lines.
3. Carefully remove the heater and accessories
from the plastic bag and carton. Please
assemble the air outlet before mounting the
unit into the hole. Air outlet assemble steps as
below:
4. Connect the ducting if required to the outer
grille of the unit. Insert the unit into the square
hole being sure to pull the side clips inward
so that the body can pass through the hole
without damaging the plaster Rotate the
swing clips to hold motor body in place(gure
1)then tighten screw to let the clip clamp
onto the ceiling board(gure 2).
5. Hold the fascia against the body of the heater
and the ceiling and attach the securing
spring clips to hold the fascia in place.
6. Now screw the two large heat lamps into the
lamp holder through the holes provided in
the fascia. The globes should be screwed up
rmly to ensure a good electrical contact but
don’t over tighten. Next t the small centre
globe in the same way ensuring that it is
positioned centrally.

5
Installing The Duct
1. Outlet Louvre: A 130 mm diameter hole is
required for the outlet louvre (see template
below). Use 4 screws appropriate for the
mounting surface to secure it in place.
NOTE: The vent louvres should be
facing downwards, preventing water
from running into the duct.
65 mm
OUTLET LOUVER TEMPLATE
2. Duct Connection: Fully extend 3m duct to
minimise airow restrictions then cut to t
components. To cut duct use a sharp knife
for the silver walls and wire cutters for the
wire support coil. Plan the duct-run to be as
straight as possible. The fewer obstacles that
the duct has to weave around, the better! Do
not squash or force duct through tight bends.
in house end of the duct x to the outlet of
fan motor housing, and x another end of
duct to vent louvres with metal clip.
Electrican’s Wiring
Instructions
Your Mistral Bathroom Heater requires a 220-240
Volt, 50Hz electrical supply. All electrical work
must be carried out by a qualied electrician
and installed in accordance with relevant
Electrical Wiring Regulations.
Your new Mistral Bathroom Heater comes with all
required switches and mounting plates.
How
1. Decide the best position for the switch set and
mount it. Be sure to click the switches into the
backing plate in the desired order before
hand.
2. Connect wiring to switches as shown in the
appropriate electrical diagram.
3. Remove screws from terminal cover on the
Mistral Bathroom Heater and put aside.
Wire according to the label beside the
terminal strip. Once the wires are connected
incoming cable must not be fouled by cover.
Use appropriate knockouts in terminal cover
to accommodate cable before replacing.
Screw down rmly.

6
Test
Clean surround and globes with a soft, dry cloth.
Check power is switched on and all switches
activate properly, according to their marked
function.
This product is equipped with
thermostat for overheat protection,
when temperature exceeds 80ºC
the exhaust fan will be turned on
automatically.
When cool down the fan will close
accordingly.
Replacement of Lamp
1. Check and tighten lamp regularly.
2. Shut off power before replacement.
3. Use E27 6W LED for lighting.
4. Use E27 275W infrared lamp for heating.
Technical
Specications
Power Supply : AC 220-240V~ 50Hz
Power Consumption : 581W
2 x 275W Heat lamps
6W LED Light
NOTE: As a result of continual
improvements, the design and
specications of the product within
may differ slightly to the unit illustrated
on the packaging.

7
Warranty Conditions for purchase in Australia &
New Zealand
Any claim under this warranty must be made within 12 months of the date of purchase of the product.
To make a claim under the warranty in Australia, take the product (with proof of purchase) to any
Bunnings store (see www.bunnings.com.au in Australia or www.bunnings.co.nz in New Zealand for store
locations).
GSM International Ltd bears reasonable, direct, expenses of claiming under the warranty in Australia.
You may submit details and proof to a Bunnings store for consideration or contact our service agent
below.
This warranty is provided in addition to other rights and remedies you may have under law: our goods
come with guarantees which cannot be excluded under the Australian Consumer Law (if purchased
in Australia) or the Consumer Guarantees Act 1993 (if purchased in New Zealand). You are entitled to
replacement or refund for a major failure and to compensation for other reasonably foreseeable loss
or damage. You are also entitled to have the goods repaired or replaced if the goods fail to be of
acceptable quality and the failure does not amount to a major failure.
The warranty excludes damage resulting from product misuse or product neglect. The warranty covers
domestic use only and does not apply to commercial applications.
This warranty is given by GSM International Ltd
ABN: 53007682475
For Warranty and technical queries: 1300 373 199 Aus Or 0800 200 037 NZ
Warranty Exclusions
Damage to the base or diffuser or any part through accident, misuse or negligence.

8
Cat. No. ML506
April 2020
Table of contents
Popular Heater manuals by other brands

Bio Green
Bio Green PHOENIX PHX 2.8 Installation and operating instruction

Beurer
Beurer KR 40 Instructions for use

Mr. Coffee
Mr. Coffee BVMC-TM33 user manual

REMKO
REMKO Allmat Operation,technology,spare parts

Silvercrest
Silvercrest SHLF 2000 A1 operating instructions

heat4all
heat4all ICONIC Series Mounting manual

Atlantic
Atlantic F617 Installation and operating manual

Elnur Gabarron
Elnur Gabarron SOLARHHR20 User operating instructions

VTS Medical Systems
VTS Medical Systems WING W Series Technical documentation

Rointe
Rointe Sygma SRI0330RAD2 Installation and user manual

TESY
TESY HL-245VB user manual

UNMAK
UNMAK 10 P 300 Installation and user manual