GSM Burglar User manual

GSM
Burglar
Alarm System

- 1 -
Table of Content
1.1General Description------------------------------------------------------------------ - 1 -
2.2System Setup------------------------------------------------------------------------- - 3 -
2.2.1Panel Setup------------------------------------------------------------------------- - 3 -
2.2.2Connections of Cables----------------------------------------------------------- - 3 -
2.2.3SIM Card installation------------------------------------------------------------ - 3 -
3.1Alarm Panel Initial Setup------------------------------------------------------------ 4 -
3.2Add Remote Control:---------------------------------------------------------------- 5 -
3.3Delete the remote control:---------------------------------------------------------- - 5 -
3.4Add detector-------------------------------------------------------------------------- - 5 -
3.5Delete detector----------------------------------------------------------------------- - 5 -
4.1Commands for Configuration--------------------------------------------------------6-
4.2Commands of System Enquiries----------------------------------------------- -- 11 -
4.3SMS Commands--------------------------------------------------------------------- 13 -
5.1After receiving the Panel Alert:-------------------------------------------------- - 15 -
5.2Remote Dialing In Operation:---------------------------------------------------- - 15 -
6.1 Definitions of Zones-------------------------------------------------------------- - 16 -
7 .APP Operation Manual-------------------------------------------------------------------------19

- 2 -
1.1 General Description
This LCD English large-screen GSM alarm system is equipped with technologies and suitable for both
home and commercial use. It uses the advanced GSM digital signal process technology, GSM Wireless
mobile networks with intelligent alarm system. It has highly integrated digital voice, SMS, self-learning
wireless communication code, remote appliance control and text messaging technologies. The alarm
provides automatic voice or SMS message as notifications for incidents. It is a choice of stability,
reliability, security, and user friendliness. Features are very practical, cost-effective, completed
configuration and ease of use. This large LCD display alarm can integrate with a lot of alarm accessories
including door sensor, smoke detectors, gas detectors, emergency buttons and other accessories to build a
powerful security setup. It has been widely used in homes, factories, schools, shops, convenience stores,
financial and banking workplace, community centre and residential area to provide protection to valuable
assets.
1.2 System Features
Large LCD English blue back-light display, voice prompt, ease of use.
Support GSM mobile network, provide redundancy for extra stability.
Can check status and call records from panel.
Allow up to 99 wireless defense zones and 4 wired zones.
Each can be defined as one of the 8 zone types including NORMAL, STAY, INTELLIGENT,
EMERGENCY, CLOSED, HELP SENIOR, WELCOME and CHIME.
Four sets of scheduled arm/disarmed function, each time disarmed you can select the included
period of time and different defense zone, eliminating of need of the manual procedure, realizing the
beauty of automatic controls.
Support configuration via phone ( handset ) or SMS messages to System Setup text messaging costs
associated with the alarm panel.
6 group voice alarm phone number for alert calling, 3 group phone number for help senior, 6 group
for SMS messaging, numbers saved inside EEPROM without lost upon power failure.
Different zones can dial a pre-set telephone number.
Telephone (phone) long-distance telephone control for arming, disarming, monitoring, remote
announcement.
1 Set of normally open signal outputs, relay linkage output, home appliances remote control can be
realized.
Wireless intelligent study coding, compatible with PT2262 normal encoding and a 1527 encoding,
convenient and flexible for adding or reducing accessories. Maximum support 150 remote control
and 150 sensors.
Unique black box features, you can display most recent 72 disarmed records and 102 recent alarm
recording. Accurately shows the alarm time and control code.
Built-in Lithium rechargeable battery and automatically switchable upon power failure, and
notification will be sent via SMS.
Panel integrated with either dual-band, triple-band, quad-band GSM/GPRS industrial graded module,
stable and reliable.
APP control function, can through the smart phone to arm, disarm, control appliances etc.
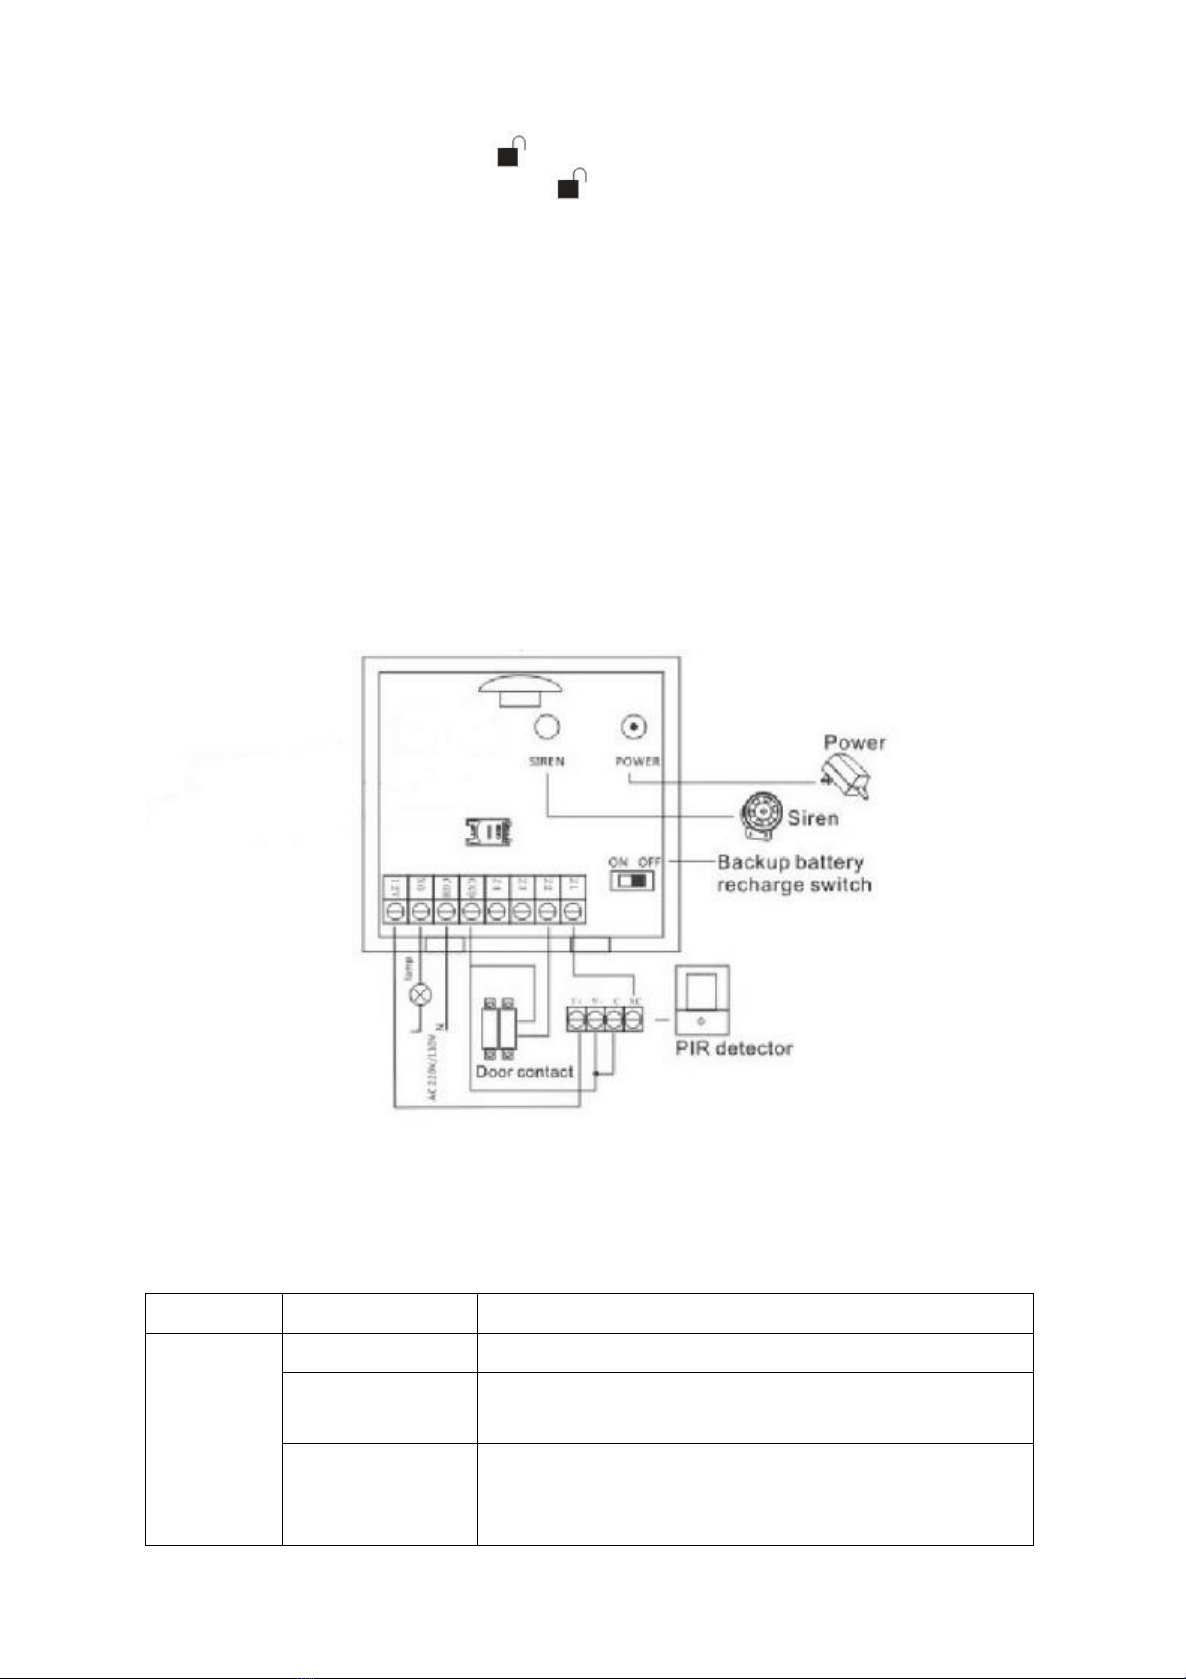
2.1 System Components and Usage
ARM
The system is at a fully ready status where all detectors are activated in a working state, when the some
events ( burglar, fire, gas leak, etc ) happened and detected, , alarm system alarm right away.
In a ARM status, the panel [ ARM ] light is on, LCD screen show "ARM" is also on.
To activate using remote control: press [ ] key once.
To activate using keyboard: on panel keyboard [ ] keys once.
STAY ARM
This is for partial arming of the alarm system when there are people at home, only some of
the selected sensors are activated and could be triggered by events.
To activate using keyboard: on panel keyboard [ S ] keys once.
DISARM
All sensors are deactivated and will not be respond to any events.

- 3 -
In a DISARM status, the panel [ ARM ] light is off, LCD screen show " DISARM " ison.
To activate using remote control: press [ ] key once.
To activate using keyboard: on panel keyboard [ ] keys once.
EMERGENCY
When an emergency occurs, press emergency button on the remote or the * /SOS button
on panel to activate alarm.
Remark:
If password on keyboard is enabled, you need to enter password before other operations, the
initial password is 1234.
2.2 System Setup
2.2.1 Panel Setup
Alarm panel should be installed at a central location with best transmission to all the
wireless sensors and accessories. Keep the panel well away from large metal objects or
household appliances with high-frequency interference, and avoid barriers such as concrete
walls with metal frame inside and fire doors.
2.2.2 Connections of Cables
2.2.3 SIM Card installation
SIM card installation is simple. Firstly remove the cover of SIM card slot at the back of the
alarm panel and then place the card according to direction indicated. Make sure the cover of
SIM card slot is fixed suitably.
Function
Indications
Description
Built-in
speaker
short "beep" once
Confirming key signal received
"beep", "beep" two
short tones
Exit configuration or code succeed
"beep", "beep", "beep"
three short tones
Error indication

- 4 -
Voice prompt
The function and status of the prompt voice
Power LED
Light up and "AC
adaptor" icon display
on LCD
Panel power is normal
Light up and "battery"
icon display on LCD
Alarm panel external power disconnect, using battery
Is off
Alarm panel without power supply
ARM LED
Light up and "STAY
ARM" icon display on
LCD
Alarm panel at STAY ARM state
Long light up and "
ARM" icon display on
LCD
Alarm panel at ALL ARM state
Flashing
Is changing to the DELAY ARM
Is off
Alarm panel at DISARM
ALARM LED
Light
Alarming, LCD display specific information
Flashing
Is changing to the DELAY ALARM
Status LED
Light
Panel at the configuration mode
Flashing
Panel at the enquiry mode
Display on
LCD the GSM
Signal, SIM
card Status
“ GSM Signal
"flashing
Searching GSM Signal
“ GSM Signal " light
GSM Good signal
“ SIM Card " not light
Indicates that no plug SIM Card
“ SIM Card " light
SIM Card loaded correctly
3.1 Alarm Panel Initial Setup
Load the SIM Card, fix the GSM Antenna, connect the power and other cables if any, then power up
alarm panel. The alarm panel voice prompt "Welcome to use alarm system", and start self-test the GSM
network, LCD shows "GSM signal" flashing while searching GSM Signal (it takes about 10 seconds or
so for searching). "GSM signal" light means GSM signals and SIM card are normal.
Upon everything working properly, the battery switch should be at the [ON] position for continuous
charging.

- 5 -
3.2 Add Remote Control:
Press "#" key to enter the configuration mode:
Syntax: 07+(00~99)+# to configure remote control
Example: 07 then press 01# , to configure the 1st remote control. then press any key of the remote control
to send a signal to the alarm panel, panel beep twice means successful, beep only once means the remote
control has been configured before. Alarm panel can configure up to 150 remote control of different
addressing. Upon completion press # to exit the configuration mode, press * and then # exit the
configuration mode.
3.3 Delete the remote control:
Press "# "Key to enter the configuration mode:
Syntax 1: 08+(00~99)+# to delete the remote control
Syntax 2: 08+**+# to delete all remote controls
Example: 08 then press 01# for deleting 1st remote control, then if you want to delete 8th remote control,
press “08” instead of “01”. Press # to exit the delete remote control, press * and then # to exit
configuration mode.
3.4 Add detector
Press "# "Key to enter the configuration mode:
Syntax: 09+(00~99)+# to set the detector
Example: 09 then press 01# , to configure 1st sensor, then trigger the detector to send a signal to the
alarm panel. panel beep twice means successful, beep only once means the remote control has been
configured before. Alarm panel can configure up to 150 sensors of different addressing. Upon completion
press # to exit the configuration mode, press * and then # exit the configuration mode.
3.5 Delete detector
Press "# "Key to enter the configuration mode:
Syntax 1: 10+(00~99)+# to delete the detector
Syntax 1: 10+**+# to delete all detectors
Example: 10 then 01#, to deleting 1st sensor. If you want to delete the 6th detectors, use “06” instead of
“01”. Upon completion press # to exit the configuration mode, press * and then # exit the configuration
mode.
This system supports three methods of configuration including the local keyboard, telephone set
and SMS messaging. Following are examples how instructions are given via one of the three
methods of setting
Example: you want to change the first phone number for voice calling to 13899998888:
Method 1: At the Keyboard
Press # to enter the configuration mode, and then press 3113899998888# , press the * then press # to
exit configuration mode.
Method 2: By telephone set
Calling into the alarm panel, upon connected, alarm panel will ask for password, it is 1234 as the default,
then press #, and then press 3113899998888# , press the * then press # to exit configuration mode.
Method 3: Using SMS
On your mobile phone, compose a SMS message as 12343113899998888# and send to your alarm
panel.
Remark:

- 6 -
The status LED is lit on the panel to indicate at the configuration mode, the status light is off upon exit.
4.1 Commands for Configuration
Set up voice alarm
phone number
To set the 1st group to the 9th group of voice alarm phone number
【1-9 】indicates that the first group to the Ninth group alarm
number correspondingly.
Example: If the user wants to set 13812345678 for the first set of voice
alarm phone number
Method one:
After you press the # key to enter the configuration mode, press the
3113812345678# , press * Then press # To exit Setup.
Method two:
Remote calling into the alarm panel put in password (initial password: 1234 )
when being asked, then press the # key, hear the voice prompt means the
host into setting state.
In remote setting, press a digital then the host will broadcast one digital
speech, if press a digital not broadcast speech or press once broadcast second
speech mean setting not correct. Press* key to exit.
Method three:
Send SMS messages 12343113812345678# to a alarm panel (which at the
beginning of 1234 is the user password), the alarm panel will reply with
SMS message "Group 1 phone number :13812345678” to confirm the 1st
group alarm phone number is set to13812345678 successfully.
For users using the telephone line extension, you should dial a number (such
as "9") to pick up a dialing tone, then with your command you should add to
this number a " * ". So the completed command becomes 9*13812345678#
Remark:
7,8,9 group number for HELP SENIOR zone and panel will only dial these
three groups number when that specific zone alarming.
Syntax:
【3】+【1-9 】
+【Phone number】+
【#】
Delete voice alarm
phone number
Used to delete the first groups to the Ninth group alert phone numbers
Example: If you want to delete the first set of alarm phone number,
Method one:
After you press the # key to enter the configuration mode, press the 31# ,
then press * then press # to exit Setup.
Method two:
After entering the phone remote setting status, press 31#.
Method three:
Send SMS message 123431# On the alarm panel, alarm panel reply " Group
1 phone number: ” to confirm the 1st group alarm phone number has been
removed.
Syntax:
【3】+【1-9】+
【#】

- 7 -
Set phone number to
receive SMS message
To set the first group to the sixth group of phone number for SMS
message. When alarm panel is alert, it sends a SMS message to the six
sets of numbers one by one.
Example: If the user wants to set 13812345678 SMS for the first group of
SMS message
Method one:
After press the # key to enter the configuration mode, press the
4113812345678# , then press * then press # Exit Setup
Method two:
After calling and connected to the panel from remote, press 4113812345678#
Method three:
Send SMS message 12344113812345678# to the panel.
Syntax:
【4】+【1-6】+
【Phone number】+
【#】
Delete SMS phone
number
Used to delete the first group to SMS of the Ninth group police number
Example: If you want to delete the first set of SMS message phone number,
Method one:
After you press the # key to enter the configuration mode, press the 41# ,
then press * then press # Exit Setup
Method two:
After calling and connected to the panel from remote, press 41#
Method three:
Send SMS message123441#
Syntax:
【4】+【1-6】+
【#】
Password
modification
Used to modify the user password, the default user password is 1234
Example: If you want to set up a new user password 4321
Method one:
Press # key to enter the configuration mode, press the 504321# , press the *
then press # to exit setup.
Method two:
After calling and connected to the panel from remote, press 504321#
Method three:
Send SMS message 1234504321#
Syntax:
【50】+【4 digits
new password 】+
【#】
Set delay for system
arm
Upon armed from the remote control or alarm panel, the alarm panel is
set to delay 0 -99 before at the ready status of ARM. The system
default is 00 seconds.
Example: users need to set the delay time for 60 Seconds.
Method one:
Press # key to enter the configuration mode, press the 5160#, then press *
then press # to exit setup.
Method two:
After calling and connected to the panel from remote, press 5160#
Method three: Send SMS messages12345160#
Syntax:
【51 】+【00-99
Second 】+【#】
Set the time of delay
for alarming
Set the time of delay upon alram, it can be set to 0-99 seconds, the
system default is 00 seconds.
Example: the user needs to set the alarm delay time to 60 Seconds.
Method one:
Press # Key to enter the configuration mode, press the 5260#, and press *
Syntax:
【52 】+【00-99
Second】+【#】

- 8 -
then press # to exit setup.
Method two:
After calling and connected to the panel from remote, press 5260#.
Method three:
Send SMS message 12345260#
Set length of Siren
sound
Set alarm length of sounding when panel alarm, could be set to 0-20
minutes, factory default is 1 minute.
Example: you want to make a siren sound 5 Minutes.
Method one:
# Key to enter the configuration mode, press the 5305#,
* Then press # To exit Setup.
Method two:
After calling and connected to the panel from remote, press 5305#.
Method three:
Send SMS messages12345305#
Syntax:
【53 】+【00-20
Minute】+【#】
Set audible
confirmation for
remote control
operation
1 means on and 0 means closed, the default is on.
Example: set panel without sound when remote control number 01 is sending
signal.
Method one:
Pressing # to entering the setup, and then press55010#, press * then press #
to exit setup.
Method two:
After calling and connected to the panel from remote, press 55010#.
Method three:
Send SMS messages123455010#
Syntax:
【55】+【Remote
control number
01~99 】+【0/1 】
+【#】
Set date and time
settings
Set the system date and time
Example: it is now 1st of July of 2011 9 :00 :00 am
Method one:
Press # to enter the configuration mode, press the 5620110701090000# ,
press * then press # to exit Setup.
Method two:
After calling and connected to the panel from remote, press
5620110701090000#.
Method three:
Send SMS message 12345620110701090000#
Syntax:
【56】+【4-digits
year】+【01-12 The
Month 】+【01-31
Day 】+【00-23
Hour 】+【00-59
Minute】+【00-59
Second " + 【#】
Scheduled arm and
disarm time setting
To set the time for scheduled arm and disarm, it allows set at most four
group of time for arm and disarm.
Example: set up the first group scheduled time to arm at 22 :00 pm and
disarm at 07 :00 am, this is valid for Monday, Tuesday, Wednesday,
Thursday and Friday of each week.
Method one:
Press # enter the configuration mode, and then press 57012200070012345#
Example: set up the second group scheduled time to arm at 12 :00 and
disarm at 13 :00 pm, this is valid for all 7 days of each week.
Method one:
Press # enter the configuration mode, and then press
Syntax:
【57 】+ Group
number【01~04 】+
【AAAA Scheduled
time of arm 】+
【BBBB Scheduled
disarmed time 】+

- 9 -
5702120013001234567#, * then press # to exit Setup.
Method two:
After calling and connected to the panel from remote, press
57012200070012345,then press5702120013001234567#
Method three:
Send SMS message 123457012200070012345# and
12345702120013001234567#
【Number week 】+
【#】
SMS Send ON/OFF
When Accessory’s
Battery Low
[0/1]: 0 means OFF,1 means On\N. Default is OFF
E.g. : Set SMS notification ON when battery of detectors is in low
voltage.
1. Press [#] on the keypad and then press [591#]
2. Remote calling the SIM card number, input [password]+[#] to enter
setting status, then press [591#].
3. Send SMS message [1234591#] “”
Command:
[59]+[0/1]+[#]
Set the type of
defense zone
To set 99 zone type, 00-99 represents 0-99 zone number, 1-8 represents
one of the 8 zone type:
1. NORMAL
2. STAY ARM
3. INTELLIGENT
4. EMERGENCY
5. CLOSED
6. CHIME
7. WELCOME
8. HELP SENIOR
The last 0/1 represents 0 siren of panel produce no sound upon alarming
while 1 is sounded.
Example: Set zone number 2 as STAY zone type, and siren not sound upon
alarming2.
Method one:
Press # enter the configuration mode, press 600220#, press * then press # To
exit Setup.
Method two:
After calling and connected to the panel from remote, press 600220#
Method three:
Send SMS message 1234600220#
Syntax:
【60 】+【00-99
zone number 】+
【1-8 Type 】+
【0/1 】+【#】
Set mode of wired
alarm zone
Set wired alarm zone to NO or NC. The zone number of 51-54 are
wired defense zones, system default is 51-54 are wired zones with NO
mode.

- 10 -
0 means NO and 1 means NC
NO means short-circuit to alarm
NC means open-circuit to alarm
Example: Set 51 zone to NC,
Method one:
# Key enters the configuration mode, press 61511#
* Then press # To exit Setup.
Method two:
After calling and connected to the panel from remote, press 61511#
Method three:
Send SMS message 123461511#
Remark: On the back pane of the alarm panel
51 = zone 1 and labelled Z1 52 = zone 2 and labelled Z2
53 = zone 3 and labelled Z3 54 = zone 4 and labelled Z4
Syntax:
【61 】+【zone
number 51-54 】+
【0/1 】+【#】
Door Sensor
Two-way ON/OFF
[0/1]: 0 means OFF,1 means ON. Default is OFF.
E.g. : Set door sensor two-way Alarm function ON
1. Press [#] on the keypad and then press [631#]
2. Remote calling the alarm panel, input [password]+[#] to enter
setting status, then press [631#]
3. Send SMS message [1234631#]
Command:
[63]+[0/1]+[#]
Alarm Panel AC
Power Disconnect
SMS Send ON/OFF
[0/1]: 0 means OFF, 1 means ON. Default is ON
E.g. : User need SMS send when AC power disconnect..
1. Press [#] on the keypad and then press [641#]
2. Remote calling the alarm panel, input [password]+[#] to enter
setting status, then press [641#].
3. Send SMS message [1234641#]
Command:
[64]+[0/1]+[#]
SMS Sent ON/OFF
When Arm/Disarm
[0/1]: 0 means OFF,1 means ON
E.g. : SMS Sent When Arm/Disarm
1. Press [#] on the keypad and then press [681#]
2. Remote calling the SIM card number, input [password]+[#] to enter
setting status, then press “681#”.
3. Send SMS message “1234681#”
Command:
[68]+[0/1]+[#]
Set audible
confirmation from
panel to on or off
Alarm panel will produce audible confirmation beep upon receipt of
signal from remote control. 1 is on, 0 is off, default is on.
Example: users need to disable the audible confirmation.
Method one:
# then press 110# , press the * then press # Exit Setup
Method two:
After calling and connected to the panel from remote, press 110#
Method three:
Send SMS messages1234110#
Syntax:
【11】+【0/1 】+
【#】
Siren volume
adjustment
Valid value is from 00 to 99 as largest, system default is the largest.
Example: users need to set volume to 50 。

- 11 -
Method one:
# , and then press 1450# , press the * then press # Exit Setup
Method two:
After calling and connected to the panel from remote, press 1450#
Method three:
Send SMS message 12341450#
Syntax:
【14 】+【00-99 】
+【#】
Restore factory setting
This command user for restore to factory settings (delete all preset
settings such as telephone No., delete alarm/arm delay, turn off
telephone line self-checking function, etc. Password turn to default
1234). But it will not delete remote control and detectors.
1. Press [#] on the keypad and then press [9898#]
2. Remote calling the alarm panel, input [password]+[#] to enter
setting status, then press [9898#]
3. Send SMS message [12349898#]
Syntax:
【9898 】+【#】
Total System Reset
Disconnect power to the alarm panel, turned off the battery switch alarm
panel, then press and hold the alarm panel of ARM button while power-on.
The system will respond with short “beep” slowly for 5 seconds, then can
release ARM button. The system is now totally reset. All configuration has
been cleared, all sensors and remote controlled are deleted and password is
restored to original 1234.
Syntax:
Press and hold the
ARM button on the
keyboard and power
on.
Note: Other than the SMS commands for assigning specific phone number for certain zone, alarm panel
will respond to all other SMS commands by replying confirmation of setting by SMS.
4.2 Commands of System Enquiry
Press button on panel to enter the query mode, alarm panel status LED is blinking. Then put in
commands as detailed in table below, when finished, Press *, and then press #, to exit the query mode.
Note: In case keyboard password protection is enabled, please enter tne password to unlock before other
commands.
Query for voice alarm
phone number
To query the alarm panel currently saved to the first set to the Nineth group
voice alarm phone number.
Press alarm panel query key of your keyboard, then blinking status LED on
the Panel, and then press 31#, the alarm panel LCD show 13812345678
means alarm panel's first set of alarm numbers are 13812345678
Syntax:
3+【1-9 】+【#】
Query SMS message
To query the alarm panel currently saved to the first set to the sixth group
Keyboard password
protection feature
To enable the password protect of keyboard. System default password
is 1234, defaultis set to off. Alarm panels will display "Key lock" when
keyboard is locked
Example: keyboard users need to set the password protection.
Method one:
# , and then press 171# , press the * then press # Exit Setup
Method two:
After calling and connected to the panel from remote, press 171#
Method three:
Send SMS message 1234171#
Syntax:
【17 】+【0/1 】+
【#】

- 12 -
alarm phone number
phone number on the alarm panel for SMS messages.
Press alarm panel query key of your keyboard, then blinking status LED on
and then press 41#, the alarm panel LCD show 13812345678 means the
first set of SMS message is 13812345678
Syntax:
4+【1-6 】+【#】
Query password
Used to query the current password of the alarm panel , Press alarm panel
query key of your keyboard, then blinking status LED on and then press
50#, the alarm panel LCD show 1234. alarm panel your current password
is 1234 . Press # to clear the screen, press * then press # to exit the query
mode.
Syntax:
50 +【#】
Query the time for delay
arm
Query delay time for arm (00-99) Seconds
Press alarm panel query key of your keyboard, then blinking status LED on
and then press 51#, the alarm panel LCD show 00 mean time for delay is 0
second.
Syntax:
51 +【#】
Query delay time for
alarming
To query the alarm delay time (00-99) Seconds
Press alarm panel query key of your keyboard, then blinking status LED on
and then press press 52#, the alarm panel LCD show 00 mean time for
delay is 0 second.
Syntax:
52+【#】
Query siren sounding
time for alarming
To query the siren sounding time (00-20) minutes when the alarming.
Press alarm panel query key of your keyboard, then blinking status LED on
and then press 53#, the alarm panel LCD show 01 mean time for delay is 1
minute.
Syntax:
53+【#】
Query remote control
audible confirmation
For query the setting of remote control 00-99 for the audible confirmation
to command.
Press alarm panel query key of your keyboard, then blinking status LED on
and then press 5501#, the alarm panel LCD show ON means remote
control 1 is set to sound upon receipt of command.
Syntax:
55+【00-99 】+【#】
Query the scheduled
time for arm and disarm
Used to query first to fourth set of scheduled time for arm and disarm.
Press alarm panel query key of your keyboard, then blinking status LED on
and then press 5701# to query the first of scheduled arm and disarm, the
alarm panel LCD show ” Mon, Tue, 22-00 07-00” means schedule set as
Monday and Tuesday 22:00 pm arm and 07:00 am disarm.
Syntax:
57+【01 -04 】+
【#】
Query type wireless
defense zone
For query the zone types of 00-99.
The alarm panel LCD show the name of type of zone, detail about zone
types can be referred to another section of manual, the word “ON” or
“OFF” next to the zone type represents whether siren will sound upon
alarming.
Syntax:
60+【00 -99 】+
【#】
Query the type of wired
zones
For query the zone type of 51-54.
Example: Press alarm panel query key of your keyboard, then blinking
status LED on and then press 6151# to query 51 zone alarm type, show
NO means short-circuit to alarm while show NC means open circuit to
alarm.
Syntax:
61+【51 -54 】+
【#】
Query alarm panel
arm/disarm records
The system can save up to the most recent 72 disarmed records.
Press alarm panel query key of your keyboard, then blinking status LED on
and then press 9901#, press 8 to scroll up and 0 to scroll down for records.
Syntax:

- 13 -
Other indications as:
JP = arm/disarm from keyboard
YC = arm/disarm from remote
tP = interference alert
01 = remote control number 1
9901+【#】
Query alarm panel
alarming records
The system can save up to the most recent 102 alarming records.
Press alarm panel query key of your keyboard, then blinking status LED on
and then press 9900#, press 8 to scroll up and 0 to scroll down for records.
Example: Screen shows 01-01 22-02 02 alarm, which means alarm happened
on 1st January 22:02pm at zone 2.
Syntax:
9900+【#】
4.3 SMS Commands
The following instructions are only for SMS command to control panel remotely:
Remote SMS disarm
Send SMS message 12340# into alarm panel
Note: 1234 is the password
0#
Remote SMS NORMAL
arm
Send SMS messages 12341# to set the alarm panel to ARM
1#
Remote SMS STAY arm
Send SMS message 12342# to set alarm panel to STAY ARM.
2#
Query the AC power
Send SMS messages 12346# to the alarm panel, the alarm panel replies AC
power ON or AC power OFF.
6#
Query the alarm panel
general settings
Query the alarm panel status included: arm/disarm, relay status, status of
integrated alarm, status of SMS messaging, status of remote operation,
password, delay alarming setting, delay arm setting, length of time of siren
sounding, volume of siren, keyboard locking status, audible confirmation
Example: Send SMS message 123411# to the alarm panel, the alarm panel
replies with a list of related setting:

- 14 -
Arming →arm status
Relay out off →relay off
Alarm out on →integrated alarm on
Send SMS on→SMS messaging on
Remote set on→remote operation on
Password:1234→the password is 1234
Alarm delay:00s→delay alarming 0 second
Arm delay:00s→delay arm 0 second
Siren on 1 min→siren sounding time 1 minute
Siren VOL:99→volume of siren 99
Key lock off →keyboard not lock
Voice on →voice on
11+ 【#】
Query voice alarm
phone number
Return a list of 1st to 9th phone number group for voice alarm.
Example: Send 12343001# to the alarm panel, the alarm panel replies "
Group 1 phone number: 13712345678” means the first voice alarm phone
number is 13712345678
30+ 【01-09 】+【#】
Query phone number for
SMS message
Query first to sixth group of phone number for SMS message.
Example: Send 12344001# to the alarm panel, the alarm panel replies
"Group 1 SMS number: 13888889999” means alarm the 1st phone number
for SMS message is 13888889999.
40+ 【01-06 】+【#】
Querying alarm panel
system time
Query alarm panel system time
Example: Send 123456# to the alarm panel, the alarm panel replies
“System clock :2011-07-01 12:00”. Means the system is now 1st of July of
2011 12 :00 :00 am.
56+ 【#】
Check the status of
scheduled arm/disarm
Query the four group of the scheduled arm and disarm
Example: 12345701# to the alarm panel, the alarm panel replies:
Group 1 timing:
Arm time:22:00
Disarm time:07:00
Arm/Disarm week:12345
Zone range:00-99
Means: the first group scheduled time to arm at 22 :00 pm and disarm
at 07 :00 am, this is valid for Monday, Tuesday, Wednesday, Thursday
and Friday of each week. control 00-99 defense zone
57+ 【01-04 】+【#】
Check the type and siren
setting of wireless
defense zone
Query the type and siren setting of certain wireless defense zone
Example: Send message 12346001# to the alarm panel, the alarm panel
replies”01 zone is wireless zone, zone type: normal; siren ON”
60+ 【00-99 】+【#】
Check the settings of
wired defense areas
Query the alarm panel for settings of zone 51 -54 wired zone.
Example: send text message 12346151# to the alarm panel, the alarm panel
replies”51 zone is wired zone, zone type : normal; siren ON; alarm type:
NO”
61+ 【51-54 】+【#】

- 15 -
80+ 【00-99 】+ "Panel
with SMS message"+
【#】
Used to customize the SMS message for zone 00-99.
Example: Send message “12348001 Front Door Alarm#” to the alarm
panel will set alarm panel to send SMS message “Front Door Alarm” upon
zone 01 alarm being triggered.
Note: Maximum length of message is 25 characters.
Query the customized
SMS message content
Query zone 00-99 the content of SMS message customized.
Example: Send 12348101# to the alarm panel to query for zone 01
message content.
81+ 【00-99 】+【#】
Note: "1234" string shown above table all represents the password. User can change password and thus
should adjust the commands listed accordingly.
Remark:
This machine can be used as a mobile for conversation. To do that, on the keyboard, put in
#0013812345678# where 13812345678 is the phone number you’re going to connect. At the end of
your call, press DISARM key, press *, then press # to exit.
5.1 After receiving the Panel Alert:
After Panel alerts, it will automatically dial the preset phone number for three times until connected.
When the user picks up the phone, a piece of pre-recorded voice message will be played back
immediately and let the receiver noted about the event. Upon receiving the call, it can also control the
alarm panel remotely via the phone (according to the command below). User will not be asked for
password upon connected and alarm will automatically hang up call within receiving any instruction
within 20 seconds.
[1] key: arming [2] key: disarming
[3] key: monitoring open [4] key: monitoring closed
[5] key: turn on announcement [6] key: turn off announcement
[7] key: siren ringing [8] key: stop siren sound
[9] key: turn on relay [0] key: turn off relay
[*] key: hang up, system will not dial the next number on list.
Remark:
If not hang up using [*] key or disarm using [2] key, the system will retry to call the next phone numbers
on list until one connected.
Panel will not ask for password when dialing out upon alarming.
5.2 Remote Dialing In Operation:
Remote-control operations can be done via any phone. You can just dial into the alarm panel and user will
be asked for password upon connected and alarm will automatically hang up call within receiving any
instruction within 20 seconds or password is incorrect. (original password 1234)
[1] key: arming [2] key: disarming
[3] key: monitoring open [4] key: monitoring closed
[5] key: turn on announcement [6] key: turn off announcement
[7] key: siren ringing [8] key: stop siren sound
[9] key: turn on relay [0] key: turn off relay
[*] key: hang up,
[#] key: Enter the system remote configuration mode, Without receiving no instruction, the panel will
automatically hang up after 20 seconds.

- 16 -
6.1 Definitions of Zones
The alarm supports 99 distinguishable defense zones and they can be classified into one of the 8 Zone
Types with their respective characteristics.
Type
ID
Zone Type
Interpretation
1
NORMAL Defense
Zone
the Panel only works on the arming status. When disarming,
there is no response.
2
STAY Defense zone
(AT-HOME Defense
zone)
can be shut off solely through the remote control (keyboard) to
avoid the Infrared Detectors and other in-room detectors from
misinformation when master is resting at home.
3
INTELLIGENT Defense
zone:
if the detector in the Defense zone is triggered only once, it will
not immediately alarm. But if being triggered once again within
30 seconds after the first triggering, it will alarm immediately.
4
EMERGENCY Defense
zone:
no matter on arming or disarming status, if detector is triggered it
will alert. Usually used in connecting with Smoke Detectors, Gas
Detectors and emergency button, etc.
5
CLOSED Defense zone:
no matter arming or disarming status, detectors will not alert
even being triggered.
6
CHIME Zone
No matter in what status, when sensor with this zone is triggered,
a welcome door bell will be ring as notification.
7
WELCOME Zone
Only work on the arming status, when sensor with this zone is
triggered, a welcome voice message will be played.
8
HELP SENIOR Defense
Zone
This type of zone is for elderly safety, no matter in what status,
the panel will alarm once sensor with this zone type is triggered.
6.2 Fitting parameters:
- Input voltage: DC9V-12V
- Standby currents: < 25 mA
- Alarm current: <450 mA
Wireless frequency: 315/433MHZ ,2262/1.5-4.7M ,EV1527/300K
- GSM Format: Support GSM850/900/1800/1900MHz (option)
Backup battery: Lithium battery DC7.2V
Alarm loudness: 110dB
Detailed parameters: The alarm should be compatible with PT2262, PT2240 and EV1527. Using PT2262
encoding, the resistance is recommended 1.5M-4.7M; using with EV1527 encoding, the resistance by
300K.
7、APP Operation Manual
Apple user search “WifiAlarm”
Android user search “WifiAlarm”

- 17 -
After download APP in smart phone, user need to register in APP, click “Register”
button to go to register interface. User can choose phone number or email and
enter password, then click“ Register” to save settings. Then user can log-in the
APP to do operation.
1.Add device
1). add the device,press “Device”(at the bottom of the page),
2)device name you can make a name yourself, just like “home”, “office” or any others. (since you
might have two alarm systems need to be controlled with one smart phone. One alarm in home
and the other one in office)
P.S.: One APP supports more than one alarm system
3). Device number is the phone number of the sim card which you already put inside the alarm
system.
4). Device password is the password of alarm system, the factory setting is 1234
2.Operate
Back to the first home page,choose the device you added just now,then you can operate it.
Pictures in next page
Table of contents
Other GSM Security System manuals