manuals.online logo
Brands
  1. Home
  2. •
  3. Brands
  4. •
  5. GTV
  6. •
  7. Lighting Equipment
  8. •
  9. GTV LD-KONML-RGBW-PIL User manual

GTV LD-KONML-RGBW-PIL User manual

GTV Poland spółka z ograniczoną odpowiedzialnością sp.k., ul. Przejazdowa 21, 05-800 Pruszkow, Poland, inf[email protected]
Ул. Пшеяздова, 21, 05-800, Прушкув, Польша 1
PL PILOT RF 4-strefowy RGB/RGBW / EN 4-zone RGB/RGBW RF remote control /
DERF 4-Zonen RGB/RGBW FERNBEDIENUNG / RU 4-х зонный пульт RF RGB/RGBW /
FR TÉLÉCOMMANDE RF 4 zones RGB/RGBW
LD-KONML-RGBW-PIL 50 g 5902801200380
PL Instrukcja montażu / EN Assembly instruction / DE Montageanleitung / RU Инструкция
по установке / FR Instruction de montage:
1
5
3
7
E1
E3
2
6
4
8
E2
E4
D1
D2
D3
D4
D5
E1
--
+
+
1
2
3
4
7
E2
E3
E5
E6
E7
5
6
+
-
D6
D7
E4
E8
D8
D1
D2
D3
D4
D5
E1
--
+
+
1
2
3
4
7
E2
E3
E5
E6
E7
5
6
+
-
D6
D7
E4
E8
D8
D1
D2
D3
D4
D5
E1
--
+
+
1
2
3
4
7
E2
E3
E5
E6
E7
5
6
+
-
D6
D7
E4
E8
D8
D1
D2
D3
D4
D5
E1
--
+
+
1
2
3
4
7
E2
E3
E5
E6
E7
5
6
+
-
D6
D7
E4
E8
D8
D1
D2
D3
D4
D5
E1
--
+
+
1
2
3
4
7
E2
E3
E5
E6
E7
5
6
+
-
D6
D7
E4
E8
D8
D1
D2
D3
D4
D5
E1
--
+
+
1
2
3
4
7
E2
E3
E5
E6
E7
5
6
+
-
D6
D7
E4
E8
D8
D1
D2
D3
D4
D5
E1
--
+
+
1
2
3
4
7
E2
E3
E5
E6
E7
5
6
+
-
D6
D7
E4
E8
D8
D1
D2
D3
D4
D5
E1
--
+
+
1
2
3
4
7
E2
E3
E5
E6
E7
5
6
+
-
D6
D7
E4
E8
D8
D1
D2
D3
D4
D5
E1
--
+
+
1
2
3
4
7
E2
E3
E5
E6
E7
5
6
+
-
D6
D7
E4
E8
D8
D1
D2
D3
D4
D5
E1
--
+
+
1
2
3
4
7
E2
E3
E5
E6
E7
5
6
+
-
D6
D7
E4
E8
D8
D1
D2
D3
D4
D5
E1
--
+
+
1
2
3
4
7
E2
E3
E5
E6
E7
5
6
+
-
D6
D7
E4
E8
D8
D1
D2
D3
D4
D5
E1
--
+
+
1
2
3
4
7
E2
E3
E5
E6
E7
5
6
+
-
D6
D7
E4
E8
D8
E5
E7
E6
E8
PL
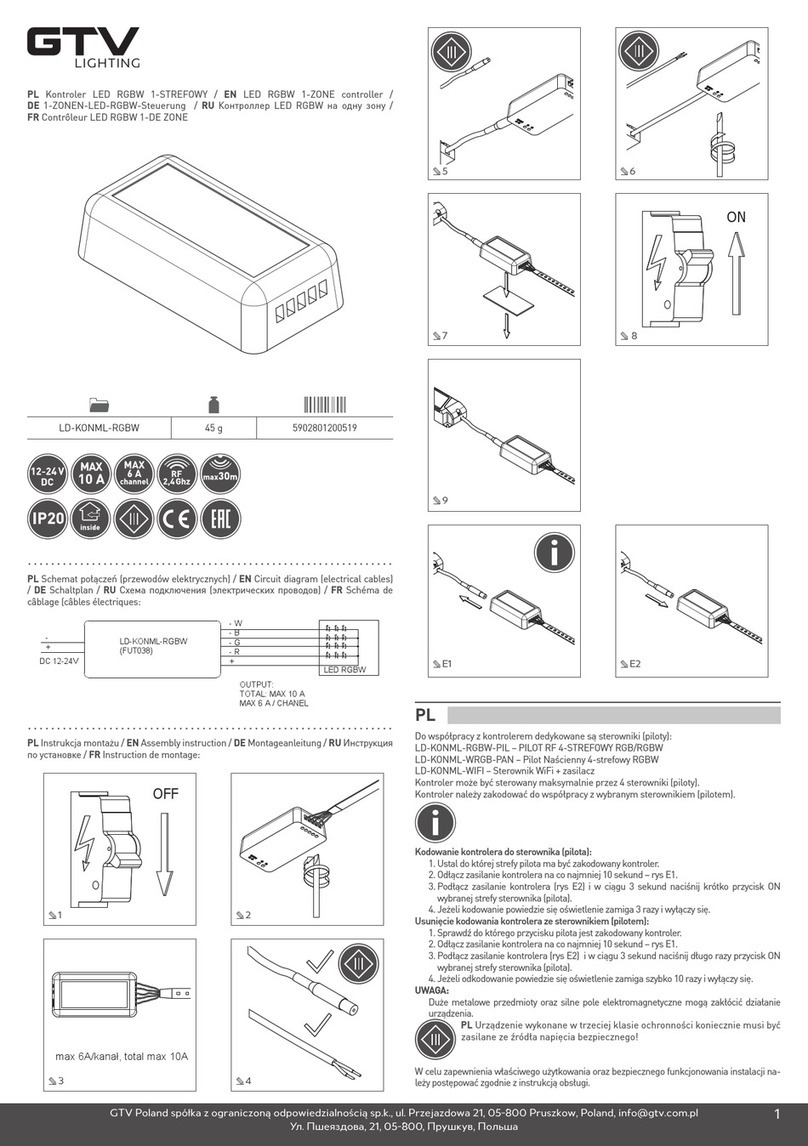
Do współpracy z pilotem dedykowane są kontrolery:
LD-KONML-RGBW – kontroler LED RGBW 1-STREFOWY
Pilot może sterować wieloma kontrolerami. Natomiast kontroler może być sterowany
maksymalnie przez 4 sterowniki (piloty).
Pilot należy zakodować do współpracy z wybranym kontrolerem.
Funkcje przycisków (Rys 8):
1. Wyłącznik Master ( do wszystkich stref), przytrzymaj długo aby załączyć kolor biały dla
wszystkich stref
2. Wybór koloru RGB
3. Lampka kontrolna
4. Wybór jasności
5. Wybór programu
6. Wybór szybkości programu
D1
D2
D3
D4
D5
E1
--
+
+
1
2
3
4
7
E2
E3
E5
E6
E7
5
6
+
-
D6
D7
E4
E8
D8
D1
D2
D3
D4
D5
E1
--
+
+
1
2
3
4
7
E2
E3
E5
E6
E7
5
6
+
-
D6
D7
E4
E8
D8
D1
D2
D3
D4
D5
E1
--
+
+
1
2
3
4
7
E2
E3
E5
E6
E7
5
6
+
-
D6
D7
E4
E8
D8
D1
D2
D3
D4
D5
E1
--
+
+
1
2
3
4
7
E2
E3
E5
E6
E7
5
6
+
-
D6
D7
E4
E8
D8
GTV Poland spółka z ograniczoną odpowiedzialnością sp.k., ul. Przejazdowa 21, 05-800 Pruszkow, Poland, inf[email protected]
Ул. Пшеяздова, 21, 05-800, Прушкув, Польша
GTV Poland spółka z ograniczoną odpowiedzialnością sp.k., ul. Przejazdowa 21, 05-800 Pruszkow, Poland, inf[email protected]
Ул. Пшеяздова, 21, 05-800, Прушкув, Польша
2
7. Wyłączniki stref 1-4; przytrzymaj długo aby załączyć kolor biały dla wybranej strefy;
przycisk kodowania pilot-kontroler
Aby sterować wszystkimi strefami naciśnij Master ON (I). Abu sterować wybraną strefą naciśnij
ON (I) dla wybranej strefy.
Aby włączyć oświetlenie nocne (maksymalnie ściemnione) naciśnij i przytrzymaj OFF Master
lub OFF wybranej strefy.
Kodowanie kontrolera do sterownika (pilota):
1. Ustal do której strefy pilota ma być zakodowany kontroler
2. Odłącz zasilanie kontrolera na co najmniej 10 sekund – rys E1
3. Podłącz zasilanie kontrolera (rys E2) i w ciągu 3 sekund naciśnij krótko przycisk ON
wybranej strefy sterownika (pilota) – rys E3.
4. Jeżeli kodowanie powiedzie się oświetlenie zamiga 3 razy i wyłączy się (rys E4)
Usunięcie kodowania kontrolera ze sterownikiem (pilotem):
1. Sprawdź do którego przycisku pilota jest zakodowany kontroler
2. Odłącz zasilanie kontrolera na co najmniej 10 sekund – rys E5
3. Podłącz zasilanie kontrolera (rys E6) i w ciągu 3 sekund naciśnij długo przycisk ON
wybranej strefy sterownika (pilota) – rys E7.
4. Jeżeli odkodowanie powiedzie się oświetlenie zamiga szybko 10 razy i wyłączy się – rys E8
UWAGA:
Duże metalowe przedmioty oraz silne pole elektromagnetyczne mogą zakłócić działanie
urządzenia.
W celu zapewnienia właściwego użytkowania oraz bezpiecznego funkcjonowania instalacji
należy postępować zgodnie z instrukcją obsługi.
• Należy zawsze wyłączyć zasilanie przed przystąpieniem do instalacji, konserwacji, czy
naprawy urządzenia.
• Instalację może wykonywać wyłącznie personel posiadający stosowne uprawnienia.
• Instalacji należy dokonać zgodnie z obowiązującymi przepisami.
Gwarancja nie obejmuje wad powstałych w wyniku instalacji urządzenia niezgodnie z instrukcją,
naprawy lub modyfikacji przez osoby nieuprawnione. Gwarancja nie obejmuje wad powstałych
w wyniku uszkodzeń mechanicznych oraz na skutek przepięć pochodzących z sieci zasilającej.
Producent nie ponosi odpowiedzialności z tytułu uszkodzeń i szkód będących rezultatem
niewłaściwego (niezgodnego z niniejszą instrukcją) zastosowania urządzeń. Jakakolwiek
modyfikacja konstrukcji lub specyfikacji technicznej wyłącza odpowiedzialność producenta.
Częstotliwość emisji 250 kHz. Maksymalna moc emisji 6 dBm.
GTV Poland spółka z ograniczoną odpowiedzialnością sp. k. niniejszym oświadcza, że
urządzenie radiowe typ: LD-KONML-RGBW-PILPilot RF 4-strefowy RGB/RGBW jest zgodny
zdyrektywą 2014/53/UE. Pełny tekst deklaracji zgodności UE jest dostępny pod następującym
adresem internetowym: www.gtv.com.pl
EN
The following controllers are designed to be paired with remote control:
LD-KONML-RGBW 1-ZONE RGBW LED controller
The remote control can work with multiple controllers. However, the controller can be
controlled by up to four remote controls.
The remote control should be coded for being paired with the selected controller.
Button functions (Picture 8):
1. Master ON switch, hold on long time to turn on the white color for all zones
2. RGB colour change
3. Control lamp
4. Brightness adjustment
5. Zone change
6. Programme speed choice
7. Zone switches 1-4; hold long time to turn on the white color for the selected zone;
pilot-controller coding button
To control all zones, press Master ON (I). To control the selected zone, press ON (I) for the
selected zone.
To turn on the night light (maximally dimmed) press and hold OFF All or OFF for the selected zone.
Controller coding to the remote control:
1. Determine to which remote control zone the controller should be coded
2. Disconnect the controller’s power supply for at least 10 seconds - Picture E1
3. Connect the controller’s power supply (Picture E2) and press the ON button within
3seconds of the selected zone of the remote control - Picture E3.
4. If coding succeeds, the lighting will flash 3 times and turns off - Picture E4
Removal of controller’s coding from the remote control:
1. Check to which button of the remote control the controller is coded
2. Disconnect the controller’s power supply for at least 10 seconds - Picture E5
3. Connect the controller’s power supply (Picture E6) and press the ON button quickly
5times within 3 seconds of the selected zone of the remote control - Picture E7.
4. If decoding succeeds, the lighting will flash quickly 10 times and turns off - Picture E8
WARNING:
Large metal objects and strong electromagnetic fields can disrupt the work of device.
In order to ensure proper use and safe operation of the installation please follow the
instructions for use.
• Always turn the power off before proceeding with installation, maintenance, or device
repairs.
• Installation may only be performed by authorized personnel.
• Installation should be done in accordance with applicable regulations.
The warranty does not cover defects resulting from the installation of the device contrary to the
instructions, repair or modification by unauthorized personnel. The warranty does not cover
defects arising as a result of mechanical damage and due to overvoltages coming from the
power supply network.
The producer is not liable for physical damages and also damages being the result of improper
use of devices (not in accordance with this manual). Any modification of the device or technical
specification excludes the producer’s liability.
The product meets the requirements of the European Union legislation, including
in particular Regulation (EU) 2017/1369 of the European Parliament and of the Council of 4 July
2017 setting a framework for energy labelling and implementing legislation
into domestic law. More information is available at www.gtv.com.pl and in
declarations of conformity
Frequency band(s) 250 kHz. Maximum radio-frequency power
transmitted inthe frequency band(s) 6 dBm.
GTV Poland spółka z ograniczoną odpowiedzialnością sp. k. hereby declares that
radio device type: LD-KONML-RGBW-PIL4-zone RGB/RGBW RF remote control complies
with Directive 2014/53 / EU. Full
text of the EU declaration of conformity is available at the following Internet address:
www. gtv.com.pl
DE
Für die Nutzung mit der Fernbedienung sind folgende Steuerungen vorgesehen:
LD1-ZONEN LED Steuerung KONML-RGBW - RGBW
Die Fernbedienung kann mehrere Steuerungen steuern. Die Steuerung kann dagegen von bis
zu 4 Fernbedienungen bedient werden.
Für die Nutzung mit der ausgewählten Steuerung muss die Fernbedienung kodiert werden.
Tastenfunktionen (Abb. 8):
1. Halten Sie den Masterschalter (für alle Zonen) lange gedrückt, um Weiß für alle Zonen
einzuschalten.
2. Auswahl der RGB-Farbe
3. Kontrollleuchte
4. Auswahl der Helligkeit
5. Programm- Auswahl
6. Auswahl der Programmgeschwindigkeit
7. Schalter für Zonen 1-4; halten Sie ihn lange gedrückt, um Weiß für die ausgewählte Zone
zu aktivieren; Codiertaste der Fernbedienung mit der Steuerung
Drücken Sie Master ON (I), um alle Zonen zu steuern. Um die ausgewählte Zone zu steuern,
drücken Sie ON (I).
Halten Sie OFF-Mastertaste oder OFF der ausgewählten Zone gedrückt, um das Nachtlicht
einzuschalten (maximal gedimmt).
Kodierung der Steuerung an die Fernbedienung:
1. Bestimmen Sie, für welche Fernbedienungszone die Steuerung kodiert werden soll.
2. Trennen Sie die Steuerung für mindestens 10 Sekunden von der Stromversorgung - Abb. E1.
3. Schließen Sie die Stromversorgung an die Steuerung an (Abb. E2) und drücken Sie
innerhalb von 3 Sekunden kurz die ON-Taste der ausgewählten Zone der Fernbedienung
– Abb. E3.
4. Bei erfolgreicher Codierung blinkt die Beleuchtung drei Mal und schaltet sich dann aus
(Abb. E4).
Löschen der Kodierung der Steuerung von der Fernbedienung:
1. Überprüfen Sie, auf welche Taste der Fernbedienung die Steuerung kodiert ist.
2. Trennen Sie die Steuerung für mindestens 10 Sekunden von der Stromversorgung - Abb. E5.
3. Schließen Sie die Stromversorgung an die Steuerung an (Abb. E6) und drücken Sie innerhalb
von 3 Sekunden die ON-Taste der ausgewählten Zone der Fernbedienung – Abb. E7.
4. Wenn die Dekodierung erfolgreich ist, blinkt die Beleuchtung 10 Mal schnell und schaltet
sich dann aus - Abb. E8.
ACHTUNG:
Große Metallgegenstände und starke elektromagnetische Felder können den Betrieb des
Gerätes stören.
Beachten Sie die Bedienungsanleitung, um den ordnungsgemäßen Gebrauch und den
sicheren Betrieb der Anlage zu gewährleisten.
• Schalten Sie die Stromversorgung immer aus, bevor Sie das Gerät installieren, warten
oder reparieren.
• Die Montage darf nur vom Personal mit entsprechenden Berechtigungen durchgeführt
werden.
• Die Montage soll in Übereinstimmung mit geltenden Vorschriften erfolgen.
Die Garantie umfasst nicht die Mängel, die aus der unsachgemäßen Montage des Geräts
oder aus Reparaturen und Änderungen durch unbefugte Personen resultieren. Die Garantie
erstreckt sich nicht auf Mängel, die durch mechanische Beschädigungen und Überspannungen
aus dem Netz entstehen. Der Hersteller haftet nicht für Schäden, die durch unsachgemäßen
(dieser Anleitung nicht gemäßen) Gebrauch der Geräte entstehen. Jede Änderung der
Konstruktion oder der technischen Spezifikation schließt die Haftung des Herstellers aus.
Emissionsfrequenz 250 kHz. Maximale Emissionsleistung 6 dBm.
GTV Polen spółka z ograniczoną odpowiedzialnością sp. k. erklärt hiermit, dass das Funkgerät
vom Typ: LD-KONML-RGBW-PIL RF 4-Zonen RGB/RGBW Fernbedienung der Richtlinie
2014/53/EU entspricht. Der vollständige Text der EU-Konformitätserklärung ist unter folgender
Internetadresse verfügbar: www.gtv.com.pl
RU
Для работы с пультом дистанционного управления предназначен контроллер:
LD-KONML-RGBW светодиодный контроллер RGBW на одну зону
Пульт дистанционного управления может управлять несколькими контроллерами. Тем не
менее, контроллером может управлять
до четырех пультов дистанционного управления.
Пульт дистанционного управления должен быть закодирован для работы с выбранным
контроллером.
GTV Poland spółka z ograniczoną odpowiedzialnością sp.k., ul. Przejazdowa 21, 05-800 Pruszkow, Poland, inf[email protected]
Ул. Пшеяздова, 21, 05-800, Прушкув, Польша
GTV Poland spółka z ograniczoną odpowiedzialnością sp.k., ul. Przejazdowa 21, 05-800 Pruszkow, Poland, [email protected]
Ул. Пшеяздова, 21, 05-800, Прушкув, Польша 3
Функции кнопок (рис. 8):
1. Главный переключатель (для всех зон), долго удерживайте нажатым, чтобы включить
белый цвет для всех зон
2. Выбор цвета RGB
3. Контрольная лампа
4. Выбор яркости
5. Выбор программы
6. Выбор скорости программы
7. Зональные переключатели 1-4; придерживайте долго, чтобы включить белый цвет
для выбранной зоны
кнопка кодирования пилота-контроллера
Для управления всеми зонами нажмите Master ON (I). Для управления выбранной зоной
нажмите ON (I) для выбранной зоны.
Чтобы включить ночной свет (максимальное затемнение), нажмите и удерживайте кнопку
OFF All или OFF выбранной зоны.
Кодирование контроллера на пульт дистанционного управления:
1. Определите, к какой зоне пульта дистанционного управления должен быть
закодирован контроллер
2. Отключите питание контроллера не менее чем на 10 секунд - Рисунок E1
3. Подключите источник питания контроллера (Рисунок E2) и нажмите кнопку ON
втечение 3 секунд для выбранной зоны пульта дистанционного управления - рис E3.
4. Если кодирование выполнено успешно, освещение мигнет 3 раза и погаснет
-Рисунок E4
Снятие кодировки контроллера с пульта дистанционного управления:
1. Проверьте, к какой кнопке на пульте дистанционного управления закодирован
контроллер
2. Отключите питание контроллера не менее чем на 10 секунд - Рисунок E5
3. Подключите источник питания контроллера (Рисунок E6) и быстро нажмите кнопку
ON 5 раз в течение 3 секунд для выбранной зоны пульта дистанционного управления
- рис. E7.
4. Если декодирование выполнено успешно, освещение быстро замигнет 10 раз
ипогаснет - рисунок E8
ВНИМАНИЕ:
Крупные металлические предметы и сильное электромагнитное поле может нарушить
работу устройства.
Для обеспечения правильного использования и безопасной работы установки необходимо
следовать инструкции по применению.
• Всегда отключайте питание от сети перед началом установки, обслуживания или
ремонта устройства.
• Установка может выполняться только авторизованным персоналом, имеющим
соответствующие компетенции
• Установка должна выполняться в соответствии с действующими правилами.
Гарантия не распространяется на дефекты, возникшие в результате установки устройства
вопреки инструкции, в случае ремонта или модификации лицами без соответствующей
компетенции. Гарантия не распространяется на дефекты, возникающие в результате
механического повреждения и из-за перепадов напряжения электросети.
Производитель не несет ответственности за повреждения и ущерб, возникшие
в результате неправильного (не в соответствии с этой инструкцией) использования
устройства. Любая модификация конструкции или технических параметров исключает
ответственность производителя.
Продукт соответствует требованиям законодательства Европейского Союза, в том
числе, в частности, Регламента Парламента и Совета ЕС 2017/1369 от 4 июля 2017 г.,
устанавливающего рамки энергетической маркировки, и актов, имплементирующих
его в национальное право. Более подробная информация доступна на www.gtv.com.pl
ивдекларациях соответствия
Частота электромагнитного
излучения 250 кГц
Максимальная излучаемая
мощность 6 дБм
GTV Poland spółka z ograniczoną odpowiedzialnością sp. k. настоящим заявляет, что
тип радиоустройства: LD-KONML-RGBW-PIL4-х зонный пульт RF RGB/RGBW
соответствует Директиве 2014/53 / EU. Полный текст декларации соответствия ЕС
доступен на следующей интернет-странице: www.gtv.com.pl
FR
Les contrôleurs sont dédiés pour fonctionner avec une télécommande:
LD-KONML-RGBW - contrôleur de LED RGBW 1-ZONE
La télécommande peut contrôler plusieurs contrôleurs. Par contre le contrôleur peut être
commandé au maximum par 4 commandes (télécommandes).
La télécommande doit être programmée pour fonctionner avec le contrôleur sélectionné.
Fonctions des touches (Fig. 8) :
1. Interrupteur principal (pour toutes les zones), maintenez la touche longuement pour
activer le blanc pour toutes les zones
2. Sélection des couleurs RVB
3. Témoin d’alimentation
4. Sélection de la luminosité
5. Sélection du programme
6. Sélection de la vitesse du programme
7. Interrupteurs de zone 1-4 ; maintenez cette touche enfoncée pour activer le blanc pour la
zone sélectionnée ; bouton de programmation de la télécommande associé au contrôleur
Appuyez sur l’interrupteur maître ON (I) pour commander toutes les zones. Appuyez sur ON (I)
pour commander une zone donnée.
Maintenez l’interrupteur maître OFF ou OFF de la zone sélectionnée enfoncée pour allumer la
veilleuse de nuit (le plus sombre possible).
Programmation du contrôleur associé à la commande (télécommande):
1. Déterminez pour quelle zone de la télécommande le contrôleur doit être programmé
2. Débranchez l’alimentation du contrôleur pendant au moins 10 secondes - fig. E1
3. Connecter l’alimentation au contrôleur (fig. E2) et appuyer brièvement sur la touche ON
de la zone sélectionnée de la commande (télécommande) dans un délai de 3 secondes–
fig. E3.
4. Si la programmation est effacée, l’éclairage clignote 3 fois et s’éteint (fig. E4)
Effacement du programme du contrôleur avec la commande (télécommande):
1. Vérifier pour quelle touche de la télécommande le contrôleur est programmé
2. Débranchez l’alimentation du contrôleur pendant au moins 10 secondes - fig. E5
3. Connecter l’alimentation au contrôleur (fig. E6) et appuyer longuement sur la touche ON
de la zone sélectionnée de la commande (télécommande) dans un délai de 3 secondes–
fig. E7.
4. Si la programmation est effacée, l’éclairage clignote 10 fois et s’éteint– fig. E8
ATTENTION:
De gros objets métalliques et de forts champs électromagnétiques peuvent interférer avec le
fonctionnement de l’appareil.
Afin d’assurer un fonctionnement correct et sûr de l’installation, suivre les instructions du
mode d’emploi.
• Toujours mettre l’appareil hors tension avant de l’installer, de l’entretenir ou de le réparer.
• L’installation ne doit être effectuée que par du personnel autorisé.
• L’installation doit être effectuée conformément à la réglementation en vigueur.
La garantie ne couvre pas les défauts résultant d’une installation de l’appareil non conforme
aux instructions, des réparations ou modifications effectuées par des personnes non
autorisées. La garantie ne couvre pas les défauts causés par des dommages mécaniques et
par des surtensions provenant de l’alimentation secteur. Le fabricant n’est pas responsable des
dommages résultant d’une utilisation incorrecte (non conforme à ce manuel) des appareils.
Toute modification de la conception ou des spécifications techniques exclut la responsabilité
du fabricant.
Fréquence d’émission 250 kHz. Puissance d’émission maximale 6 dBm.
GTV Poland société à responsabilité limitée, société en commandite, déclare par la présente
que le type d’appareil radio : LD-KONML-RGBW-PIL La télécommande 4 zones RGB/RGBW
est conforme à la Directive 2014/53/EU. Le texte intégral de la déclaration de conformité de l’UE
est disponible à l’adresse internet suivante : www.gtv.com.pl
GTV Poland spółka z ograniczoną odpowiedzialnością sp.k., ul. Przejazdowa 21, 05-800 Pruszkow, Poland, [email protected]
Ул. Пшеяздова, 21, 05-800, Прушкув, Польша
GTV Poland spółka z ograniczoną odpowiedzialnością sp.k., ul. Przejazdowa 21, 05-800 Pruszkow, Poland, inf[email protected]
Ул. Пшеяздова, 21, 05-800, Прушкув, Польша
4

Other GTV Lighting Equipment manuals

GTV LD-KONML-RGBW User manual

GTV

GTV LD-KONML-RGBW User manual

GTV OS-MARMO25-00 User manual

GTV

GTV OS-MARMO25-00 User manual

GTV FOCUS LD-FO120CB-40 User manual

GTV

GTV FOCUS LD-FO120CB-40 User manual

GTV LD-ZL5RGB150-00 User manual

GTV

GTV LD-ZL5RGB150-00 User manual

GTV SENSA OP-SENZWOKB-10 User manual

GTV

GTV SENSA OP-SENZWOKB-10 User manual

GTV LD-LUM120-30 User manual

GTV

GTV LD-LUM120-30 User manual

GTV LD-LOG16W-LED User manual

GTV

GTV LD-LOG16W-LED User manual

GTV TIAGO LD-TIAGOGU10D-20 User manual

GTV

GTV TIAGO LD-TIAGOGU10D-20 User manual

GTV NEON FLEX User manual

GTV

GTV NEON FLEX User manual

GTV LD-KNG24063-CB User manual

GTV

GTV LD-KNG24063-CB User manual

GTV AVARO PLUS User manual

GTV

GTV AVARO PLUS User manual

GTV BRESSI LB-BRE8W-11-DEC User manual

GTV

GTV BRESSI LB-BRE8W-11-DEC User manual

GTV decor LINEAR LB-LIN7W-10-DEC User manual

GTV

GTV decor LINEAR LB-LIN7W-10-DEC User manual

GTV LARGO OS-LARGP40G-30 User manual

GTV

GTV LARGO OS-LARGP40G-30 User manual

GTV KERTA User manual

GTV

GTV KERTA User manual

GTV OP-PALACEKW-10 User manual

GTV

GTV OP-PALACEKW-10 User manual

GTV BOLERO LD-BLRKW18W-61 User manual

GTV

GTV BOLERO LD-BLRKW18W-61 User manual

GTV LED Roma LD-RO2120N-50 User manual

GTV

GTV LED Roma LD-RO2120N-50 User manual

GTV CAMINO AE-BPW2FCAM-20 User manual

GTV

GTV CAMINO AE-BPW2FCAM-20 User manual

GTV AE-BPW3GS-80 User instructions

GTV

GTV AE-BPW3GS-80 User instructions

Popular Lighting Equipment manuals by other brands

Diode Dynamics STAGE Series manual

Diode Dynamics

Diode Dynamics STAGE Series manual

Kino Flo Diva-Lite 400 Universal Operation manual

Kino Flo

Kino Flo Diva-Lite 400 Universal Operation manual

Stahl YL60/2 Series operating instructions

Stahl

Stahl YL60/2 Series operating instructions

Assurance Emergency Lighting Cold Pack L10-ET-CEC Sereis installation instructions

Assurance Emergency Lighting

Assurance Emergency Lighting Cold Pack L10-ET-CEC Sereis installation instructions

AGM ASCENSION VIRTUOSO 5460P Series operating manual

AGM

AGM ASCENSION VIRTUOSO 5460P Series operating manual

Philip Payne SPRH870 Series quick start guide

Philip Payne

Philip Payne SPRH870 Series quick start guide

American DJ Energy DMX User instruction

American DJ

American DJ Energy DMX User instruction

Qtx Pixel-Bar user manual

Qtx

Qtx Pixel-Bar user manual

Lupo 404 instruction manual

Lupo

Lupo 404 instruction manual

B-K lighting ArtiStar Series STANDARD INSTALLATION

B-K lighting

B-K lighting ArtiStar Series STANDARD INSTALLATION

Pahlen MiniMaster user manual

Pahlen

Pahlen MiniMaster user manual

ARRI DAYLIGHT 18/12 PLUS user manual

ARRI

ARRI DAYLIGHT 18/12 PLUS user manual

Lucci LEDlux 259100 installation instructions

Lucci LEDlux

Lucci LEDlux 259100 installation instructions

DOTLUX 5233 user manual

DOTLUX

DOTLUX 5233 user manual

Hamron 017345 operating instructions

Hamron

Hamron 017345 operating instructions

Jands Vista S3 Setup guide

Jands

Jands Vista S3 Setup guide

AquaScape 84055 installation instructions

AquaScape

AquaScape 84055 installation instructions

American DJ Energy One User instruction

American DJ

American DJ Energy One User instruction

manuals.online logo
manuals.online logoBrands
  • About & Mission
  • Contact us
  • Privacy Policy
  • Terms and Conditions

Copyright 2025 Manuals.Online. All Rights Reserved.