Gundlach Superspreader 636 Datasheet

GUNDLACH
Instructions and Parts List for
No. 636 Superspreader™Frame
Spreads mortar and grout from a standing position in much less time!
For mortar application:
•Superspreader width is adjustable from
24" to 40".
•Up to 20 lineal feet (at a rate of 120 sq. ft.
per minute) of mortar can be trowelled in
less than 30 seconds!
•Evenly distributes mortar in a straight
combed direction. This allows uniform
collapsing of mortar ridges helping assure
100% coverage.
•Uses two 24" Superspreader Trowel Blades
in the forward Spreader Bar.
For grout application:
•Superspreader width is fixed at 24".
•Spreads grout at up to 60 sq. ft. per minute.
•Uses two Superspreader Grout Float
Pads with one pad mounted in the
forward Spreader Bar for joint packing
and the other pad mounted in the rear
Spreader Bar for cleaning excess grout
from the tile.
For both applications:
•Spring loaded Spreader Bars assure
Trowel Blades and Grout Float Pads
always contact the surface.
•Reversible Nylon Skids prevent
premature wear of Frame Angles while
spreading mortar and prevent
scratching tile while grouting.
•Holds 50 pounds (dry weight) of mixed
mortar or grout.
U.S. Patent No. 5,607,256

Item Qty.
Key Number Req. Description
1 636-01 1 Right Hand Frame Angle
2 636-02 1 Left Hand Frame Angle
3 636-03 2 Width Adjustment Tube Assembly
4 636-04 2 Stabilizer Tube Assembly
5 636-05 2 Spreader Bar Assembly
6 636-06 4 7/16" x 1-1/2" Coil Spring
7 636-07 1 12' Strap with Bolt Snaps
8 636-08 2 30" Nylon Skid
9 636-09 4 3" Nylon Wiper
10 636-10 8 1/4-20 x 1-1/2" Phillips Screw
11 636-11 10 1/4-20 Nylon Insert Lock Nut
12 636-12 2 1/4-20 Hex Nut
13 636-13 12 1/4" Washer
14 636-14 8 1/4-20 x 1-1/2" Eye Bolt
15 636-15 2 1/4" x 1-1/2" Eye Screw
16 636-16 6 1/4-20 x 1/2" Weld Screw
17 636-17 6 1/4-20 High Crown Acorn Nut
18 636-18 6 1/4" Washer
19 WGN 6 1/4-20 Wing Nut
20 636-43 2 Superspreader Grout Float Pad
21 636-(notch) 2 Superspreader Trowel Blade
No. 636 Superspreader Frame Parts List
Assembling the No. 636 Superspreader Frame
Tools needed: Phillips screw driver, needle nose pliers and 7/16" open end wrench.
To assemble the Superspreader frame:
1. Lay out the Right Hand Frame Angle (1),
the Left Hand Frame Angle (2) and the
two Width Adjustment Tube Assemblies (3)
to form a square.
2. Install the Width Adjustment Tube
Assemblies (with the locking collar knobs
down as shown) to each Frame Angle
using eight Phillips Screws (10) and eight
Nylon Insert Lock Nuts (11).
Do not
overtighten—which could crush the Width
Adjustment Tube Assembly and prevent
complete closure (to 24") of the
Superspreader.
1
3
10
11
Locking Collar
Locking Collar
14
8
8
14
4
2
12
13
13
3. Thread a Hex Nut (12) onto an Eye Bolt (14) and slide a Washer
(13) onto the Eye Bolt.Then, insert the Eye Bolt in the holes on the
top of the Right Hand Frame Angle and install a Washer (13) and
Nylon Insert Lock Nut (11) to the Eye Bolts. Repeat this step for the
Left Hand Frame Angle.
4. Press a Nylon Skid (8) onto the bottom of each Frame Angle.
5. Install two Stabilizer Tube Assemblies (4) to each Frame Angle
using four 1/4-20 Eye Bolts (14) and four washers (13). Hand
tighten Eye Bolts so they align with slots in the Frame Angles.

5
6
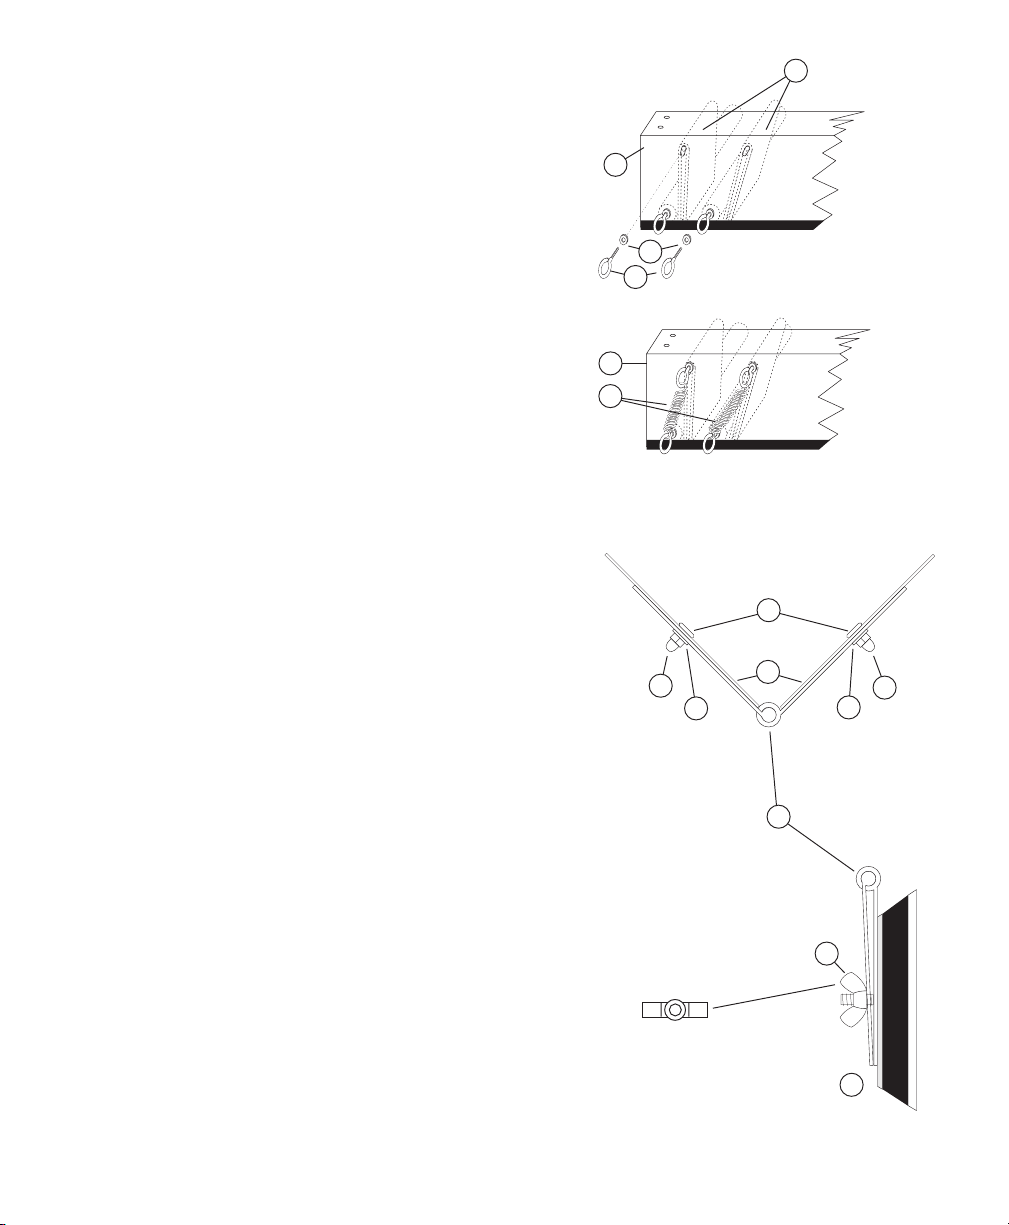
Install Acorn Nuts on outside of
forward Spreader Bar Assembly
for mortar applications.
Install Wing Nuts on back side of
Spreader Bar Assemblies for grout-
ing applications.
After assembly, orient the Wing Nut
horizontally with the Spreader Bar
Assembly to avoid contact with the
Stabilizer Tube Assembly.
Matching
Trowel Blades
Grout Float Pad
17 21
16
19
20
5
18
17
18
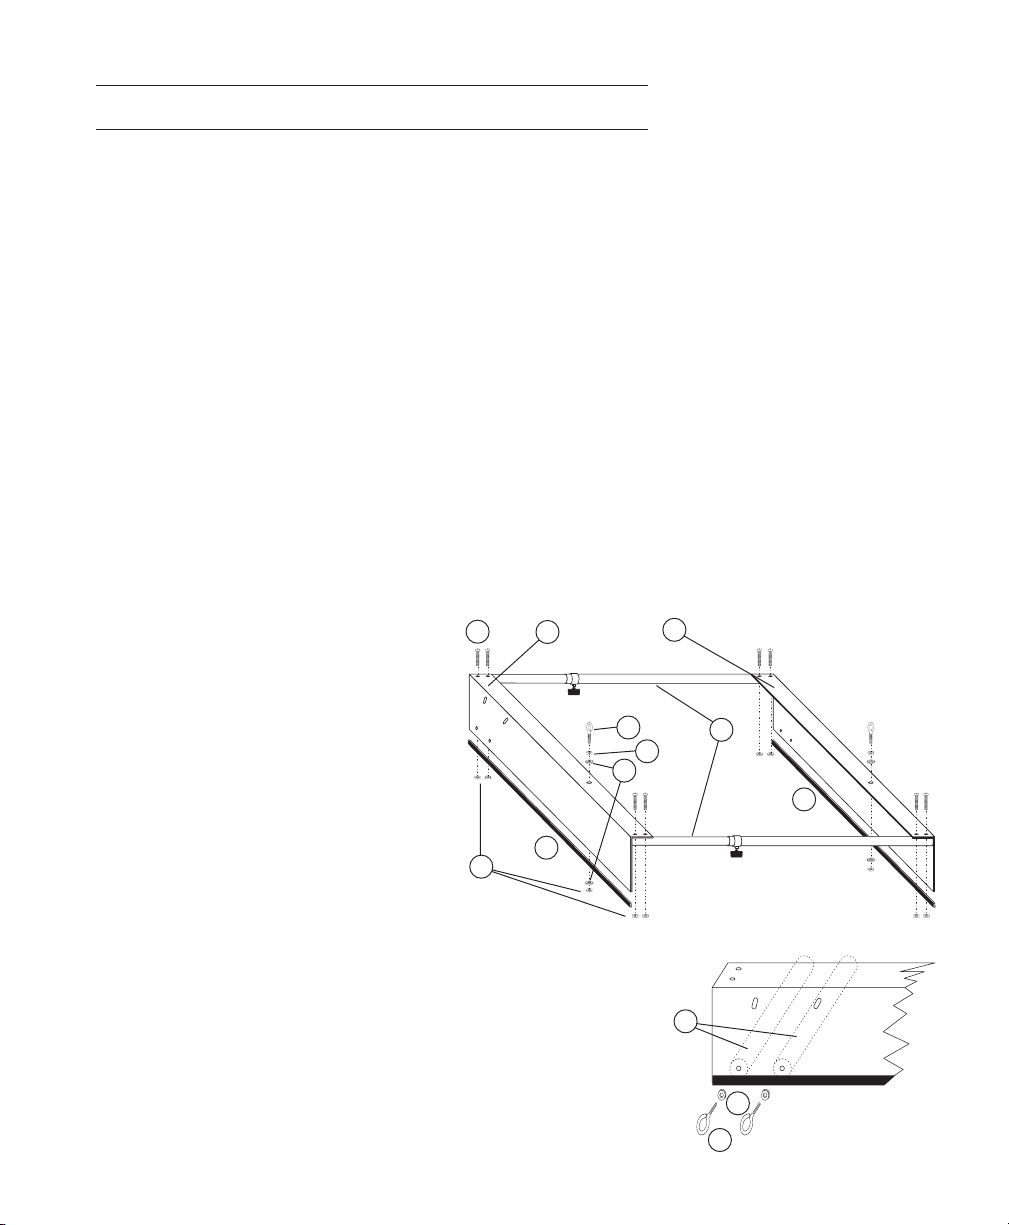
6. Install four 3" Nylon Wipers (9; not shown) to the edges of
both Spreader Bar Assemblies (5) that always contact the
Frame Angles. These four edges are the two edges of both
Spreader Bar Assembly blades with the brass insert, and
the two edges at the opposite end of both Spreader Bar
Assembly blades without the brass insert.
7. Orient Spreader Bar Assemblies so the ends with brass
inserts face the Right Hand Frame Angle (1).
8. Install a Spreader Bar Assembly (5) to the front oblong hole
using a 1/4-20 Eye Bolt (14) and Washer (13) on the end
with the brass insert, and a 1/4" Eye Screw (15) and Washer
(13) on the other end.
9. Repeat Step 8 to install the rear Spreader Bar Assembly.
10. Tighten Eye Bolts and Eye Screws until snug, then back off
about 1/2 turn.The Spreader Bars should move up and down
freely in the oblong holes.
11. Attach four Coil Springs (6) from the Spreader Bar Eye Bolts
to the Stabilizer Tube Eye Bolts on each side of the frame as
shown at right.
12. Attach the Strap with Bolt Snaps (7; not shown) to the Eye
Bolts on the top of the frame.
Setting Up Superspreader System
for Mortar Spreading Application
1. Remove Grout Float Pads. (Store Wing Nuts on the float
studs.)
2. Turn Superspreader Frame over and open forward Spreader
Bar Assembly (5).
3. Orient two matching Trowel Blades (21) so that the ends have
notches against each Frame Angle.
4. Install trowel blades to the inside of the forward Spreader
Bar Assembly using six Weld Screws (16), six washers (18),
and six High Crown Acorn Nuts (17). Install these screws
from the inside out with Acorn Nuts on the outside. Leave nuts
loose until you turn the Superspreader Frame over and make
sure bottoms of both blades are flush with a flat surface.
5. Tighten Acorn Nuts (no need to hold screws on inside while
tightening).
Setting Up Superspreader System
for Grout Spreading Application
1. Remove Trowel Blades from the forward Spreader Bar Assembly.
2. Close (adjust) frame width until the holes in the Spreader
Bar Assemblies line up.
3. Install Grout Float Pads (20) to the front and rear Spreader
Bar Assemblies with Wing Nuts (19).
Orient horizontally and
do not overtighten.
15
13
2
2

Quality Products Since 1927
IP-636 3/24/03
Using the No. 636 Superspreader System
Mortar Applications
The diagram above shows a
typical procedure for spreading
mortar and laying tile. The
Superspreader configuration
shown is a 40" spread for 8"
ceramic tile.
Note: To obtain proper mortar flow
through the trowel notches, start
pulling the Superspreader slowly.
Increase pulling speed once
proper mortar flow is achieved.
Grouting Applications
For grouting applications, the tile
should first be dampened by
pulling a wet towel over the tile.The
towel can be wrapped around a
broom to do this while standing.
It is best to apply grout at a 45°
angle to the tile joints.This reduces
pulling grout from the joint by the float
pads.A hand float is required around
the perimeter of the tiled area.
Both Applications
For both applications, using 3-4
tiles per side as weights on the
rear of the Superspreader Frame
compresses the Spreader Bar
Assemblies to assure that the
Trowel Blades and Grout Float
Pads always contact the surface.
Clean up with a sponge or scrub
brush and water. If available, a
hose speeds cleanup.
Start an adjacent run by
adding tile weights to the
Superspreader Frame from
the double stack of tile at
the beginning of the run.
Remove tile weights
at end of run.
Note: After pulling the Superspreader Frame to
the wall, the strap can be detached. Grab the
front Width Adjustment Tube Assembly and
continue pulling the Superspreader Frame until
it contacts the wall. Remove the tile weights from
the Superspreader Frame as indicated, then
remove the Superspreader from the run. Some
hand trowelling is required at the wall.
Other Gundlach Tools manuals