Hach PHC745 User manual

DOC022.53.80435
PHC745
05/2021, Edition 2
User Manual


Table of Contents
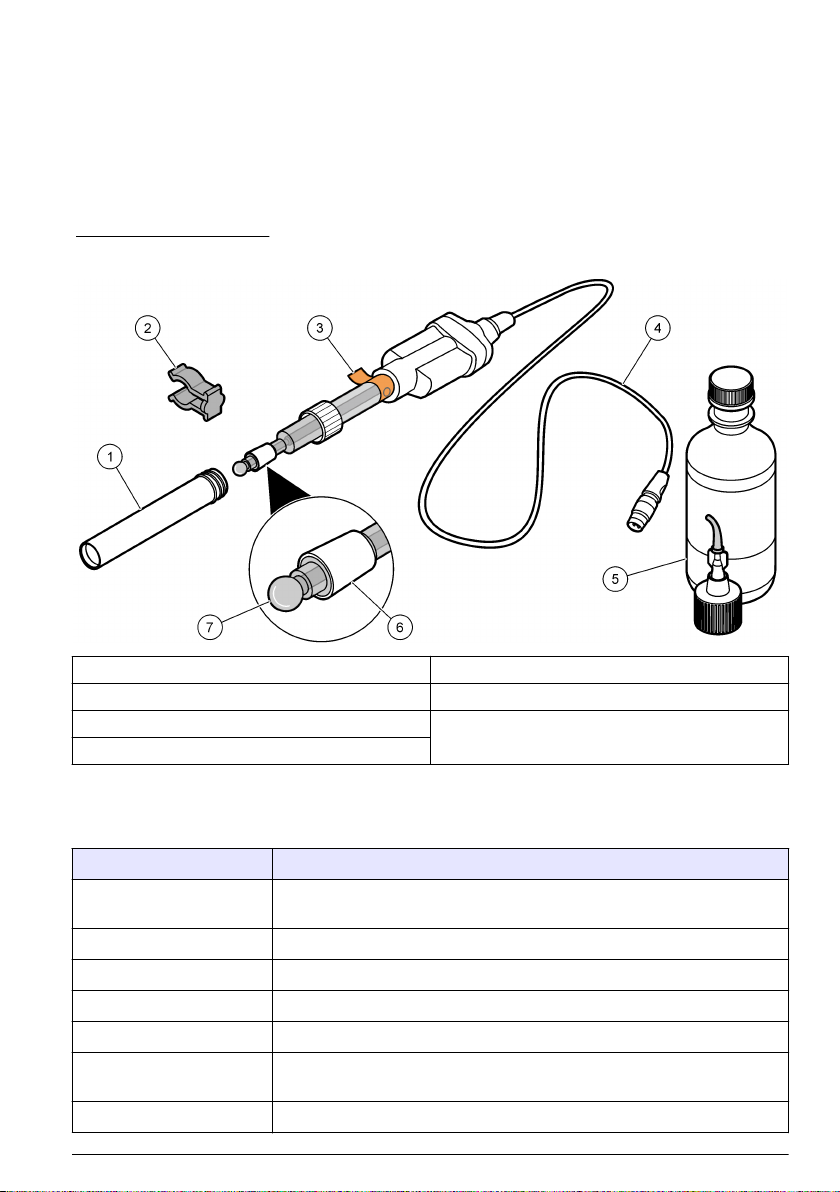
Section 1 Product overview................................................................................. 3
Section 2 Specifications........................................................................................ 3
Section 3 Safety information............................................................................... 4
3.1 Intended use ....................................................................................................... 4
3.2 Use of hazard information..................................................................................... 4
3.3 Precautionary labels............................................................................................. 5
3.4 Product hazards.................................................................................................... 5
Section 4 Preparation for use.............................................................................. 5
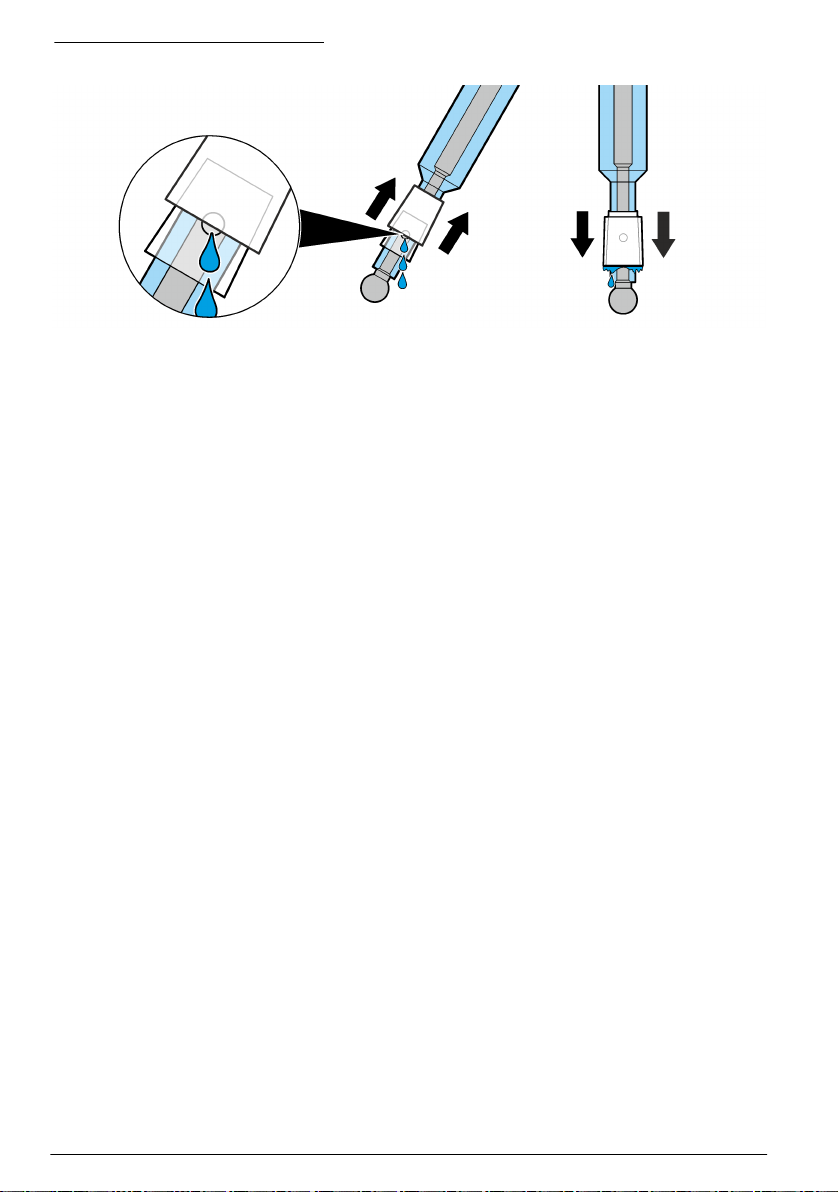
4.1 Operate the sleeve junction.................................................................................. 7
Section 5 Calibration.............................................................................................. 8
5.1 Calibration notes................................................................................................... 8
5.2 Calibration procedure........................................................................................... 9
Section 6 Sample measurement .................................................................... 10
6.1 Sample requirements.......................................................................................... 10
6.2 Sample measurement notes............................................................................... 10
6.3 Sample measurement procedure....................................................................... 10
Section 7 Verify the calibration........................................................................ 11
7.1 Verification procedure......................................................................................... 11
Section 8 Maintenance......................................................................................... 12
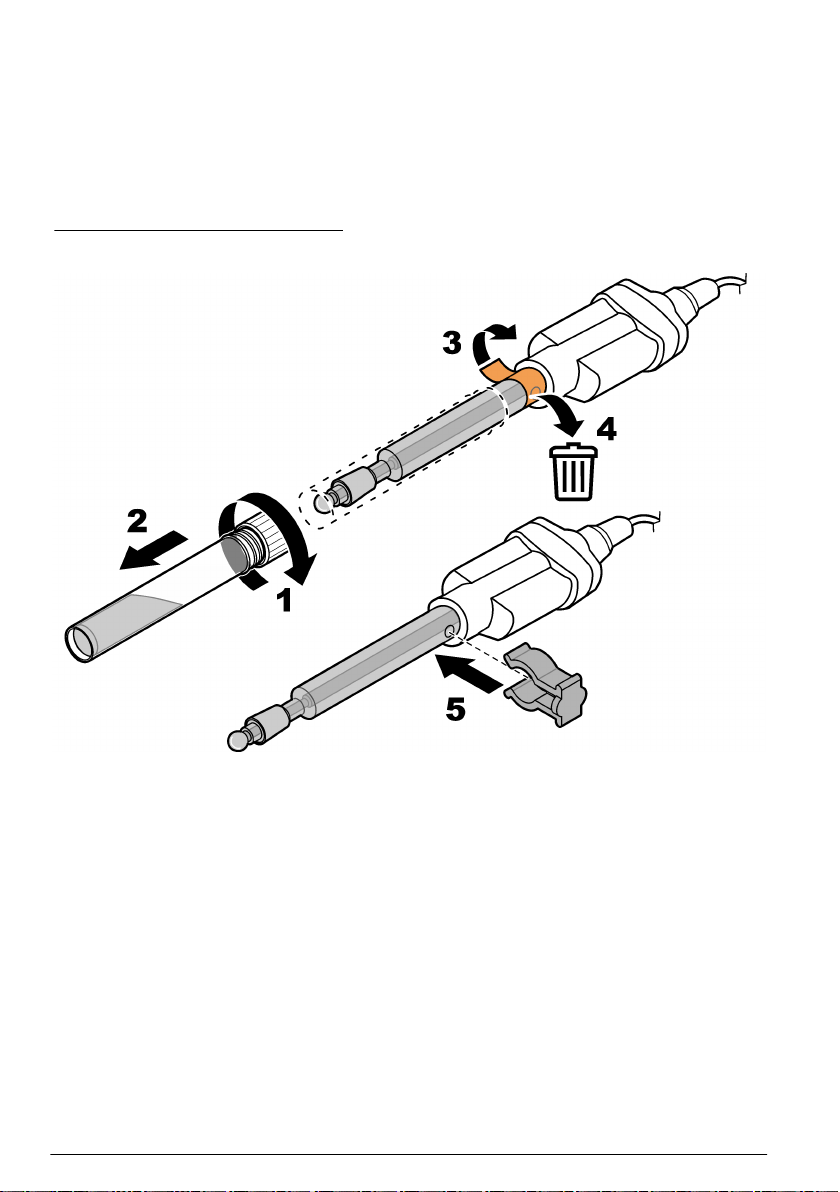
8.1 Clean the probe.................................................................................................. 12
8.1.1 Clean the sleeve junction......................................................................... 13
8.2 Fill the probe....................................................................................................... 14
8.3 Add KCl crystals to the probe............................................................................. 14
8.4 Replace the filling solution.................................................................................. 16
8.5 Soak procedure for dry probes........................................................................... 17
8.6 Storage............................................................................................................... 17
Section 9 Troubleshooting ............................................................................... 18
Section 10 Consumables..................................................................................... 19
10.1 Recommended standards................................................................................. 19
10.2 Accessories...................................................................................................... 20
1

Table of Contents
2

Section 1 Product overview
The Intellical PHC745 pH probes are digital, combination electrodes that measure the pH of water
samples. The glass sleeve junction keeps the reference junction clean for measurements in
wastewater influent, emulsions and viscous liquids. The probes use the Red Rod technology and a
saturated KCl electrolyte for high performance. The probes are refillable and have a built-in
temperature sensor. A 59-mL bottle of reference electrolyte filling solution (saturated KCl solution) is
supplied with the probe. Refer to Figure 1.
Note: Do not use the probe to measure the pH of organic solvents or very alkaline samples.
Figure 1 Probe overview
1 Probe soaker bottle with storage solution 5 Electrode filling and storage solution
2 Filling-hole plug 6 Glass sleeve junction
3 Protective tape and filling hole 7 Glass bulb and temperature sensor
4 Cable
Section 2 Specifications
Specifications are subject to change without notice.
Specifications Details
Probe type Digital combination glass pH probe with refillable electrolyte and built-
in temperature sensor
pH range 0 to 14 pH
pH accuracy ±0.01 pH
Reference type Red Rod (Ag/AgCl in protective tubes)
Reference junction Glass sleeve
Slope –59 mV/pH (85 to 115% at 25 °C (77 °F) per Nernstian theoretical
value)
Isopotential point 6.00 pH
English 3

Specifications Details
Sodium (alkalinity) error <0.3 pH at pH 13 in 0.1 M NaOH
Temperature accuracy ±0.3 °C (±0.54 °F)
Temperature sensor type 30 kΩ NTC thermistor
Operating temperature –10 to 110 °C (14 to 230 °F)
Storage temperature 5 to 40 °C (41 to 104 °F)
Minimum immersion depth 18 mm (0.71 in.)
Body material Glass
Electrolyte filling solution Saturated KCl
Storage solution Saturated KCl
Cable connection M12 digital output and connector
Dimensions Diameter: 12 mm (0.47 in.)
Length: 200 mm (7.9 in.) total; 103 mm (4.1 in.) below head
Cable length: 1 m (3.3 ft)
Weight (includes cable) ~0.4 kg (0.9 lb)
Warranty 1 year on the probe. This warranty covers manufacturing defects, but
not improper use or wear.
Certifications CE, FCC/ISED
Section 3 Safety information
3.1 Intended use
The Intellical probes are intended for use by individuals who measure water quality parameters in the
laboratory. The Intellical probes do not treat or alter water.
3.2 Use of hazard information
D A N G E R
Indicates a potentially or imminently hazardous situation which, if not avoided, will result in death or
serious injury.
WARNING
Indicates a potentially or imminently hazardous situation which, if not avoided, could result in death
or serious injury.
CAUTION
Indicates a potentially hazardous situation that may result in minor or moderate injury.
N O T I C E
Indicates a situation which, if not avoided, may cause damage to the instrument. Information that
requires special emphasis.
4 English

3.3 Precautionary labels
Read all labels and tags attached to the instrument. Personal injury or damage to the instrument
could occur if not observed. A symbol on the instrument is referenced in the manual with a
precautionary statement.
Electrical equipment marked with this symbol may not be disposed of in European
domestic or public disposal systems. Return old or end-of-life equipment to the
manufacturer for disposal at no charge to the user.
3.4 Product hazards
CAUTION
Chemical exposure hazard. Obey laboratory safety procedures and wear all of the
personal protective equipment appropriate to the chemicals that are handled. Refer to
the current safety data sheets (MSDS/SDS) for safety protocols.
CAUTION
Chemical exposure hazard. Dispose of chemicals and wastes in accordance with local,
regional and national regulations.
CAUTION
Personal injury hazard. Glass components can break. Handle with care to prevent cuts.
Section 4 Preparation for use
N O T I C E
Make sure to remove the protective tape from the filling hole of new probes. A probe with a blocked
filling hole will not operate correctly.
New probes are filled with electrolyte filling solution and have a soaker bottle that contains storage
solution to keep the glass bulb and reference junction hydrated. Prepare the probe for calibration and
measurement as follows.
1. Remove the protective tape from the filling hole. Refer to Figure 2.
Note: Put the soaker bottle on the soaker bottle holder when not in use.
2. Rinse the reference junction and glass bulb with deionized water. Blot dry with a lint-free cloth.
3. If the inner filling solution is low, add more filling solution. Refer to Fill the probe on page 14.
4. If the level of KCl crystals in the probe is less than approximately 0.5 cm (0.2 in.), or for
measurements at high temperatures (> 60 °C (140 °F), add more KCl crystals. Refer to Add KCl
crystals to the probe on page 14.
5. Invert the probe to make sure that the KCl crystals move freely through the liquid. If necessary,
shake the probe to loosen the crystals.
6. Move the sleeve junction up and down to make sure that electrolyte flows from the sleeve
junction (refer to Operate the sleeve junction on page 7).
7. Soak the probe in a warm pH 4 buffer solution for approximately 1 hour to condition the probe.
Note: If probe stabilization is slow, soak the probe for 2 hours in a warm pH 4 buffer solution. The soak
procedure helps to dissolve KCl crystals in the reference junction.
English 5

8. Make sure that the meter has the correct date and time settings. The service-life time stamp in
the probe comes from the date and time settings in the meter.
Note: Some meters automatically open the date and time settings when the meter starts for the first time, or
after battery replacement.
9. Connect the probe to the meter.
10. Remove the filling-hole plug before use. Keep the level of the electrolyte filling solution above the
level of the measurement liquid during use. Refer to Figure 3.
Note: For measurements in low ionic strength (LIS) samples, soak the probe for a maximum of 5 minutes in the
sample before use.
Figure 2 Remove the protective tape
6 English

Figure 3 Probe position during use
1 Filling hole 3 Level of calibration solution or sample
2 Level of electrolyte filling solution 4 Sleeve junction
4.1 Operate the sleeve junction
N O T I C E
Close the sleeve junction and fill the electrolyte after each use. The probe can become permanently
damaged if all of the electrolyte drains from the probe.
Loosen the sleeve junction during calibration and measurement to make sure there is a good
electrical connection between the inner electrolyte and the standard or sample. Lightly move the
sleeve junction up or down a small distance to change the flow rate of the electrolyte. A high
electrolyte flow rate gives a fast response in different sample types but uses a high volume of
electrolyte. Make sure that the electrolyte does not fully drain from the probe.
1. Hold the probe over a beaker or container.
2. Lift the sleeve junction until drops of electrolyte flow out.
3. Lightly push the sleeve junction down to the initial position. Refer to Figure 4.
Note: Do not loosen the sleeve junction too much. If the electrolyte flow is too high, the electrolyte will drain
quickly and the probe must be filled frequently. Do not tighten the sleeve junction too much. If the electrolyte
flow is too low, the electrolyte will not flow and the electrical connection will not be sufficient.
4. To close the reference junction, slowly move the sleeve junction down until the electrolyte flow
stops.
Note: Always close the sleeve junction when the probe is not in use.
English 7

Figure 4 Sleeve junction operation
Section 5 Calibration
The procedure that follows is applicable to meters that can connect to Intellical pH probes. Refer to
the applicable meter documentation for meter operation and probe-specific settings.
5.1 Calibration notes
Read the notes that follow before calibration:
• Use prepared pH buffer solutions or mix pH buffer powder pillows with deionized water for
calibration. Discard the prepared buffer solutions after each calibration.
• Use two or three buffer solutions for best results. Two buffer solutions are sufficient if the expected
sample pH is between the pH of the two buffer solutions. The sequence in which the pH buffer
solutions are used is not important. Use buffer solutions that are 2 or more pH units apart.
• For a one-point calibration, use a pH buffer near the expected sample pH.
• Use the default calibration options or change the options in the probe settings menu.
• Use the single display mode for calibration when more than one probe is connected to the meter (if
applicable).
• Calibrate the probes and verify the calibration regularly for best results. Use the meter to set
calibration reminders.
• The calibration data is stored in the probe. When a calibrated probe is connected to a different
meter with the same calibration options, a new calibration is not necessary.
• Air bubbles below the sensor when in solution can cause a slow response or error in the
calibration. Make sure to remove air bubbles during calibration.
• The pH buffer solutions have known pH values at different temperatures. The meter uses the mV
and temperature readings of the probe in the pH buffer solutions to calculate a calibration slope.
During measurements, the meter adjusts the slope for the sample temperature to determine the
pH value of the sample.
8 English

5.2 Calibration procedure
1. Go to the
calibrate menu.
Select the probe, if
applicable. The
display shows the
pH buffer solutions
to use for calibration.
2. Prepare or pour
the pH buffer
solutions in different
beakers.
3. Open the filling
hole.
4. Rinse the probe
with deionized water.
Dry the probe with a
lint-free cloth.
5. Loosen the
sleeve junction. Put
the probe in the first
pH buffer solution.
Make sure that the
sensor and
reference junction
are fully in the
solution. Do not put
the probe on the
bottom or sides of
the beaker.
6. Shake the probe
from side to side to
refresh the reference
junction and remove
air bubbles.
Note: Be careful to not
hit the beaker and
damage the probe.
7. Stir slowly, then
read the pH value of
the buffer solution.
The display shows
the temperature-
corrected pH value
when the reading is
stable.
8. Continue with
steps 4 through 7 for
the remaining
buffers or select
Done.
9. Save the
calibration.
English 9

Section 6 Sample measurement
The procedure that follows is applicable to meters that can connect to Intellical pH probes. Refer to
the applicable meter documentation for meter operation and probe-specific settings.
6.1 Sample requirements
N O T I C E
Make sure that the sample type is compatible with the probe, or probe damage can occur.
• Samples must be aqueous. The probe can also make measurements in samples that are not fully
aqueous and in some solvents that dissolve in water. Read the results with caution because the
pH scale changes when the solvent system changes.
• Samples can contain components that react with silver (e.g., TRIS, proteins and sulfides). The
Red Rod tubes protect the probe from interference with such components.
• Proteins can collect on the sensing element. Make sure that the probe stays clean if proteins are in
the sample.
• Do not measure samples that are hotter or colder than the specified operating temperature of the
probe. Refer to Specifications on page 3.
• High purity or low ionic strength (LIS) samples absorb gases from the air that can change the
sample pH. For stable measurements, use an LIS chamber or a flow cell.
6.2 Sample measurement notes
Read the notes that follow before sample measurements.
• Rinse the probe with deionized water and dry with a lint-free cloth between measurements to
prevent contamination.
• If complete traceability is necessary, enter a sample ID and operator ID before measurement.
Refer to the meter manual for instructions.
• The meter automatically saves the measurement data when the user manually reads each data
point and when the meter is set to read at regular intervals. The user must manually save each
data point when the meter is set to read continuously.
• Air bubbles below the sensor can cause a slow response or error in the measurement. Make sure
to remove air bubbles before and during measurements.
6.3 Sample measurement procedure
1. Collect the
sample.
2. Open the filling
hole.
3. Rinse the probe
with deionized water.
Dry the probe with a
lint-free cloth.
4. Loosen the
sleeve junction. Put
the probe in the
sample with the
sensor and
reference junction
fully in the sample.
Do not put the probe
on the bottom or
sides of the beaker.
10 English

5. Shake the probe
from side to side to
refresh the reference
junction and remove
air bubbles.
Note: Be careful to not
hit the beaker and
damage the probe.
6. Stir gently, then
read the pH value of
the sample. The
display shows the
temperature-
compensated pH
value when the
reading is stable.
Section 7 Verify the calibration
Measure the pH value of a fresh pH buffer solution to make sure the result is accurate. The meter
compares the selected pH buffer value to the measured pH value and accepts or rejects the
measurement. The user can change the pH buffer solution and acceptance criteria for verification in
the probe-specific settings.
Note: Password protection may prevent access to the acceptance criteria.
7.1 Verification procedure
1. Go to the
verification menu.
The display shows
the pH buffer
solution to use for
verification.
Note: Menu name for
HQd meters: Run check
standard.
2. Prepare or pour
the pH buffer
solution into a
beaker.
3. Open the filling
hole.
4. Rinse the probe
with deionized water.
Dry the probe with a
lint-free cloth.
English 11

5. Loosen the
sleeve junction. Put
the probe in the pH
buffer solution with
the sensor and
reference junction
fully in the solution.
Do not put the probe
on the bottom or
sides of the beaker.
6. Shake the probe
from side to side to
refresh the reference
junction and remove
air bubbles.
Note: Be careful to not
hit the beaker and
damage the probe.
7. Stir gently, then
read the pH value of
the buffer solution.
The meter accepts
or rejects the result.
Section 8 Maintenance
Regular maintenance is necessary for the best accuracy, stabilization time and life of the probe.
Keep the probe in the recommended storage solution between measurements.
8.1 Clean the probe
Clean the probe regularly to remove contamination and to keep the reference junction open.
Symptoms of contamination:
• Incorrect or irregular readings
• Slow stabilization times
• Calibration errors
• Sample material stays on the probe
1. Rinse the probe with deionized water. Use warm (35–45 °C (95–113 °F)) deionized water to
remove storage solution that dries on the probe. Dry the probe body with a lint-free cloth.
2. Soak the glass bulb and reference junction in the applicable cleaning solution for the specified
time. Refer to Table 1 and Consumables on page 19.
3. Rinse or soak the probe for 1 minute in deionized water. Dry the probe body with a lint-free cloth.
4. Soak the probe in pH 4 buffer for 20 minutes.
5. Rinse the probe with deionized water. Dry the probe body with a lint-free cloth.
Table 1 Cleaning solution
Contamination Cleaning solution Active component Soak time
General
contamination
Electrode cleaning solution for
regular maintenance
KATHON™ CG,
DECONEX®11
12–16 hours
Minerals Electrode cleaning solution for
minerals/inorganic
contamination
Phosphoric acid
(~10%)
10–15 minutes
Fats, grease and oils Electrode cleaning solution for
fats, oils and grease
contamination
KATHON™ CG,
TRITON® X
2 hours maximum
12 English

Table 1 Cleaning solution (continued)
Contamination Cleaning solution Active component Soak time
Proteins Electrode cleaning solution for
proteins/organic
contamination
Pepsin in HCl 3 hours maximum
Wastewater and
organic compounds
Electrode cleaning solution,
extra strong
Sodium hypochlorite 5–10 minutes
8.1.1 Clean the sleeve junction
Clean the sleeve junction when the sleeve junction does not move correctly. Refer to Figure 5.
Note: If dried salt crystals prevent the movement of the sleeve junction, soak the probe tip in warm water to
dissolve the salt crystals.
Figure 5 Clean the sleeve junction
English 13

8.2 Fill the probe
Add electrolyte filling solution to the probe regularly to make sure that the electrolyte flows from the
probe to the sample. Refer to Figure 6. Make sure to use the correct filling solution (saturated KCl).
Note: If the dispensing tip becomes clogged, remove the dispensing tip and soak the tip in warm water. Then, fully
dry and assemble the tip again.
Figure 6 Fill the probe
8.3 Add KCl crystals to the probe
The filling solution in the probe contains crystals of potassium chloride (KCl) that keeps the filling
solution saturated with KCl. When the sample temperature is more than 60 °C (140 °F), more
crystals are necessary to keep the solution saturated with KCl. Add more KCl crystals when the level
of crystals above the glass bulb is less than 0.5 cm (0.2 in.), or when the sample temperature is more
than 60 °C (140 °F). Refer to Figure 7 and Table 2 for preparation. Mix some of the filling solution
with the crystals to help move the crystals through the filling hole. Refer to Figure 8.
14 English

Figure 7 Items to collect
1 Plastic pipet 4 Mixing bottle
2 Measuring scoop 5 Saturated KCl solution
3 KCl crystals
Table 2 KCl quantity at high temperatures
Temperature KCl quantity
60 °C (140 °F) 0.5 g (0.5 cm (0.2 in.))
70 °C (158 °F) 0.625 g
80 °C (176 °F) 0.750 g
90 °C (194 °F) 0.875 g
100 °C (212 °F) 1.0 g (1.0 cm)
English 15

Figure 8 Add KCl crystals to the probe
8.4 Replace the filling solution
Replace the filling solution and KCl crystals when one of the conditions that follow occurs:
• The filling solution becomes contaminated.
• The KCl crystals in a probe do not move freely through the liquid when the probe is inverted.
1. Tilt the probe and open the filling hole.
2. Use a syringe or small transfer pipet to remove as much of the filling solution and KCl crystals
from the probe as possible. Discard the solution and KCl crystals.
3. Remove the remaining KCl crystals as follows:
a. Fill the probe half full with deionized water. Close the filling hole.
b. Shake the probe until the crystals become loose.
Note: If the crystals do not loosen, fill the probe with deionized water and put the probe in a warm water
bath (maximum 60 °C (140 °F)) for approximately 10 minutes.
c. Use a syringe or small transfer pipet to remove the remaining solution and KCl crystals.
4. Rinse the inner probe three times with deionized water.
5. Rinse the inner probe three times with new filling solution.
16 English

6. Add new KCl crystals to the probe until there is approximately 0.5 cm (0.2 in.) of crystals above
the glass bulb. Refer to Figure 8 on page 16.
7. Fill the probe with new filling solution. Refer to Fill the probe on page 14.
8.5 Soak procedure for dry probes
If the glass bulb becomes dry, complete the steps that follow to hydrate the probe.
1. Soak the probe tip in a warm pH 4 buffer solution for 2 hours.
2. Rinse the probe with deionized water. Blot dry with a lint-free cloth.
3. Calibrate the probe.
8.6 Storage
N O T I C E
Probes can become permanently damaged if kept in a storage solution that is not specified by the
manufacturer. Use only the specified storage solution (saturated KCl).
Do not store the probe in deionized water or in samples of low ionic strength. For short-term storage,
the probe can stay in the sample for a maximum of 2 hours if the sample pH is not high. Close the
filling hole and put the soaker bottle that contains the storage solution on the probe when not in use.
Refer to Figure 9. Keep the probe in a vertical position with the sensor and reference junction below
the liquid level in the soaker bottle. Add storage solution to the soaker bottle if necessary.
Figure 9 Probe storage
English 17

Section 9 Troubleshooting
Keep the probe clean and in the recommended storage solution when not in use for the best
accuracy, stabilization time and life of the probe.
Problem Possible cause Solution
Decreased probe performance
causes slow stabilization and
prevents accurate calibrations or
measurements.
The glass sensor is dirty. Clean and condition the probe.
Refer to Clean the probe
on page 12.
The reference junction is
clogged.
Clean and condition the probe.
Refer to Clean the probe
on page 12.
The filling solution has
contamination.
Replace the filling solution.
Refer to Replace the filling
solution on page 16.
The probe is not conditioned
to the sample sufficiently.
Condition the probe. Refer to
Preparation for use on page 5.
The glass sensor has become
dry.
Soak the probe tip in buffer
solutions. Refer to Soak
procedure for dry probes
on page 17.
The calibration slope of the
probe has changed.
Increase the accepted slope
limit settings if possible, or
contact technical support.
Sample properties cause slow
stabilization or inaccurate
measurements.
The sample absorbs carbon
dioxide (CO2) from the air,
which causes the pH value to
slowly decrease in low ionic
strength (LIS) or high purity
samples.
Use the LIS chamber for
LIS/high purity samples to
prevent CO2 absorption.
The sample temperature is
low, or there is a large
temperature difference
between samples.
Increase the sample
temperature or adjust the
temperature of different
samples to be the same (within
2 °C (3.6 °F)).
18 English
Table of contents
Other Hach Laboratory Equipment manuals

Hach
Hach HQ440d Quick manual

Hach
Hach QuikChem 8500 2 Series User manual

Hach
Hach AS1000 User manual

Hach
Hach HQ440d User manual

Hach
Hach DRB 200 User manual

Hach
Hach POCKET COLORIMETER II User manual

Hach
Hach Lange 2100AN User manual

Hach
Hach TitraLab KF1000 Series Quick manual

Hach
Hach 2100AN IS User manual

Hach
Hach sension ph31 User manual