Hadeco Better Packages MATIC 80 PLUS User manual

€•‚ƒ„ƒ…†‡„ƒ ˆƒ
‰‚†ˆŠ•‹‡‹Œ••
HADE MATIC 80 PLUS
ˆŽ••‘’“Ž”‘“•–—˜™•š ›•˜œ—•˜—ž
›•Ÿ ’•‘ •Žš ™•—š™Žš •—•“¡

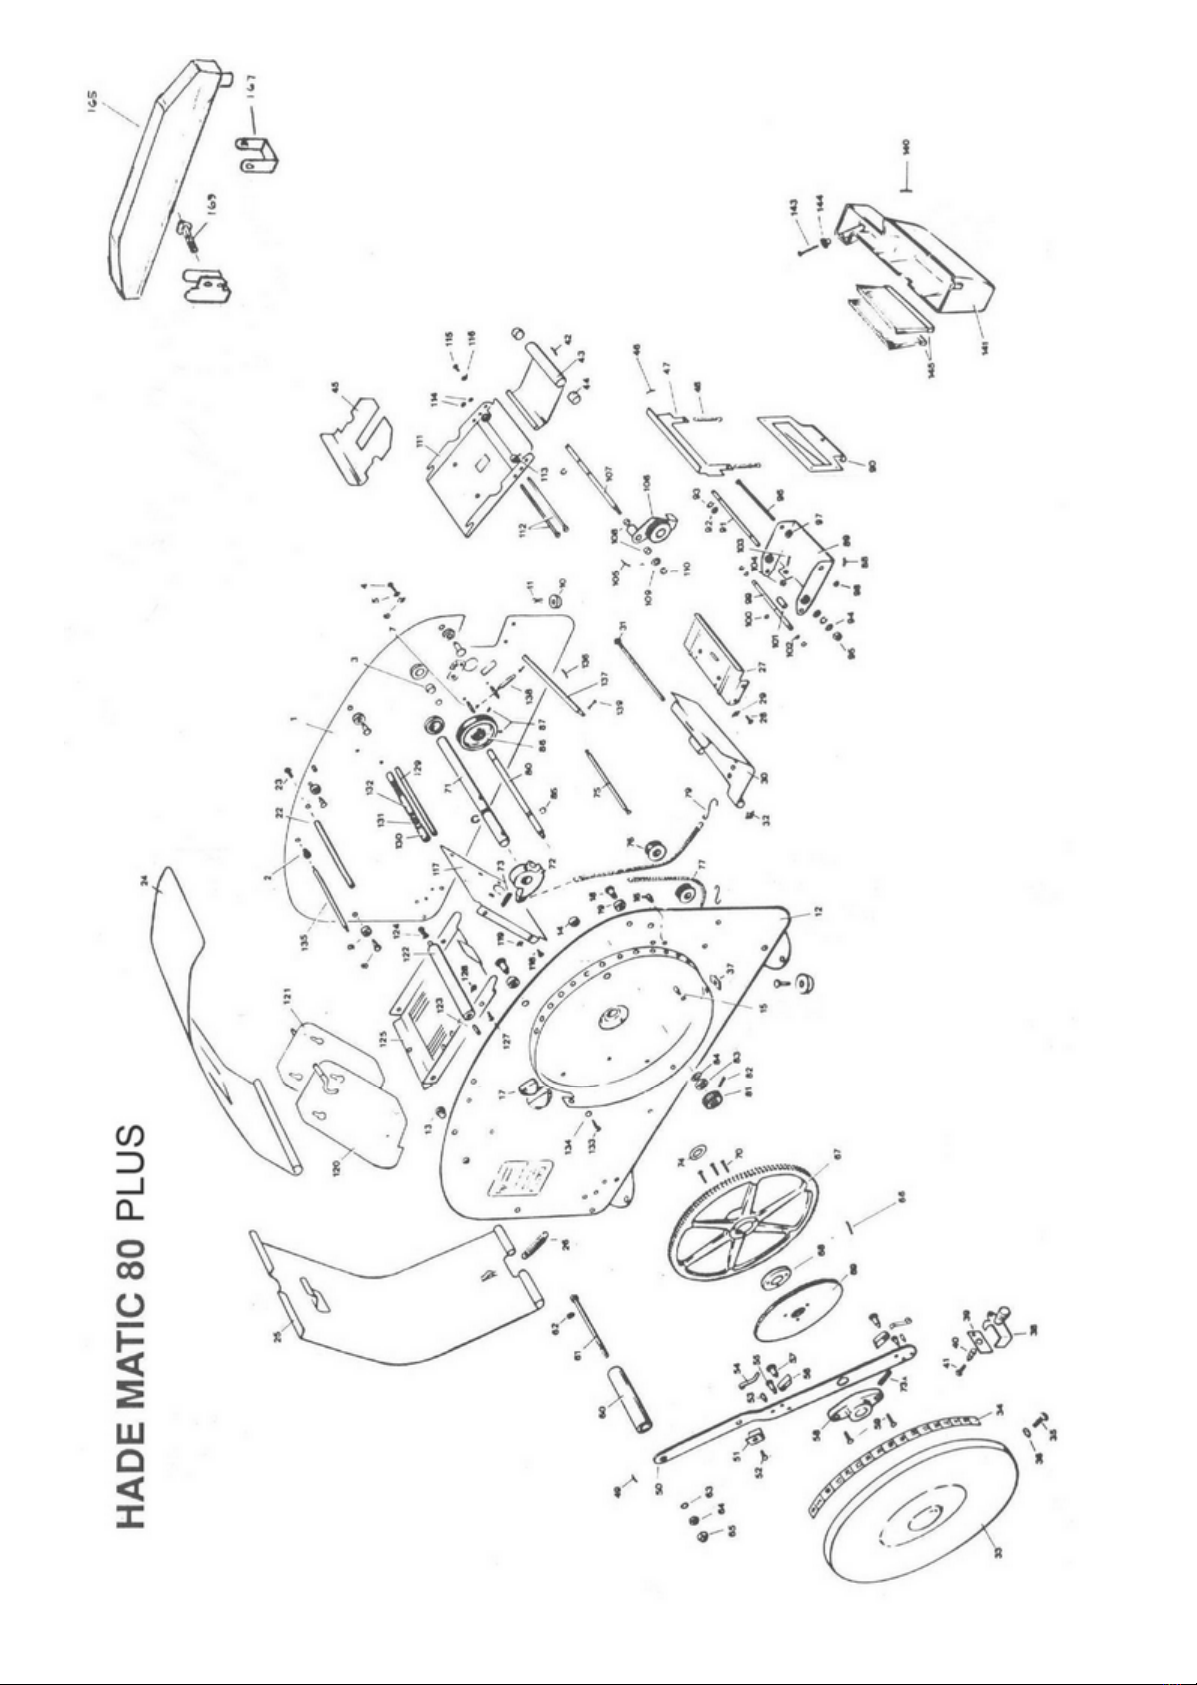
ˆŽ••‘’“Ž”‘“•–—˜™•š ›•˜œ—•˜—ž ›•Ÿ ™•—š™Žš •—•“¡ HADE MATIC 80 PLUS
€•‚ƒ„ƒ…†‡„ƒ ˆƒ ‰‚†ˆŠ•‹‡‹Œ••
1. €‹†ˆ‹‚ƒ„‚‹
ˆžŽ˜¢£‘ Ž£ž‘“•“¢ ’••”‘••— •‘ ¤“•
™Ž”œ•—™“•¥¦•—:
1.1 §‘™ ›•Ÿ ’Ž›¡ ˜ 2 •’•‘ •Ÿ¥¦•”•
¦—“™‘”•.
1.2 •“Ÿ —••“—•¢ ™•˜“Ž–™•
1.3 ˆ•‘˜“•™Ž’‘Ÿ £•“¡•™‘ ›•Ÿ ’Ž›¡
2. •†‡‹Žƒ„‚‹ • Ž‹†‡€ƒ•‚‹
2.1 ••Ž •“¢ •¨•Ž’•¥ •“Ÿ —••“—•¢••¥
œ‘•—•¢ •‘ œž—›Ž©ž‘••“—•¢•¡— •œŽž¡
ލž‘••–•“—•¢•Žš œ•‘•™• •—•“¡ • •‘
œ—ž—›•¥¥ Ž˜¢.
2.2 •’•‘ •Ÿ¥¦•— ¦—“™• ˜•‘–‘•‘ œžŽ”¡“¢
“—œ•Žš ”¡•¢•Žš ’Ž›Žš.
2.2 ª‘œŽ••—•••¥ £•“¡•™• ›•Ÿ ’Ž›¡
’•Ž •“¢ ’ ›—ž ‘“—•¢ “‘™, –“Ž£¡ ¨Žž•Ž’••‘
£•“¡•™• •— ‘•‘ œ—ž—› •˜“‘•Ž’Ž–•¡”
’••“Ž”. (€—¨•••ž•Ÿ •˜“‘•Ž’Ž–•¡š ’••“,
”Ž •Ž œŽ’¡«‘“¢ ••• œŽ•• ‘“¢ •žŽ’—•¢
’Ž›¡ ’ £‘™—)
2.4 ƒ¨ž‘••–•“—•¢•¡— œ•‘•™• ™•—š™Žš •—•“¡
••Ž •“¢ ™•—𙕥 •—•“• œŽ˜—ž—›••—
˜—œ‘ž‘“Žž‘ žŽ••™ŽœŽ›«•œ••™‘, •‘•Ž •“¢
ލž‘••–•“—•¢•¡— œ•‘•™• • ’˜“‘’•“¢ •© ’
œž—›•‘¬•‘–—••¡— ›•Ÿ ¤“Ž¨Ž œ‘¬¡.
2.5 ‚•—š™‘Ÿ •—•“‘
„˜“‘’•“¢ •‘–‘•Ž ž••Ž•‘ ™•—š™Žš •—•“¡ œŽ›
•‘œž‘’•Ÿ¥¦•¥ œ•‘•™• •—•“¡ ›Ž ž— •¦—¨Ž
”—©‘••¬”‘.
2.6 •“Ÿ —••“—•¢•‘Ÿ œ‘•—•¢
ª‘ ›’Žš•¡© ¦—“™‘© •— •“ •“Ÿ —••“—•¢•‘Ÿ
œ‘•—•¢, ’œ—ž—›• ’¡œŽ••—••‘Ÿ ’ ’•›— “ž•£¡
›•Ÿ •˜“‘•Ž’™• -••••›ž•–—˜™•© ˜“‘•¢•¡©
¨ž•¬Ž’, œž• œŽ˜“‘’™— Ž˜•‘¦—•‘ 2 ¨ž•¬‘”•.
‡‘™‘Ÿ ™Ž•®•¨•ž‘-•Ÿ Ÿ’•Ÿ—“˜Ÿ Žœ“•”‘•¢•Žš
›•Ÿ •Žž”‘•¢•Žš • •˜••—••Žš ™•—š™Žš •—•“¡
75 ¨/”2. …•Ÿ £Ž•—— •—¨™Žš £•”‘¨•
•—Ž£©Ž›•”Ž •£ž‘“¢ ¨ž•¬, ›•Ÿ £Ž•—— “Ÿ —•Žš
™•—š™Žš •—•“¡ ›ŽœŽ•••“—•¢•Ž ’˜“‘’•“¢ 1
¨ž•¬, ™Ž“Žž¡š £—˜œ•‘“•Ž ›ŽœŽ•••“—•¢•Ž
œŽ˜“‘’•Ÿ—“˜Ÿ œŽ ¬‘œžŽ˜•.
3. •ˆ€‹„Еޕ•
3.1 ª‘ •—’Žš ˜“ŽžŽ•— ”‘«••¡ •‘©Ž›•“˜Ÿ
“ž‘•˜œŽž“•ž•¥¦•š ”—©‘••¬”, •‘ ™Ž •©—
“ž‘•˜œŽž“•ž•¥¦—¨Ž ”—©‘••¬”‘ •”——“˜Ÿ
«™‘•‘ ›•••¡ 0-75 ˜”. ¯•‘–—••Ÿ ›•••¡
•˜“‘•‘’••’‘¥“˜Ÿ ˜ «‘¨Ž” 5 ˜”. …•Ÿ
¤“Ž¨Ž •—Ž£©Ž›•”Ž œŽ›•Ÿ“¢
ž—¨•••žŽ’Ž–•Ž— •˜“žŽš˜“’Ž • •˜“‘•Ž’•“¢
—¨Ž ’ ˜ŽŽ“’—“˜“’•¥¦—— Ž“’—ž˜“•—.
ƒœž—›—•Ÿ¥¦—— ¬•‘–—••— •”——“ –•˜•Ž,
™Ž“ŽžŽ— ’•›•Ž •‘› ž¡–‘¨Ž” œŽ›‘–•.
3.2 ‡ž‘•˜œŽž“•žŽ’™‘ ™•—š™Žš •—•“¡
€‘’•Ž”—ž•Ž œŽ“Ÿ••“¢ ž¡–‘¨ œŽ›‘–• ›Ž
•• •Ž¨Ž œžŽ›Ž•¢•Ž¨Ž •œŽž‘. ¯‘“—”
Ž“œ•˜“•“¢ ž•–•Žš ž¡–‘¨, –“Ž£¡ Ž•
”¨•Ž’—••Ž Ž“˜™Ž–•• •‘¬‘›, ’ ž—¬••¢“‘“—
’¡œŽ••Ÿ—“˜Ÿ –•˜“¡š Ž“ž—¬ •—•“¡,
™Ž“Žž•¥ ¬‘“—” ”Ž •Ž •¬’•—–¢ •¬ ”‘«••¡.
3.3 …•Ÿ œŽ••–—••Ÿ ˜ œŽ”ަ¢¥ ›‘••Žš
”‘«••¡ Ž“ž—¬™Ž’ •—•“¡ ›•••Žš £Ž•—— 75
˜” •—Ž£©Ž›•”Ž •—˜™Ž•¢™Ž ž‘¬ •‘ ‘“¢ •‘
ž¡–‘¨ œŽ›‘–• (•— Ž“œ•˜™‘Ÿ —¨Ž).
4. ‡•‘ƒ’†Š•“•„‹Ž•• • •‘ƒ…
°‘«••‘ œŽ–“• •— “ž—£•—“
“—©Ž£˜•• •’‘••Ÿ. ª—˜”Ž“žŸ •‘ ¤“Ž, œž•
›••“—•¢•¡© œ—ž—ž¡’‘© ’ ž‘£Ž“—,
•‘œž•”—ž, •‘ ’¡©Ž›•¡— ›••, •—Ž£©Ž›•”Ž
’¡••“¢ •’•‘ •Ÿ¥¦•— ¦—“™• •¬ ”‘«••¡ •
œŽ•Ž •“¢ ’ ˜Ž˜•› ˜ ’Ž›Žš. §•‘¨Ž›‘žŸ
¤“Ž”• Ž˜“‘“™• ™•—Ÿ ž‘˜“’ŽžŸ¥“˜Ÿ, •
•’—••–•’‘—“˜Ÿ ˜žŽ™ ˜•• £¡ •’•‘ •Ÿ¥¦•©
¦—“Ž™.
°‘«••• •—Ž£©Ž›•”Ž ˜Ž›—ž ‘“¢ ’ –•˜“Ž“—,
¬‘¨žŸ¬•—••Ÿ, •‘œž•”—ž, œŽ›
•‘œž‘’•Ÿ¥¦—š œ•‘•™Žš •—•“¡, ”ލ•“
œž•’—˜“• ™ ¬‘˜“ž—’‘••¥ £•”‘¨•, ’
ž—¬••¢“‘“— –—¨Ž ‘œœ‘ž‘“ •— ˜”Ž —“
ž‘£Ž“‘“¢ £—¬ œ—ž—£Ž—’. „ ˜••–‘—
¬‘˜“ž—’‘••Ÿ £•”‘¨• •—Ž£©Ž›•”Ž œŽ“Ÿ••“¢
™•—𙕥 •—•“• •‘¬‘› • ’¡••“¢ ——, ¬‘“—”
“¦‘“—•¢•Ž •›‘••“¢ Ž˜“‘“™• £•”‘¨•.


†ˆ•†ƒ‚ …•‡‹Š••
HADE #Ž”•–—˜™š”˜•—
›œ™ •”-
ž”Ÿ™ ¡,
BP
211 000
¢”œ”£˜¤— ¥”£ž• • ”œœ”¦”ž¡ MATIC 80
PLUS
211001 ˆž‘’‘Ÿ £Ž™Ž’‘Ÿ ›—“‘•¢ FM2FX
211003 „“••™‘ œŽ›«•œ••™‘ T1A
211004 „••“ FM96
211005 ˆŽ›™•‘›•‘Ÿ «‘𣑠BS40
211006 ±‘𙑠FM75
211007 ²“•®“ PW134
211009 €—¬••Ž’Ž— ™Ž•¢-Ž FM8
211010 €—¬••Ž’Ž— Ž˜•Ž’‘••—, ˜ ¬‘™•—œ™Žš (#11) A47
211011 ¯‘™•—œ™‘ PW17
211012 Š—’‘Ÿ £Ž™Ž’‘Ÿ ›—“‘•¢ FM1FX
211014 „“••™‘ œŽ›«•œ••™‘ T1A
211015 ²“•®“ PW134
211017 €—¬••Ž’¡š ‘”Žž“•¬‘“Žž PW35A
211019 €—¬••Ž’Ž— ™Ž•¢-Ž FM8
211022 „‘• FM117
211023 „••“ TO105
211024 ˆ—ž—›•ŸŸ ™ž¡«™‘ FM4
211025 ¯‘›•ŸŸ ™ž¡«™‘ FM5X
211026 ˆž• ••‘ FM64
211027 ‚ž—œ— •¡š •¨Ž•Ž™ FM40
211028 „••“ TO105
211029 ±‘𙑠FM75
211030 ‚ž—œ— •¡š •¨Ž•Ž™ FM3
211031 „••“ FM61
211032 ±‘𙑠FM91
211033 ‚Ž •© “ž‘•˜œŽž“•žŽ’Ž–•Ž¨Ž ”—©‘••¬”‘ FM80
211034 ²™‘•‘ FM79C
211035 „••“ FM99
211036 U-Ž£ž‘¬•‘Ÿ «‘𣑠1210
211037 ±‘𙑠FM100
211038 ³•™˜‘“Žž, ’ ˜£Žž™— (# 39-41) FM110XX
211039 ˆž• ••Ÿ¦‘Ÿ œ•‘˜“••™‘ FM111
211040 ˆž• ••‘ APS61
211041 „••“ K206C
211042 •“Ÿ —••“—•¢ ™•˜“Ž–™•, ˜ ¨ž•¬Ž” FM16X
211044 ±ž•¬ FM17
211045 ª‘œž‘’•Ÿ¥¦‘Ÿ œ•‘•™‘ •—•“¡ FM12EL
211046
ª• ••š •Ž , ’ ™Ž”œ•—™“— ˜2 œž• ••‘”•
#48 FM21X
211048 ˆž• ••‘ FM23HD
211049 €¡–‘¨, ’ ˜£Žž™— (# 50-65) FM41FX
211050 €¡–‘¨, £—¬ œŽ™ž¡“•Ÿ (#51,52,58,59) FM41X
211053 ²“•®“ APS76
211054 Š•˜“Ž’‘Ÿ œž• ••‘ K45
211055 ¯‘™•—œ™‘ GE94

211056 ´ž‘œŽ’‘Ÿ ”•®“‘ K44B
211057 ¯‘™•—œ™‘ FM43
211060 €•–™‘ FM70
211061 „••“ FM71
211062 U-Ž£ž‘¬•‘Ÿ «‘𣑠SX49A
211063 ¯‘ •”•Ž— ™Ž•¢-Ž 1218
211064 ±‘𙑠K417A
211065 ‚Ž•œ‘–Ž™ K417B
211066 §Ž•¢«Ž— ¬•£–‘“Ž— ™Ž•—˜Ž, ’ ˜£Žž™— (#67-69) GE79X
211071 ±•‘’•¡š ’‘• FM46
211072 ‚••‘–Ž™ FM47
211073 †“Ÿ •Žš «“•®“ 023-519-0
211074 U-Ž£ž‘¬•‘Ÿ «‘𣑠K35A 1/32
211075 „‘• FM67
211076 €Ž••™ 0010500
211077 ˆž• ••‘, 16 ˜” FM33AX
211080 „‘• ˜ ”‘•Žš «—˜“—ž•—š (#81-82) FM49X
211083 ¯‘ •”•Ž— ™Ž•¢-Ž FM101
211084 U-Ž£ž‘¬•‘Ÿ «‘𣑠ST2528
211085 ¯‘ •”•Ž— ™Ž•¢-Ž FM101
211086
„—ž©•—— “ž‘•˜œŽž“•žŽ’Ž–•Ž— ™Ž•—˜Ž
(•ž—“‘•)
E5550650
0
211087
²“•®“ ›•Ÿ ’—ž©•—¨Ž “ž‘•˜œŽž“•žŽ’Ž–•ލŽ
™Ž•—˜‘ EA46P
211088 §‘•‘•˜•ž, ’ ˜£Žž™— FM26XX
211089 §‘•‘•˜•ž FM26X
211090 „—ž©••š •Ž FM20BX
211091 „‘• FM32
211092 U-Ž£ž‘¬•‘Ÿ «‘𣑠SX49A
211093 ¯‘ •”•Ž— ™Ž•¢-Ž FM94
211095 ±‘𙑠K242AB
211096 ²“•®“ FM25C
211097 U-Ž£ž‘¬•‘Ÿ «‘𣑠FM14
211098 ¯‘ •”•Ž— ™Ž•¢-Ž WK21BS
211099 „‘• FM30A
211100 ¯‘ •”•Ž— ™Ž•¢-Ž WK2
211101 °•®“‘ FM31A
211102 U-Ž£ž‘¬•‘Ÿ «‘𣑠SX49A
211103 ˆŽ“‘š•Žš ’••“ FM73
211104 ±‘𙑠FM29
211105
ª• •—— “ž‘•˜œŽž“•žŽ’Ž–•Ž— ™Ž•—˜Ž ˜ ’‘•Ž”
(#106-110) FM39XXX
211107 „‘• FM34
211109 U-Ž£ž‘¬•‘Ÿ «‘𣑠SX49A
211110 ¯‘ •”•‘Ÿ «‘𣑠FM94
211111
ª• •—— •‘œž‘’•Ÿ¥¦—— •˜“žŽš˜“’Ž ›•Ÿ
•—•“¡ FM11X
211112 ²“•®“FM15
211113 €‘˜œŽž•¡š žŽ••™ FM18
211114 ¯‘ •”•Ž— ™Ž•¢-Ž WK21BS
211115 „••“ TO105
211116 ±‘𙑠FM75
211117 ‚ž—œ— •¡š •¨Ž•Ž™ FM58
211118 „••“ TO256
211119 ±‘𙑠FM91
211120 Š—’‘Ÿ ”—“‘•••–—˜™‘Ÿ œžŽ™•‘›™‘ FM52ALX

211121 ˆž‘’‘Ÿ ”—“‘•••–—˜™‘Ÿ œžŽ™•‘›™‘FM52ARX
211122 …—ž—’Ÿ••¡š žŽ••™ FM59X
211123 ²“•®“ GE147
211124 „“••™‘ œŽ›«•œ••™‘ FM116
211125 †—œ‘ž‘“Žž žŽ••™ŽœŽ›«•œ••™‘ FM57EX
211127 „••“ TO256
211128 ±‘𙑠FM91
211129 „‘• E56GO
211130 €‘˜œŽž•‘Ÿ ’“••™‘ E57BGO
211131 €‘˜œŽž•‘Ÿ ’“••™‘ E57AGO
211132 €‘˜œŽž•‘Ÿ ’“••™‘ E57CGO
211133 „••“ TO256
211134 U-Ž£ž‘¬•‘Ÿ «‘𣑠1214
211135 „‘• E57GO
211136 ¯‘“’Žž (#137+139) FM108X
211138 ˆž• ••‘ FM23HD
211140 §‘™ ›•Ÿ ’Ž›¡ (œ•‘˜“•™ #141) FM6AXX
211143 ±‘𙑠˜ •‘™‘“™Žš ST28
211144 „••“ FM118
211145 ‚•˜“Ž–™‘ PW107A
211165 §•“¡•™‘ ›•Ÿ ’Ž›¡ (•Ž’‘Ÿ)FF6100
211167 …—ž ‘“—•¢ £•“¡•™•, œ•‘˜“•™ FF612P
211169 „••“ 0237710

BEDIENUNGSANLEITUNG
INSTRUCTIONS FOR USE
NOTICE D‘UTILISATION
HADE MATIC 80 PLUS

Halbautomatis her Klebestreifengeber HADE MATIC 80 PLUS
BEDIENUNGSANLEITUNG
1. AUSPACKEN
Bitte diese Zubehörteile ni ht übersehen:
1.1 Der Wasserbehälter mit 2
Anfeu htbürsten.
1.2 Pinselbes hwerung
1.3 Kunststoffwasserflas he
2. AUFSTELLEN UND EINRICHTEN
2.1 Die gewinkelte
Bandbes hwerungsplatte an den
Si herungsans hlägen des
Bandbegrenzungsble hes und an der
vorderen A hse anlegen.
2.2 Anfeu htbürsten zunä hst in warmem
Seifenwasser auswas hen.
2.2 Wasserflas he gefüllt so in die
Halterung legen, daß die
Flas henmündung vor der Stells hraube
aufliegt. (Verstellen der Stells hraube
erhöht oder senkt den Spiegel des
Wassertanks)
2.4 Klebestreifen-Begrenzungsble he
Den Klebestreifen in die Mitte des
Rollenkorbes legen, die
Begrenzungsble he anlegen und in die
dafür vorgesehenen S hlitze einrasten
lassen.
2.5 Klebestreifen
Den Kleberollenanfang unter das
Bandführungsble h bis zum
S hneidesystem führen.
2.6 Bes hwerungsplatte
Auf den Doppelbürsten liegt die
Bes hwerungsplatte, vorn als Rohr
ausgebildet zur Aufnahme von
zylindris hen Stahlgewi hten, bei
Anlieferung mit 2 Gewi hten ausgestattet.
Diese Anordnung ist ri htig für normale
und verstärkte Klebestreifen 75 gr/qm. Bei
lei hteren Papieren Gewi ht entfernen, bei
höher gewi htigem Klebestreifen zusätzli h
1 Gewi ht eins hieben, das dann auf
Anforderung gratis na hgeliefert wird.
3. BEDIENUNG
3.1 An der linken Seite der Mas hine
befindet si h das Transportgetriebe, auf
der Getriebeabde kung sehen Sie eine
Längenskala von 0-75 m. Im Abstand
von 5 m sind die Längen einstellbar.
Dazu die Einstellvorri htung dur h
Ho hziehen und Versetzen in die
jeweilige Lo hung bringen. Die über
dem Transporthebel si htbare Zahl ist
maßgebend.
3.2 Klebestreifentransport
Ziehen Sie den Transporthebel
glei hmäßig bis zum gewüns hten
Längenans hlag. Lassen Sie dann den
Handhebel zurü ks hnellen, der Streifen
ist dann sauber abges hnitten und kann
der Mas hine entnommen werden.
3.3 Größere Längen als 75 m lassen
si h aus der Mas hine produzieren dur h
mehrmaliges Betätigen des
Transporthebels (ohne ihn zurü k-
s hnellen zu lassen).
4. WARTUNG UND PFLEGE
Die Mas hine ist nahezu wartungsfrei.
Trotzdem sollten Sie bei längerer
Arbeitsunterbre hung, z.B. zum
Wo henende, die Anfeu htbürsten aus
der Mas hine nehmen und in ein
Wasserbad legen. Dadur h lösen si h
Klebstoffrü kstände, die
Anfeu htbürsten honorieren dies mit
längerer Lebensdauer.
Halten Sie die Mas hine sauber,
Vers hmutzungen, z.B. unter dem Band-
führungsble h, können zum Papierstau
führen, das Gerät kann dann ni ht
störungsfrei arbeiten. Im Falle eines
Papierstaus ziehen Sie den Klebestreifen
na h hinten heraus, etwaige Papierreste
sorgfältig entfernen.

Semi-automati gummed tape dispenser HADE MATIC 80 PLUS
INSTRUCTIONS FOR USE
1. UNPACKING
Remove all pa king material before using the ma hine, making sure that the following are
not thrown away:
BRUSHES – there are two in the water tank
WATER BOTTLE (PLASTIC) – pa ked under the rear over
UPPER TAPE PLATE – held in position by pa king materials. Remove all holding material
before using the ma hine.
2. SETTING UP
2.1 UPPER TAPE PLATE. Repla e this, if ne essary, as follows:
With entre slot towards front of ma hine slide under feed wheel shaft from rear until
the ut-out portions on the sides are over the retaining “buttons”. Lower the plate
and slide it forward so that the front end of the plate is registered under the rod just
to the rear of the shear and the sides are under the buttons
2.2 BRUSHES. It is parti ularly important that the brushes are washed thoroughly in
warm water with the soap or mild detergent to make their apillary a tion most
effe tive. Remove the tank and the brushes from the ma hine to do so and ensure
that on repla ement the high side of the brush bevel is towards the front side.
2.3 BOTTLE. Fill with warm water and pla e within the bottle holder so that the mouth is
in the tank and the shoulder is resting on the water level adjusting s rew. Set the
water lever (see “adjustments”).
2.4 ROLL GUIDES. Adjust to proper width for tape to be used (see “adjustments”).
2.5 TAPE (GUM IN). Unwind about 50 m of tape. Pla e the roll in the basket with the
free end of tape towards the ba k of the ma hine. Pass the leading edge under the
lower wooden roller then over the upper metal roller and on beneath the upper tape
plate. Ensure the tape is forward of the top feed wheel.
2.6 PRESSURE. Set pressure plate weight (see “adjustments”).
3. ADJUSTMENTS
3.1 ROLL GUIDE. Position a roll of tape entrally in the tape basket, slide the guides to
suitable positions on either side of it and drop them ba k in their slots.
3.2 MOISTENING. Heavier tapes will normally require more water than lighter tapes.
This is provided by raising the water level by turning the adjustment s rew
(lo ated in the proje ting part of the water tank) in an anti- lo kwise dire tion.
In reasing the weight on the top pressure plate also in reases the water supply and
spreads the water more evenly. Too mu h water results in a weak seal; also the tape
will tend to slide and need extra rubbing down. Redu e pressure before lowering
water level sin e ex essive pressure in reases brush wear. Too little water gives
inadequate and uneven adhesion.
3.3 SHEAR ADJUSTMENT. This adjustment is made at the fa tory and it should not be
ne essary to hange it unless diffi ulty is en ountered in utting tape.
Lift the front over and look dire tly down on the moving and stationary shear blades.
The two shear blades should only be onta ting ea h other on the right side. There

should be a gap on the left side de reasing in width until onta t on the right side.
Ordinarily this gap is about 1 mm to 1,5 mm on the left side. At no time the shear
blades should be parallel.
If it be omes ne essary to readjust the shear blades pro eed as follows:
a) Lo ate the shear adjusting s rew on the right side of the ma hine just in the ba k
of the tank (this s rew has a washer under it).
b) Loosen s rew only slightly so it an be slid up or down.
) If it is desired to in rease the gap slide the adjusting s rew upwards. To de rease
the gap slide the s rew downwards.
d) Retighten the s rew se urely and try dispensing tape, If adjustment is orre tly
made tape should be ut easily and leanly.
3.4 FEED STOP. A spring-loaded stop limits the movement of the handle rank ensuring
a urate repeat lengths of dispends tape. This length may be varied. It is set by
lo ating the stop against the length indi ated on the s ale.
3.5 SPRING TENSION. To adjust the springs turn the ma hine upside down after first
removing the water tank and bottle.
3.5.1 HANDLE RETURN SPRING. To in rease tension for faster handle return or for utting
extremely short lengths insert hook on spring lip in se ond or third hole.
3.5.2 FEED WHEEL TENSION SPRING. To in rease tension to ompensate for feed wheel
wear unhook spring at basket and move to a hole nearer to the rear of the ma hine.
For lighter tension move the end of the spring nearer to the front of the ma hine.
4. OPERATION
4.1 Che k that the setting up and adjustment pro edures have been arried out.
4.2 Position the roll guides and load the tape reel as previously des ribed.
4.3 Set the feed stop to the length of tape required.
4.4 Pull the handle forward to the stop and release it. Tape is dispensed during the
forward movement and ut on the return of the handle.
5. MAINTENANCE
5.1 CLEANING. It is most important to keep all working parts of the ma hine lean. Every
week at least the brushes should be washed thoroughly in warm water with soap or
mild detergent (make sure that they are repla e with the high side forward).
Every week the water tank should be removed from the ma hine and leaned.
Deposits of gum and dirt should be removed from all parts of the me hanism –
notably under the pressure plate where it tou hes the moistening brushes. Shear
blades should be leaned with a solvent or with a light ma hine oil – never s raped
with a knife of sandpaper.
5.2 KNIFE CLEANING. Remove the water tank and the bottle. Depress the ro ker stop
protruding from the right side of the ma hine with the right hand. Keep depressed
while pulling the knife assembly down and swinging it our to the leaning position.
Clean the knife by wiping with a suitable solvent – never s rape it. Wipe with lightly
oiled loth.
Re-insert the knife to utting position by depressing the ro ker stop rod as above,
tipping the knife up into utting position and pushing forward so that it is lo ated
between the stationary blade and the guide rollers. Release the ro ker stop rod.
5.3 LUBRICATION. The bearings are all oil retaining porous bushes whi h should not
require additional oil for the average life of the ma hine. However, all other working
parts should o asionally re eive a few drops of good grade light ma hine oil. The
gear me hanism (under the gear over on the left side of the ma hine) should be
greased, preferably with a graphite grease, about twi e a year.

Dévidoir semi-automatique de bandes gommées de type HADE MATIC 80
PLUS
NOTICE D EMPLOI
1. DÉBALLAGE
Ne pas oublier de déballer les a essoires suivants :
a) Ré ipient d’eau ave 2 brosses hume teurs
b) Plaque d’alourdissement de bande
) Bouteille d’eau plastique
2. MONTAGE ET INSTALLATION
2.1 Pla er la plaque d’alourdissement de bande oudée au niveau des butées de sé urité
de la tôle de délimitation de bande et au niveau de l’axe avant.
2.2 Nettoyer au préalable les brosses hume teurs ave de l’eau savonneuse haude.
2.3 Mettre la bouteille d’eau remplie sur le support de sorte que le goulot de la bouteille
soit positionné en regard de la vis de réglage (en déplaçant la vis de réglage on
augmente ou réduit le niveau du ré ipient d’eau).
2.4 Rails de délimitation des bandes gommées pla er le rouleau ollant au entre du
panier porte rouleau, mettre en position le rail de délimitation et l’en astrer dans la
fente prévue à et effet au bas de la partie in urvée et en haut dan l’axle.
2.5 Bande ollante. Faire passer le bout de rouleau sous la plaque de guidage de bande
jusqu’au point de oupe.
2.6 Plaque d’alourdissement. Sur les brosses doubles se trouve la plaque
d’alourdissement ayant devant la forme de tuyau et prévue pour a ueillir 1 á 3 poids
ylindriques en a ier ; elle est livrée ave un poids. La disposition telle qu’elle se
présente onvient à des bandes ollantes normales et renfor ées allant jusqu’à 75
g/m². Dans le as de papiers plus légers, retirer le poids, et dans le as de bandes
ollantes plus lourdes, ajouter 1 ou 2 poids, eux- i pouvant alors être livrés
ultérieurement gratuitement, sur demande.
3. UTILISATION
3.1 On trouvera sur le ôté gau he de la ma hine l’unité de transport et sur le apot du
mé anisme une graduation de 0 à 75 m pour la définition de la longueur. Les
longueurs sont réglables à des intervalles de 5 m. Mettre le dispositif de réglage
dans ha un des trous en tirant vers le haut et par dépla ements. Le hiffre
apparaissant au-dessus du levier de transport est dé isif.
3.2 Transport de bandes ollantes. Tirer d’une même intensité le levier de transport
jusqu’à la butée prédéfinie. Laisser revenir le levier manuel en position initiale ; la
bande est maintenant oupée de façon nette et peut être retirée de la ma hine.
3.3 On peut, ave la ma hine, produire des longueurs supérieures à 75 m en a tionnant
plusieurs fois levier de transport (sans le faire revenir en position initiale).

4. MAINTENANCE ET ENTRETIEN
La ma hine ne né essite pratiquement au une maintenan e. Il est toutefois re ommandé de
retirer les brosses hume teurs en as de pause prolongée, par exemple le week-end, et de
les mettre dans un bain d’eau. Les restes de olle s’enlèvent alors, les brosses hume teurs
ont alors une plus longue durée de vie.
Faire en sorte que la ma hine reste propre. Les impuretés, par exemple sous la plaque de
guidage de bande, peuvent ause un bourrage de papier, l’appareil ne peut alors plus
fon tionner orre tement. S’il y a bourrage de papier, sortir la bande ollante par l’arrière et
retirer soigneusement les mor eaux de papier pouvant apparaître.


TEILELISTE / PARTS LIST
TEIL
Item
ARTIKELNR
Article no. BEZEICHNUNG
Description deutsch english
#1 211001 FM2FX re htes Seitenteil Right frame
#3 211003 T1A Lagerbu hse Bearing
#4 211004 FM96 S hraube S rew
#5 211005 BS40 Unterlegs heibe Washer
#6 211006 FM75 Mutter Nut
#7 211007 PW134 Stift Groove pin
#9 211109 FM8 Gummiring Cover bumper
#10 211010 A47 Gummifuß Foot
#11 211011 PW17 Niet Rivet
#12 211012 FM1FX linkes Seitenteil Left frame
#14 211014 T1A Lagerbu hse Bearing
#15 211015 PW134 Stift Groove pin
#17 211017 PW35A Gummipuffer Bumper
#19 211019 FM8 Gummiring Cover bumper
#22 211022 FM117 Welle Tie rod
#23 211023 TO105 S hraube S rew
#24 211024 FM4 vorderer De kel Top over
#25 211025 FM5X hinterer De kel Rear over
#26 211026 FM64 Feder Spring
#27 211027 FM40 Winkelble h Tank shelf
#28 211028 TO105 S hraube S rew
#29 211029 FM75 Mutter Nut
#30 211030 FM3 Winkelble h Lower front over
#31 211031 FM61 S hraube S rew
#32 211032 FM91 Mutter Nut
#33 211033 FM80 Getriebeabde kung Drum
#34 211034 FM79C Skala S ale
#35 211035 FM99 S hraube S rew
#36 211036 1210 Unterlegs heibe Washer
#37 211037 FM100 Mutter Speed nut
#38 211038 FM110XX Feststeller, kpl. Crank stop assy
#39 211039 FM111 Federplatte Tension plate
#40 211040 APS61 Feder Spring
#41 211041 K206C S hraube S rew
#42 211042 FM16X Pinselbes hwerung Pressure plate assy
#44 211044 FM17 Gewi ht Weight
#45 211045 FM12EL Bandführungsble h Upper tape plate
#46 211046 FM21X Untermesser Stationary shear assy
#48 211048 FM23HD Feder Spring
#49 211049 FM41FX Hebel, kpl. Crank, pawl & handle
assy
#50 211050 FM41X Hebel, blank Crank
#53 211053 APS76 Stift Groove pin
#54 211054 K45 Blattfeder Pawl spring
#55 211055 GE94 Niet Pawl spring stud
#56 211056 K44B Rats he Pawl
#57 211057 FM43 Niet Pawl stud
#60 211060 FM70 Handgriff Handle grip
#61 211061 FM71 S hraube Handle bolt
#62 211062 SX49A U-S heibe Washer

TEIL
Item
ARTIKELNR
Article no. BEZEICHNUNG
Description deutsch english
#63 211063 1218 Klemmring Lo kwasher
#64 211064 K417A Mutter Nut
#65 211065 K417B Kappe Cap
#66 211066 GE79X großes Zahnrad, kpl. Drive gear assy
#71 211071 FM46 Hauptwelle Crankshaft
#72 211072 FM47 No ke Cam
#73 211073 023-519-0 Spannstift Roll pin
#74 211074 K35A 1/32 U-S heibe Washer
#75 211075 FM67 Welle Return spring pulley
shaft
#76 211076 TS324 Rolle Pulley
#77 211077 FM33AX Feder, 16 m Spring
#80 211080 FM49X Welle mit Ritzel Feed wheel shaft
#83 211083 FM51 Klemmring Retainer
#84 211084 KA35 1/64 U-S heibe Washer
#85 211085 FM101 Klemmring Retainer
#86 211086 E55506500 oberes Transportrad Feedwheel
#87 211087 EA46P Stift zu Transportrad Setpin
#88 211088 FM26XX Wippe, kpl. Ro ker & blade assy
#89 211089 FM26X Wippe Ro ker arm & bushing
assy
#90 211090 FM20BX Obermesser Shear assy
#91 211091 FM32 Welle Ro ker shaft
#92 211092 SX49A U-S heibe Washer
#93 211093 FM94 Klemmring Retainer
#95 211095 K242AB Mutter Nut
#96 211096 FM25C Stift Pivot pin
#97 211097 FM14 U-S heibe Washer
#98 211098 WK21BS Klemmring Retainer
#99 211099 FM30A Welle Striker shaft
#100
211100 WK2 Klemmring Retainer ring
#101
211101 FM31A Hülse Bushing
#102
211102 SX49A U-S heibe Washer
#103
211103 FM73 S hraube S rew
#104
211104 FM29 Mutter Nut
#105
211105 FM39XXX unt. Transportrad m. Welle Idler & shaft assy
#107
211107 FM34 Welle Idler shaft
#109
211109 SX49A U-S heibe Washer
#110
211110 FM94 Klemms heibe Retainer
#111
211111 FM11X untere Bandführung Lower tape plate assy
#112
211112 FM15 Stift Support rod
#113
211113 FM18 Distanzrolle Shear guide roller
#114
211114 WK21BS Klemmring Retainer
#115
211115 TO105 S hraube S rew
#116
211116 ST2888 Mutter Nut
#117
211117 FM58 Winkelble h Verti al tie plate
#118
211118 TO256 S hraube S rew
#119
211119 FM91 Mutter Nut
#120
211120 FM52ALX linkes Trennble h Left roll guide assy
#121
211121 FM52ARX re htes Trennble h Right roll guide assy
#122
211122 FM59X Holzrolle Roller assy
#123
211123 GE147 Stift Pin
#124
211124 FM116 Lagerbu hse Nylon bush
#125
211125 FM57EX Rollenkorb Coil basket
#127
211127 TO256 S hraube S rew
#128
211128 FM91 Mutter Nut
#129
211129 E56GO Welle Support

TEIL
Item
ARTIKELNR
Article no. BEZEICHNUNG
Description deutsch english
#130
211130 E57BGO Distanzhülse Spa er
#131
211131 E57AGO Distanzhülse Spa er
#132
211132 E57CGO Distanzhülse Spa er
#133
211133 TO256 S hraube S rew
#134
211134 1214 Unterlegs heibe Washer
#135
211135 E57GO Welle Roller
#136
211136 FM108X Riegel Ro ker stop bar assy
#138
211138 FM23HD Feder Spring
#140
211140 FM6AXX Wasserbehälter (Kst.) Plasti tank assy
#143
211143 ST28 Rändelmutter S rew
#144
211144 FM118 S hraube Thumb s rew
#145
211145 PW107A Pinsel Brush
#165
211165 FF6100 Wasserflas he (neu) Bottle (new)
#167
201167 FF612P Flas henhalterung Bra ket
#169
201169 0237710 S hraube S rew

GEBRUIKERSHANDLEIDING
HADE MATIC 80 PLUS
Halfautomatis he plakstrokendispenser
voor natplakband

Halfautomatis h plakstrookdispenser HADE MATIC 80 PLUS
GEBRUIKERSHANDLEIDING
1. UITPAKKEN
A.u.b. de toebehorende onderdelen niet
over het hoofd zien:
1.1 De waterhouder met 2
bevo htigingsborstels.
1.2 Kwastenverzwaring
1.3 Kunststof waterfles
2. OPZETTEN EN INRICHTEN
2.1 De gehoekte bandverzwaringsplaat
aan de zekeringsaanslagen van de
bandbegrenzerplaat en aan de voorste as
aanleggen.
2.2 Bevo htigingsborstels de eerste keer
in warm zeepwater uitwassen.
2.3 De gevulde waterfles dusdanig in de
houder plaatsen, dat de tuit zi h voor de
stels hroef bevindt. (Verstellen van de
stels hroef verhoogt of verlaagt de spiegel
van de watertanks)
2.4 Begrenzingsplaten voor plakstroken
De plakstroken in het midden van de
rolkooi leggen, de begrenzingsplaat
aanleggen en in de daarvoor bestemde
gleuf klikken.
2.5 Plakstroken
Het beginpunt van de plakbandrol onder
de bandgeleidingsplaat naar het
snijsysteem geleiden.
2.6 Verzwaringsplaat
Op de dubbele borstel ligt de
verzwaringsplaat, van voren als buis
afgebeeld, voor bevestiging van de
ilindris he staalgewi hten, bij aflevering
uitgerust met 2 gewi hten. Deze s hikking
is orre t voor normale en versterkte
plakstroken 75 gr/qm. Bij li hter papier
gewi ht verwijderen, bij hoger
plakstrookgewi ht 1 extra gewi ht
tussenvoegen, wat op verzoek gratis wordt
nageleverd.
3. BEDIENING
3.1 Aan de linkerkant van de ma hine
bevindt zi h een transportaandrijving.
Op de behuizing van de aandrijving ziet
u een lengtes haal van 0-75 m. De
lengtes zijn op 5 m afstand instelbaar.
Hiervoor het instelapparaat door
omhoogtrekken en verzetten in de
respe tievelijke boring brengen. Het
zi htbare nummer op de
transporthendel is maatgevend.
3.2 Plakstrooktransport
Trek gelijkmatig aan de transporthendel
tot aan de gewenste lengteafdruk. Laat
vervolgens de hendel terugs hieten, de
strook is dan afgesneden en kan van de
ma hine af worden genomen.
3.3 De ma hine maakt langere stroken
dan 75 m door de transporthendel
meerdere malen te bedienen (zonder
deze terug te laten s hieten).
4. ONDERHOUD EN SERVICE
De ma hine is nagenoeg onderhoudsvrij.
Desondanks dienen bij langere
werkonderbrekingen, b.v. het weekend,
de bevo htigingsborstels uit de ma hine
genomen genomen en in een waterbad
gelegd. Hierdoor kunnen de
plakstofresten oplossen, wat door de
bevo htigingsborstels wordt beloond
met een lange levensduur.
Houd de ma hine s hoon. Vervuilingen,
b.v. onder de bandgeleidingsplaat
kunnen tot papierverstopping leiden, het
apparaat kan dan niet storingsvrij
werken. In geval van
papierverstoppingen trekt u de
plakstroken er naar a hteren uit,
eventuele papierresten zorvuldig
verwijderen.


ONDERDELENLIJST
HADE # Benaming Ond.nr.
BP
211 000
Vervangingsonderdelen voor de MATIC 80
PLUS
211001 re hterkant FM2FX
211003 Lagerbus T1A
211004 S hroef FM96
211005 Onderlegplaatje BS40
211006 Moer FM75
211007 Pen PW134
211009 Rubberring FM8
211010 Rubberen voet, plus klinknagel (#11) A47
211011 Klinknagel PW17
211012 linkerkant FM1FX
211014 Lagerbus T1A
211015 Pen PW134
211017 Rubberbuffer PW35A
211019 Rubberring FM8
211022 Aandrijfas FM117
211023 S hroef TO105
211024 voorste behuizingsdeel FM4
211025 a hterdeel behuizing FM5X
211026 Veer FM64
211027 Hoekplaat FM40
211028 S hroef TO105
211029 Moer FM75
211030 Hoekplaat FM3
211031 S hroef FM61
211032 Moer FM91
211033 Aandrijfbehuizing FM80
211034 S haal FM79C
211035 S hroef FM99
211036 Wasser 1210
211037 Moer FM100
211038 Bevestiger, ompl. (# 39-41) FM110XX
211039 Veerplaatje FM111
211040 Veer APS61
211041 S hroef K206C
211042 Kwastverzwaring, in l. gewi ht FM16X
211044 Gewi ht FM17
211045 Bandgeleidingsplaat FM12EL
211046 Ondermes, ompl. met 2 x veer #48 FM21X
211048 Veer FM23HD
211049 Hendel, ompl. (# 50-65) FM41FX
211050 Handel, kaal (#51,52,58,59) FM41X
211053 Pen APS76
211054 Bladveer K45
211055 Klinknagel GE94
211056 Ratel K44B
211057 Klinknagel FM43
211060 Handgreep FM70
211061 S hroef FM71
Table of contents
Other Hadeco Dispenser manuals