HAGENUK Venga 300 User manual

- 1 -
Venga 300 Skype DECT
2-in-1 Skype/DECT phone
Instruction Manual

- 2 -
Contents
Chapter 1: Installation ....................................................................................................................4
Parts included .........................................................................................................................4
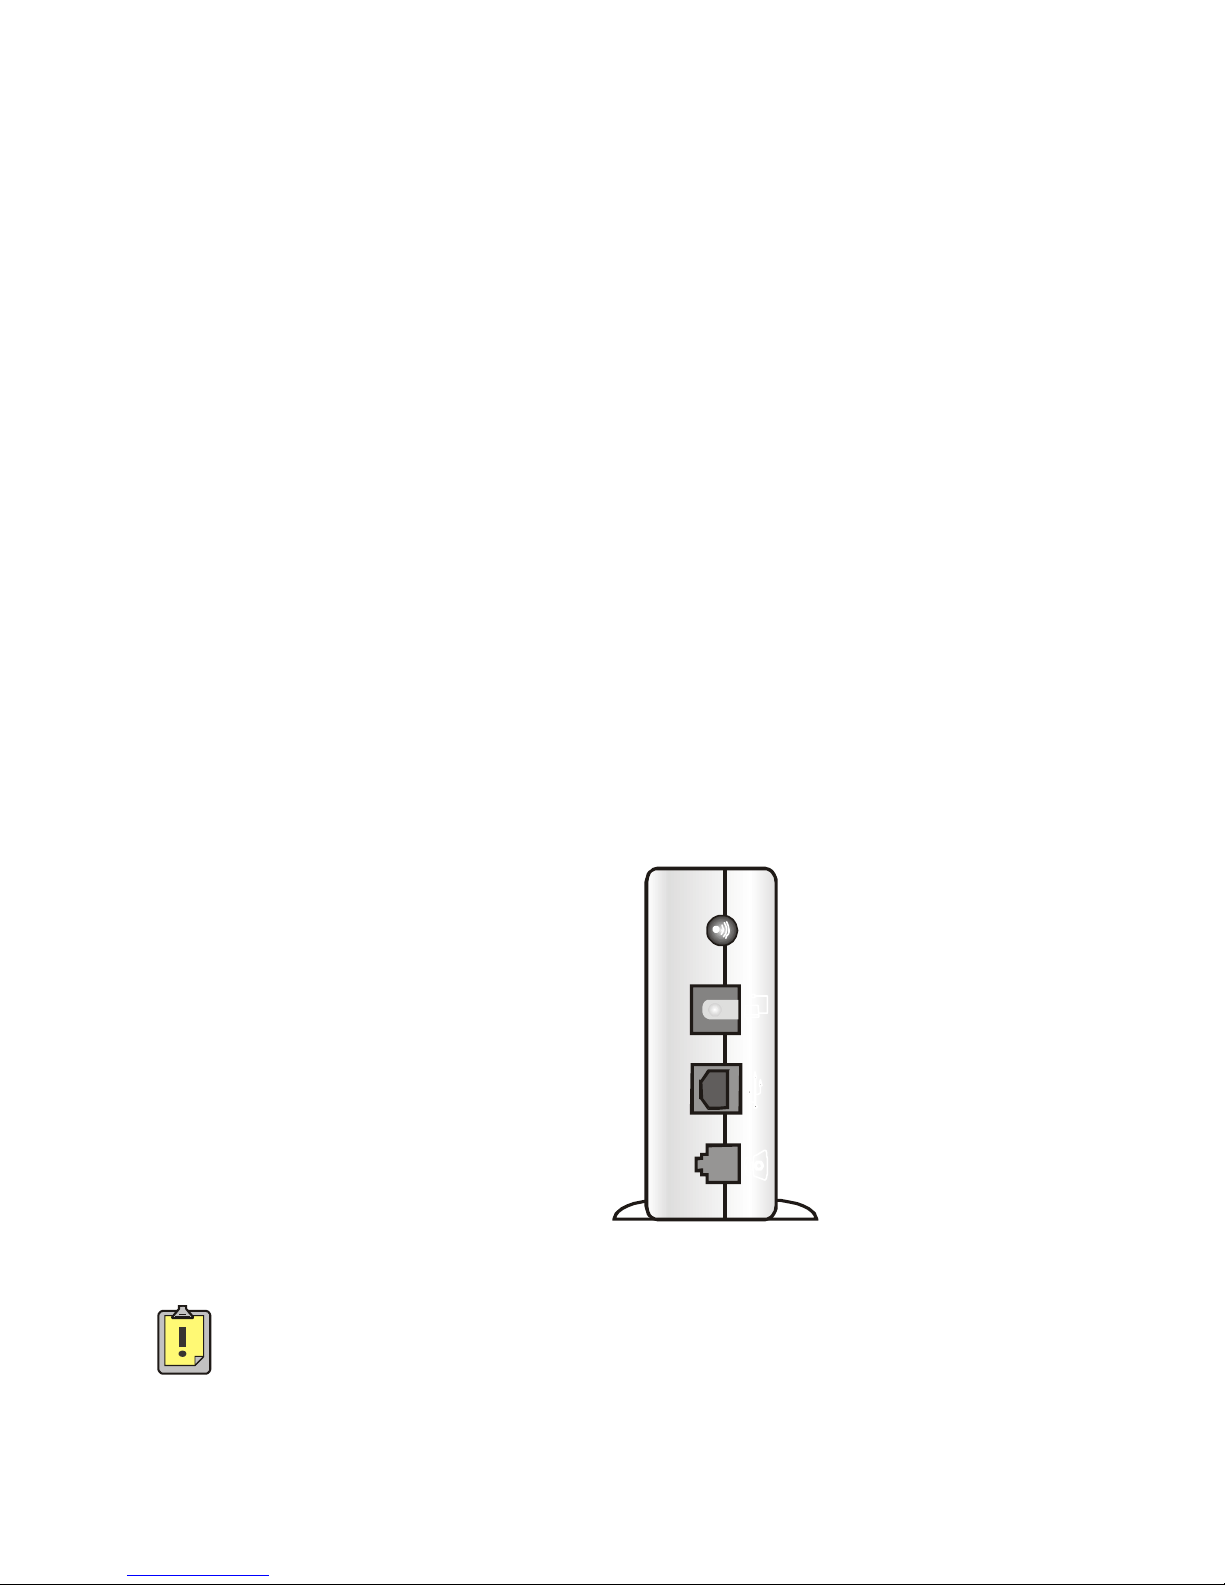
Installation – Base unit...........................................................................................................4
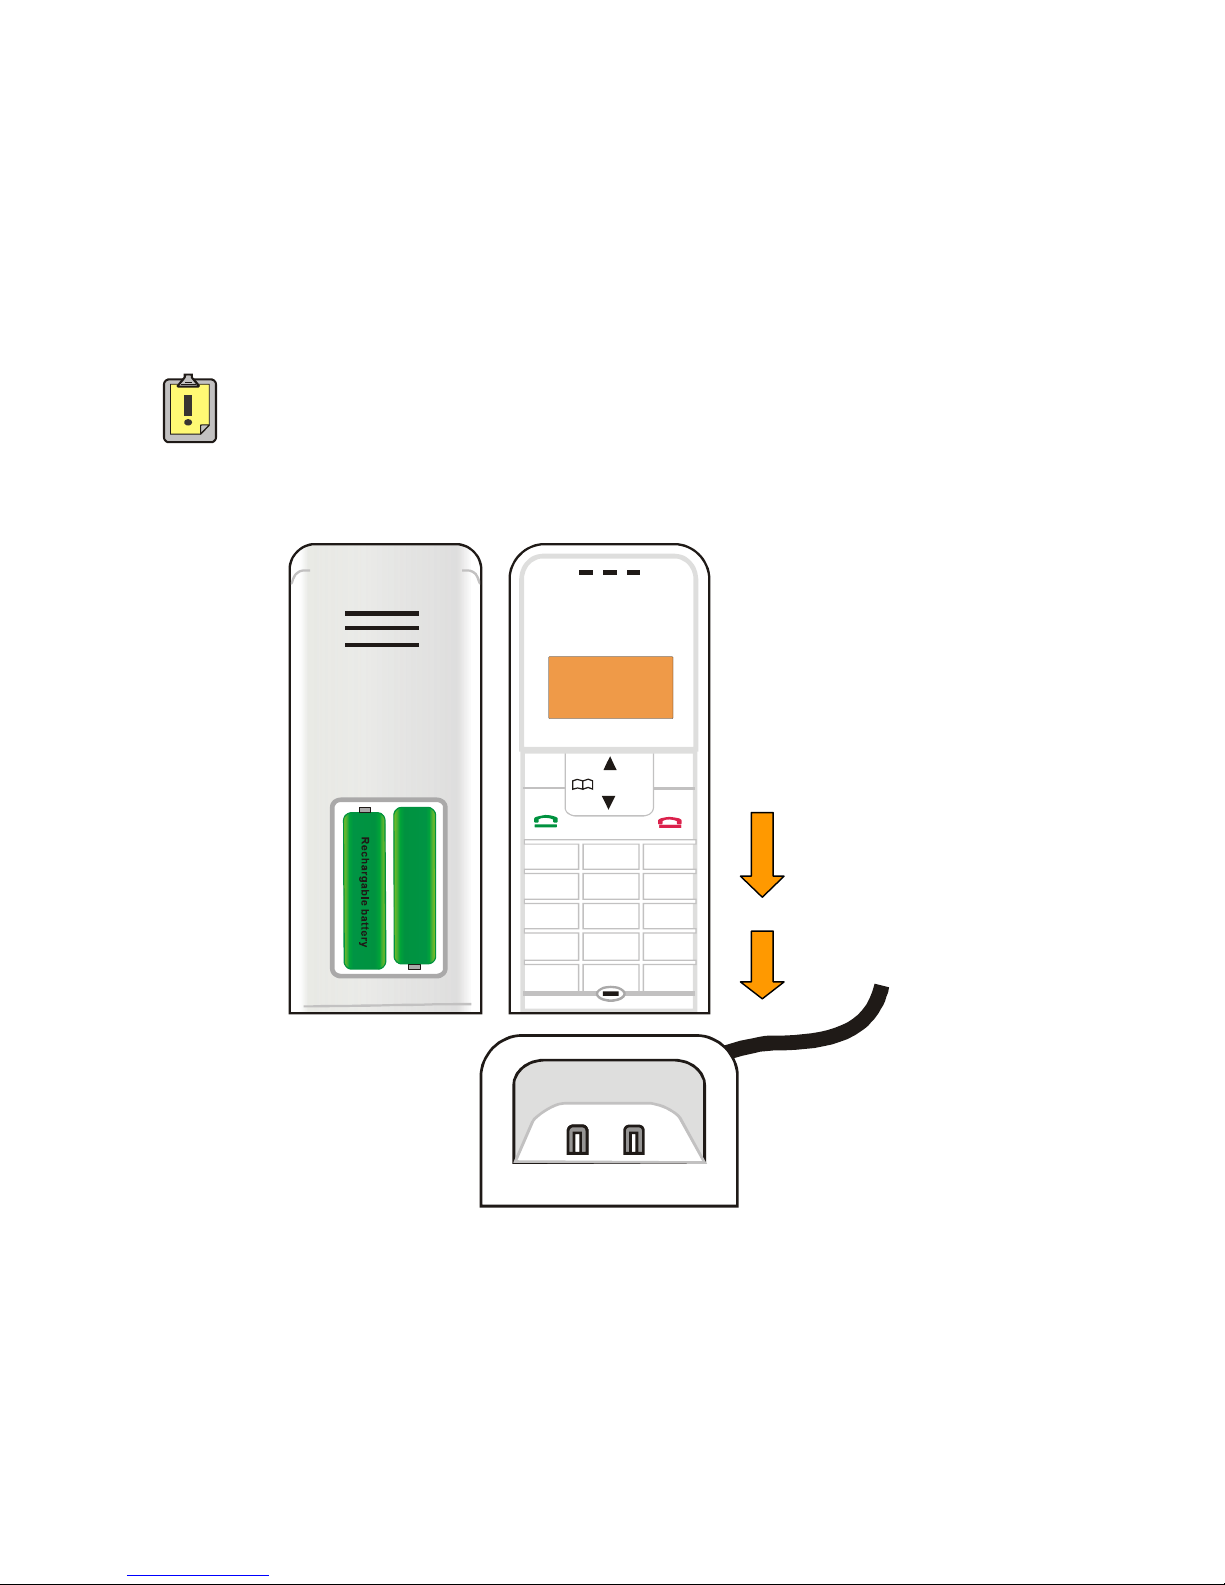
Installation - Handset..............................................................................................................5
Chapter 2: Handset Unit.................................................................................................................6
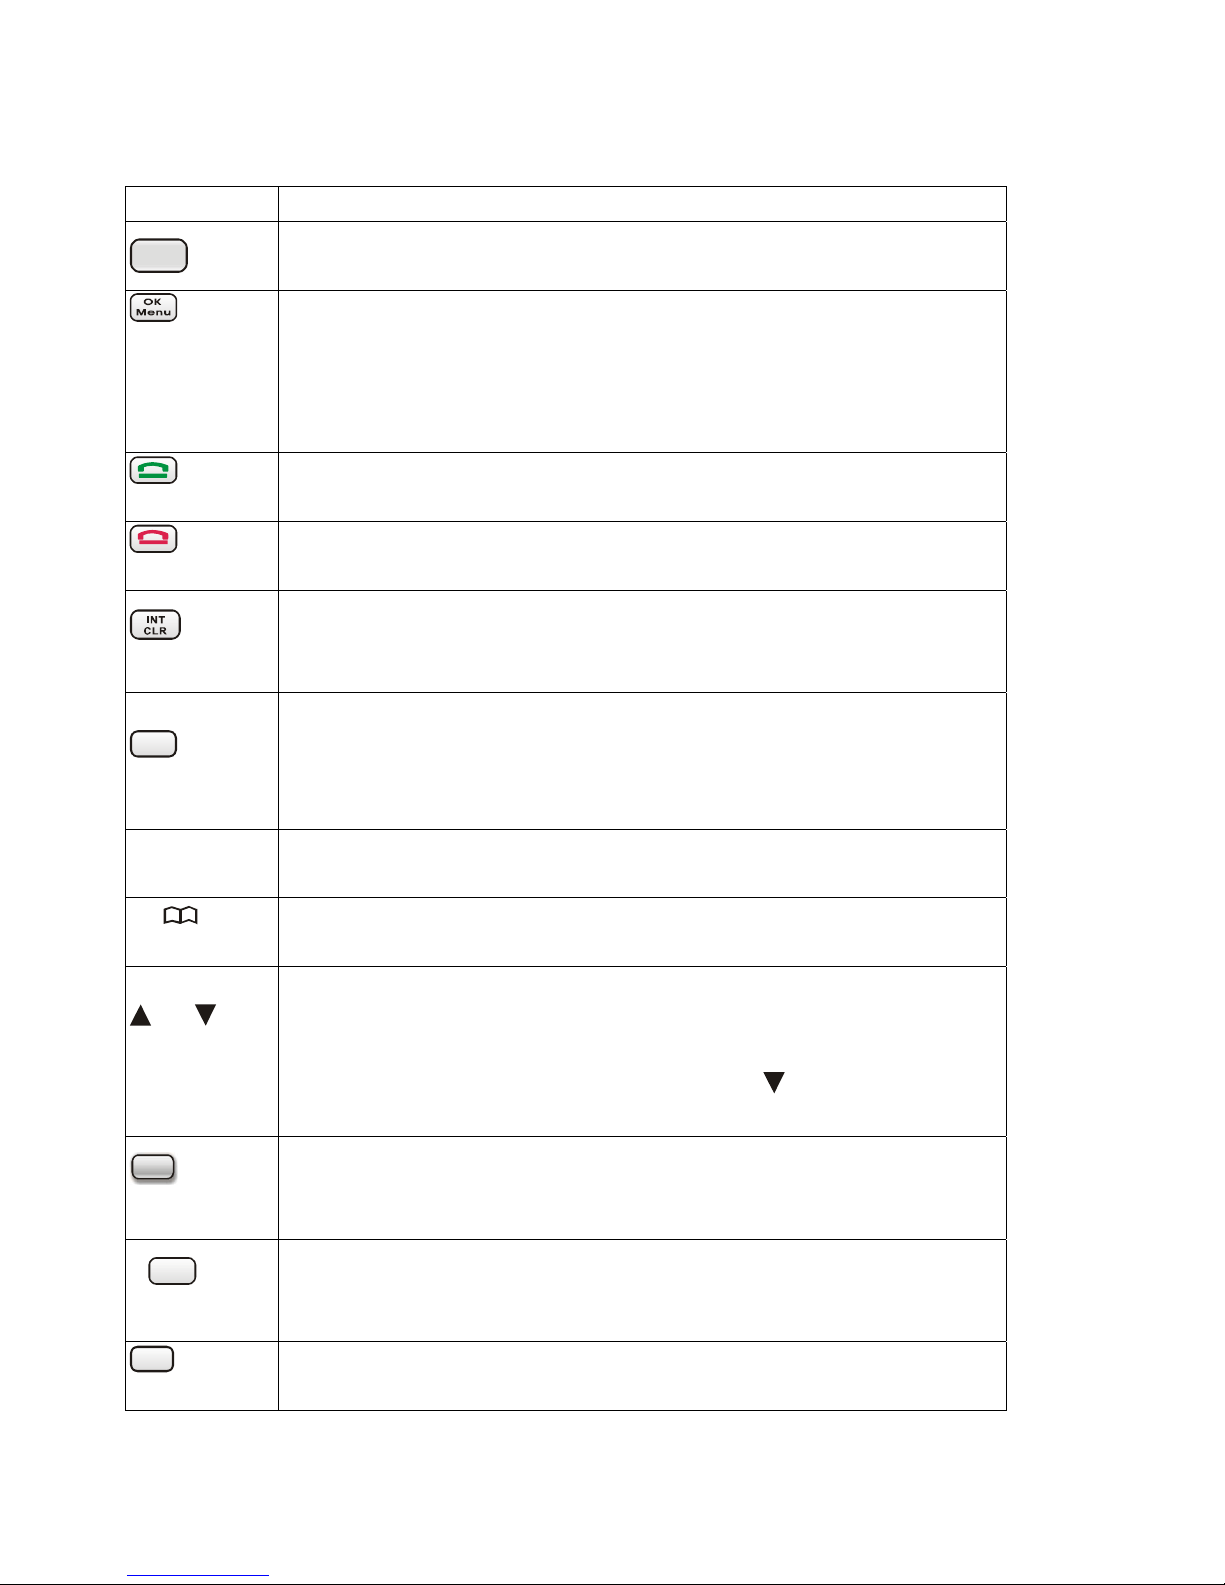
Handset panel .................................................................................................................6
LCD................................................................................................................................9
Chapter 3: Handset.......................................................................................................................10
Preparatory dialing (pre-dialing)..................................................................................10
Redialing.......................................................................................................................10
Making a call using the phonebook..............................................................................10
Skype™ Dialing...........................................................................................................11
Redial – Skype™..........................................................................................................11
CID Call back – Skype™.............................................................................................12
Preparatory dialing (SkypeOut™)................................................................................12
Chapter 4: Menu Structure:..........................................................................................................13
Handset.................................................................................................................................14
Setting Ringer...............................................................................................................14
Auto PickUp setting (On/Off) ......................................................................................15
Selecting a Language....................................................................................................16
Base ......................................................................................................................................16
Call Barring Setting......................................................................................................16
Removing a handset from the base (de-registration)....................................................18
Setting the Dial mode...................................................................................................18
PABX pre-fix code .......................................................................................................18
Recall (Flash) time .......................................................................................................19
Pause (time) Setting......................................................................................................20
PIN change ...................................................................................................................20
System ..................................................................................................................................21
Changing the name of your handset (handset name)....................................................21
Registering a new handset with your base station........................................................21
Keypad Lock/unlock ............................................................................................................23
Baby Sit................................................................................................................................23
You can monitor a baby room with your handset.........................................................23
Chapter 5: Phonebook ..................................................................................................................25
Making a call using the phonebook..............................................................................25

- 3 -
Storing a name and number in your phonebook...........................................................25
Editing a record in the phonebook................................................................................26
Removing record from your phone book .....................................................................26
Removing all entries from your phone book................................................................27
Chapter 6: Caller identification (CID)..........................................................................................28
Reviewing the caller list...............................................................................................28
Chapter 7: VoIP Operations.......................................................................................................30
VoIP Call Transfer - Handset-to-handset......................................................................33
VoIP Call Transfer -Handset-to-PC..............................................................................33
VoIP Call Transfer -PC-To-Handset.............................................................................34
Put a Skype™ Call On Hold ........................................................................................34
Call Switch between Two Skype™ Calls.....................................................................34
Chapter 8: VoIP Menu ..................................................................................................................35
Change Status Option...................................................................................................36
Contact List Option ......................................................................................................36
Sel. Callerlist Option....................................................................................................36
User Name Option........................................................................................................36
Chapter 9: 2-in-1 SkypeDECT.....................................................................................................36
Set Audio Device..........................................................................................................37
Check Update ...............................................................................................................38
Setup.............................................................................................................................39
Select Language............................................................................................................40
About............................................................................................................................40
Appendix-A: Specifications .........................................................................................................41
Appendix B: Trouble Shooting.....................................................................................................42
Appendix C: System Requirements..............................................................................................43
Appendix D: Warranty Terms.......................................................................................................43

- 4 -
Chapter-1: Installation
hagenuk Venga 300 Skype DECT is a cordless phone which can access both analogue
phone lines (PSTN) and Skype™ internet communication services. By using this device,
you can enjoy free VoIP calls over the Internet (if registered to Skype) and you can still use
it as an analogue cordless phone.
Parts included
1. Handset unit
2. Baseunit
3. Charger unit connected with power adaptor
4. Power adaptor for base unit
5. 2 x rechargeable batteries
6. Telephone line cord (RJ11)
7. USB cable
8. Installation software/manual on CD-R
Installation – Base unit
1. Connect the power adaptor with the wall
outlet and connect the wiring plug into the
adaptor jack located at the side face of the
base unit. A LED indicates the power on
state of the base unit.
2. Connect the telephone line cord to the
telephone wall socket, and plug the other
end to the base unit.
3. Plug the USB cable to socket on base as
shown, and plug the other end to any free
USB port on your computer.
Remark: Before connecting USB cable to PC, please install the software
which is available on CD-R. Kindly verify that your PC system allows to run
this device (see page 43 of this manual).
Paging key
AC Adaptor
USB
Analogue
Telephone Line

- 5 -
Installation - Handset
1. Carefully remove the battery cover of the handset, insert the batteries into the battery
compartment according to the polarity shown (+ and -). Close the battery cover.
2. Place the handset into the charger. The CHARGE indicator on the base will turn on as
indication and “charging” will be shown on LCD.
For initial set up, it is necessary to charge up
the battery for at least 10 hours before use.
+
-
Rechargablebattery
+-
123
456
789
0
*#
Redial
Scroll
INT
CLR
Skyp e
OK
Menu
CID
Recall Pause
Skype

- 6 -
Chapter –2: Handset Unit
Handset panel
1. LCD panel (backlit) with 2 lines x
16 characters plus icons
2. Center of the panel is a navigation key
with Up/Down arrows plus phonebook
& CID access key
3. The ‘Talk’ key is used to accept a call.
Press this key during a call to switch
the handsfree function -On/Off
LCD Panel with
Back-Light
Ok/Menu
End
Receiver
VoIP
Phonebook View CID
Talk/Speaker
Redial/Scroll
Microphone
Pound & Pause
Intercom/Clear
Star & Recall (R)
123
456
789
0
*#
Redial
Scroll
INT
CLR
Skyp e
OK
Menu
CID
Recall Pause
Skype

- 7 -
Function keys
Key Functions
Skype
‘Skype’key is used to enter the Skype™ mode and view Skype’s contact list.
1. ‘Ok/Menu’key is used to start the handset menu or to confirm a menu
operation
2. Press and hold this key during the idle mode to temporarily disable the
PABX function
1. ‘Talk’ key is used to start calling.
2. During a conversation press this button to switch the handsfree On/Off..
1. ‘End’key is to end a call or to leave the current operating mode.
2. This key is also used to exit the menu.
1. INT function is used to start the intercom mode.
2. Clear function is used to delete the last entered digit/letter during edit
mode.
Redial
Scroll
1. Redial/Scroll key is used to view the 10 last numbers stored in the redial
list.
2. Also used to show the next part of the phone number on the display if the
phone number is longer than 16 digits
CID ‘CID’key is used to view the content of CID log in PSTN or CID log in
Skype™.
‘Phonebook’key is used to view the phone number in PSTN-mode or Contact
list in Skype™ mode.
&
1. ‘Up’and ‘Down’key is used to scroll the phonebook list and CID log.
2. During a call, press these keys to increase or decrease the earpiece or
speaker volume.
3. During a call, pressing and hold the ‘Down’key ( ) for 2secs will
activate/deactivate the mute function.
*
/R 1. The ‘*/Recall’key is used to enter the ‘*’if pressed once.
2. Can be used as ‘Recall’key if pressed and hold for around 1.5 seconds in
dialing mode.
P/
#
1. The ‘#/Pause’key is used to enter the ‘#’=number sign if pressed once.
2. It works as ‘Pause’key if pressed and hold for around 1.5 seconds in dialing
mode.
1
1. The ‘1’key is used to enter the DTMF ‘1’if pressed once

- 8 -
2. The ‘1’key is also used to connect to Skype™ Voice Mail by pressing and
holding this key during Skype™ Mode.
0
1. The ‘0’key is used to enter the DTMF ‘0’ if pressed once.
2. The ‘0’key is also used for transferring a call from handset to PC during a
Skype call.
’Search’/”paging” key, on the Base unit.
1) By pressing this button, the handset will ring about 15 seconds. To stop the
paging process, simply press the ’Search’/”paging” button again.
2) By pressing and holding for longer than 10 seconds, the base unit will start
the registration mode (for new handsets).

- 9 -
LCD
The 2 upper lines have dot-matrix display (each max 16
characters). The bottom line displays max. 10 icons.
Icon Meaning
Talk-icon. Talk mode is ON.
Speaker-icon. Speaker mode is ON.
Mute-Icon. The microphone is OFF.
Ringer-Icon. The ringer is OFF.
CID-Icon. A new CID number waiting.
Message-icon. Message waiting.
Repeat-icon. The CID is a repeated CID.
Key lock-icon. The keypad is locked.
Base/Handset link.
Battery level indicator, fully charged
only 2/3 charge
only 1/3 charge
Low battery indication

- 10 -
Chapter-3: Handset
Preparatory dialing (pre-dialing)
1. Enter the number (Up to 32 digits). You can use the ‘Clear’ key to
make corrections by deleting the last digit entered. If the number
entered is longer than 16 digits, the display will scroll the number to
the left to show the last digits.
2. Press the key to dial out the number in PSTN-mode.
3. To hang up, press key or return the handset to the charger. The call duration
will be displayed for 5 seconds after the call.
Redialing
1. In standby, press the ‘Redial/Scroll’ key on the handset. The last dialed number will be
displayed. Use 'UP' or 'Down' keys for choosing the redial number (max. 10 redialed
number stored).
2. Press the key to initiate the call.
3. It is also possible to redial in off hook-mode. In off hook-mode, press ‘Redial/Scroll’ key
followed by 'Up'/'Down' for choosing the redial number. Now press again to
start the call.
Saving a redial number to your phonebook is possible, please refer to CID chapter (page
28).
Making a call using the phonebook
1. Press the key on the handset.
2. Press ‘Up’ or ‘Down’ to scroll through the list of phonebook entries. If the number is
longer than 16 digits, press ‘Scroll’ to see the rest of the digits.
3. Or enter the first character of the name you are searching for (e.g. press # 5 for K). The

- 11 -
first name with this starting character will be shown. Use ‘Up’ or ‘Down’ to scroll
through the rest of the list.
4. Press key, the phone will seize the line and dial out the number automatically.
5. Phone book dialing in off hook-mode. In off hook-mode, select the phonebook entry as
described above. To start the call, press the key.
Skype™ Dialing
1. Press the
Skype
key once, first name of Skype’s contact list will be shown.
2. Please use ‘Up’ or ‘Down’ key to navigate through the list.
3. Or press the first character of the name you are searching for (e.g. press # 3 for D)
4. Once the name appears, press key to initiate your call.
5. To enable the handsfree mode during the call press the again.
6. Press key to hang up.
Redial – Skype™
1. Press the
Skype
key once, first name of Skype’s contact list will be shown.
2. Press the
Redial
Scroll
button, the last dialed contact name with details will be shown instead.
3. Press the ‘Up’ or ‘Down’ key to navigate through the list (up to 10 entries).
4. Once the requested contact name is shown in the display, press key to start the
call.
5. Press to hang up.

- 12 -
CID Call back – Skype™
1. Press
Skype
on the handset, first name of Skype’s contact list will be shown.
2. Press the ‘CID’ button, the missed Skype calls will be shown (if any).
3. Press the ‘Up’ or ‘Down’ key to navigate through the list.
4. You can simply press to call back the displayed Skype subscriber.
5. Press to hang up.
Preparatory dialing (SkypeOut™)
1. Please see paragraph “Preparatory dialing” as described on page 10.
2. Enter the phone number in idle mode.
3. Press
Skype
on the handset.
4. Talk to the called party when the connection has succeeded.
5. To hang up, press or return the handset to the charger.
You have to purchase Skype™ credit first before using SkypeOut™ service.
All SkypeOut™ calls are handled as international calls (even local calls),
therefore ‘00’ or ‘+’ should be dialed prior to dialing the area code followed by
number. For example: 0049(Germany) 721(area code) 1234(number)

- 13 -
Chapter 4: Menu Structure:
Menu Level –1 Menu Level-2 Menu Level-3 Selections
Handset
Ringer Melody ━━━ (Melody 1 ~ Melody10)
Volume ━━━ (Voume1 ~ Volume3)
KeyTone ━━━━━━━━━━ (On/Off)
Auto-pickup ━━━━━━━━━━ (On/Off)
Language ━━━━━━━━━━ English/German/French/Italian
Base
Call Barring ━━━━━━━━ Empty1 ~ Empty3, Delete All
Remove HS ━━━━━━━━━━ (1 ~ 4)
Dialing Mode ━━━━━━━━━━ Tone/Pulse
PABX ━━━━━━━━━━ Mem1
Pin Change ━━━━━━━━━━ 4 digits code
Recall ━━━━━━━━━━ 100/120/270/300/375/600/800mS
Pause ━━━━━━━━━━ 1/2/3 seconds
System
Handset Name ━━━━━━━━━━ Enter a name (up to 6 letters)
Register ━━━━━━━━━━ Register the handset to base
KeyLock ━━━━━━━━> ━━━━━━━━━-- On/Off
Baby Sit ━━━━━━━━━━> ━━━━━━━━━━ On/Off

- 14 -
Handset
Setting Ringer
You can change the handset ringer melody and volume. There are three possible ringer
tones & 9 polyphonic melodies. Ringer volume can be changed as follows: 3 levels and off.
Setting melody
1. Press key, then press ‘Up’ or ‘Down’ until you reach ‘Menu Handset’. Press
.
2. Scroll ‘Up’ or ‘Down’ until you reach ‘Handset Ringer’, then press key and
‘Ringer Melody’ is shown.
3. Press key, the current set melody ‘Melody-n’ is displayed and heard. Press 'Up'
or 'Down' to select a new melody, the new melody will be heard for your selection.
4. Press to choose and set a new melody.
Setting volume
1. Press key, then scroll ‘Up’ or ‘Down’ until you reach ‘Menu Handset’. Press
.
2. Press ‘Up’ or ‘Down’ until you reach ‘Handset Ringer’, then press ’. ‘Melody’ is
shown.
3. Press 'Up' or 'Down' key to select ‘Ringer Volume’ and press
4. Current selected volume (and the current melody) will be heard and displayed.

- 15 -
5. Press ‘Up’ or ‘Down’ to scroll through the volume options, the new volume will be
heard and displayed. Press to confirm. Press 'End' to abort an entry.
Key tone setting (On/off)
1. Press key, then press ‘Up’ or ‘Down’ to display 'Menu Handset'. Press .
2. Press ‘Up’ or ‘Down’ until 'Handset Keytone' is displayed, then press .
3. Press ‘Up’ or ‘Down’ to select 'On' or 'Off', then press .
Auto PickUp setting (On/Off)
1. Press , then press ‘Up’ or ‘Down’ to display 'Menu Handset'. Press .
2. Press ‘Up’ or ‘Down’ until 'Autopickup' is displayed, then press .
3. The current setting is shown with ‘*’ as the first character.
4. Press ‘Up’ or ‘Down’ to select 'On' or 'Off ', then press .
This function allows to pickup the phone from the charger
(if receiving an incoming call) without using the 'Talk' key.

- 16 -
Selecting a Language
1. Press key, then press ‘Up’ or ‘Down’ to display 'Menu Handset'. Press .
2. Press ‘Up’ or ‘Down’ until 'Language' is displayed, then press .
3. Press ‘Up’ or ‘Down’ to select a language, then press .
You can select: English/German/French/Italian.
Base
1. Press key in the idle state.
2. Press ‘Up’ or ‘Down’ until 'Menu Base’ is shown and press key.
3. The display will show 'PIN' for requesting the password for accessing Base setting.
4. Enter the PIN code, then press 'Ok ' key.
5. The first item of the Base menu will be shown:
The default PIN code is ‘0000’
Call Barring Setting
Call barring is the function which prevents a long-distance call or the number beginning
with the preset string being dialed from the handsets registered to the base unit. Kindly
note that a barred number will apply to all handsets.
You can setup the barred number on any handset by the following procedure:

- 17 -
1. After confirming the password, press ‘Up’ or ‘Down’ until 'Call Barring' is displayed,
then press key.
2. Press ‘Up’ or ‘Down’ to select an empty location, such as Empty-1, then press
key.
3. Now enter the barred number, e.g. 00 (up to 4 digits) and then press key. None
of the handsets can dial out a number starting with the barred number, e.g. 00.
Default setting offers already three different kinds of numbers.
You may remove the barred number by the following operation:
1. After confirming the password, press ‘Up’ or ‘Down’ until 'Call Barring' is displayed,
then press key.
2. Press ‘Up’ or ‘Down’ key to find the barred number to be removed from the handset
and press key.
3. Press to completely delete the barring number and press key to confirm.
Or you may also remove all the barred number by the following operation:
1. After confirming the password, press ‘Up’ or ‘Down’ until 'Call Barring' is displayed,
then press key.
2. Press ‘Up’ or ‘Down’ key until ‘Delete All’ is shown and press key.

- 18 -
Removing a handset from the base (de-registration)
1. After confirming the password, press ‘Up’ or ‘Down’ until 'Remove HS' is displayed,
then press
2. Press ‘Up’ or ‘Down’ to scroll through until you reach 'Remove HS', then press
key.
3. Press ‘Up’ or ‘Down’ to enter the handset you wish to remove. (Remark: at least 2
handsets have to be registered to use this function)
4. You can press key to give up the removal.
A handset cannot be removed if it was registered by default (during production).
Setting the Dial mode
1. After confirming the PIN code, press ‘Up’ or ‘Down’ until ‘Dial Mode’ is shown,
then press key,
2. Press ‘Up’ or ‘Down’ to Enter Tone or Pulse dialing mode,
3. To confirm press key. A beep is heard for confirmation.
The selected item will have a "*" mark (e.g. *Tone) as indication.
PABX pre-fix code
This function allows you to insert a prefix code to a number for dialing.
1. After confirming the PIN code, press ‘Up’ or ‘Down’ until PABX is displayed, then
press key.

- 19 -
2. Enter the pre-fix code (e.g. digit 9, and up to 4 digits) and followed by the key.
3. If you call the following number (eg. 85734), the unit will add the code 9 to the
number (becomes 985734).
Temporarily deleting a pre-fix code before a call is possible by pressing and holding
key (~2s) until a beep is heard. Enter a number and press ‘Talk’ key, the unit
dials out the number without the pre-fix code. For any next call, the set pre-fix code
will become active again.
The PABX pre-fix code can be removed by the following operation:
1. After confirming the PIN code, press ‘Up’ or ‘Down’ until PABX is displayed, then
press key.
2. Press key to clear the PABX number and press key to confirm.
Recall (Flash) time
1. After confirming the PIN code, press ‘Up’ or ‘Down’ until ‘Flash Time’ is displayed,
then press key.
2. The currently set recall time will be displayed with ‘*’. You may press ‘Up’ or
‘Down’ to select one of the different options. Please press key to confirm.
Possible flash times are: 100 ms, 120 ms, 270 ms, 300 ms, 375 ms, 600 ms and 800
ms. Be careful before changing the setting. Consult your service provider if you
are not sure which recall/flash time is common.

- 20 -
Pause (time) Setting
A different pause length can be selected (for example needed if you operate through PABX)
1. After confirming the PIN code, press ‘Up’ or ‘Down’ key until you reach PAUSE, then
press key.
2. Press ‘Up’ or ‘Down’ to select either 1, 2 or 3 seconds then press again to
confirm.
Factory default setting is 3 seconds.
PIN change
Your phone has a 4-digit PIN for protecting its settings. The default setting is ‘0000’ and
you can change your PIN code for security purposes.
1. After confirming the PIN code, press ‘Up’ or ‘Down’ until 'PIN CHANGE' is displayed,
then press .
2. 'Old PIN' is displayed, type in your current PIN (0000) and then press .
3. 'New PIN' is displayed. Enter the new 4-digit PIN and then press .
4. Press to store the setting. A beep is are heard for confirmation.
Table of contents
Other HAGENUK Telephone manuals