Haiboxing 2118 User manual

Please completely read and understand the entire manual before using, assembling and/or
disassembling your remote controlled car.
INSTRUCTION MANUAL
LENGTH WIDTH HEIGHT
WHEELBASE
WHEEL DIA. WHEEL SPAN GROUND
CLEARANCE
110mm182mm 122mm 70mm
46mm
19mm
Notification: This data is subject to change without the prior notice.
1/24TH SCALE FOUR WHEEL DRIVE ELECTRIC POWERED VEHICLES
This product is not a toy. It is not intended for persons under 14 years of age, unless closely
supervised by an adult.
This manual is subject to change without prior notice.
GEAR RATIO
1:9.06
22mm
ITEM NO.:2118
Technical Data: Off-Road Buggy
OFF-ROAD BUGGY
READY TO RUN
ITEM NO.:2128
OFF-ROAD TRUGGY
ITEM NO.:2138
OFF-ROAD TRUCK
Technical Data: Off-Road Truggy
Technical Data: Off-Road Truck
These are 1/24th scale hobby grade R/C cars which are ready to go where the big cars can not.
Because of a tiny size, the smallest of spaces are transformed into big adventures. There 1/24th
scale hobby buggy/truggy/truck are built in RTR version, equipped with 2.4Ghz radio system.
LENGTH WIDTH HEIGHT
WHEELBASE
WHEEL DIA. WHEEL SPAN GROUND
CLEARANCE
110mm190mm 130mm 72mm
48.5mm
24mm
GEAR RATIO
1:9.06
25mm
LENGTH WIDTH HEIGHT
WHEELBASE
WHEEL DIA. WHEEL SPAN GROUND
CLEARANCE
110mm168mm 133mm 75mm
49mm
25.5mm
GEAR RATIO
1:9.06
25.5mm

This user's manual is designed for use with your vehicles and contains the instructions you will
need to assemble, operate and maintain your vehicles.
We know you are anxious to start driving, but it is very important that you take time to read the
manual even if you are an experienced R/C driver.
Carefully read and follow all instructions in the manual. Failure to follow the instructions will
be considered abuse and/or neglect and may void the warranty.
Your vehicle is designed to run on uneven or rough terrain. However dust, sand, water and
carpet fibres can lodge in the working parts of your cars and can damage your vehicle if not
removed promptly. We do not warranty your vehicle from damage due to outside elements
including sand, dirt or water. The users are responsible for the maintenance and safe operation
of this vehicle.
This product is not a toy. It is not suitable for users under 14 years old unless they are supervised
by adults.
Never attempt to re-assemble any electronic components. These have been carefully calibrated
at the factory.
Only use manufactured parts to upgrade your car. If you perform a drive train upgrade, replace
the entire system (Such as motor, ESC/receiver unit and the like) so that all components are properly
matched. Any malfunction incurred by custom modification will void your warranty.
Before driving your vehicle, please read this manual completely and examine your vehicle and
radio control for any defects.
For better performance, some adjustment may be necessary.
This vehicle requires batteries ( included in the car or in the packaging). Make sure the vehicle's
batteries have a sufficient charge before driving or possible loss of control may result. The radio
controller requires three AA size batteries (not included in the packaging).
Always remove batteries from the vehicle and the radio controller when not in use.
Please operate your vehicle in a spacious area. Never operate your vehicle in crowded street.
This product is fully assembled at factory. We do not take any responsibility for damage and/or
accidents that occur as the result of custom modifications and/or incorrect operation.
GENERAL INFORMATION
1

SAFETY INFORMATION
We want users to enjoy our RC vehicles and to operate them with care. Failure to operate
your vehicle in a safe and responsible manner may result in injury to yourself, others or damage
to property around you.
Read and understand all instructions carefully before use
and assembly/disassembly.
Do not run your vehicle on public roads or any area where you
may encounter pedestrian or vehicle traffic.
Do not operate in a congested area or in crowds.
Do not operate your vehicle with obstructed line of sight,
at night, or near water.
Your vehicle is radio controlled. Radio waves are subject to
interference. Radio interference can cause loss
of control of your vehicle.
Take care not to cut yourself while using tools to adjust or
upgrade your vehicle.
Since the model contains many small parts, keep out of reach
of children while assembling and/or disassembling.
If your vehicle becomes stuck, release the throttle, then retrieve it by hand.
Do not continue to apply the throttle or you may damage the motor and/or the ESC/receiver
unit.
Turn off your vehicle and discontinue use if it runs erratically. Not do you run it again until the
issue has been found and resolved.
2

GETTING FAMILIARIZED WITH YOUR 2.4GHz RADIO SYSTEM
3
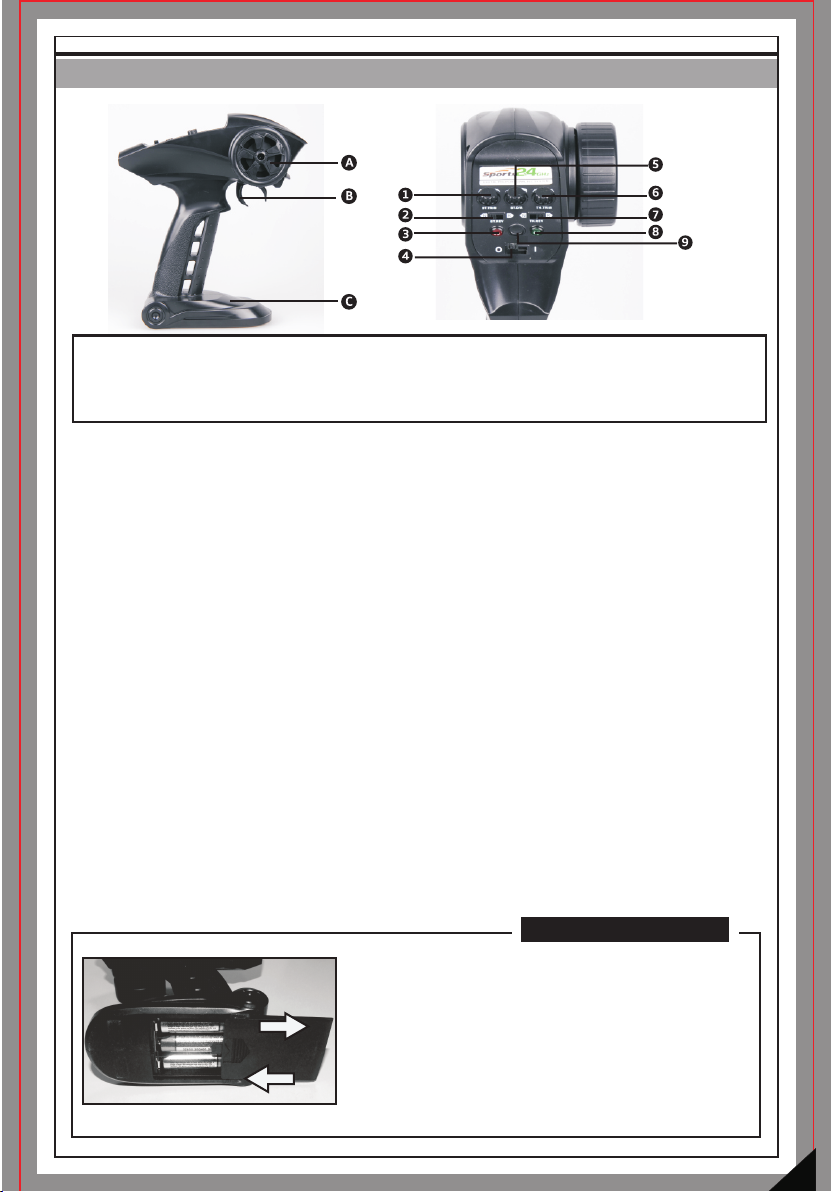
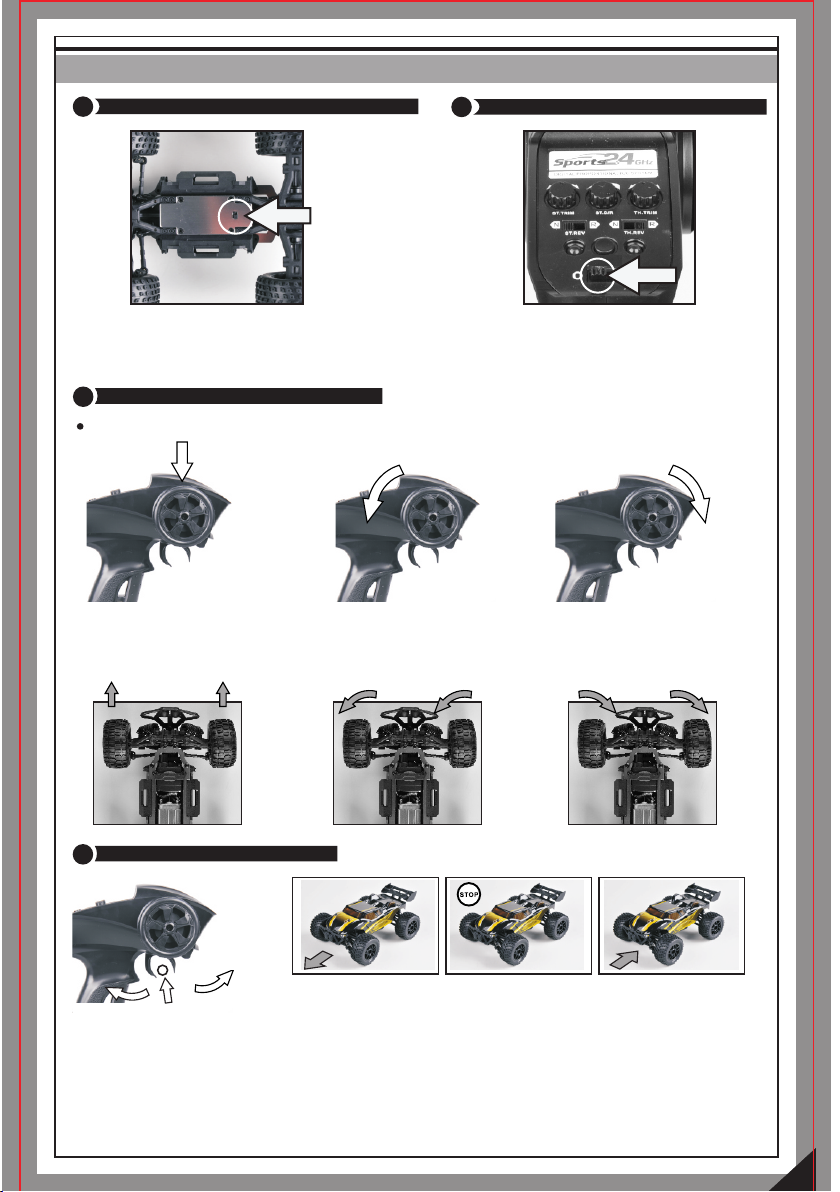
Steering Wheel: It proportionally operates the model s right and left steering control.
Battery Case: It requires 3pcs of AA size batteries.
Power Switch: It is used to turns the radio controller ON/OFF
Steering Dual Rate Dial: It allows you to change the amount of steering servo travel compared to the amount
of physical movement of the steering wheel.
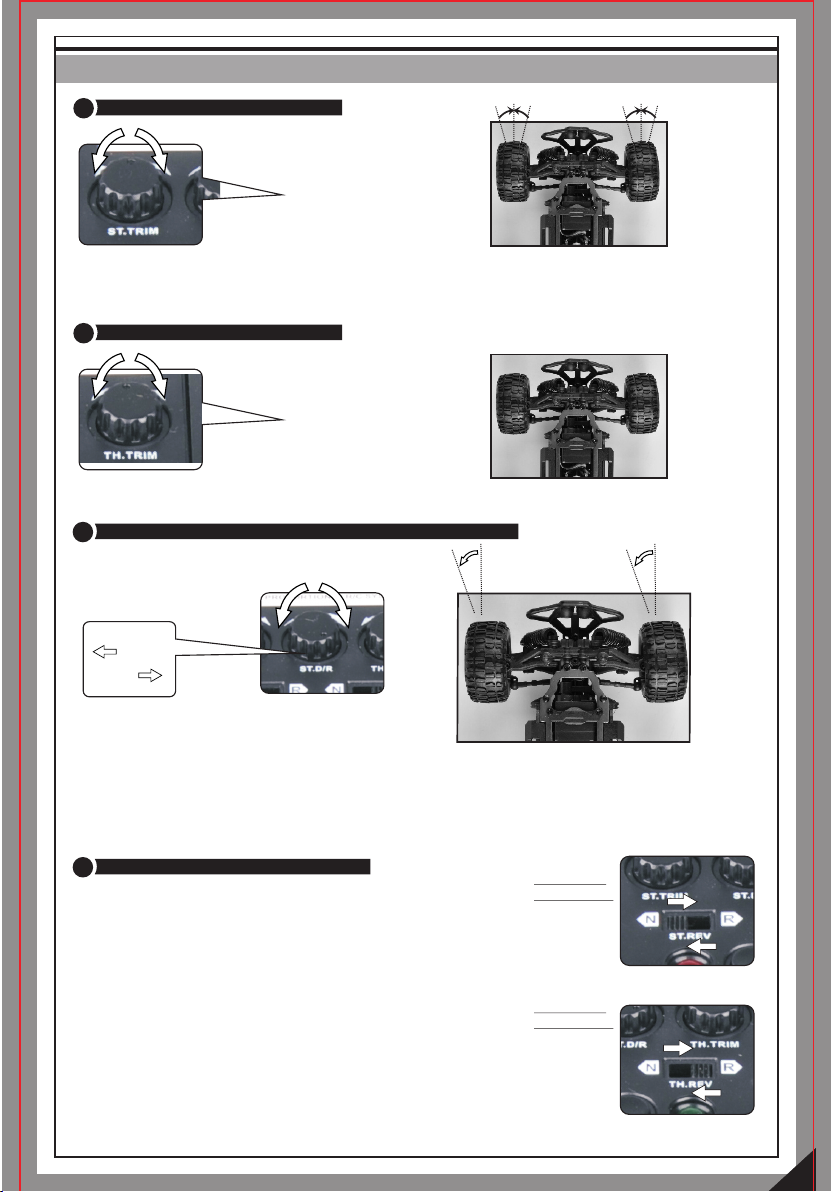
Throttle /Steering Trims: They are used to adjust the center trim of the throttle/steering channel.
Steering Reverse: It allows you to electronically switch the direction of steering servo travel. For example,
if you move the steering wheel to the right and the steering servo moves to the left,flip the Steering Reverse
Switch to make the steering servo move to the left.
Throttle Reverse : It allows you to electronically switch the direction that the motor operates in relation to the
throttle trigger. For example, if you pull the throttle trigger to accelerate forward, but the model goes in reverse,
flip the Throttle Reverse Switch to make the model accelerate forward.
Trigger: It controls the speed and braking ability of your car. Pull it to accelerate, release it to decelerate,and
push it to brake. Pushing it a second time activates the reverse feature.
Indicators: It shows battery power level.Green indicator flashing means battery power is not enough.
As long as bothred and green indicator goes flashing indicating that the radio controller runs out of battery
power, you must replace with fresh batteries immediately.
Bind/Mode button: It used to bind your 2.4GHz radio system.(This button is no longer used because your car
is automatically bound with your 2.4Ghz radio in system when both are switched on.)
A: Steering Wheel
B: Trigger
C: Battery Case
1: Steering Trim
2: Steering Reverse
3: Red Indicator
4: Power Switch
5: Steering Dual Rate
6: Throttle Trim
7: Throttle Reverse
8: Green Indicator
9: Bind/Mode button
Bin d/Mo de
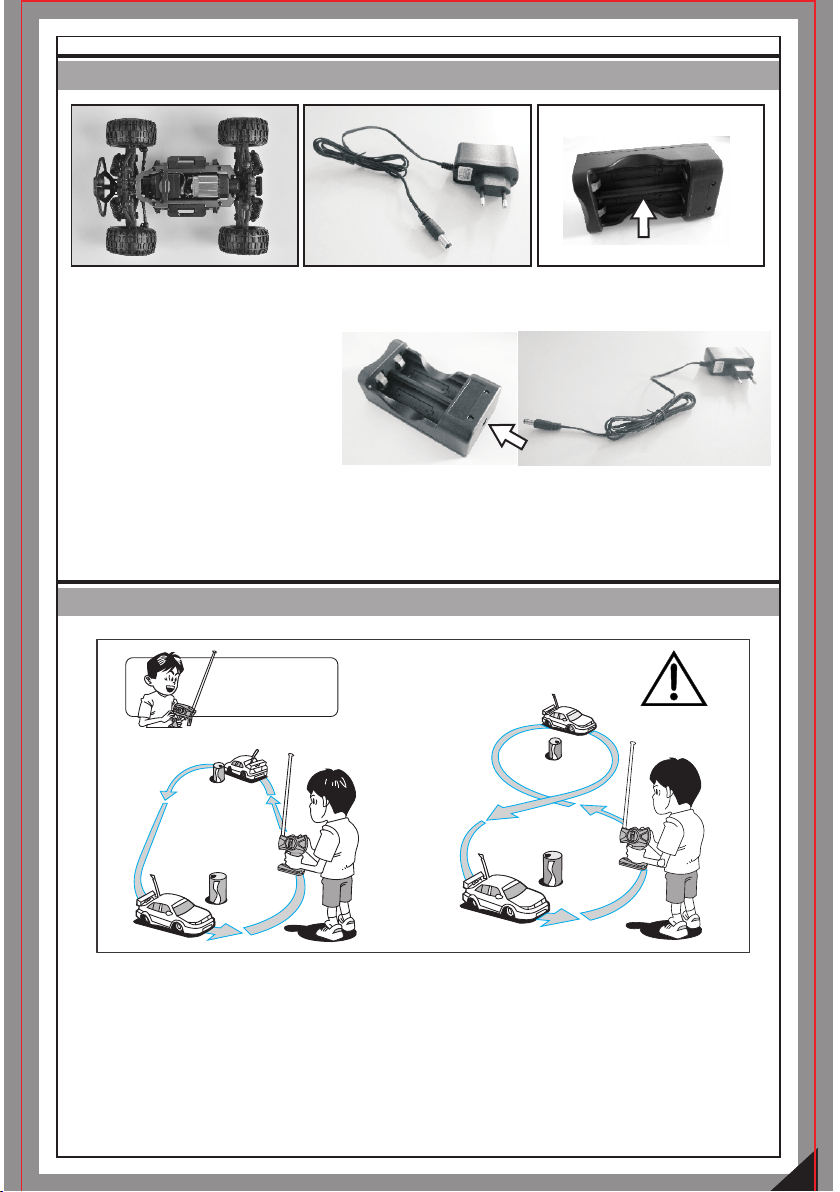
BATTERY INSTALLATION
1) Slide the battery cover as shown , and according to the
illustrations of polarities, install 3pcs of AA size batteries.
2) Replace the battery cover after batteries are installed.
-Use batteries of same type.
-Remove batteries from the case if not in use.
-Always check the battery power.
-Dispose of exhausted batteries properly.
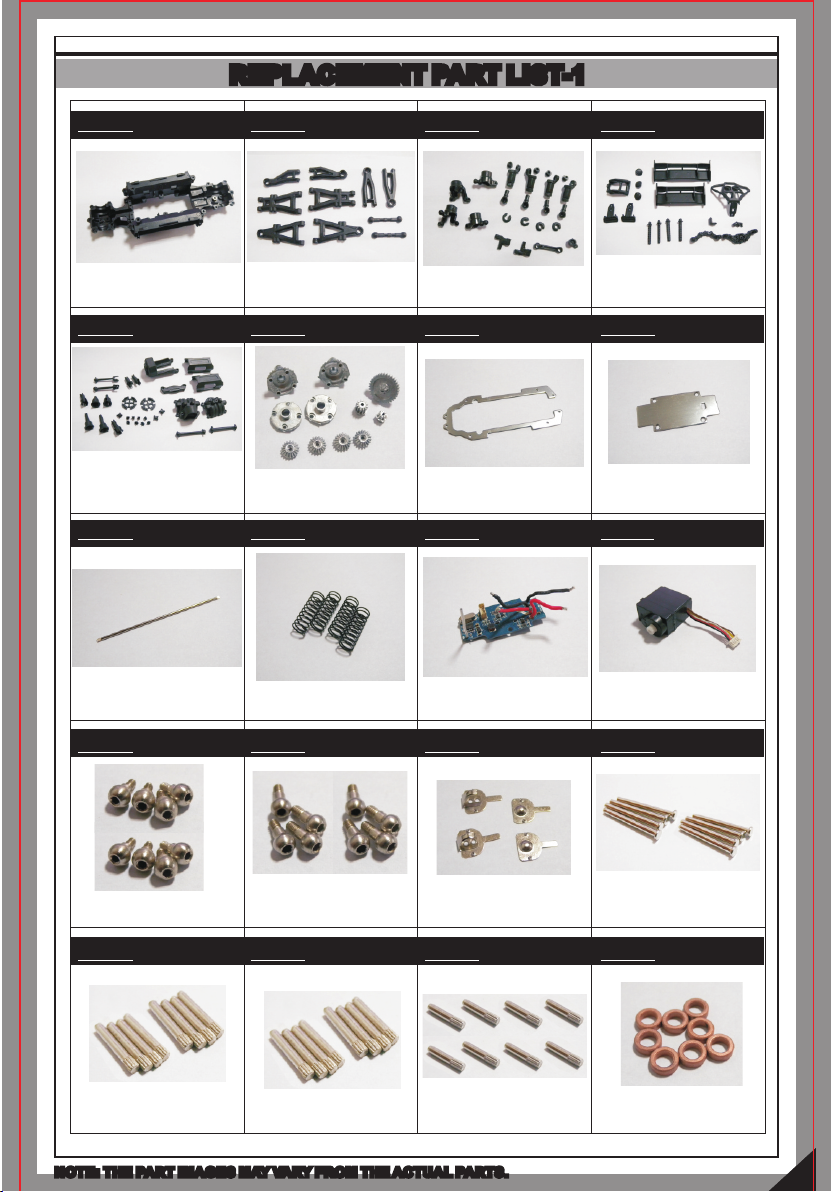
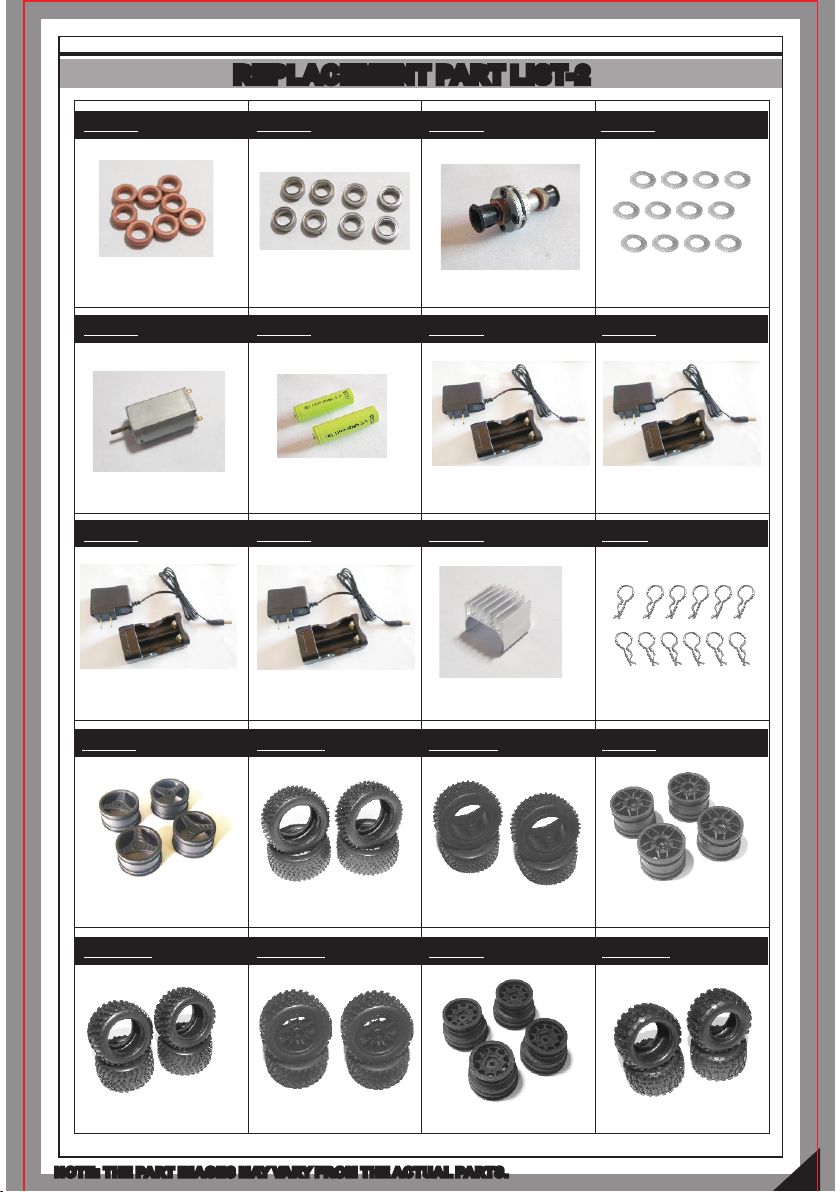
NOTES:

4
RUNNING YOUR CAR
12
Bind/ Mode
TURN ON THE RADIO CONTROLLER
TURN ON THE RECEIVER ON YOUR CAR
The ESC/receiver switch is located on the bottom
as shown in the picture. Switch on the ESC/receiver
switch.
3CHECK STEERING PERFORMANCE
4CHECK TRIGGER RESPONSE
1) To keep the car run straight
in line , do not move the
control wheel.(Keep it
at centre)
2) Turn it left to allow your
vehicle turn to left.
3) Turn it right to allow your
vehicle turn to right.
A. Pull the trigger back t
push it to brake.
B. To stop running your car, release the trigger to Neutral.
C. Pushing the trigger a second time activates the reverse feature.
o accelerate, release it to decelerate and
Ensure good steering performance.
TURN LEFT TURN RIGHTCENTRE
CENTRE
PULL IT
BUCK
PUSH IT
FORWARD
Switch on the power switch on the
radio controller. Your car is bound
with your radio controller automatically.
A B C

5
RUNNING YOUR CAR
5TO TUNE THE STEERING TRIM
Gently pull the trigger to allow your car to run slowly. Meantime, tune the steering trim to allow the
front wheels to be aligned.
STEERING TRIM
7TO TUNE THE STEERING DUAL RATE CONTROL DIAL
This dial adjusts the overall travel of the steering servo. Push the dial forward for maximum
steering. Pull the dial back to reduce the steering level.
- Set the Steering Dual Rate Control Dial to Minimum first. To set the desired steering level
increase it again whilst decelerating your vehicle.
Decrease
Increase
STEERING D/R
6TO TUNE THE THROTTLE TRIM
Throttle trim is used to set your idle speed.
THROTTLE TRIM
8STEERING/THROTTLE REVERSE
Steering Reverse: It allows you to electronically switch the
direction of steering servo travel. For example, if you move
the steering wheel to the right and the steering servo moves
to the left,flip the Steering Reverse Switch to make the steering
servo move to the left.
Throttle Reverse : It allows you to electronically switch the
direction that the motor operates in relation to the throttle trigger.
For example, if you pull the throttle trigger to accelerate forward,
but the model goes in reverse, flip the Throttle Reverse Switch
to make the model accelerate forward.
N: Normal
R: Reverse
N: Normal
R: Reverse

6
PRACTICE
Once you become conformable driving the vehicle, perform driving practice on the tracks as shown
in the figure.Keep practising until you feel comfortable with the steering, throttle and brake at low
speeds. Once you are feeling comfortable try operating on another track.When you have mastered
the basics you will be able to drive at higher speeds in a more controlled way.
RUNNING PRACTICE
TO CHARGE THE BATTERY PACK
Remove the batteries from the car.
Use only the provided charger and charger box to charge the batteries of your cars.
Load batteries onto the charger box.
Connect the charger box with the
charger as shown in the picture.
It will be 2-2.5 hours before batteries
are fully charged.
Both red and green indicators are bright when batteries are being charged.
The red indicator goes out immediately batteries are fully charged.

7
TROUBLESHOOTING
A. The vehicle does
not work at all.
1. Check to see if transmitter and car are on.
2. Replace batteries.
B. The runs
slow.
vehicle
1. Replace or charge the battery pack and/or the radio batteries.
2. Make sure the is geared properly and the pinion
and spur gear are over tightened.
vehicle
3. Clean all bushings or ball bearings.
4. Check for stripped or dirty gears.
C. The throttle works,
but not the steering.
1. Check if the servo feels jammed, try centering it by hand.
2. Check the whole steering system.
D. It steers, but throttle
is uncontrollable. 2. Replace or charge the battery pack and/or the radio batteries.
E. runs
noisily.
The vehicle
1. Check gear mesh between spur gear and pinion.
2. Check for stripped and/or dirty gears.
3. Clean and oil bushings or ball bearings.
3. Check if there are damaged parts.
1. Check if there are damaged parts.
MAINTAINING YOUR CAR
After running your car, the following procedures should be performed regularly and will help to
maintain your car's performance.
Inspect your car for any obvious damage.
Check the gears for wear, debris or broken/slipping teeth.
Check the wheels and tighten the wheel screws properly.
Check for loose screws in the chassis.
Check the wiring for frayed or damaged wires or connectors.
Check the steering servo which will wear out over time and require replacement.
Check all batteries.
Keep the chassis clean and free of sand, dust and moisture.
Remove and clean the motor if necessary. (Never attempt to re-assemble the motor, you
will damage it and void the warranty).
Clean the car body with a soft lint-free cloth.
Remove all batteries when not in use.

8
REPLACEMENT PART LIST-1
25000
Chassis
25001 25002 25003
Shocks Assembly/ Steering
Hubs/Rear Uprights
Suspension Arms/Steering
Links
Wings/Bumpers/Body Posts
Motor Mount/Battery Cover/
Dogbones/Diff. Small Bevel
Gears+ Wheel Shafts+
Outdrive Cups Aluminum Upper Deck
Metal Diff. Gears/ Metal
Drive Pinion Gears
Shock Springs ESC/RECEIVER UNIT 5-Wire Steering Servo (9g)
Ball Stud. (φ4.7) 8P
Aluminum Bottom Plate
Main Drive Shaft
(φ2*99.3mm)
Suspension Pins
(1.5*12mm) 8P
NOTE: THE PART IMAGES MAY VARY FROM THE ACTUAL PARTS.
25004 25005 25006 25007
25008 25009 25010 25011
25012 25013 25014 25015
25016 25017 25018 25019
Ball Stud. (φ3.8) 8P Battery Contact Strips
Suspension Pins
(2*21.8mm) 8P
Suspension Pins
(2*13mm) 8P
Servo Arm Pins
(1.5*8mm) 8P
Brass Bushes (6*10*3mm)
8P

9
REPLACEMENT PART LIST-2
25020
25024
Brass Bushes (5*8*2.5mm)
8P
25021 25022
Diff. Complete
25023
Diff. Washers
φ5.8*8.5*0.2 mm (12P)
25025
Charge Box/ Charger
(Europen Standard Charger)
25026 25027
25028 25029 24605 H021
24024R 24025R 24026
Buggy Wheels 4P Buggy Tires (w/Sponges) 4P Buggy Whees Complete 4P Truggy Wheels 4P
24023
24028R
24027R 24029
NOTE: THE PART IMAGES MAY VARY FROM THE ACTUAL PARTS.
Ball Bearings (5*8*2.5mm)
8P
Li-ion Battery
(3.7v, 800mAH) 2P
Charge Box/ Charger
(American Standard Charger)
Charge Box/ Charger
(Australian Standard Charger)
Charge Box/ Charger
(U.K. Standard Charger)
Brushed Motor (RC 180)
Body Clip A/B-SmallMotor Heat Sink
24030R
Truggy Tires (w/Sponges) 4P Truggy Whees Complete 4P Truck Wheels 4P Truck Tires (w/Sponges) 4P

10
REPLACEMENT PART LIST-3
NOTE: THE PART IMAGES MAY VARY FROM THE ACTUAL PARTS.
24031R
Truck Whees Complete 4P
18B01 18B02 28B01
Buggy Body (Red)
w/Decals
Buggy Body (Green)
w/Decals
Truggy Body ( Yellow)
w/Decals
Truggy Body ( Green)
w/Decals
Truck Body (Gray)
w/Decals
28B02 38B01 25050 25051
25052 25053 25054 25055
25056 25057 25058 25059
Washer Head Self Tapping
Screws 2*6mm 20P
Washer Head Self Tapping
Screws 2*10mm 20P
Washer Head
Screws 2*18mm 20P
Countersunk Screws
1.5*5mm 20P
Countersunk Screws
2*3mm 20P
Countersunk Screws
2*5mm 20P
Countersunk Self Tapping
Screws 2*6mm 20P
Countersunk Self Tapping
Screws 2*9mm 20P
Flange Head Self Tapping
Screws 2*6mm 20P
Flange Head Self Tapping
Screws 2.6*8mm 20P
E779
2.4GHz 3-in-1 Radio
Controller

-This R/C vehicle is intended for persons over 14 years of age. Children under 14 years of age should
only operate this car under supervision by an adult.
-To avoid losing control of your car, do not operate near other electric remote controlled products.
-Please operate your vehicle in a spacious area. Never operate your vehicle in crowded street.
-This product is fully assembled at factory. We do not take any responsibility for damage and/or
accidents that occur as the result of custom modifications and/or incorrect operation.
Thank for purchasing our product.
This product is an authentic remote controlled vehicle (RC vehicle). It is not a toy.
Read and understand this instruction manual thoroughly before operating the vehicle.
If you are not familiar with RC vehicles, we recommend that seek out RC experts for reliable
advice.
WARNINGS
Please completely read and understand the entire manual before using, assembling and/or
disassembling your remote controlled car.
This manual suits for next models
2
Table of contents
Other Haiboxing Motorized Toy Car manuals
Popular Motorized Toy Car manuals by other brands

MODSTER
MODSTER Mini Dasher user manual

REVELL
REVELL ‘78 Firebird 3 n 1 Assembly instructions

Kyosho
Kyosho EP ULTIMA RB Type-R EVOLUTION instruction manual

HOMCOM
HOMCOM Children ATV Assembly instruction

Serpent
Serpent VIPER 990e instruction manual

Agora Models
Agora Models STEVE MCQUEEN'S ICONIC PORSCHE 917 KH Pack... Build instructions