Haier DW60BI User manual

0120505374
60cm Fully Integrated Dishwasher
DW60BI

Close-up View (control panel)
GB
.1.
ON-OFF Light
BCycle Indicator Light
DC Cycle Select Button
AON-OFF Button
ABD
C
Dear customer,
Thank you for purchasing this high quality product, designed and manufactured to satisfy all up-to-date requirements and guarantee
prolonged lifetime in keeping with all your expectations.
Your 1st Year Guarantee
Your appliance carries a 12 months parts and labour warranty. To fulfil the conditions of your guarantee, the appliance must be correctly
installed and operated, in accordance with the instructions, and only be used for normal domestic purposes.
Please note that the guarantee and service availability only apply to the United Kingdom.
Customer Service
In case of difficulty please call the Customer Service Helpline on our new helpline number:
0870 850 2234
When calling customer service, please ensure you have the model and serial number to hand.
Please keep your receipt or invoice in a safe place as they will be required as proof of date of purchase.
NOTICE
Carefully read the instructions contained in this manual, as they
provide important information which is essential for safe and
proper installation, use and maintenance of the appliance.
* During installation, the power supply cord must not be exces-
sively or dangerously bent or flattened;
* If the appliance is not operated properly or maintenance must
be performed, disconnect the appliance from the power supply.
Keep detergents out of the reach of children, who must also be
kept away from the dishwasher when it is open.
- This appliance cannot be installed outdoors, not even if the
area in which it is installed is covered by a roof; it is also very
dangerous to leave it exposed to the rain and elements.
- Do not touch the heating element during or after a wash cycle.
- Do not lean or sit on the door when it is open ,as this could
overturn the dishwasher.
- If the appliance malfunctions, turn off water supply to the appli-
ance and disconnect the plug from the wall socket. Then, con-
sult the section entitled, "Troubleshooting". If you cannot solve
the problem, contact a service center.
- Only specialized personnel are authorized to make repairs.
- Appliances which are no longer being used must be made inop-
erable by cutting the power supply cord and removing the door
lock.
- If the supply cord is damaged, it must be replaced by the
manufacture, its service agent of similarly qualified persons in
order to avoid a hazard.
This appliance complies with the following EEC
directives:
- 73/23/EEC of 19/02/73 ( Low Voltage) and subsequent
modifications;
- 89/336/EEC of 03/05/89 (Electromagnetic Compatibility) and
subsequent modifications.
- Carefully dispose of the packing material.
- After removing the packing, check to make sure that the appli-
ance is not damaged. If in doubt, contact a qualified professional.
- The dishwasher must only be used by adults for the washing of
household dishes and cooking utensils.
- Fundamental rules to follow when using the appliance:
* Never touch the dishwasher when barefoot or with wet hands
or feet;
* We discourage the use of extension cords and multiple sock-
ets;
Safety Is a Good Habit to Get Into

Close-up View (Interior)
.2.
GB
A
B
C
D
Upper Rack
Top Spray Arm
Lower Rack
E
F
G
H
Washing Filter
Detergent and Rinse Aid Dispenser
Salt Container Cap
Bottom Spray Arm
Technical characteristics
60 cm
58 cm
82 cm
12 standard place settings
0.03-0.6MPa
220-240V~ 50Hz
1950W
Width
Depth
Height
Capacity
Mains water pressure
Power voltage
Maximum load
A
B
C
D
E
F
G
H
Third Sprayer

Salt
.3.
GB
Salt
The hardness of the water varies from place to place. If hard
water is used in the dishwasher, deposits will form on the dishes
and utensils.
The appliance is equipped with a special softener that uses a salt
specifically designed to eliminate lime and minerals from the water.
Loading the Salt into the Softener
Always use salt intended for use with dishwashers.
The salt container is located beneath the lower rack and should
be filled as follows:
- Remove the lower rack and then unscrew and remove the cap
from the salt container;
- If you are filling the container for the first time, fill it with water;
- Place the end of the funnel (supplied) into the hole and intro-
duce about 2 kg of salt. It is normal for a small amount of water
to come out of the salt container.
- Carefully screw the cap back on.
The salt container should be refilled after approximately 10-12
washers
To prevent the formation of rust, load the salt just be-
fore beginning a wash cycle.
Adjusting Salt Consumption
The dishwasher is designed to allow for adjusting the amount of
salt consumed based on the hardness of the water used. This is
intended to optimize and customize the level of salt consumption
so that it remains at a minimum.
To adjust salt consumption, proceed as follows:
- Unscrew the cap from the salt container;
- There is a ring on the container with an arrow on it (see figure to
the side);
- If necessary, rotate the ring in an anti-clockwise direction from
the "-" setting towards the "+" sign, based on the hardness of
the water being used.
It is recommended that adjustments be made in accordance
with the following schema:
Water Hardness
Clarke
degrees ºdH mmol/l Selector
position
Salt
consumption
(Grams/cycle)
Autonomy
(cycles/2kg)
014 MNT MNIT
NIUQIQNUQQNQPS
PSTN QRUV QIRUIV
[UV[TN [UIV
L
=?J?
jba
LM
OM
QM
SM?H?
SM
QM
OR
Level
1
2
3
4

.4.
GB
Detergent and Rinse Aid
Detergent
Detergent specifically intended for use with dishwashers must
be used. The dispenser must be refilled before the start of each
wash cycle following the instructions provided in the "Wash Cycle
Table". The detergent dispenser is located on the inside panel
the door.
Loading the detergent
To open the "A" cover on the dispenser, press the "B" button.
The detergent for the wash cycle should be poured into the "C"
compartment.
After the detergent has been placed in the dispenser, close the
cover and press down until it clicks in place.
Notice: To facilitate closing the cover, remove any ex-
cess detergent on the edges of the dispenser.
Rinse Aid
This product makes dishes sparkle and helps them to dry with-
out spotting. The dispenser is located on the inside panel of the
door and should be filled after every 80 wash cycles.
Loading the Rinse Aid
Regardless of the type of detergent dispenser installed on your
appliance, you must proceed as indicated below when loading
the rinse aid.
To open the dispenser, turn the "C" cap in an anti-clockwise
direction and then pour in the rinse aid, making sure not to overfill.
The amount of rinse aid used for each cycle can be regulated by
turning the "F" dose adjustor ,located beneath the "C" cap, with
a screwdriver. There are 6 different settings; the normal dosage
setting is 3.
Important
Proper dosage of the rinse aid improves drying.
If drops of water remain on the dishes or spotting occurs,
the dosage adjustor should be turned to a higher setting.
If the dishes have white streaks, turn the dosage adjustor
to a lower setting.
F
C
B
C A

Before placing the dishes in the dishwasher, remove the larger
food particles to prevent the filter from becoming clogged, which
results in reduced performance.
If the pots and pans have baked-on food that is extremely hard
to remove, we recommend that they be allowed to soak before
they are washed. This will eliminate the need for extra wash
cycles.
Pull out the rack to facilitate loading the dishwasher.
How to Use the Lower Rack
We recommend that you place the most difficult to clean items
on the bottom rack: pots, lids, serving dishes and bowls, as shown
in the figure to the right.
It is preferable to place serving dishes and lids on the sides of
the racks in order to avoid blocking the rotation of the top spray
arm.
- Pots, serving bowls, etc. must always be placed face down.
- Deep pots should be slanted to allow the water to flow out.
- Cutlery should be placed in the cutlery basket with the
handles at the bottom; if the rack has side baskets, the spoons
should be placed individually into the appropriate slots. Espe-
cially long utensils should be placed in the horizontal position at
the front of the upper rack( see Fig.A).
How to Use the Upper Rack
The upper rack is designed to hold more delicate and lighter
dishware, such as glasses, coffee and tea cups and saucers, as
well as plates, small bowls and shallow pans (as long as they
are not too dirty).
- Position the dishes and cookware so that they do not get
moved by the spray of water.
The upper rack can be adjusted for height by using the knobs
located on the sides of the rack itself (see fig.B).
.5.
Loading the Dishwasher GB
Lower Rack Upper Rack
Fig.B
Fig.A
Load for 12 Standard Settings (for EN 50242 tests)
2
34

.6.
Starting the Appliance GB
Starting a wash cycle
After having completed all of the installation steps in the preced-
ing paragraphs, turn on the water to the unit, partially open the
door of the dishwasher, and press the ON-OFF button "A" lo-
cated on the control panel. The "B" indicator light will come on.
At this point, the appliance is on and ready to be programmed.
Setting and Starting a wash Cycle
Choose the desired cycle by pressing the cycle selection button
"C". Each time it is pressed, one of the cycle indicator lights "D"
will come on in succession.
Choose the wash cycle you feel is most appropriate for the type
of dishes that need washing (consult the wash cycle table con-
tained in this manual, especially when first using the appliance).
Close the door and the indicator light “D” will begin to blink indi-
cating that the wash cycle has begun and cannot be modified. If
necessary, read the paragraph entitled, "Cancelling or modifying
a cycle while underway". The end of the cycle will be signalled by
six acoustic sound, and the indicator light "D" will turn off.
Cancelling or modifying a cycle while underway...
Premise: A cycle that is underway can only be modified if it has
only been running for a short time.
Otherwise, the detergent may have already been used, and the
appliance may have already drained the wash water. If this is the
case, the detergent dispenser must be refilled (see the paragraph
entitled, "Loading the Detergent").
To change the cycle currently underway, open the door, press
the ON-OFF button "A" to turn the machine off and then open the
door.
To set a new wash cycle, follow the instructions contained in the
paragraph entitled, "Starting a Wash Cycle".
If you forget to load some of the dishes...
The wash cycle can be interrupted by opening the door carefully
(in order to avoid being sprayed by hot water). Acoustic sound
will be heard and all cycle indicator lights will flash. When the
door is closed again, the cycle will automatically restart at the
point where it left off.
At the end of the wash cycle...
The end of the cycle will be indicated by six acoustic signal,at
the same time the "D" indicator light will turn off. Open the door,
turn off the appliance using the ON-OFF switch and turn off the
water supply to the unit. Wait a few minutes before removing the
dishes so as to avoid handling them while still hot (when they
are more susceptible to breakage) and to get better drying results.

.7.
Wash Cycle Table GB
Cycle Cycle
Selection
Information
Description of
Cycle
Normal Wash
Heavy Duty
Light Wash
Glassware
Rapid Wash
ERF
Normally dirty dishes,
pots and pans. Stan-
dard daily cycle.
Very dirty dishes,
pots and pans. (Not
to be used with deli-
cate items)
Normally dirty dishes,
pots and pans without
dried on residue.
Economic, fast cycle to
be used for items which
are sensitive to height.
Run immediately after
dishes are used.
Economic, fast cycle to
be used to on not very
dirty dishes right after
they are used. No dry-
ing cycle.
Pre-wash with hot water.
Extended wash at 70K
Rinse with cold water.
Rinse with hot waterK
Drying.
Pre-wash with cold water.
Extended wash at 50.
Rinse with hot water.
Drying.
Wash at 50.
Rinse with warm water.
Hot rinse.
Drying.
Short wash at 40.
Cold rinse.
30g
30g
15g
15g
Pre-wash with cold water.
Extended wash at 50K
Rinse with cold water.
Rinse with hot waterK
Drying.
30g
Detergent Rinse Aid
(EN50242)

.8.
Energy Saving Tips GB
-Choose the right wash cycle: the choice of cycle depends on
the type of dishware, cookware and utensils being washed and
how dirty they are.
-Use the right amount of detergent: if you use too much detergent,
the result will not be cleaner dishes, but, rather, a greater nega-
tive impact on the environment.
-There is no advantage in rinsing dishes, cookware and utensils
before placing them in the dishwasher.
How to keep Your Dishwasher in Shape
After every wash, turn off the water supply to the appliance and
leave the door slightly ajar so that moisture and odors are not
trapped inside.
After Every Wash
Before cleaning or performing maintenance, always remove the
plug from the socket. Do not take risks.
Remove the plug
To clean the exterior and rubber parts of the dishwasher, do not
use solvents or abrasive cleaning products. Rather, use only a
cloth and warm soapy water.
To remove spots or stains from the surface of the interior, use a
cloth dampened with water and a little white vinegar, or clean-
ing product made specifically for dishwashers.
No solvents or Abrasive Cleaning Products
When you go on holiday, it is recommended that you run a wash
cycle with the dishwasher empty and then remove the plug from
the socket, turn off the water supply and leave the door of the
appliance slightly ajar. This will help the seals last longer and
prevent odors from forming within the appliance.
When You Go on Holiday
If the appliance must be moved, try to keep it in a vertical position.
If absolutely necessary, it can be positioned on its back.
Moving the Appliance
One of the factors that cause odors to form in the dishwasher is
food that remains trapped in the seals. Periodic cleaning with a
damp sponge will prevent this from occurring.
Seals
Cleaning and Special Maintenance
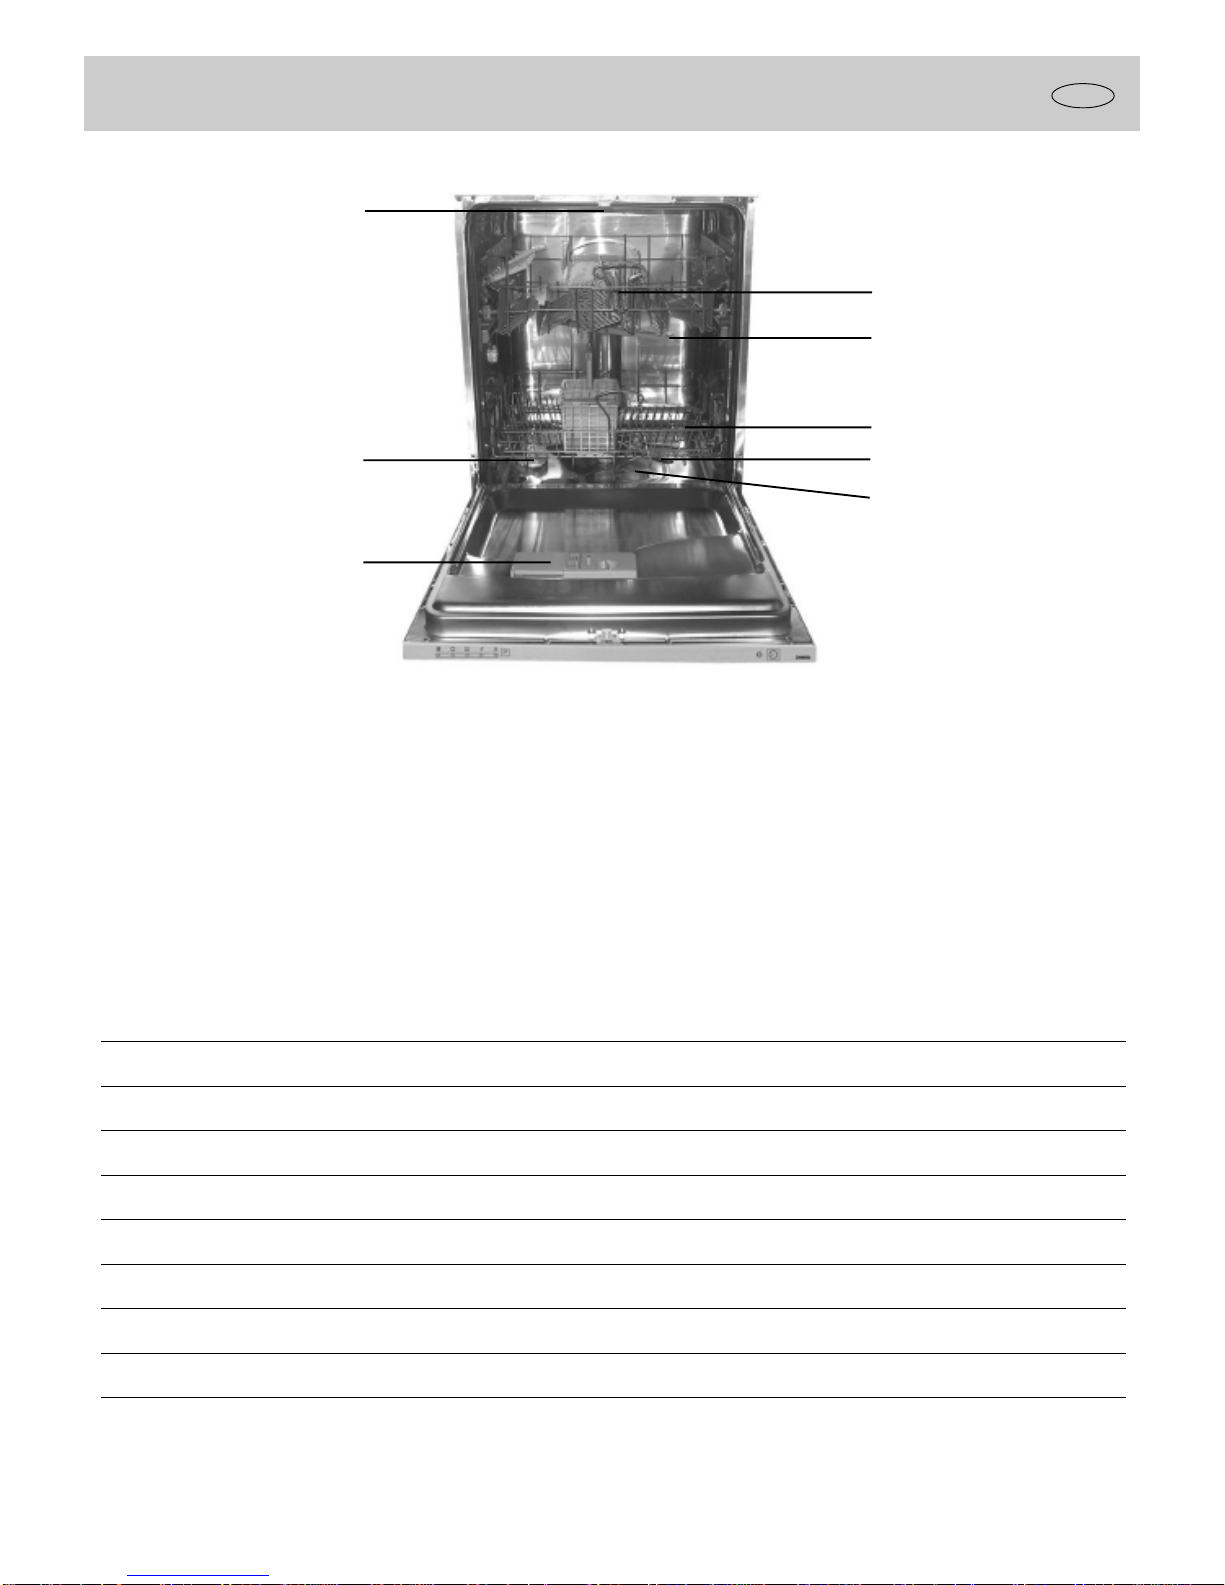
Filter Assembly
For best performance and results, the filter assembly must be
cleaned frequently.
The filter efficiently removes food residue from the wash water,
allowing it to be recirculated during the cycle. For this reason ,it
is a good idea to remove the larger food particles trapped in the
filter after each wash cycle by rinsing the "A" semicircular filter
and cup under running water. To remove the filter assembly, pull
on the cup handle in the upward direction. The entire filter as-
sembly (made up of the "A" semicircular filter and the "B" fine
filter) should be cleaned at least once a week.
To clean the filter and the fine filter, use a cleaning brush .Then,
reassemble the filter parts as shown in the figures below and
reinsert the entire assembly in the dishwasher, positioning in its
seat and pressing downward.
The dishwasher must never be
used without the filters. Improper
replacement of the filters may re-
duce level of the appliance and
damage dishes and utensils.
Cleaning the Spray Arms
It may happen that food particle become encrusted on the spray
arms and block the holes. Check the spray arms periodically and
clean them when needed.
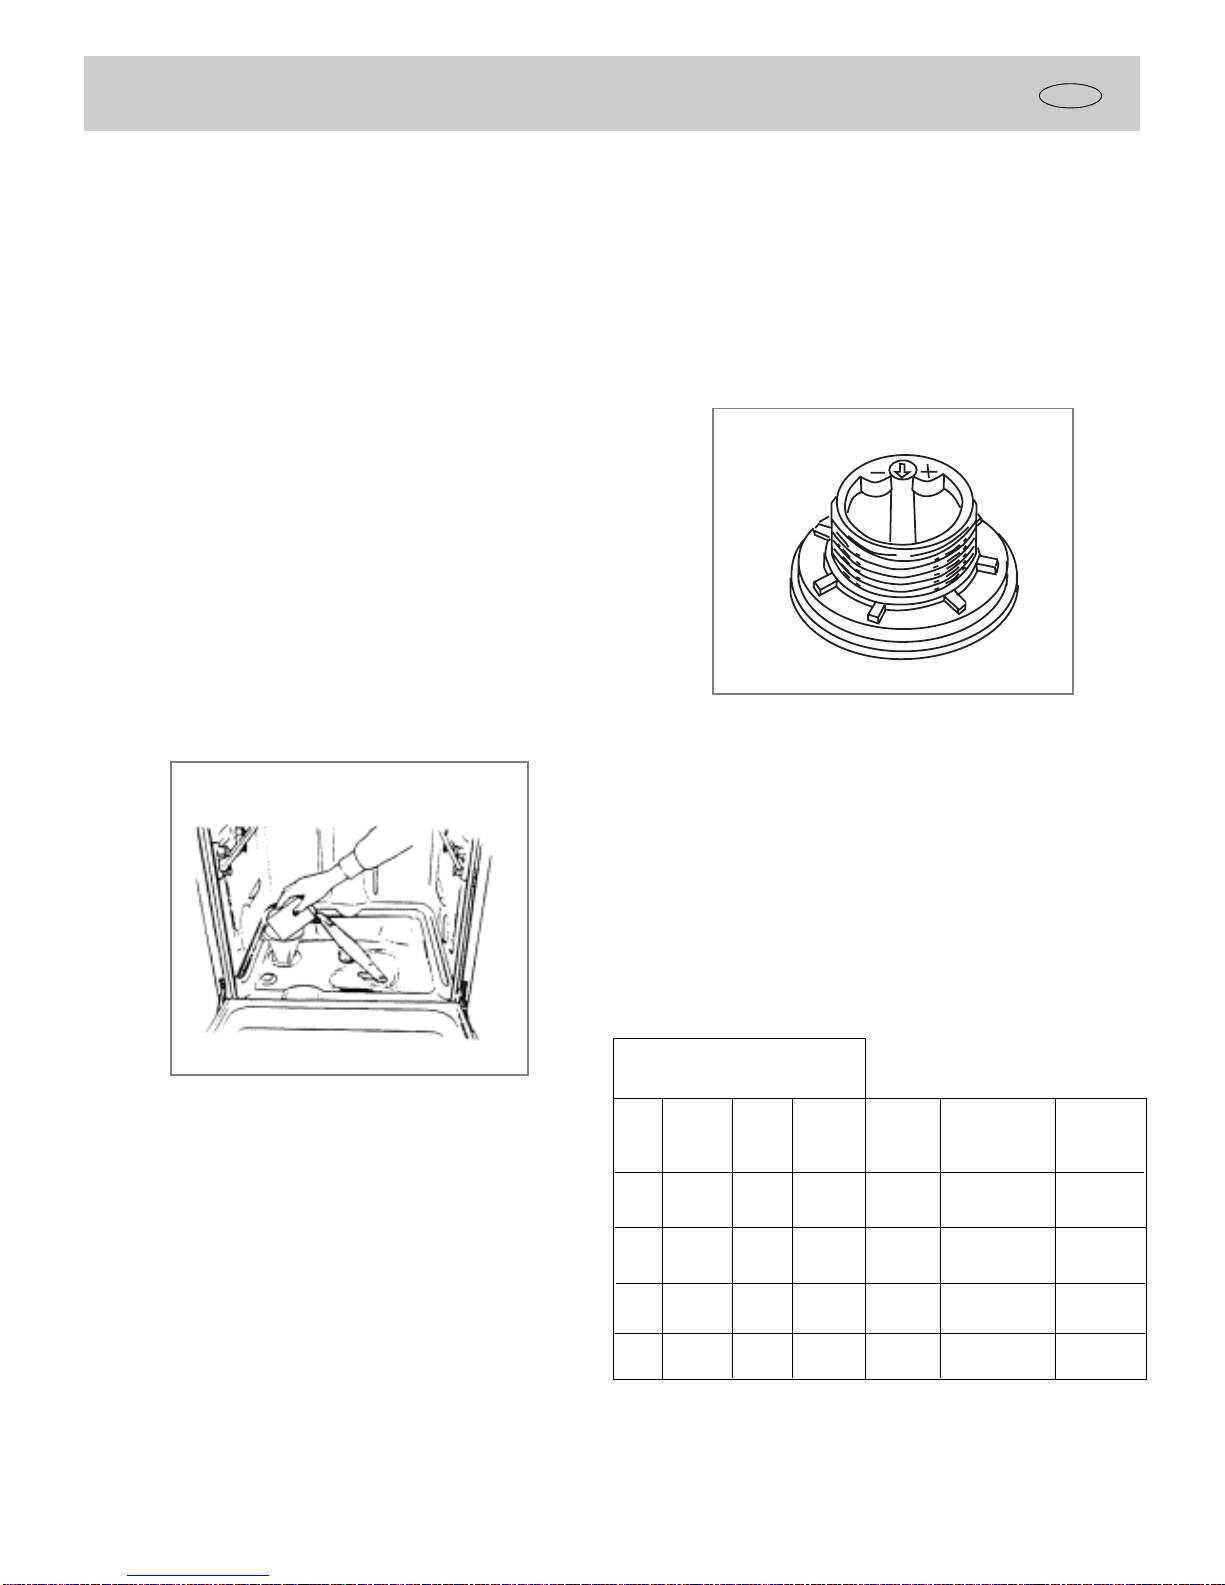
Cleaning the Water Inlet Filter
Periodically clean the water inlet filter (see figure) located on the
outlet of the water supply tap.
After turning off the water tap, unscrew the end of the water sup-
ply hose, remove the filter and clean it carefully under running
water. Then, return the filter to its place and tighten the water
supply hose back into position.
A
B

.9.
Troubleshooting GB
It may occur that the dishwasher does not function or does not
function properly. Before calling for assistance, Iet us see what
can be done first: have you forgotten to press one of the buttons
or to perform an essential operation?
The Dishwasher Does Not Start
Have you checked whether:
- the plug is pushed into the socket correctly;
- the power is on in the house;
- the door is closed properly;
- the ON-OFF switch is on "ON";
- the water supply is turned on.
The Dishwasher Does Not Load Water
Have you checked whether:
- the water is turned on and the hose is connected properly;
- the water supply to the house is on and has sufficient pressure;
- the water supply hose is crimped or bent;
- the filter for the water supply hose is clogged.
The Dishes Are Not Clean
Have you checked whether:
- the water is turned on and the hose is connected properly;
- the water supply to the house is on and has sufficient pressure;
- the water supply hose is crimped or bent;
- the filter for the water supply hose is clogged.
The Dishwasher Does Not Drain
Have you checked whether:
- the drain hose is crimped or bent.
Lime Deposits or a White Film Form on the Dishes
Have you checked whether:
- the lid to the salt container is closed properly;
- the rinse aid dosage is correct.
Error message
Error display on the time-remaining indicator
When all the programme indicators “ D” blink.
Have you checked whether:
- the door is closed properly.
When the programme indicators “ D1,D3,D5” blink.
Have you checked whether:
- the drain hose is crimped or bent.
- the drain hose is too high.
D
If you take all these checks and the dishwasher still does not
function or your dishwasher have any other error display, you
can power the dishwasher OFF, and wait a few minutes. You can
power the dishwasher on, try it again , if the dishwasher still does
not function and/or the problem persists, contact the nearest
authorised service center and provide them with the following
information:
Never call on unauthorised technicians and refuse to
allow parts to be installed that are not original spare
parts.
- the nature of the problem.
- the model type number (Mod...) And the serial number (S/N...),
which are indicated on the plate located on the side of the inner
part of the door.
When the programme indicators “D1,D2,D3” blink.
Have you checked whether:
- the water is turned on and the hose is connected properly;
- the water supply to the house is on and has sufficient pressure;
- the water supply hose is crimped or bent;
- the filter for the water supply hose is clogged.
- the drain hose is too low.
D2 D4D3
D1 D2

.10.
Installation
Positioning the Appliance
Position the appliance in the desired location. The back should
rest against the wall behind it, and the sides, along the adjacent
cabinets or wall. The dishwasher is equipped with water supply
and drain hoses that can be positioned to the right or the left to
facilitate proper installation.
Levelling the Appliance
Once the appliance is positioned, adjust the feet (screw them in
or out) to adjust the dishwasher, making it level. In any case, the
appliance should not be inclined more than 2˚. If the appliance is
level, it will help ensure proper performance.
Cold Water Connection
Connect the cold water supply hose to a threaded 3/4(gas)
connector, inserting the small filter supplied with the dishwasher
and making sure that it is fastened tightly in place (see Fig.1).
If the water pipes are new or have not been used for an extended
period of time, let the water run to make sure that the water is
clear and free of impurities. If this precaution is not taken, there
is a risk that the water inlet can get blocked and damage the
appliance.
Drain Hose Connection
Insert the drain hose into a drain pipe with a minimum diameter
of 4cm, or let it run into the sink, making sure to avoid bending
or crimping it. Use the special plastic support that comes with
the appliance (see Fig.2). The free end of the hose must be at a
height between 40 and 100 cm and must not be immersed in
water.
Attention:
The special plastic hose support must be solidly fastened to the
wall to prevent the drain hose from moving and allowing water to
spill outside the drain.
ELECTRICAL CONNECTION (UK ONLY)
For your safety please read the following information.
Caution:
The dishwasher plug must be accessible even when the appliance is
installed as a built-in unit so that maintence can be done safety.
Fig.2
Warning: This appliance must be earthed.
The appliance must be connected to a 220-240 volts 50 cycle
AC supply by means of a three pin socket, suitably earthed and
should be protected by a 13 amp fuse in the plug or a 15 amp
fuse in the consumer unit.
The appliance is supplied with a moulded 13 amp 3 pin mains
plug fitted with a 13 amp fuse. Should the fuse require
replacement, it must be replaced with a fuse rated at 13 amp
and approved to BS1362.
The plug contains a removable fuse cover that must be refitted
when the fuse is replaced. In the event of the fuse cover being
lost or damaged, the plug must not be used until a replacement
cover has been obtained.
If the moulded mains plug is unsuitable for the socket outlet in
your home or is removed for any other reason, then the fuse
should be removed and the cut off plug disposed of safely to
prevent the hazard of electric shock.
There is a danger of electric shock if the cut off plug is inserted
into any 13 amp socket outlet.
How to wire a 13 amp plug.
Important
The wires in the mains lead on this appliance are coloured in
accordance with the following code:
Green and Yellow - Earth
Blue – Neutral
Brown – Live
As the colours may not correspond with the markings identifying
the terminals in your plug proceed as follows.
The green and yellow wire must be connected to the terminal in
the plug which is marked with the letter E or with the earth sym-
bol or coloured green and yellow.
The blue wire must be connected to the terminal marked N or
coloured black.
The brown wire must be connected to the terminal marked L or
coloured red.
Fig.1
GB

Installation
Diagram
The symbol on the product or on its packaging indicates that this product may not be treated as household waste.
Instead it shall be handed over to the applicable collection point for the recycling of electrical and electronic equipment.
By ensuring this product is disposed of correctly, you will help prevent potential negative consequences for the environ-
ment and human health, which could otherwise be caused by inappropriate waste handling of this product.
For more detailed information about recycling of this product, please contact your local city office, your household waste
disposal service or the shop where you purchased the product.
GB
Premium Appliance Brands Ltd
Cranage House, 730 Mandarin Court, Centre Park, Warrington, Wa1 1GG
Table of contents
Other Haier Dishwasher manuals

Haier
Haier DW12-PFE1S User manual

Haier
Haier DW12-AFM3 User manual

Haier
Haier DWL7075MBSS User manual

Haier
Haier XPB55-12S User manual

Haier
Haier ESD200 User manual

Haier
Haier DW9-AFE ME User manual

Haier
Haier DW12-EBET User manual

Haier
Haier DW12-HFE2 User manual

Haier
Haier HDW12-TFE3SS User manual

Haier
Haier HDW100SCT User manual

Haier
Haier WQP12-EFMSA User manual

Haier
Haier DW12-CBE5 User manual

Haier
Haier DW12-PFE2-U User manual

Haier
Haier DW12-BFE ME User manual

Haier
Haier DW9-TFE3-F User manual

Haier
Haier DW-9999-18 User manual

Haier
Haier DDW101S User manual

Haier
Haier DW12-CBE7 User manual

Haier
Haier DW12-EFMSS User manual

Haier
Haier HDW100SCT User manual