Remote
control
operation
Note:
a) Point
the remote
control
unitfrom no morethan about
3m from the remote control
sensor and within about
60" of the front of the TV monitor.
b) Do not press the button too quick Press the button
after the previous operatronis completed
1. MUTE: Used
totogglebetween
normal
& muted
audio
2. PICTURE:
Pressthisbutton
to select
thepicture
display
effect between Dynamic, soft, personal or standard.
3. MTS:Press
to select
theaudio
output
language
during
DTV modeifthereare multi
languages
available,
during
ATV mode, press this button to select audio output like
mono & stereo.
4. MENU: Press
thisbutton
to access
the menuinterface.
5. SLEEP:
Useto autopower
offbysetting
sleep
timer'
6. NAVIGATION
buttons:
Press
to select
theoptions
under
OSD setting
intertaceor alter
the settings
ina menu.
7.(0-9 ): Enter
numericvalues
andto select
thechannel
or
program
directly
by entering
itsnumber.
B.
): Pressto go to previouslyselected
channel.
9.
VOL-.Pressthisbutton
to decrease
thespeaker
volume.
l0.POWER: Press
thisbutton
to set
the player
tostandby
on or offstate(
lfthe main
power
of
the setis
on).
11.ZOOM: Used
to select
thedesired
display
modewide or
normal.
.
12.EXIT:Exit
the menu interface.
13.EPG: Pressthisbutton
toskimover
TV programs
guide
14.Ol(ENTER: Confirm
theselection.
15.
TV/AV.Select
thedesired
signal
input
mode
16.
INFO:Press
thisbutton
to display
current
program
information.
17.CH+: Press
thisbutton
to increase
thechannel
number.
18.
CH-: Pressthisbutton
to decrease
thechannel
number.
19.
- : Used
todirectly
inputTV channels.
20.
VOLUME +:Press
thisbutton
to increase
the
speaker
votume.
HOW
TOUSE
ANTENNA
Directly
connect
external
movable
antenna
to RF in,
may
also connect roof antenna directly.
For better receptaoni
Adjust the directton/position of the antenna. The signal
strength
depends on the area of reception.
lf the signal is
too weak, poor or no reception
is possible.
This is not a
malfunction.
TVOPERATION
GET STARTED
o Be sure the
TV antenna
isconnected
tothesetproperly.
. Plug the AC adaptor to the power source to power on
theTV set.
. Slide power on/off switch to on position.
. Press the TV/AV button on the remote or MODE button
on the main
unitto select TV Mode.
. PressAUTO/OK on the unit.Then select YES & press
AUTO button to program the channels onto the memory.
PROGRAMING BY REMOTE:
Press
the MENU button
on the remote,and
thenselect
the
satellite
image by using the > key.Then press down arrow
button
(Y
)to select
antenna
function.
Change
toAir or
Cable
by using
> button,
depending
upon
thetypeof
connection.
Then scroll
toAuto Scan and press> button
twice,TV will start auto programing function taking allthe
available
chalnels intomemory.
NOTE:Auto Scan
functionhas
to be done
for
TV tocapture
channels
initially.
SEARCH A PROGRAM
. Press
CH UP/DOWNbutton
once,
thechannel
number
changes.
A desired
channel
can be reached
using
these
two keys.
. NUMERIC
button
on theremotecanfacilitate
you to
select
a soecific
channel.
lf
thechannel
number
exceeds
10, input
firstdigital
unit,
thenanother
digitalunit;
o Note:
thisATSC&Analog
TV receivercan store
the
channels
from2-69, and
the maximum
ofeach
channel
has8 programs.To
select
thedesired
programs
by
using - button and numeric buttons.
o Do as follows:
ToselectCH 13 NO. 2
Press
'1
and 3,
then press
- and input2.
Once
the input
isdone,
itwillstart
broadcasting
the selected
channel
immediately.
ADJUST
THE
VOLUME
Too loudthe voice
willdamage
your
ears,
to adjust
the
volume,
use
theVOLUME UP/DOWN buttons
on the main
unit
oron the remotecontrol.
AUDIO EFFEGT
OPTIONS
ThisTV setiswith
twospeakers
insidethefront
panel,
whichareenabled
immediately
itis powered
on.
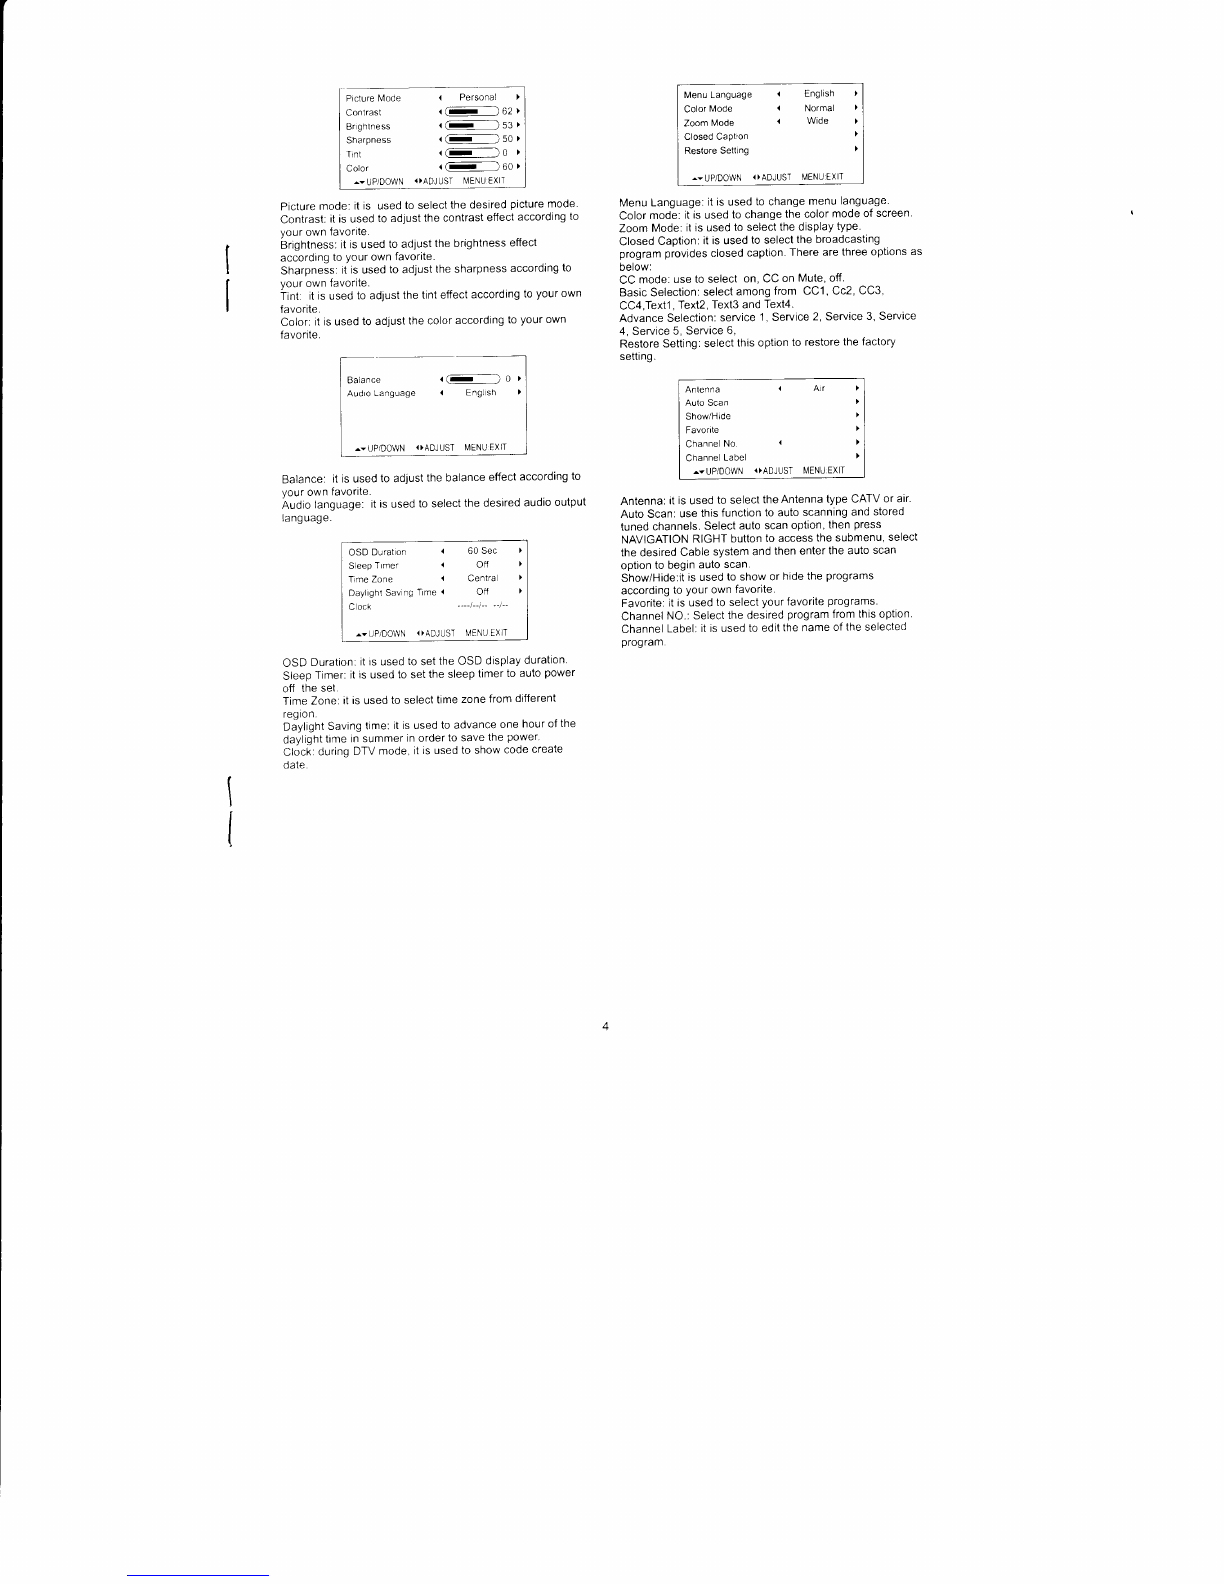
Tv SETTING MENU
PressTV/AV buttonon the remote or MODE button on the
mainunit to select
TV mode,
then Press
once
theMENU
button, the screen will pop up a setting menu;
use the NAVIGATION LEFT/RIGHT buttons to select among
the
setting
options,
thenpress
NAVIGATION
UP/DOWN
buttonto enter the sub menu, again use NAVIGATION
LEFT/RIGHT buttonto selectthe desired option or adjust
and oress OI(ENTER Button to confirm the item to be set;
Press MENU button to go to previouslymenu and press
EXIT buttonto exit the menu interface.
11
12
13
17
18
19
20
/\-
-r\
@.t2
v-;
@@@ 15