Haier LE42A300 User manual

Please READ this manual carefully before
operating your TV, and retain it for future
reference.
OWNER’S MANUAL
LED-LCD TELEVISION
LE32A300
LE42A300
LE55A300

Contents
2 LED -LCD television Owner’s Manual
Contents
Warning 3
Important Safety Instructions 4
Introduction 6
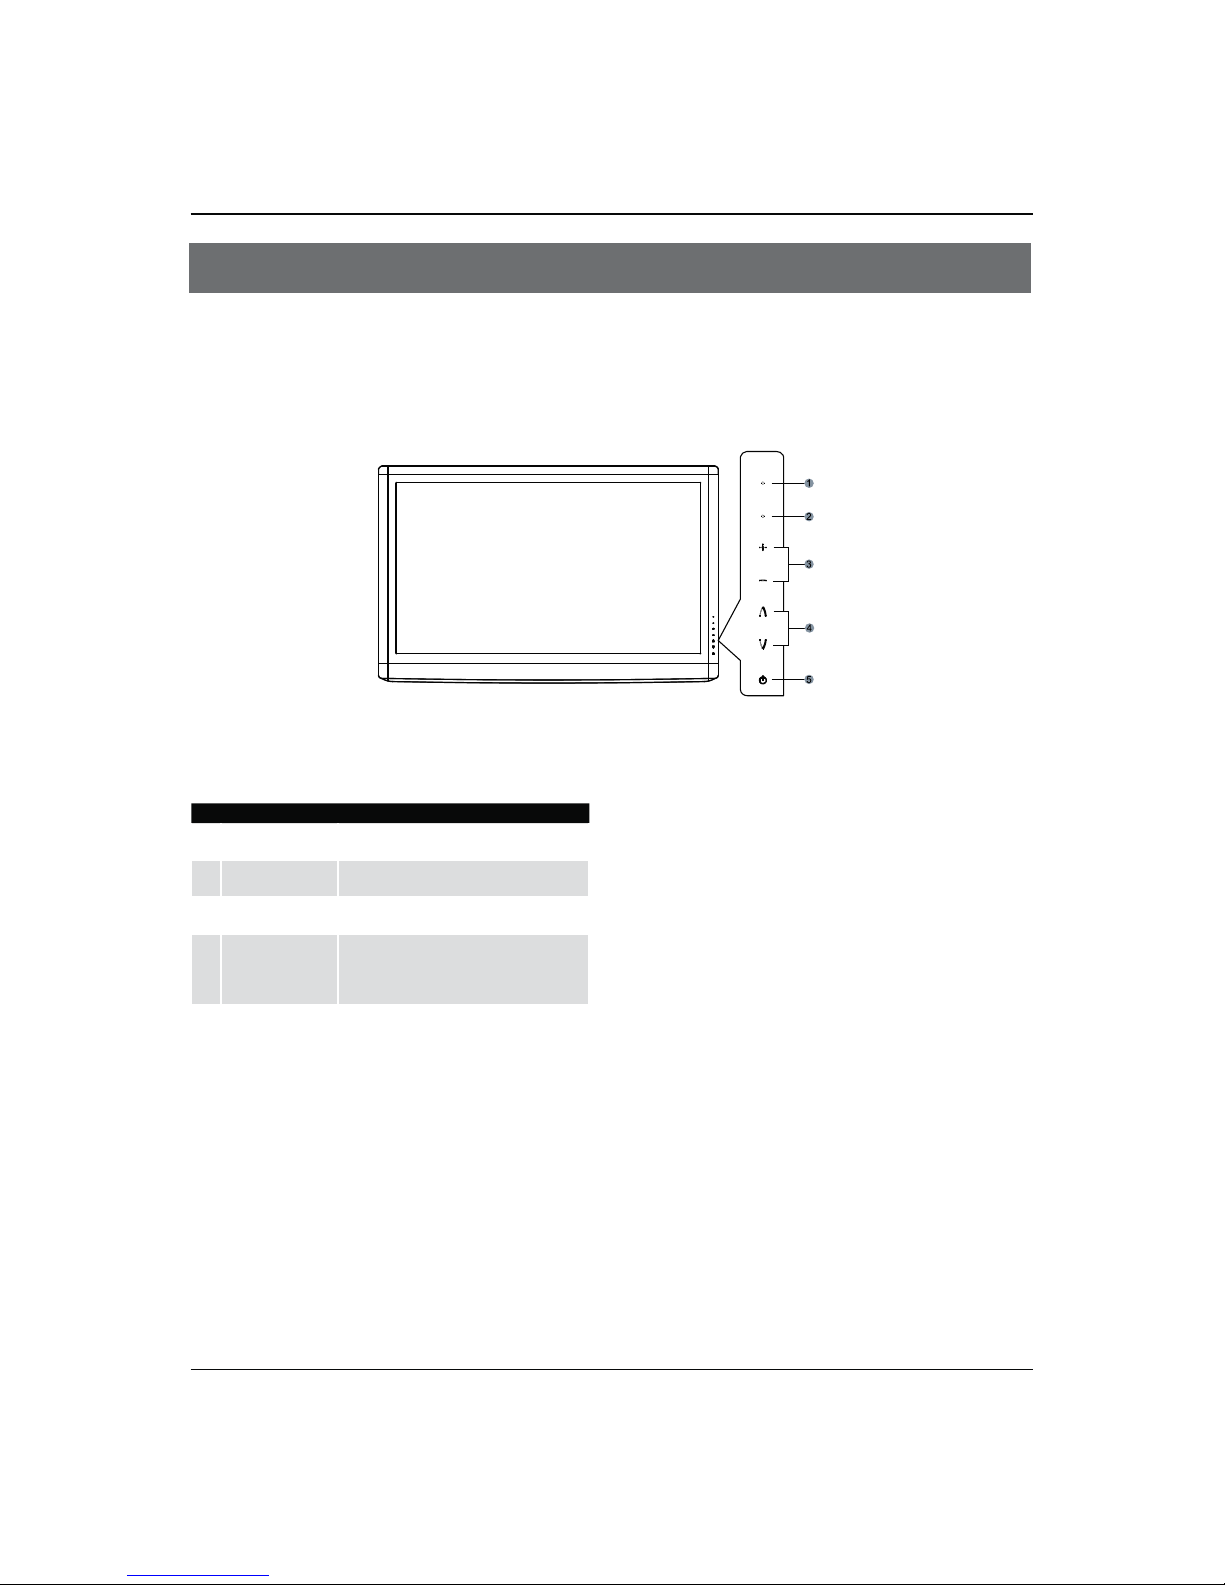
Panel Control .......................................................6
Connection Option .............................................. 7
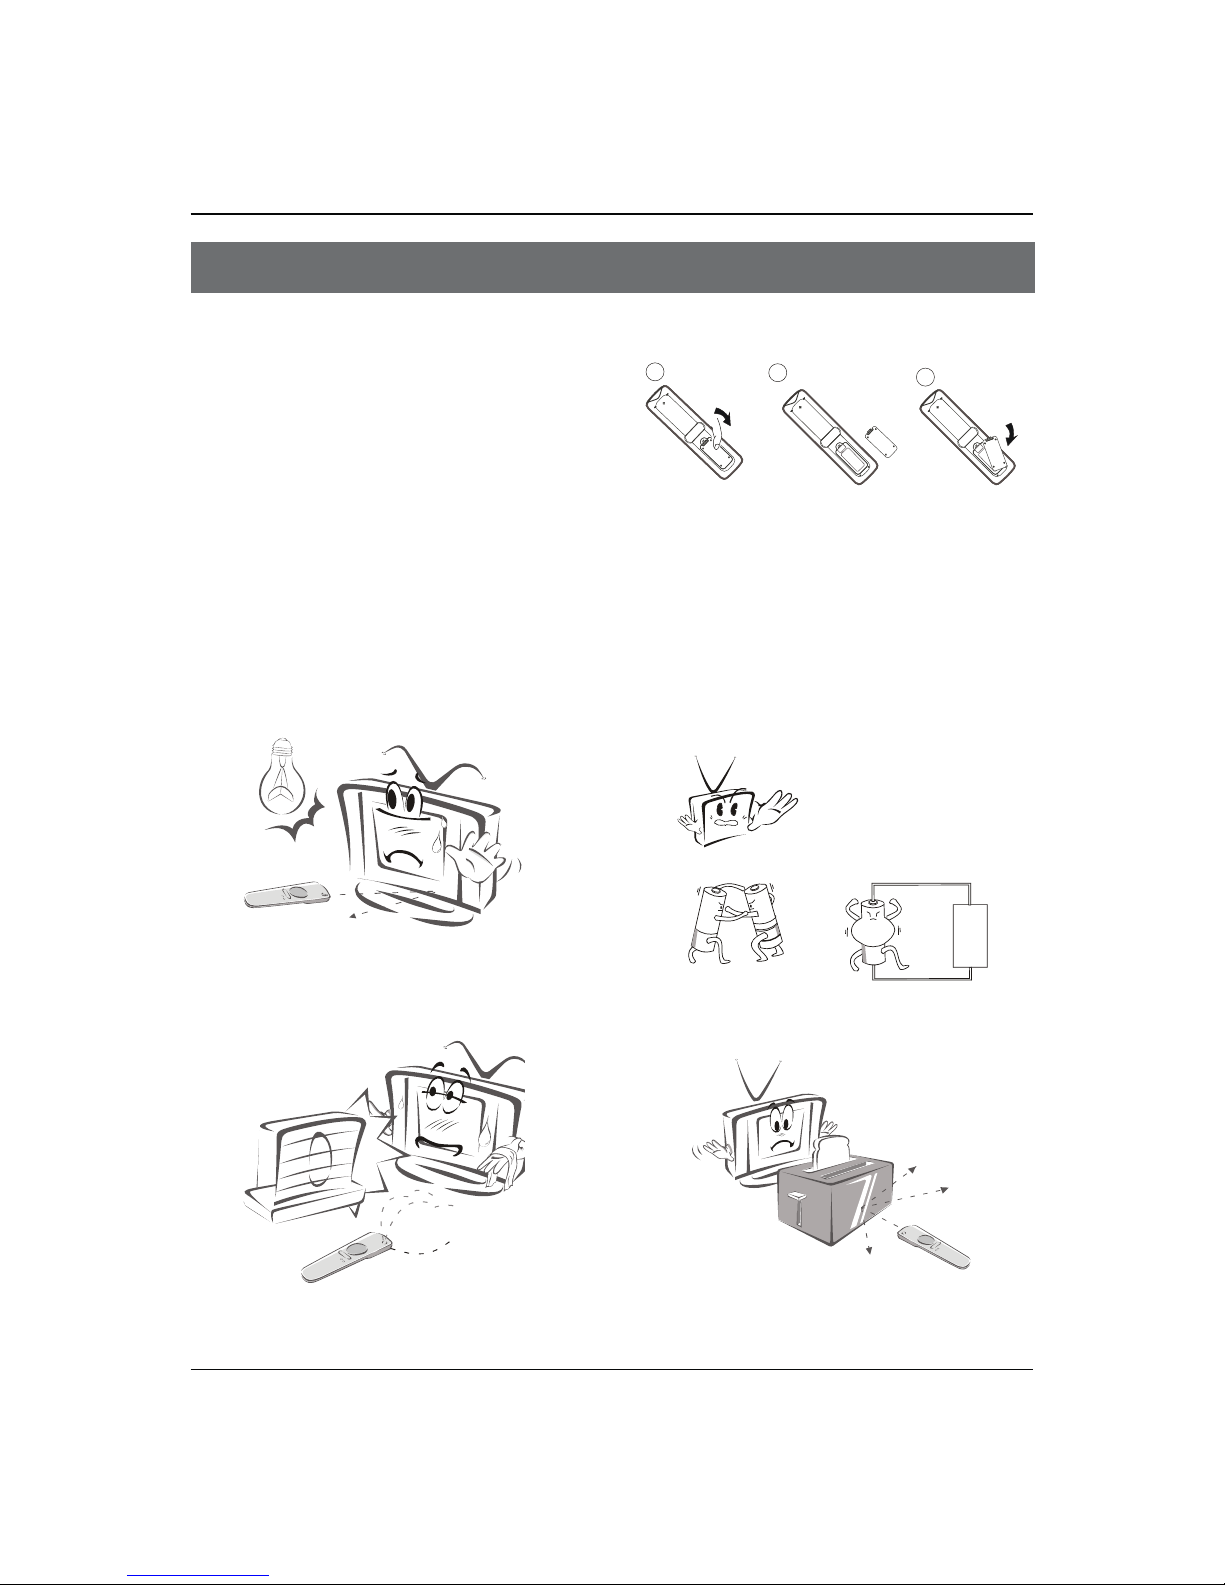
Remote Control 8
Battery loading.................................................... 8
Precautions ..........................................................8
Remote Control Function 9
Function introduction ......................................... 9
External Equipment Connections 10
Antenna Connection .........................................10
Choose Your Connection...................................11
VCR Connection.................................................................. 11
External AV Source............................................................. 11
Connecting a DVD player................................................ 11
HDMI or DVI Setup............................................................. 12
PC Setup ................................................................................ 12
Monitor Out Setup............................................................. 13
Power source......................................................13
Basic Receiving and Playing
Operations 14
Switching ON/OFF the TV set ...........................14
Switching ON/OFF the TV set ........................................ 14
Choose the Menu Language.......................................... 14
Choose the Input source ................................................. 14
Picture Menu .....................................................14
How to select the picture mode ................................... 14
How to customize your own picture status.............. 15
Sound Menu.......................................................15
How to select the sound mode..................................... 15
How to customize your own sound status................ 16
Channel Menu....................................................16
Programme Edit.................................................................. 16
Auto Tuning.......................................................................... 17
Exchange............................................................................... 17
Function Menu...................................................18
Function Menu Set ............................................................ 18
Adjust Menu.......................................................19
Time Menu..........................................................19
Lock Setup..........................................................20
How to use the password function.............................. 20
Streaming Media Playing System ....................21
Start/Exit Streaming Media Playing system.............. 22
Operating Method of Streaming Media Menu........ 22
Playing a Picture................................................................. 22
Playing a Movie................................................................... 23
Playing Music
......................................................................... 23
Text
.......................................................................................... 23
Settings
................................................................................... 23
Maintenance 24
Troubleshooting 24
Specification 25
Format 25

Warning
LED -LCD television Owner’s Manual 3
WARNING
!
WARNING:
TO REDUCE THE RISK OF ELECTRIC SHOCK DO NOT REMOVE COVER (OR BACK). NO USER SERVICEABLE PARTS
INSIDE. REFER TO QUALIFIED SERVICE PERSONNEL.
*
To avoid electric hazards, it is strongly suggested that the back cover not be opened, as there is no any
accessory inside the casing.
*
lf necessary, please contact authorized after-sales services.
*
A lighting ash mark in a triangle: A potentially hazardous situation, which, if not avoided, could result in
serious injury by high voltage.
*
An exclamation mark in a triangle: Major part or accessory of which technical specications must be followed if
it is to be replaced.
RISK ELECTRIC SHOCK
DO NOT OPEN
WARNING: To avoid fire or electric hazards, never place your television receiver in an area with heavy
moisture. Attention should be paid to avoid accidental scratches or impacts onto the screen.
CAUTION: Please read this manual carefully before using your television and keep this manual in a
good place for future reference.
To achieve the best performance of your television, read this User’s Manual carefully and
properly store it for future reference.
Information of screen displays and figures in the User’s Manual may vary due to technical
innovations.
CAUTION: Unauthorized disassembly of this product is prohibited.
Warning

Important Safety Instructions
4 LED -LCD television Owner’s Manual
Important Safety Instructions

Important Safety Instructions
LED -LCD television Owner’s Manual 5

Panel Control and Rear Terminals Control
6 LED -LCD television Owner’s Manual
- This is a simplified representation of front panel.
- Here shown may be somewhat dierent from your TV.
Panel Control
LOV
HC
UNEM
TV/AV
1TV/AV Press this key to open/close signal source
options menu.
2MENU Menu display. Press to access the on-screen
menu display.
3VOL +/-
Press to adjust the volume. In the MENU screen,
these buttons serve as right/left buttons.
4CH +/-
Press to scan through channels.To scan quickly
through channels, press and hold down either
+/- . In the MENU screen, these buttons serve
as up/down buttons.
5POWER Press to turn on and o the TV.
Introduction

Remote Control
LED -LCD television Owner’s Manual 7
HDMI 3 IN
COMPONENT / AV2 IN
Y / VIDEO P
b
P
r
L- AUDIO - R
PC IN
PC/DVI AUDIOPC
DSMB
HDMI 2 IN ANT IN Mini USB
HDMI 1 IN AV1 IN
VIDEO
LR
- AUDIO-
AV OUT
LVIDEO
AUDIO
R
SPDIF USB
Connection Options
Back panel connections
1PC Video In Connect a video cable from a computer to this
jack.
.
2PC/DVI Audio
In
Connect the audio L/R cables from a computer
to this jack.
3Component
Video In
Connect a component video device to these
jacks.
4Component
Audio In
Connect the audio L/R cables from the
component video signal source to these jacks.
5DSMB Mo-Box jack .
6HDMI1-3 In Connect a HDMI device to receive digital audio
and uncompressed digital video.
7AV1 In Connect the video signal from a video device.
8ANT In Connect cable pr antenna signal to theTV, either
directly or through your cable box.
9AV OUT Connect the audio L/R and video cables to your
other video equipment.
0SPDIF Digital Audio Optical output.
AMini USB Connect a USB ash drive to view videos,images
or listen music.
BUSB jack Connect a USB ash drive to view videos,images
or listen music
.

Panel Control and Rear Terminals Control
8 LED -LCD television Owner’s Manual
Remote Control
Battery loading
1. Slide open the cover of the battery compartment on
the back of the remote controller.
2. Load two 7# (AAA) alkaline batteries in the
compartment, (plus and minus poles to respective mark)
3. Replace the cover of the battery compartment.
Precautions
As strong light may interfere the signals, change your
position to operate the remote controller if the television
cannot be turned on or o as you expect.
Keep the remote controller away from heat source or
humid area to ensure eective performance of the
remote controller.
Make sure that two AAA alkaline batteries are loaded.
The batteries must be of the same type. The batteries
must be located properly. The batteries are not
rechargeable.
Make sure that there is no obstacle between the remote
controller and television set.

External Equipment Connections
LED -LCD television Owner’s Manual 9
- The remote control cannot be operated unless the batteries are properly loaded.
- When using the remote control, aim it at the remote control sensor on the TV.
Function introduction
1POWER Press this key to start TV from standby mode, press it again to return to standby
mode.
2USB Press this key for quick switching of streaming media.
3H. LOCK Refer to the Functional Description on Page 20.
4SOURCE Press this key to open/close signal source options menu.
5DSMB Press this key for quick switching of MO-Car.
6STILL
Press this key to freeze the image. Press it again to return to normal screen. (Note:
Do not display a still picture for a long time to prevent the screen from burns.).
7ARC
Press this key to select the screen display proportion.
8MUTE Press this key to mute the sound, press it again to activate the sound. The sound
may be activated by turning theTV on again or increasing the volume.
90-9 These keys are used to select a channel.
0Q. VIEW Press this key to return to the previousTV program(only work in theTV mode).
AVOL+ /- Used to adjust the volume when the screen menu is closed.
BCH+/- Used to select a TV channel when the screen options menu is closed, specically,
press Pto decrease the channel and press Pto increase the channel..
CSound Mode Press this key continuously to select the sound mode.
DPicture Mode Press this key continuously to select the picture mode.
ETV.MENU Press this key to display or exit the main menu.
FD.MENU Press this key to display the Special Function Menu (it functions when special
modules are inserted).
GTHUMBSTICK (Up/
Down/Left/Right)
Allows you to navigate the on-screen menus and adjust the system settings to
your preference.
HOK Press this key to conrm the selection.
IEXIT
Clears all on-screen displays and returns toTV viewing from any menu.
JUSB
Control the USB System.
Backward
Forward
Play/Pause BACK: Back REC: no available
ZOOM: Press to magnify/minify an image D.CALL: Press to display program
information.
KTV.CALL Display on/o.
L
TIMESHIFT
No available.
MVOD No available.
NAUDIO No available.
OPAGE+ No available.
P
GUIDE
No available.
QTV/FM No available.
RINFO No available.
SPAGE- No available.
TCH.LIST No available.
UFAV
Press this key to display the favorite program list menu.
VSTOCK No available.
WSLEEP Displaying the sleep time.
XINTERACTION No available.
YFn No available.
ZDDS No available.
[BUSINESS No available.
\GAME No available.
Remote Control Function

Remote Control Function
10 LED -LCD television Owner’s Manual
Antenna Connection
- Antenna or Cable Service without a Cable Box Connections.
- For optimum picture quality, adjust antenna direction if needed.
Note:
* It is recommended that you'd better use 757coaxial cable to remove
the disturbance caused by airwave.
* Don't bind antenna cable and electric wire together.
To improve picture quality in a poor signal area,
purchase and install a signal amplifier.
If the antenna needs to be split for two Tv’s, install a
"2-WaySignal Splitter" in the connections.
If the antenna is not installed properly, contact your
dealer for assistance.
Note
All cables shown are not included with the TV.❏
ANT.
External Equipment Connections

External Equipment Connections
LED -LCD television Owner’s Manual 11
Choose Your Connection
There are several ways to connect your television,
depending on the components you want to connect and
the quality of the signal you want to achieve.
The following are examples of someways to connect
your TV. Choose the connection which is best for you.
VCR Connection
To avoid picture noise (interference), leave an adequate
distance between the VCR and TV.
External AV Source Setup
How to connect
Connect the audio and video cables from the•
external equipment’s output jacks to the TV input
jacks, as shown in the figure.
When connecting the TV to external equipment,•
match the jack colors (Video = yellow, Audio Left =
white, and Audio Right = red).
HDMI 3 IN
COMPONENT / AV2 IN
Y / VIDEO P
b
P
r
L- AUDIO - R
PC IN
PC/DVI AUDIOPC
DSMB
HDMI 2 IN ANT INHDMI 1 IN AV1 IN
VIDEO
LR
- AUDIO-
How to use
Select the input source with using theASOURCE
button on the remote control.
Press
BCH+/- button to select the desired source.
Press
COK button to confirm.
Operate the corresponding external equipment.
D
Connecting a DVD player
How to connect
Connect the DVD video outputs (Y, PAb/Cb, Pr/Cr)
to the COMPONENT (Y, Pb/Cb, Pr/Cr) input jacks on
the TV and connect the DVD audio outputs to the
AUDIO jacks on the TV’ as shown in the figure.
HDMI 2 IN ANT IN Mini USB
HDMI 1 IN AV1 IN
VIDEO
LR
- AUDIO-
AV OUT
LVIDEO
AUDIO
R
SPDIF USB
Connection Option 1
Set VCR output switch to channel 3 or 4 and then tune
the TV to the same channel number.
Connection Option 2
Connect the audio and video cables from the VCR’sA
output jacks to the TV input jacks, as shown in the
figure. When connecting the TV to VCR, match the
jack colors (Video = yellow, Audio Left = white, and
Audio Right = red).
Insert a video tape into the VCR and press
BPLAY on
the VCR. (Refer to the VCR owner’s manual.)
Select the input source with using theCSOURCE button
on the remote control, and then press
/
button to
select the source, press the
button to confirm.

External Equipment Connections
12 LED -LCD television Owner’s Manual
HDMI 3 IN
COMPONENT / AV2 IN
Y / VIDEO P
b
P
r
L- AUDIO - R
PC IN
PC/DVI AUDIOPC
DSMB
How to use
Turn on the DVD player, insert a DVD.A
Use theB
SOURCE
button on the remote control,
and
then press
/
button to
to select COMPONENT
mode
, press the
button to confirm.
PressCPlay button on external equipment for
program play.
Refer to the DVD player’s manual for operating
D
instructions.
HDMI or DVI Setup
To watch digitally broadcast programs, purchase and
connect a digital set-top box.
How to connect
Use the TV’s COMPONENT (Y, P•b/Cb, Pr/Cr) INPUT
jacks, VGA or HDMI port for video connections,
depending on your set-top box connections
available. Then, make the corresponding audio
connections.
How to use
Turn on the digital set-top box.A
(Refer to the owner’s manual for the digital set-top box.)
Use SOURCE on the remote contralto select PC orB
HDMI (Y, Pb/Cb, Pr/Cr) mode.
Press
CPlay button on external equipment for
program play.
/
HDMI 3 IN
COMPONENT / AV2 IN
Y / VIDEO P
b
P
r
L- AUDIO - R
PC IN
PC/DVI AUDIOPC
DSMB
HDMI 2 IN ANT IN Mini USB
HDMI 1 IN AV1 IN
VIDEO
LR
- AUDIO-
AV OUT
LVIDEO
AUDIO
R
SPDIF USB
PC Setup
How to connect
Use the TV’s PC IN port for video connections.A
Then, make the corresponding audio connection. IfB
using a sound card, adjust the PC sound as required.
How to use
Turn on the PC and the TV.A
Turn on the display by pressing theBPOWER button
on the TV’s remote control.
Use SOURCE on the remote control to select PC source.C
Check the image on your TV. There may be noiseD
associated with the resolution, vertical pattern,
contrast or brightness in PC mode. If noise is
present, change the PC mode to another resolution,
change the refresh rate to another rate or adjust the
brightness and contrast on the menu until the picture
is clear. If the refresh rate of the PC graphic card
can not be changed, change the PC graphic card or
consult the manufacturer of the PC graphic card.

External Equipment Connections
LED -LCD television Owner’s Manual 13
HDMI 3 IN
COMPONENT / AV2 IN
Y / VIDEO P
b
P
r
L- AUDIO - R
DSMBPC IN
PC/DVI AUDIOPC
Note
Avoid keeping a fixed image on the TV’s screen for❏
along period of Time. The fixed image may become
permanently imprinted on the screen.
The synchronization input form for Horizontal and❏
Vertical frequencies is separate.
To obtain the best picture, do not play the USB,❏
YPbPr, HDMI or PC source at the same time.
Monitor Out Setup
The TV has a special signal output capability which
allows you to hook up a second TV or monitor.
Connect the second TV or monitor to the TV’s AV OUT.
See the Operating Manual of the second TV or monitor
for further details regarding that device’s input settings.
ANT IN Mini USBAV OUT
LVIDEO
AUDIO
R
SPDIF USB
Note
Component, PC, HDMI input sources cannot be❏
used for Monitor out.
When connecting with external audio equipments,❏
such as amplifiers or speakers, please turn the TV
speakers o.
Power source
TO USE AC POWER SOURCE
Use the AC polarized line cord provided for operation on
AC. Insert the AC cord plug into a standard polarized AC
outlet.
Note
Never connect the AC line cord plug to other than❏
the specified voltage. Use the attached power cord
only.
If the polarized AC cord does not fit into a non❏
polarized AC outlet, do not attempt to file or cut
the blade. It is the user’s responsibility to have an
electrician replace the obsolete outlet.
If you cause a static discharge when touching the❏
unit and the unit fails to function, simply unplug
the unit from the AC outlet and plug it back in. The
unit should return to normal operation. Polarized
AC Cord Plug.
External Equipment Connections / Basic Receiving and Playing Operations

Troubleshing and Specication
14 LED -LCD television Owner’s Manual
Playing Operations
Switching ON/OFF the TV set
In the manual, the OSD (on screen display) may be
dierent from your TV’s because it is just an example to
help you with the TV operation.
Switching ON/OFF the TV set
First, connect power cord correctly and the powerA
indicator will light.
Press
BPOWER on the remote control again.
If you want to exchange to standing by status,
C
please press down POWER on the remote control
Disconnect the power supply or unplug the
D
television if it is intended to completely cease the
television performance.
Choose the Menu Language
When you satisfied with your set for the first time,
you must select the language which will be used for
displaying menus and indications.
Press
AMENU and
/
to select Function menu.
Press
B
/
button to select language option.
Select a particular language by pressingCOK repeatedly.
When you satisfied with your choice, press
DMENU to
return to normal viewing.
Choose the Input source
Change the picture source so you can watch your TV,
VCR, Cable , or any other devices that are connected to
your TV.
PressASOURCE button to enter the Input Source
menu and then use
/
button to select the
desired items (TV, AV1, AV2, Component1, PC,
HDMI1, HDMI2, HDMI3, Multimedia).
PressBOK button to confirm .
Picture Menu
The TV menu gives you an overview of the menus you
can select.
Note
Depending on the input signal, one or more menu❏
items may not be selectable.
How to select picture mode
The picture mode provides the pre-defined images
settings:
Standard, Mild, User,
Dynamic and EyeGuard
.
Press
AMENU button and then use
/
button to
select Picture menu.
Press
B
/
button to select Picture Mode, press
OK to enter its submenu.
Press
C
/
button to select the option
Standard,
Mild, User,
Dynamic and EyeGuard
.
You can also press PICTURE button on the remote
control and then press
/
to select the option
Standard, Mild, User,
Dynamic and EyeGuard
.
Basic Receiving and
Playing Operations

Specication and Format
LED -LCD television Owner’s Manual 15
How to customize your own picture status
PressAMENU button and then use
/
button to
select Picture menu.
Press
B
/
button to select the desired items.,
press OK to enter its submenu.
Press
C
/
button to adjust the setting.
Contrast
This will adjust the intensity of bright parts in the
picture but keep the dark parts unchanged.
Brightness
This will adjust the light output of the complete
picture, which will mainly aect the darker areas of
the picture.
Color
This will adjust the saturation level of the colors to suit
your personal preference.
Sharpness
This will adjust the sharpness of fine details in the
picture.
Note
The picture options can only be adjusted in the❏
User mode. The other picture modes are preset.
Tint
Allows you to select the color mix (Tint) of the picture.
Picture Mode
Select the mode of picture:
Standard, Mild, User, Dynamic and EyeGuard
.
LED 3D_DIM
Select the 3D-DIM Demo or 3D-DIM Calibration, Press
OK to set.
Palette:
Press
/
to select the Palette option, and then
press OK to enter its submenu, and finally press
/
to select a toner pattern from six patterns
(Cool2, Cool1, Standard, Warm1, Warm2, User) to your
color preference. Normally, the Standard mode is
selected.
If the User mode is selected, press
/
to enter
the palette menu, (as shown in the below figure),
and then press
/
to select a benchmark in the
range of 2500K~15000K from warm color to cold
color, afterwards press
/
to adjust; if a dierent
benchmark is selected for adjustment, the original
adjustment data will be automatically cleared.
Picture
Sound
Channel
Function
Adjust
Timer
Language Menu Time
out
Programe. Auto Tun. Exchange
Volume Balance Digital SRS AVL MAXX Bass Reset
Current.. Off Time Off Time On Channel Remind T.. Remind C..
Image Po.. Horizont Wertical. Auto.. Clock Phase Reset
Picture MEMC DSM Background OPC Eye Guard Reset
Optimize Mode
Reset
%$&. 029( 2.
MENU OK
Contrast Brightness Color Sharpness Tint Picture LED
Mode 3D_DIM
Palette
+50
0
-50
Cool2
Cool1
Standard
Warm1
Warm2
User
Reset
Press
/
to select OK or Cancel..
Sound menu
How to select sound mode
PressAMENU button and then use
/
button to
select Sound menu.
Press
B
OK
button and then use
/
button to
select Digital tone Mode.
PressC
/
button to select the option Standard,
Music, Movie and User.

Troubleshing and Specication
16 LED -LCD television Owner’s Manual
You can also press•SOUND button on the remote
control and then press
/
to select the Audio
Mode: Standard, Music, Movie and User.
How to Customize your own sound
status
PressAMENU button and then use
/
button to
select Sound menu.
Press
B
/
button to select the desired items,
press OK to enter its submenu.
Press
C
/
button to adjust the setting.
Volume
Press
/
to adjust the volume of a TV Program.
Balance
This will adjust the output of the right and left
speakers to obtain the best stereo reproduction for
your listening position.
The intermediate value is 0. When indication value
of Balance increases toward 50, sound of the right
and left speakers becomes stronger and weaker,
respectively. When indication value of Balance
decreases toward -50, sound of the right and left
speakers becomes weaker and stronger.
Digital tone
This select the modes for sound reproduction dependent
on the broadcast signals or signals from external inputs
received.
Select the mode of sound (User/Standard/Music/Movie).
If the User mode is selected, press
/
to select
a benchmark in the range of 50~15K from bass to
treble, afterwards press
/
to adjust, if a dierent
benchmark is selected for adjustment, the original
adjustment data will be automatically cleared.
SRS TS XT
The surround sound feature expands the audio
listening field wider and deeper to create exceptional
sound quality from the TV’s speakers.
AVL (Automatic Volume Limit)
This will reduces the dierences in volume level
among broadcasters.
MAXX Bass
To adjust the super bass. Press
/
to select super
bass o, low , high or Medium.
Reset
Return to factory default settings.
Channel menu
Display channel menu by pressing SOURCE button then
use
/
button to select the source of Air or Cable
item.
Press
AMENU button and then use
/
button to
select Channel menu.
Press
B
/
button to select the desired items,
press OK to enter its submenu.
Programme Edit
You can add a label to a channel to make it easier to nd.
Press
AMENU button and then use
/
button to
select Channel menu.
Press
B
/
button to select the channel, press
the green FAV button on the remote control, the
channel with a check icon is a favorited channel.
Press the red SKIP button on the remote control, the
channel with a check icon is a skipped channel.

Specication and Format
LED -LCD television Owner’s Manual 17
Manual Search
Press
/
to select the Search option, and finally
press
/
to start manual search. Upon finding a
program, the search will automatically stop, and the
program will be stored onto the current channel.
You may stop the search by pressing OK or MENU.
Fine Tune
Press
/
to select the Fine Tune option, and
then press
/
to start UP or DOWN fine tuning
until obtaining a relatively good picture effect. The
fine tuning function is for the purpose of improving
picture effect through fine tuning when that of a
certain program is not good enough. Normally, the
optimal picture effect can be obtained without fine
tuning when watching TV programs, and fine tuning
is to meet the need of adjusting a certain program.
Color system
Press
/
to select the Color Systems option,
and then press
/
to select correct color
system.
The TV is designed with three systems for your
choice, i.e. Auto, PAL , SECAM and NTSC. Generally,
the system is set as Auto and it is not necessary to
make an adjustment. The system is normally set as
Auto during auto search.
Sound system
The TV is designed with four systems for your
choice, i.e. DK, M, BG and I. Generally, it is not
necessary to adjust the system. The system is
normally set as DK during auto search.
Skip
When the skip is set ON, the channel will be
skipped when pressing CH or CH and only can
be selected by pressing 0-9 numerical keys.
If you want to recover the skipped channel
1. Use Direct-digit Choosing button to select the
number of the channel to be recovered.
2. Do the above steps again.
3. Press
/
to set Skip as Off.
Auto Tuning
PressAMENU button and then use
/
button to
select Channel menu.
Press
B
/
button to select Auto Tuning, then
press OK the menu opens.
PressC
/
button to select Start, press
OK
button
to start to scan. Press MENU button to return to the
previous menu, press EXIT button to EXIT the menu
screen.
All channels now available will be automatically preset in
order .After the search has nished, the rst program
number will display on the screen. This search
automatically adds only the active channels in your area
to the TV's memory.
It deletes any channels on which there is no broadcast or
a poor signal.
The channels found are automatically saved.
Exchange
PressAMENU on the remote control unit or MENU on
the TV’s front panel to display main menu, and then
press
/
to select Channel menu.
Press
B
/
to select the Prog. Exchange option,
and then press OK to enter its submenu.
PressC
/
to select the To Channel option, and

Troubleshing and Specication
18 LED -LCD television Owner’s Manual
then press
/
to set the found to be exchanged to
.
After adjusting the current channel and the found toD
be exchanged to, press
/
to move the cursor
to the Exchange option, and then press OK to start
exchange and exchange the program on current
channel to the channel you set for exchange.
Function Menu
Function Menu Set
PressAMENU on the remote control unit or MENU
on the TV’s front panel to display the main menu, and
then press
/
to select the Function menu.
PressB
/
to select the option to be adjusted,
and then press
/
to adjust it.
Language
Two languages (i.e. Simplified Chinese and English)
are available for your choice.
Menu Timeout
The option is for adjusting the menu display time.
Press
/
to set the desired time (5-15s).
Picture Optimize
Press•
/
to select the Picture Optimize option.
Press•OK to enter the submenu.
Press•
/
to select theDCDI/Color
Management to be adjusted, and then press
/
to select ON or OFF.
Press•
/
to select the DNR to be adjusted, and
then press
/
to select Low/Middle/High/ O.
Picture
Sound
Channel
Function
Adjust
Timer
Picture MEMC DSM Background OPC Eye Guard Reset
Optimize Mode
Reset
Palette
Language Menu Time
out
Programe. Auto Tun. Exchange
Volume Balance Digital SRS AVL MAXX Bass Reset
Contrast Brightness Color Sharpness Tint Picture.. 3D_DIM
Current.. Off Time Off Time On Channel Remind T.. Remind C..
Image Po.. Horizont Wertical. Auto.. Clock Phase Reset
%$&. 029( 2.
MENU OK
Picture Optimize
DCDI
DNR
Color Management
< Off >
< Middle >
< Off >
MEMC
Press
/
to set ON or OFF, if you select ON, the TV
screen will be black if no signals are available.
DSM
Press
/
to set ON or OFF, if you select ON, the TV
screen will be black if no signals are available.
Blackground
Press
/
to set ON or OFF, if you select ON, the TV
screen will be black if no signals are available.
OPC
Press•
/
to select the OPC , t
hen press
/
to
select Uesr/Dynamic/Daylight/ Normnal/Night.
Press•
/
to select the Adjust , t
hen press
/
to set 0-10.
Press•
/
to select theDynamic Contral to be
adjusted, and then press
/
to select ON or
OFF.
Eye guard Mode
Press•
/
to select the Eye guard Mode option.
Press•OK to enter the submenu.
Press•
/
to select the Power E.G.Mode , t
hen press
/
to select Standard/Eye Guard/Curtain.
Press•
/
to select the Change Ch.E.GI/
Watching E.G/Watching E.G.Delay to be adjusted,
and then press
/
to select ON or OFF.

Specication and Format
LED -LCD television Owner’s Manual 19
Reset
Press
/
to
select
OK or Cancel which with Do
you want to reset option values.
Adjust Menu
The TV can be used as a display, and you may adjust
relevant settings.
Press SOURCE to switch the signal
input to PC mode.
Press
AMENU to display the screen main menu, and
then press
/
to select the Adjust menu as
shown in the below figure.
Picture
Sound
Channel
Adjust
Timer
%$&. 029( 2.
Picture MEMC DSM Background OPC Eye Guard Reset
Optimize Mode
Reset
Palette
MENU OK
Language Menu Time
out
Programe. Auto Tun. Exchange
Volume Balance Digital SRS AVL MAXX Bass Reset
Contrast Brightness Color Sharpness Tint Picture.. 3D_DIM
Current.. Off Time Off Time On Channel Remind T.. Remind C..
Image Horizont Vertical Auto Clock Phase Reset
Position .. Size Size. Adjust
Adjust
Function
PressB
/
to select the option to be adjusted.
Press
C
/
to adjust it.
Image Position
This is used to adjusting H-Position and V-Position.
H-Size
Vertical and Horizontal position of picture can be
adjusted in this item.
V-Size
Vertical and Horizontal position of picture can be
adjusted in this item.
Auto Adjust
Vertical and Horizontal position of picture can be
adjusted in this item.
Clock
This is used for adjusting the phase of pixel clock in PC
mode.
Phase
This is used for adjusting H Position and V Position as
well as relative parameters in PC modes.
Reset
Return to factory default settings.
Time Menu
PressAMENU button and then use
/
button to
select Time menu.
Press
B
/
to select the desired option, press OK
to enter its submenu.
˖
Time
Picture
Sound
Channel
Adjust
Function
%$&. 029( 2.
MENU OK
Reset
Palette
Programe. Auto Tun. Exchange
Volume Balance Digital SRS AVL MAXX Bass Reset
Contrast Brightness Color Sharpness Tint Picture.. 3D_DIM
Picture MEMC DSM Background OPC Eye Guard Reset
Optimize Mode
Language Menu Time
out
Current.. Off Time Off Time On Channel Remind T.. Remind C..
Image Po.. Horizont Wertical. Auto.. Clock Phase Reset
On
Off
00 00
˖
Current Time:
The current time is calculated from the
moment upon turning the TV on. At first, check whether
the time indicated on the TV's clock is consistent with the
standard time of your time zone; if not, adjust the clock as
follows:
Press•MENU on the remote control unit or MENU
on the TV’s front panel to display the main menu,
and then press
/
to select the Timer menu,
afterwards press
/
to select the Current Time
option
Press•
/
to set hour and minute.
.•Press
/
to adjust the time.
After finishing time setting, press•OK or MENU to
confirm.
O Time/On Time: Set a time for the TV to turn of or
on.
This function allows the TV to automatically turn on or
enter standby mode upon reaching the preset time.
Press OK to enter the setting screen, and then•
Picture
Sound
Channel
Function
Adjust
Timer
Reset
Palette
Language Menu Time
out
Programe. Auto Tun. Exchange
Volume Balance Digital SRS AVL MAXX Bass Reset
Contrast Brightness Color Sharpness Tint Picture.. 3D_DIM
Current.. Off Time Off Time On Channel Remind T.. Remind C..
Image Po.. Horizont Wertical. Auto.. Clock Phase Reset
Picture MEMC DSM Background OPC Eye Guard Reset
Optimize Mode
Eye Guard Mode
Change Ch.E.G
Watching E.G
Watching E.G.Delay
< On >
< Off >
< Off >
PowerOn E.G.Mode
< Standard >
%$&. 029( 2.
MENU OK

Troubleshing and Specication
20 LED -LCD television Owner’s Manual
press
/
to select ON or OFF, if you select ON,
press
/
to set hour and minute. ON indicates
the On/O Time function is enabled while OFF
indicates the function is disabled.
.•
After finishing time setting, press OK or MENU to
confirm.
Note
After setting the On/O Time function, if the TV is AC
o or forcible DC o, the function will be automatically
cleared.
On channel:
This function is used in combination with
the On/O Time function. When the TV turns on upon
reaching the On time, it automatically enters the preset
channel.
Press•
/
to set the On Channel or OFF.
Remind Time/Remind channel:
The remind time and
remind channel functions allow the TV to automatically
enter the preset channel at preset time. If the TV is AC o
or forcible DC o, the preset time will be cleared.
Press•MENU on the remote control unit or MENU
on the TV's front panel to display the main menu,
and then press
/
to select the Timer menu,
afterwards press
/
to select the Remind
Time option.
Press OK to enter the setting screen, and then•
press
/
to select ON or OFF, if you select ON,
press
/
to set hour and minute, and then
press
/
to adjust time.
After finishing time setting, press•OK or MENU to
confirm
Press•
/
to select the Remind Channel
option, and press
/
to set the found
.
Lock Setup
The television has the function of security default lock.
Password needs to be entered when the program lock
mode is to be set.
How to use the password function
Press H. LOCK, the TV screen will display Enter Password
to prompt the user to enter a correct password by
pressing corresponding numerical keys; if the password
is correct, the user enters the Lock Set menu; if incorrect,
the user is required to enter a password again.
If there is no operation for a few seconds, the display will
automatically disappear.
The Lock Set menu is as follows:
Change Password OK
Tuning Lock
Preset Source
Preset Prog
Source Lock OK
Child Lock
Max Volume 100
Power On Volume off
Unlock OK
off
off
off
off
Lock Set
Change Password
After entering the Lock Set menu, press
/
to
select the Change Password option, and then press
/
to display the Change Password menu,
afterwards enter a new 4-digit password by pressing
numerical keys and repeat entering this password
once, and finally select the option to be confirmed
and press MENU to confirm, indicating the successful
change of password.
If the user does not want to change the password in
halfway, he may press MENU to exit from this menu.
Note
The initial password is 0000, and the password setting
will not be changed after executing the Unlock
option.
Tuning Lock
Press
/
to select the Tuning Lock option, and
then press
/
to set ON or OFF.
(If set ON, the Tuning Menu is not available in TV
mode. To make any operation related to the Tuning
Menu, it is necessary to enter the Lock Set menu to
set Tuning Lock OFF or execute the Unlock option.)
Preset Source Setting
Preset Source may be set as O, TV, AV,Component,
HDMI, PC and USB. When the Preset Source is set as
TV, after entering the Preset Channel menu, press
/
to select the preset channel, and
the channel
will be forcibly switched to the preset one upon
turning the TV on; when the Preset Source is set as
other signal sources, the TV will be forcibly switched to
the preset source upon turning on. For example, when
the Preset Source is set as
YPbPr/YCbCr
, the TV will be
This manual suits for next models
10
Table of contents
Other Haier LCD TV manuals

Haier
Haier LED40T3 User manual

Haier
Haier LE19P620 User manual

Haier
Haier HL24XD2 User manual

Haier
Haier L15TA11W User manual

Haier
Haier LE47H5000 User manual

Haier
Haier HL32D2 User manual

Haier
Haier LET32/40T900 User manual

Haier
Haier L1510P User manual

Haier
Haier HLC19K2 User manual

Haier
Haier HL32D2 User manual

Haier
Haier LC32F2120 User manual

Haier
Haier L37V6-A8K User manual

Haier
Haier LE22D3380 User manual

Haier
Haier L32R1, L40R1, L42R1 User manual

Haier
Haier HL32P2 User manual

Haier
Haier LD42U7000 User manual

Haier
Haier 22T32 User manual

Haier
Haier 32E2000 User manual

Haier
Haier L32A9A-A1 User manual

Haier
Haier LE32G610CF User manual